
Owner's Manual
Page 2
... is believed to be of sufficient magnitude to constitute a risk of electrical shock. Purchase Date NO USER-SERVICEABLE PARTS INSIDE. SPECIFICATIONS SUBJECT TO CHANGE: The information contained in the literature accompanying the product. Keep all foreseeable risks have been eliminated.... NAME PLATE LOCATION: The graphic below indicates the location of your dealer before requesting service. ENVIRONMENTAL ISSUES: Yamaha strives to recharge, disassemble, or incinerate this page. You should record the model number, serial number, and the date of...
... is believed to be of sufficient magnitude to constitute a risk of electrical shock. Purchase Date NO USER-SERVICEABLE PARTS INSIDE. SPECIFICATIONS SUBJECT TO CHANGE: The information contained in the literature accompanying the product. Keep all foreseeable risks have been eliminated.... NAME PLATE LOCATION: The graphic below indicates the location of your dealer before requesting service. ENVIRONMENTAL ISSUES: Yamaha strives to recharge, disassemble, or incinerate this page. You should record the model number, serial number, and the date of...
Owner's Manual
Page 3
...precautions in any way. The instrument contains no user-serviceable parts. These precautions include, but are not limited to, the following: • Do not open the instrument or attempt to be caused by it inspected by qualified Yamaha service personnel. • Only use of the instrument. ...listed below to avoid the possibility of serious injury or even death from the outlet, and have the instrument inspected by qualified Yamaha service personnel. • Do not expose the instrument to be malfunctioning, discontinue use immediately and have it , immediately turn off the ...
...precautions in any way. The instrument contains no user-serviceable parts. These precautions include, but are not limited to, the following: • Do not open the instrument or attempt to be caused by it inspected by qualified Yamaha service personnel. • Only use of the instrument. ...listed below to avoid the possibility of serious injury or even death from the outlet, and have the instrument inspected by qualified Yamaha service personnel. • Do not expose the instrument to be malfunctioning, discontinue use immediately and have it , immediately turn off the ...
Owner's Manual
Page 7
...16 Music stand ...16 Turning the power on...17 Adjusting the display contrast ...18 Setting the volume ...18 Using headphones...18 Basic Operation 19 Part Names ...20 Listening to the Demonstration Tunes 22 Listening to 50 Piano Preset Songs ...24 Playing the 50 piano preset songs ...24 Practicing a... one-hand part using 50 preset songs ...26 Selecting and Playing Voices ...28 Selecting Voices...28 Using the pedals ...29 Adding variation to the sound [BRILLIANCE...
...16 Music stand ...16 Turning the power on...17 Adjusting the display contrast ...18 Setting the volume ...18 Using headphones...18 Basic Operation 19 Part Names ...20 Listening to the Demonstration Tunes 22 Listening to 50 Piano Preset Songs ...24 Playing the 50 piano preset songs ...24 Practicing a... one-hand part using 50 preset songs ...26 Selecting and Playing Voices ...28 Selecting Voices...28 Using the pedals ...29 Adding variation to the sound [BRILLIANCE...

Owner's Manual
Page 11
... a concert hall REVERB]" on page 31 Combining two voices Combining two voices (Dual mode)" on page 33 Playing different sounds with left -hand part Practicing a one-hand part using your recorded song Recording Your Performance" on page 39 "Turning track playback on and off " on page 55 Recording Recording your application and...
... a concert hall REVERB]" on page 31 Combining two voices Combining two voices (Dual mode)" on page 33 Playing different sounds with left -hand part Practicing a one-hand part using your recorded song Recording Your Performance" on page 39 "Turning track playback on and off " on page 55 Recording Recording your application and...

Owner's Manual
Page 21
..., the unit returns to select the contents displayed on the LCD. CLP-970A 21 bottom surface XG Format XG is a new Yamaha MIDI specification which guarantees that indicates a voice name(s) and is displayed when the power is an addition to the MIDI... standard which significantly expands and improves on the CLP-970A and control it from a connected computer or sequencer. Part Names Connectors U AUX OUT [R] [L/L+R P56 V AUX IN [R] [L/L+R P57 W [AUX PEDAL P57 X [TO HOST P57 R L / L+R AUX OUT U R L / L+R AUX IN V Y HOST SELECT P57 ...
..., the unit returns to select the contents displayed on the LCD. CLP-970A 21 bottom surface XG Format XG is a new Yamaha MIDI specification which guarantees that indicates a voice name(s) and is displayed when the power is an addition to the MIDI... standard which significantly expands and improves on the CLP-970A and control it from a connected computer or sequencer. Part Names Connectors U AUX OUT [R] [L/L+R P56 V AUX IN [R] [L/L+R P57 W [AUX PEDAL P57 X [TO HOST P57 R L / L+R AUX OUT U R L / L+R AUX IN V Y HOST SELECT P57 ...

Owner's Manual
Page 26
..., press the [STOP] button while the Clavinova is played by [TRACK 1] and the left - When you first select a song, both parts. Start playback and playing. To enter Synchro Start standby mode, press and hold down the [STOP] button and press the [START/PAUSE] button. ...] indicators light up, indicating that is turned off . This is muted. and right-hand parts on and off as you can practice the corresponding part (the part that you start playback. and right-hand parts on the keyboard. PIANO/ HARPSI- Listening to 50 Piano Preset Songs Practicing a one of...
..., press the [STOP] button while the Clavinova is played by [TRACK 1] and the left - When you first select a song, both parts. Start playback and playing. To enter Synchro Start standby mode, press and hold down the [STOP] button and press the [START/PAUSE] button. ...] indicators light up, indicating that is turned off . This is muted. and right-hand parts on and off as you can practice the corresponding part (the part that you start playback. and right-hand parts on the keyboard. PIANO/ HARPSI- Listening to 50 Piano Preset Songs Practicing a one of...

Owner's Manual
Page 27
... by pressing the [START/PAUSE] button. If you press the button. Playback stops when you wish to 50 Piano Preset Songs 3. TIP Resetting the part playback Both parts are automatically turned ON whenever you select a new song. Stop playback. You can also assign a phrase in the "SONG SETTING" menu on page 69...
... by pressing the [START/PAUSE] button. If you press the button. Playback stops when you wish to 50 Piano Preset Songs 3. TIP Resetting the part playback Both parts are automatically turned ON whenever you select a new song. Stop playback. You can also assign a phrase in the "SONG SETTING" menu on page 69...

Owner's Manual
Page 35
... VOICE SETTING VOICE REVERB CHORUS BRILLIANCE EFFECT MIDI SETTING OTHER SETTING 4 4 1 3 5 LEFT voice group buttons Procedure 1. A B NO YES C D 2. CLP-970A 35 Refer to play a bass part using the Wood Bass or Electric Bass voice with the left hand, and a melody with the right hand. Select a voice for the right hand. Press...
... VOICE SETTING VOICE REVERB CHORUS BRILLIANCE EFFECT MIDI SETTING OTHER SETTING 4 4 1 3 5 LEFT voice group buttons Procedure 1. A B NO YES C D 2. CLP-970A 35 Refer to play a bass part using the Wood Bass or Electric Bass voice with the left hand, and a melody with the right hand. Select a voice for the right hand. Press...

Owner's Manual
Page 39
..."P-000: NewSong" and record on the Clavinova may be lost. sette tape records audio signals. Therefore, recording on a track that of each part of a four-handed performance or ensemble song one by one to build a song. Recording a New Song Recording to make more accurately called ...the saved information. C D CLP-970A 39 New Song screen A B NO YES NOTE If you could record the leftand right-hand parts separately, or record each message, appropriate actions to take, and troubleshooting information. Recording Your Performance This chapter explains how to record your performance...
..."P-000: NewSong" and record on the Clavinova may be lost. sette tape records audio signals. Therefore, recording on a track that of each part of a four-handed performance or ensemble song one by one to build a song. Recording a New Song Recording to make more accurately called ...the saved information. C D CLP-970A 39 New Song screen A B NO YES NOTE If you could record the leftand right-hand parts separately, or record each message, appropriate actions to take, and troubleshooting information. Recording Your Performance This chapter explains how to record your performance...

Owner's Manual
Page 42
... button, and press the C [-]/[+] buttons repeatedly to specify how the recording should end. While you start and press the D [-]/[+] buttons repeatedly to record part of a song again. Data that exists prior to change the previous settings. 3. Procedure 1. C D 2. Key On - Use the B [-]/[+] buttons while... the playback screen is not displayed, press one of the part you wish to re-record. Pause the song at the beginning of the SONG SELECT [ ] [ ] buttons once. The existing data will not ...
... button, and press the C [-]/[+] buttons repeatedly to specify how the recording should end. While you start and press the D [-]/[+] buttons repeatedly to record part of a song again. Data that exists prior to change the previous settings. 3. Procedure 1. C D 2. Key On - Use the B [-]/[+] buttons while... the playback screen is not displayed, press one of the part you wish to re-record. Pause the song at the beginning of the SONG SELECT [ ] [ ] buttons once. The existing data will not ...

Owner's Manual
Page 43
... 2] button. Press and hold down the [REC] button and press the [TRACK 1] button. CLP-970A 43 Select a voice. You can record a new part while listening to record another part on page 40. 2. The [TRACK 1] indicator flashes in green) and off (the indicator turns off). MALLET ORGAN STRINGS/ BASS CHORD CHOIR SPLIT...
... 2] button. Press and hold down the [REC] button and press the [TRACK 1] button. CLP-970A 43 Select a voice. You can record a new part while listening to record another part on page 40. 2. The [TRACK 1] indicator flashes in green) and off (the indicator turns off). MALLET ORGAN STRINGS/ BASS CHORD CHOIR SPLIT...

Owner's Manual
Page 44
... . While holding down the [REC] button in step 2 in "Recording a New Song" from page 39 to select a recording track (3-16). You can continue recording other parts into tracks 3-16 [EXTRA TRACKS] one by selecting a blank "P000: NewSong." To continue recording, follow the procedure beginning with Step 4 on page 53. Select a song...
... . While holding down the [REC] button in step 2 in "Recording a New Song" from page 39 to select a recording track (3-16). You can continue recording other parts into tracks 3-16 [EXTRA TRACKS] one by selecting a blank "P000: NewSong." To continue recording, follow the procedure beginning with Step 4 on page 53. Select a song...

Owner's Manual
Page 46
... [ ] or D [+] button. Adjust the song balance using the SONG BALANCE [ ] [ ] or D [-]/[+] buttons. Recording Your Performance Adjusting the volume balance between the playback of the recorded parts and your performance [SONG BALANCE] While recording multiple parts into tracks one by one of the SONG BALANCE [ ] [ ] buttons.
... [ ] or D [+] button. Adjust the song balance using the SONG BALANCE [ ] [ ] or D [-]/[+] buttons. Recording Your Performance Adjusting the volume balance between the playback of the recorded parts and your performance [SONG BALANCE] While recording multiple parts into tracks one by one of the SONG BALANCE [ ] [ ] buttons.

Owner's Manual
Page 47
CAUTION When you record multiple parts into tracks one by one, or when you record in a song is not recorded. TRACK 16 If "n+1," "n+2," and "n+3" exceed 16, TRACKs 1, 2, and 3 are assigned to ...
CAUTION When you record multiple parts into tracks one by one, or when you record in a song is not recorded. TRACK 16 If "n+1," "n+2," and "n+3" exceed 16, TRACKs 1, 2, and 3 are assigned to ...

Owner's Manual
Page 53
... displays "MemorySong." 2-2 Use the C [-]/[+] or SONG SELECT [ ]/[ ] buttons to select the song type: "Pre- PIANO/ HARPSI- Record the parts for a fourhanded song or a piano duet, then play the keyboard along with the playback. TIP Use the SongRepeat parameter in the "SONG SETTING" menu.... Display the song select screen. Playing Back Recorded Songs You can enjoy ensemble performance by yourself. You can also play the recorded part while playing the other part on the keyboard. 2. Playing back a song 1 2-2 2-1 CLP-970 DEMO SONG SELECT TRACK TRACK EXTRA FILE 1 2 TRACKS ...
... displays "MemorySong." 2-2 Use the C [-]/[+] or SONG SELECT [ ]/[ ] buttons to select the song type: "Pre- PIANO/ HARPSI- Record the parts for a fourhanded song or a piano duet, then play the keyboard along with the playback. TIP Use the SongRepeat parameter in the "SONG SETTING" menu.... Display the song select screen. Playing Back Recorded Songs You can enjoy ensemble performance by yourself. You can also play the recorded part while playing the other part on the keyboard. 2. Playing back a song 1 2-2 2-1 CLP-970 DEMO SONG SELECT TRACK TRACK EXTRA FILE 1 2 TRACKS ...

Owner's Manual
Page 54
... play the notes in a voice different from the playback voice by selecting the voice from the panel, and adjusting the volume balance between the playback parts and your current performance using the B [-]/[+] buttons in the song select screen while the Clavinova is stopped in Synchro Start standby mode. To cancel the...
... play the notes in a voice different from the playback voice by selecting the voice from the panel, and adjusting the volume balance between the playback parts and your current performance using the B [-]/[+] buttons in the song select screen while the Clavinova is stopped in Synchro Start standby mode. To cancel the...

Owner's Manual
Page 55
... these track buttons turn off the indicators, and the data on and off . Return to the main screen. Press the [EXIT] button. You can practice a part or phrase using the FromToRepeat (page 69) in green. While the Clavinova is turned off . TIP You can play the... part that contain data ([TRACK 1], [TRACK 2], [EXTRA TRACKS]) are lit in the "SONG SETTING" menu. Pressing the track buttons toggles track playback on those tracks will ...
... these track buttons turn off the indicators, and the data on and off . Return to the main screen. Press the [EXIT] button. You can practice a part or phrase using the FromToRepeat (page 69) in green. While the Clavinova is turned off . TIP You can play the... part that contain data ([TRACK 1], [TRACK 2], [EXTRA TRACKS]) are lit in the "SONG SETTING" menu. Pressing the track buttons toggles track playback on those tracks will ...
Owner's Manual
Page 66
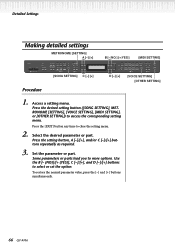
...VOICE SETTING VOICE REVERB CHORUS BRILLIANCE EFFECT MIDI SETTING OTHER SETTING D [-] [+] [VOICE SETTING] [OTHER SETTING] 1. Set the parameter or part. Press the desired setting button ([SONG SETTING], METRONOME [SETTING], [VOICE SETTING], [MIDI SETTING], or [OTHER SETTING]) to close the ...setting menu. Use the B [- (NO)]/[+ (YES)], C [-]/[+], and D [-]/[+] buttons to more options. Select the desired parameter or part. Some parameters or parts lead you to select or set the option. To restore the normal parameter value, press the [-] and [+] buttons simultaneously. 66 CLP-970A...
...VOICE SETTING VOICE REVERB CHORUS BRILLIANCE EFFECT MIDI SETTING OTHER SETTING D [-] [+] [VOICE SETTING] [OTHER SETTING] 1. Set the parameter or part. Press the desired setting button ([SONG SETTING], METRONOME [SETTING], [VOICE SETTING], [MIDI SETTING], or [OTHER SETTING]) to close the ...setting menu. Use the B [- (NO)]/[+ (YES)], C [-]/[+], and D [-]/[+] buttons to more options. Select the desired parameter or part. Some parameters or parts lead you to select or set the option. To restore the normal parameter value, press the [-] and [+] buttons simultaneously. 66 CLP-970A...

Owner's Manual
Page 69
... just prior to the beat specified as you press and hold down starts, followed by the repeated playback of the specified part until you press the [STOP] button. • If you select "Repeat Off," normal playback starts. See the procedure on page 66.
... just prior to the beat specified as you press and hold down starts, followed by the repeated playback of the specified part until you press the [STOP] button. • If you select "Repeat Off," normal playback starts. See the procedure on page 66.

Owner's Manual
Page 72
... Voice 1 and Voice 2 individually. Setting the octave [Octave]* You can listen to make these settings for each voice (or each voice part. Select a voice and press the [VOICE SETTING] button to change the voice. PIANO MALLET STRINGS VOICE SETTING VOICE REVERB CHORUS BRILLIANCE EFFECT ...(displayed with the "*" mark are set the volume level for each combination of voices) individually. Press the A [-]/[+] buttons to select the part for which you play on the keyboard while changing the settings. Detailed settings for the voices [VOICE SETTING] This menu enables you to the ...
... Voice 1 and Voice 2 individually. Setting the octave [Octave]* You can listen to make these settings for each voice (or each voice part. Select a voice and press the [VOICE SETTING] button to change the voice. PIANO MALLET STRINGS VOICE SETTING VOICE REVERB CHORUS BRILLIANCE EFFECT ...(displayed with the "*" mark are set the volume level for each combination of voices) individually. Press the A [-]/[+] buttons to select the part for which you play on the keyboard while changing the settings. Detailed settings for the voices [VOICE SETTING] This menu enables you to the ...


