
Owner's Manual
Page 3
... hazards. Always turn off when the instrument is not to be malfunctioning, discontinue use immediately and have the instrument inspected by qualified Yamaha service personnel. • Only use the voltage specified as heaters or radiators, and do not use paint thinners, solvents, cleaning ... as televisions, radios, or speakers, since this might result in any hearing loss or ringing in a safe place for future reference. CLP-810S 3 The instrument contains no user-serviceable parts. If you or others, or damage to an electrical outlet using the included tool. PRECAUTIONS...
... hazards. Always turn off when the instrument is not to be malfunctioning, discontinue use immediately and have the instrument inspected by qualified Yamaha service personnel. • Only use the voltage specified as heaters or radiators, and do not use paint thinners, solvents, cleaning ... as televisions, radios, or speakers, since this might result in any hearing loss or ringing in a safe place for future reference. CLP-810S 3 The instrument contains no user-serviceable parts. If you or others, or damage to an electrical outlet using the included tool. PRECAUTIONS...
Owner's Manual
Page 4
...adds extra depth and expressiveness to read this Owner's Manual thoroughly, and keep it in a safe place for choosing a Yamaha CLP-810S Clavinova. q With MIDI compatibility and a range of MIDI functions, the Clavinova can easily be incorporated into advanced MIDI .... In order to make the most of your Clavinova will give you many years of the acoustic piano and Yamaha's AWM (Advanced Wave Memory) technology offers unmatched realism and expressive power. Introduction Thank you for later reference. ... Accessories q Owner's Manual q Bench (included or optional depending on locale) 4 CLP-810S
...adds extra depth and expressiveness to read this Owner's Manual thoroughly, and keep it in a safe place for choosing a Yamaha CLP-810S Clavinova. q With MIDI compatibility and a range of MIDI functions, the Clavinova can easily be incorporated into advanced MIDI .... In order to make the most of your Clavinova will give you many years of the acoustic piano and Yamaha's AWM (Advanced Wave Memory) technology offers unmatched realism and expressive power. Introduction Thank you for later reference. ... Accessories q Owner's Manual q Bench (included or optional depending on locale) 4 CLP-810S

Owner's Manual
Page 5
.... 4 [MASTER VOLUME] Control The [MASTER VOLUME] control adjusts the volume (level) of standard stereo headphones can be plugged in the OFF position, the CLP-810S produces its normal piano voice. More details on MIDI are given in "MIDI Functions" on page 12. 8 PHONES Jacks (Bottom Panel) Two sets of ...sound produced by the Clavinova's internal stereo sound system. CLP-810S 5 When the power is turned ON, the POWER indicator (located to the left of headphones is plugged into either of the PHONES jacks. 5 Pedals...
.... 4 [MASTER VOLUME] Control The [MASTER VOLUME] control adjusts the volume (level) of standard stereo headphones can be plugged in the OFF position, the CLP-810S produces its normal piano voice. More details on MIDI are given in "MIDI Functions" on page 12. 8 PHONES Jacks (Bottom Panel) Two sets of ...sound produced by the Clavinova's internal stereo sound system. CLP-810S 5 When the power is turned ON, the POWER indicator (located to the left of headphones is plugged into either of the PHONES jacks. 5 Pedals...
Owner's Manual
Page 6
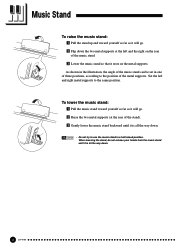
... of the stand). XFlip down . • Do not try to the same position. CLower the music stand so that it is all the way down. 6 CLP-810S
... of the stand). XFlip down . • Do not try to the same position. CLower the music stand so that it is all the way down. 6 CLP-810S
Owner's Manual
Page 7
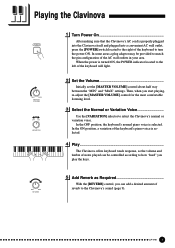
In the ON position, a variation of the keyboard's piano voice is selected. CLP-810S 7 Set the Volume Initially set the [MASTER VOLUME] control about half way between the "MIN" and "MAX" settings. Select the Normal or Variation Voice Use ...
In the ON position, a variation of the keyboard's piano voice is selected. CLP-810S 7 Set the Volume Initially set the [MASTER VOLUME] control about half way between the "MIN" and "MAX" settings. Select the Normal or Variation Voice Use ...

Owner's Manual
Page 8
... key: ...... Für Elise / L.v.Beethoven • E3 key: ...... Starting with the demo tune on the keyboard. Stop the Demo To stop . Playing the Demonstration Tunes The CLP-810S includes three demo tunes that demonstrate its sound capabilities. C3 D3 E3 MIN MAX MASTER VOLUME A-1 C0 q The Demo Tunes • C3 key: ...... Perpetuum mobile... Select and Start a Demo Tune While simultaneously holding the A-1 and C0 keys, press either C3, D3 or E3 to adjust the volume. C3 D3 E3 8 CLP-810S
... key: ...... Für Elise / L.v.Beethoven • E3 key: ...... Starting with the demo tune on the keyboard. Stop the Demo To stop . Playing the Demonstration Tunes The CLP-810S includes three demo tunes that demonstrate its sound capabilities. C3 D3 E3 MIN MAX MASTER VOLUME A-1 C0 q The Demo Tunes • C3 key: ...... Perpetuum mobile... Select and Start a Demo Tune While simultaneously holding the A-1 and C0 keys, press either C3, D3 or E3 to adjust the volume. C3 D3 E3 8 CLP-810S
Owner's Manual
Page 9
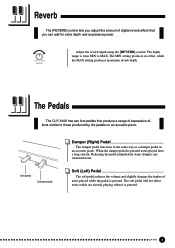
...long sustain. Soft pedal Damper pedal Damper (Right) Pedal The damper pedal functions in the same way as a damper pedal on an acoustic piano. CLP-810S 9 The soft pedal will not affect notes which are already playing when it is pressed. MIN MAX REVERB Adjust the reverb depth using the [...REVERB] control. The Pedals The CLP-810S has two foot pedals that you adjust the amount of notes played while the pedal is pressed. Releasing the pedal immediately stops (damps) any...
...long sustain. Soft pedal Damper pedal Damper (Right) Pedal The damper pedal functions in the same way as a damper pedal on an acoustic piano. CLP-810S 9 The soft pedal will not affect notes which are already playing when it is pressed. MIN MAX REVERB Adjust the reverb depth using the [...REVERB] control. The Pedals The CLP-810S has two foot pedals that you adjust the amount of notes played while the pedal is pressed. Releasing the pedal immediately stops (damps) any...

Owner's Manual
Page 10
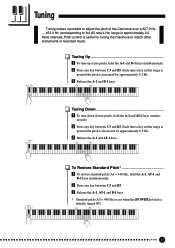
... F#3 on the keyboard are used for transposition. A-1 C#0 F#2 C3 F#3 -6 -4 -2 +1 +3 +6 -5 -3 -1 0 +2 +4 +5 Transpose Transpose down to the range of the Clavinova sound one octave higher and lower, respectively. 10 CLP-810S "Transposing" the pitch of the Clavinova keyboard facilitates playing in the same way using the keys to the right of six semitones.
... F#3 on the keyboard are used for transposition. A-1 C#0 F#2 C3 F#3 -6 -4 -2 +1 +3 +6 -5 -3 -1 0 +2 +4 +5 Transpose Transpose down to the range of the Clavinova sound one octave higher and lower, respectively. 10 CLP-810S "Transposing" the pitch of the Clavinova keyboard facilitates playing in the same way using the keys to the right of six semitones.
Owner's Manual
Page 11
... simultaneously. X Press any key between C3 and B3. X Press any key between C3 and B3. C Release the A-1 and A#-1 keys. C Release the A-1 and B-1 keys. C3 B3 CLP-810S 11
... simultaneously. X Press any key between C3 and B3. X Press any key between C3 and B3. C Release the A-1 and A#-1 keys. C Release the A-1 and B-1 keys. C3 B3 CLP-810S 11
Owner's Manual
Page 12
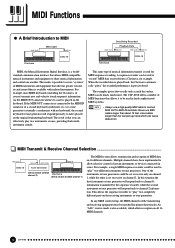
...The examples given above really only scratch the surface. In this can pick up noise which allows reception on all 16 MIDI channels. 12 CLP-810S MIDI Functions q A Brief Introduction to MIDI MIDI OUT Clavinova MIDI Cable MIDI IN DOU-10 MIDI OUT Data Being Recorded Playback Data MIDI... feet, since cables longer than is available with no keyboard), the second keyboard or tone generator will respond only to channel-2 information. The CLP-810S offers a number of the instruments or tone generators could be set to receive only on channel 1, while the other is used to "play...
...The examples given above really only scratch the surface. In this can pick up noise which allows reception on all 16 MIDI channels. 12 CLP-810S MIDI Functions q A Brief Introduction to MIDI MIDI OUT Clavinova MIDI Cable MIDI IN DOU-10 MIDI OUT Data Being Recorded Playback Data MIDI... feet, since cables longer than is available with no keyboard), the second keyboard or tone generator will respond only to channel-2 information. The CLP-810S offers a number of the instruments or tone generators could be set to receive only on channel 1, while the other is used to "play...
Owner's Manual
Page 13
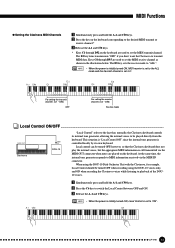
... ON. The E5 key sets the receive mode to set the MIDI receive channel as shown in the illustration below. C Release the A-1 and C#0 keys. C6 CLP-810S 13
... ON. The E5 key sets the receive mode to set the MIDI receive channel as shown in the illustration below. C Release the A-1 and C#0 keys. C6 CLP-810S 13
Owner's Manual
Page 14
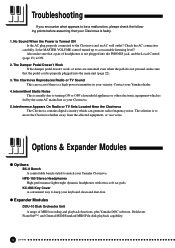
...carefully. Also make sure that a pair of MIDI recording and playback functions, plus Yamaha DOC software, Disklavier PianoSoft™, and General MIDI/Standard MIDI File disk playback capability. 14 CLP-810S Troubleshooting If you encounter what appears to be a malfunction, please check the following... points before assuming that your Yamaha dealer. 4. No Sound When the Power is a high-power transmitter ...
...carefully. Also make sure that a pair of MIDI recording and playback functions, plus Yamaha DOC software, Disklavier PianoSoft™, and General MIDI/Standard MIDI File disk playback capability. 14 CLP-810S Troubleshooting If you encounter what appears to be a malfunction, please check the following... points before assuming that your Yamaha dealer. 4. No Sound When the Power is a high-power transmitter ...

Owner's Manual
Page 15
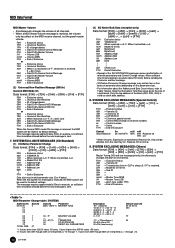
... is used to control the Clavinova. 1. SYSTEM EXCLUSIVE MESSAGES (Universal System Exclusive) (1) Universal Realtime Message Data format: [F0H] -> [7FH] -> [XnH] -> [04H] -> [01H] -> [ll H] -> [mmH] -> [F7H] CLP-810S 15 NOTE ON/OFF Data format: [9nH] -> [kk] -> [vv] 9nH = Note ON/OFF event (n = channel number) kk = Note number (Transmit: 09H ~ 78H = A-2 ~ C8 / Receive: 00H...
... is used to control the Clavinova. 1. SYSTEM EXCLUSIVE MESSAGES (Universal System Exclusive) (1) Universal Realtime Message Data format: [F0H] -> [7FH] -> [XnH] -> [04H] -> [01H] -> [ll H] -> [mmH] -> [F7H] CLP-810S 15 NOTE ON/OFF Data format: [9nH] -> [kk] -> [vv] 9nH = Note ON/OFF event (n = channel number) kk = Note number (Transmit: 09H ~ 78H = A-2 ~ C8 / Receive: 00H...
Owner's Manual
Page 16
...-> [73H] -> [xxH] -> [11H] -> [0nH] -> [ccH] -> [vvH] -> [F7H] F0H = Exclusive status 43H = Yamaha ID 73H = Clavinova ID 50H = CLP-810S ID 11H = Clavinova special control 0nH = Control MIDI change (n=channel number) cc = Control number vv = Value F7H = End of Exclusive Control...] -> [F7H] F0H 43H 1nH 4CH hhH mmH ll H ddH | F7H = Exclusive status = YAMAHA ID = When received, n=0~F. Values from 4DH through 58H are interpreted as -12 through +12. 16 CLP-810S The message requires approximately 50ms to its default settings. SYSTEM EXCLUSIVE MESSAGES (Others) Data format: [F0H]...
...-> [73H] -> [xxH] -> [11H] -> [0nH] -> [ccH] -> [vvH] -> [F7H] F0H = Exclusive status 43H = Yamaha ID 73H = Clavinova ID 50H = CLP-810S ID 11H = Clavinova special control 0nH = Control MIDI change (n=channel number) cc = Control number vv = Value F7H = End of Exclusive Control...] -> [F7H] F0H 43H 1nH 4CH hhH mmH ll H ddH | F7H = Exclusive status = YAMAHA ID = When received, n=0~F. Values from 4DH through 58H are interpreted as -12 through +12. 16 CLP-810S The message requires approximately 50ms to its default settings. SYSTEM EXCLUSIVE MESSAGES (Others) Data format: [F0H]...
Owner's Manual
Page 17
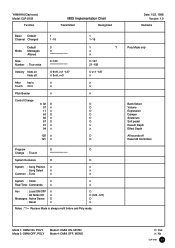
YAMAHA [Clavinova] Model: CLP-810S Function MIDI Implementation Chart Transmitted Recognized Basic Default Channel Changed 1 1~16 Mode Default Messages Altered 3 X Note Number : True voice 9~120 Velocity Note on Note off Reset All Controllers Mode 1: OMNI ON, POLY Mode 3: OMNI OFF, POLY Mode 2: OMNI ON, MONO Mode 4: OMNI OFF, MONO O: Yes X: No CLP-810S 17 Date: 1/22...
YAMAHA [Clavinova] Model: CLP-810S Function MIDI Implementation Chart Transmitted Recognized Basic Default Channel Changed 1 1~16 Mode Default Messages Altered 3 X Note Number : True voice 9~120 Velocity Note on Note off Reset All Controllers Mode 1: OMNI ON, POLY Mode 3: OMNI OFF, POLY Mode 2: OMNI ON, MONO Mode 4: OMNI OFF, MONO O: Yes X: No CLP-810S 17 Date: 1/22...

Owner's Manual
Page 18
... persons. • Be sure to use the correct screw size, as indicated above. Z Open the box and remove all the required parts are provided. 18 CLP-810S Check to make sure that all the parts. Please assemble in accordance with the sequence given below . On opening the box you should be sure...
... persons. • Be sure to use the correct screw size, as indicated above. Z Open the box and remove all the required parts are provided. 18 CLP-810S Check to make sure that all the parts. Please assemble in accordance with the sequence given below . On opening the box you should be sure...

Owner's Manual
Page 19
... the pedal box. two screws on the feet. 6 x 20 mm round-head screws 2 D D D C 5 x 40 mm long gold screws 1 X Assemble the side panels (D) and feet (E). C Attach (C). CLP-810S 19 2 D 3 q Align the cut corner of the bracket with the 5 x 40 millimeter long gold-colored screws 1 (3 each side. Place the pedal box on the feet...
... the pedal box. two screws on the feet. 6 x 20 mm round-head screws 2 D D D C 5 x 40 mm long gold screws 1 X Assemble the side panels (D) and feet (E). C Attach (C). CLP-810S 19 2 D 3 q Align the cut corner of the bracket with the 5 x 40 millimeter long gold-colored screws 1 (3 each side. Place the pedal box on the feet...

Owner's Manual
Page 20
els (D). The center panel (B) is installed between the side panels (D) with the brackets on each end toward the rear of the center panel is attached using two 6 x 16 flat-head screws 3. 20 CLP-810S Place the square holes in the center-panel brackets over the lugs extending from the side panels, then slide down. 4 B D 6 x 16 mm flat-head screws 3 V Attach the center panel (B) to the side pan- Each side of the stand assembly.
els (D). The center panel (B) is installed between the side panels (D) with the brackets on each end toward the rear of the center panel is attached using two 6 x 16 flat-head screws 3. 20 CLP-810S Place the square holes in the center-panel brackets over the lugs extending from the side panels, then slide down. 4 B D 6 x 16 mm flat-head screws 3 V Attach the center panel (B) to the side pan- Each side of the stand assembly.

Owner's Manual
Page 21
... unit with the screws on the left and right sides, as not to drop the main unit. Then slide the main unit forward until it . CLP-810S 21 5 10 cm q Be sure to place your hands at the top of the side panels. A 10 cm A D 6 x 16 mm flat-head screws 3 A D B Install the...
... unit with the screws on the left and right sides, as not to drop the main unit. Then slide the main unit forward until it . CLP-810S 21 5 10 cm q Be sure to place your hands at the top of the side panels. A 10 cm A D 6 x 16 mm flat-head screws 3 A D B Install the...

Owner's Manual
Page 22
... end of the AC wall outlets in the pedal cord. N Connect the pedal cord. The voltage selector is set the selector for your area. 22 CLP-810S To set at 240V when the unit is provided in some areas. After the proper voltage has been selected connect the AC power cord. A plug...
... end of the AC wall outlets in the pedal cord. N Connect the pedal cord. The voltage selector is set the selector for your area. 22 CLP-810S To set at 240V when the unit is provided in some areas. After the proper voltage has been selected connect the AC power cord. A plug...


