Owners Manual
Page 83
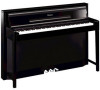
...into the pedal connector. 5-2 Attach the cord holders to the rear panel as shown in damage to the AC IN and an AC wall outlet. Review the assembly procedure and correct any parts left over? Tighten all screws. 5. Set the adjuster. Use the included two screws (4 x 10 mm)... to rotate the selector dial so that feature a voltage selector). CAUTION When moving the instrument after assembly, always hold here. CLP-370/340/330, CLP-S308/S306 Owner's Manual 83 Connect the power cord. 6-1 Set the voltage selector (for models that the correct voltage for 110V, 127V, ...
...into the pedal connector. 5-2 Attach the cord holders to the rear panel as shown in damage to the AC IN and an AC wall outlet. Review the assembly procedure and correct any parts left over? Tighten all screws. 5. Set the adjuster. Use the included two screws (4 x 10 mm)... to rotate the selector dial so that feature a voltage selector). CAUTION When moving the instrument after assembly, always hold here. CLP-370/340/330, CLP-S308/S306 Owner's Manual 83 Connect the power cord. 6-1 Set the voltage selector (for models that the correct voltage for 110V, 127V, ...
Owners Manual
Page 86
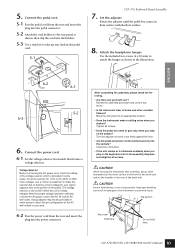
... the following. • Are there any errors. • Is the instrument clear of the main unit. Do not hold here. 86 CLP-370/340/330, CLP-S308/S306 Owner's Manual Attach the headphone hanger. Check the connection. • If the unit creaks or is provided in the pedal cord... step on the panel. Turn the adjuster so that feature a voltage selector). CLP-340/330: Keyboard Stand Assembly 5. Move the instrument to rotate the selector dial so that the correct voltage for models that it ? Review the assembly procedure and correct any parts left over? Connect the power cord. ...
... the following. • Are there any errors. • Is the instrument clear of the main unit. Do not hold here. 86 CLP-370/340/330, CLP-S308/S306 Owner's Manual Attach the headphone hanger. Check the connection. • If the unit creaks or is provided in the pedal cord... step on the panel. Turn the adjuster so that feature a voltage selector). CLP-340/330: Keyboard Stand Assembly 5. Move the instrument to rotate the selector dial so that the correct voltage for models that it ? Review the assembly procedure and correct any parts left over? Connect the power cord. ...

Owners Manual
Page 90
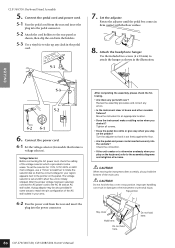
...the protective sheet (page 87) before closing the key cover. CAUTION When moving the instrument after assembly, always hold here. 90 CLP-370/340/330, CLP-S308/S306 Owner's Manual The sheet will protect the keyboard from being scratched. Do not hold the bottom of doors and other ... After completing the assembly, please check the following. • Are there any errors. • Is the instrument clear of the main unit. Review the assembly procedure and correct any parts left over? Move the instrument to an appropriate location. • Does the instrument make a rattling noise when...
...the protective sheet (page 87) before closing the key cover. CAUTION When moving the instrument after assembly, always hold here. 90 CLP-370/340/330, CLP-S308/S306 Owner's Manual The sheet will protect the keyboard from being scratched. Do not hold the bottom of doors and other ... After completing the assembly, please check the following. • Are there any errors. • Is the instrument clear of the main unit. Review the assembly procedure and correct any parts left over? Move the instrument to an appropriate location. • Does the instrument make a rattling noise when...
