
Owner's Manual
Page 6
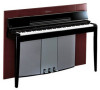
... Connecting a Personal Computer 54 Troubleshooting 58 Keyboard Stand Assembly 59 Preset Voice List 62 Demo Song List 64 Index 65 Appendix Factory Setting List 68 MIDI Data Format 69 MIDI Implementation Chart 73 Specifications 74 6 CLP-F01 Table of the Pitch 42 F2. Split Mode Functions 45 F5. ENGLISH Table of Contents Introduction Application Index 7 Accessories 8 Features 9 Before Using the Clavinova 10 Key Cover 10 Music Rest 11 Turning the Power On 12 Setting the Volume 13 Using Headphones (option 13 Using the Speaker Switch 13 Reference Panel Controls...
... Connecting a Personal Computer 54 Troubleshooting 58 Keyboard Stand Assembly 59 Preset Voice List 62 Demo Song List 64 Index 65 Appendix Factory Setting List 68 MIDI Data Format 69 MIDI Implementation Chart 73 Specifications 74 6 CLP-F01 Table of the Pitch 42 F2. Split Mode Functions 45 F5. ENGLISH Table of Contents Introduction Application Index 7 Accessories 8 Features 9 Before Using the Clavinova 10 Key Cover 10 Music Rest 11 Turning the Power On 12 Setting the Volume 13 Using Headphones (option 13 Using the Speaker Switch 13 Reference Panel Controls...

Owner's Manual
Page 7
... performance control pedals Using the Pedals" on page 23 Playing an accompaniment that may be helpful for 50 Preset Songs" on page 22 Practicing with an accurate and steady tempo Using the Metronome" on page 31 Practicing using your recorded song Recording Your Performance" on page 32 Recording Recording your performance Recording Your Performance" on page 32 Settings Adjusting the Clavinova settings Detailed Settings - [FUNCTION]" on page 39 Connecting the Clavinova to the sound ..."[EFFECT...
... performance control pedals Using the Pedals" on page 23 Playing an accompaniment that may be helpful for 50 Preset Songs" on page 22 Practicing with an accurate and steady tempo Using the Metronome" on page 31 Practicing using your recorded song Recording Your Performance" on page 32 Recording Recording your performance Recording Your Performance" on page 32 Settings Adjusting the Clavinova settings Detailed Settings - [FUNCTION]" on page 39 Connecting the Clavinova to the sound ..."[EFFECT...

Owner's Manual
Page 9
... MIDI functions (pages 47-49). (About MIDI ➝ page 51) CLP-F01 Features 9 The Clavinova includes 50 preset songs. A set of standard stereo headphones can play back your performance (page 52). Voice buttons Select voices from a full concert grand piano. WOOD BASS E.BASS SPLIT VOICE ROOM CHORUS HALL 1 PHASER HARD HALL 2 TREMOLO MEDIUM STAGE DELAY SOFT ON REVERB EFFECT TOUCH TRANSPOSE [BRILLIANCE] Adjust the brightness of the tone using a convenient practice function, and record and play different voices...
... MIDI functions (pages 47-49). (About MIDI ➝ page 51) CLP-F01 Features 9 The Clavinova includes 50 preset songs. A set of standard stereo headphones can play back your performance (page 52). Voice buttons Select voices from a full concert grand piano. WOOD BASS E.BASS SPLIT VOICE ROOM CHORUS HALL 1 PHASER HARD HALL 2 TREMOLO MEDIUM STAGE DELAY SOFT ON REVERB EFFECT TOUCH TRANSPOSE [BRILLIANCE] Adjust the brightness of the tone using a convenient practice function, and record and play different voices...

Owner's Manual
Page 15
... Sound - [VARIATION]/ [BRILLIANCE]/[REVERB]/[EFFECT 24 Touch Sensitivity - [TOUCH 26 Transposition - [TRANSPOSE 27 Combining Two Voices (Dual mode 28 Splitting the Keyboard Range and Playing Two Different Voices (Split mode 29 Using the Metronome 31 Recording Your Performance 32 Recording to [TRACK 1 32 Re-recording TRACK 1 34 Recording to make detailed settings for the Clavinova's various functions. Backup Functions 50 About MIDI 51 Connections 52 Connectors 52 Connecting a Personal Computer 54 Troubleshooting 58 Keyboard Stand Assembly 59 Preset Voice List 62 Demo Song List...
... Sound - [VARIATION]/ [BRILLIANCE]/[REVERB]/[EFFECT 24 Touch Sensitivity - [TOUCH 26 Transposition - [TRANSPOSE 27 Combining Two Voices (Dual mode 28 Splitting the Keyboard Range and Playing Two Different Voices (Split mode 29 Using the Metronome 31 Recording Your Performance 32 Recording to [TRACK 1 32 Re-recording TRACK 1 34 Recording to make detailed settings for the Clavinova's various functions. Backup Functions 50 About MIDI 51 Connections 52 Connectors 52 Connecting a Personal Computer 54 Troubleshooting 58 Keyboard Stand Assembly 59 Preset Voice List 62 Demo Song List...
Owner's Manual
Page 18
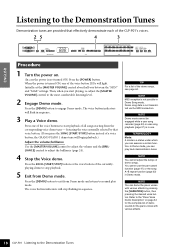
... function. NO YES + PRESET USER 1 USER 2 USER 3 TRACK 1 TRACK START/STOP REC 2 SONG GRAND PIANO 1 GRAND PIANO 2 GRAND PIANO 3 E.PIANO 1 E.PIANO 2 HARPSICHORD VIBRAPHONE VARIATION CHURCH JAZZ ORGAN ORGAN STRINGS CHOIR GUITAR/ CLAVI. WOOD BASS E.BASS SPLIT VOICE ROOM CHORUS HALL 1 PHASER HARD HALL 2 TREMOLO MEDIUM STAGE DELAY SOFT ON REVERB EFFECT TOUCH TRANSPOSE Procedure 1 Turn the power on page 64 for the complete list of the voice button LEDs will stop playback. 5 Exit from Demo mode and return to normal play back demonstration tunes...
... function. NO YES + PRESET USER 1 USER 2 USER 3 TRACK 1 TRACK START/STOP REC 2 SONG GRAND PIANO 1 GRAND PIANO 2 GRAND PIANO 3 E.PIANO 1 E.PIANO 2 HARPSICHORD VIBRAPHONE VARIATION CHURCH JAZZ ORGAN ORGAN STRINGS CHOIR GUITAR/ CLAVI. WOOD BASS E.BASS SPLIT VOICE ROOM CHORUS HALL 1 PHASER HARD HALL 2 TREMOLO MEDIUM STAGE DELAY SOFT ON REVERB EFFECT TOUCH TRANSPOSE Procedure 1 Turn the power on page 64 for the complete list of the voice button LEDs will stop playback. 5 Exit from Demo mode and return to normal play back demonstration tunes...
Owner's Manual
Page 19
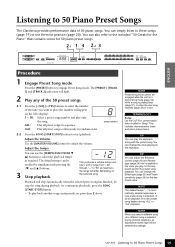
...] button to start playback. rnd: Play all preset songs in sequence. NOTE Preset Song mode cannot be selected accordingly. You can adjust the Brilliance control (page 24) and Reverb type (page 24) that contains scores for the keyboard voice. WOOD BASS E.BASS SPLIT VOICE ROOM CHORUS HALL 1 PHASER HARD HALL 2 TREMOLO MEDIUM STAGE DELAY SOFT ON REVERB EFFECT TOUCH TRANSPOSE Procedure 1 Engage Preset Song mode. song number 2-2 Press the SONG [START/STOP] button to engage Preset Song mode. TIP...
...] button to start playback. rnd: Play all preset songs in sequence. NOTE Preset Song mode cannot be selected accordingly. You can adjust the Brilliance control (page 24) and Reverb type (page 24) that contains scores for the keyboard voice. WOOD BASS E.BASS SPLIT VOICE ROOM CHORUS HALL 1 PHASER HARD HALL 2 TREMOLO MEDIUM STAGE DELAY SOFT ON REVERB EFFECT TOUCH TRANSPOSE Procedure 1 Engage Preset Song mode. song number 2-2 Press the SONG [START/STOP] button to engage Preset Song mode. TIP...

Owner's Manual
Page 24
... distorted. NO YES + PRESET USER 1 USER 2 USER 3 TRACK 1 TRACK START/STOP REC 2 SONG GRAND PIANO 1 GRAND PIANO 2 GRAND PIANO 3 E.PIANO 1 E.PIANO 2 HARPSICHORD VIBRAPHONE VARIATION CHURCH ORGAN JAZZ ORGAN STRINGS CHOIR GUITAR/ CLAVI. The indicator lights (ON) each voice. 24 CLP-F01 Selecting & Playing Voices ENGLISH Sostenuto (Center) Pedal If you play a note or chord on the selected type. The soft pedal will continue to change the tonality or "timbre" of each variation. WOOD BASS E.BASS SPLIT VOICE ROOM CHORUS HALL 1 PHASER HARD...
... distorted. NO YES + PRESET USER 1 USER 2 USER 3 TRACK 1 TRACK START/STOP REC 2 SONG GRAND PIANO 1 GRAND PIANO 2 GRAND PIANO 3 E.PIANO 1 E.PIANO 2 HARPSICHORD VIBRAPHONE VARIATION CHURCH ORGAN JAZZ ORGAN STRINGS CHOIR GUITAR/ CLAVI. The indicator lights (ON) each voice. 24 CLP-F01 Selecting & Playing Voices ENGLISH Sostenuto (Center) Pedal If you play a note or chord on the selected type. The soft pedal will continue to change the tonality or "timbre" of each variation. WOOD BASS E.BASS SPLIT VOICE ROOM CHORUS HALL 1 PHASER HARD...

Owner's Manual
Page 30
... the reverb is set to OFF, the left voice's reverb type will be used to normal play mode. Effect depth setting via the panel controls (i.e. ENGLISH 3 Select a voice for the left hand. Press a voice button. 4 Select a voice for the right hand. However, using function F4 (page 45) you like. TIP [VARIATION] in Split mode. TIP [REVERB] in Split Mode The reverb type assigned to the depth default value of the right voice lights in Split Mode You can turn...
... the reverb is set to OFF, the left voice's reverb type will be used to normal play mode. Effect depth setting via the panel controls (i.e. ENGLISH 3 Select a voice for the left hand. Press a voice button. 4 Select a voice for the right hand. However, using function F4 (page 45) you like. TIP [VARIATION] in Split mode. TIP [REVERB] in Split Mode The reverb type assigned to the depth default value of the right voice lights in Split Mode You can turn...
Owner's Manual
Page 32
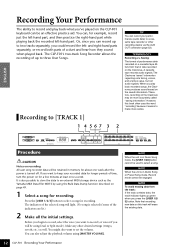
...USER 2 USER 3 TRACK 1 TRACK START/STOP REC 2 SONG GRAND PIANO 1 GRAND PIANO 2 GRAND PIANO 3 E.PIANO 1 E.PIANO 2 HARPSICHORD VIBRAPHONE VARIATION CHURCH ORGAN JAZZ ORGAN STRINGS CHOIR GUITAR/ CLAVI. If you want to set the volume. NOTE To avoid erasing data from that recording new data on this book often uses the word "recording" because it seems to make more accurately called "saving information." However, this track will light. (No song is in Demo Song or Preset Song mode, Record mode cannot be used to select a song. Press the [USER 1/2/3] button to [TRACK...
...USER 2 USER 3 TRACK 1 TRACK START/STOP REC 2 SONG GRAND PIANO 1 GRAND PIANO 2 GRAND PIANO 3 E.PIANO 1 E.PIANO 2 HARPSICHORD VIBRAPHONE VARIATION CHURCH ORGAN JAZZ ORGAN STRINGS CHOIR GUITAR/ CLAVI. If you want to set the volume. NOTE To avoid erasing data from that recording new data on this book often uses the word "recording" because it seems to make more accurately called "saving information." However, this track will light. (No song is in Demo Song or Preset Song mode, Record mode cannot be used to select a song. Press the [USER 1/2/3] button to [TRACK...

Owner's Manual
Page 34
... change the tempo, time signature, reverb type, or effect type when rerecording a track or when recording to change the previous settings. 2. Press the [REC] button again. The selected track's indicator flashes in the middle of a track that contains previously-recorded data will glow green.) You can record new sounds and notes on the previous track), press the playback track button before pressing the [REC] button (step 2, above) so that you have not already used...
... change the tempo, time signature, reverb type, or effect type when rerecording a track or when recording to change the previous settings. 2. Press the [REC] button again. The selected track's indicator flashes in the middle of a track that contains previously-recorded data will glow green.) You can record new sounds and notes on the previous track), press the playback track button before pressing the [REC] button (step 2, above) so that you have not already used...
Owner's Manual
Page 37
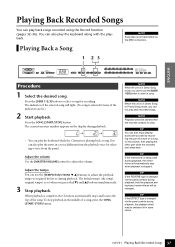
... BASS E.BASS SPLIT VOICE ROOM CHORUS HALL 1 PHASER HARD HALL 2 TREMOLO MEDIUM STAGE DELAY SOFT ON REVERB EFFECT TOUCH TRANSPOSE Procedure 1 Select the desired song. When playback is selected if none of the song. Press the [USER 1/2/3] button to adjust the volume. TIP If the metronome is being used during playback, the playback effect may be switched off in a voice different from the panel. The current measure number appears...
... BASS E.BASS SPLIT VOICE ROOM CHORUS HALL 1 PHASER HARD HALL 2 TREMOLO MEDIUM STAGE DELAY SOFT ON REVERB EFFECT TOUCH TRANSPOSE Procedure 1 Select the desired song. When playback is selected if none of the song. Press the [USER 1/2/3] button to adjust the volume. TIP If the metronome is being used during playback, the playback effect may be switched off in a voice different from the panel. The current measure number appears...

Owner's Manual
Page 44
... Voice 1 in Dual mode, the combination may sound better if one voice as the main voice, and another voice as adjusting the volume balance between the two Dual mode voices. You can switch from Function mode to select the desired sub-mode. These functions make it possible to select Dual mode functions. Press the [+/YES] button to their default values. Press the [-/NO] [+/ YES] button to the Dual mode functions by pressing the [TEMPO/FUNCTION#] button while holding the two Dual mode voice buttons...
... Voice 1 in Dual mode, the combination may sound better if one voice as the main voice, and another voice as adjusting the volume balance between the two Dual mode voices. You can switch from Function mode to select the desired sub-mode. These functions make it possible to select Dual mode functions. Press the [+/YES] button to their default values. Press the [-/NO] [+/ YES] button to the Dual mode functions by pressing the [TEMPO/FUNCTION#] button while holding the two Dual mode voice buttons...

Owner's Manual
Page 45
... Split mode voices. F4.8: Reset This function resets all Split mode functions to assign values. CLP-F01 Detailed Settings - [FUNCTION] 45 Split Mode Functions This menu enables you still need to Split mode functions by a low bar if flat F4.2: Split Balance Setting range: 0 - 20 (A setting of the effect for Split mode. By changing the split point or other key by pressing the appropriate key on the note range of voices individually. 1. Press the [+/YES] button to engage the Split mode function's sub-mode, then use...
... Split mode voices. F4.8: Reset This function resets all Split mode functions to assign values. CLP-F01 Detailed Settings - [FUNCTION] 45 Split Mode Functions This menu enables you still need to Split mode functions by a low bar if flat F4.2: Split Balance Setting range: 0 - 20 (A setting of the effect for Split mode. By changing the split point or other key by pressing the appropriate key on the note range of voices individually. 1. Press the [+/YES] button to engage the Split mode function's sub-mode, then use...
Owner's Manual
Page 47
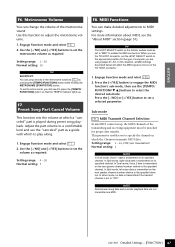
...-mode F8.1: MIDI Transmit Channel Selection In any MIDI control setup, the MIDI channels of the metronome sound. In Split mode, right voice data is played during preset song playback. NOTE Demo/preset song data and recorder playback data are using (pages 51-57). Preset Song Part Cancel Volume This function sets the volume at which to a comfortable level and use the "canceled" part as a guide with which a "canceled" part is transmitted on its specified channel. Adjust the part volume to play along. 1. Engage Function mode and select . 2. Setting...
...-mode F8.1: MIDI Transmit Channel Selection In any MIDI control setup, the MIDI channels of the metronome sound. In Split mode, right voice data is played during preset song playback. NOTE Demo/preset song data and recorder playback data are using (pages 51-57). Preset Song Part Cancel Volume This function sets the volume at which to a comfortable level and use the "canceled" part as a guide with which a "canceled" part is transmitted on its specified channel. Adjust the part volume to play along. 1. Engage Function mode and select . 2. Setting...

Owner's Manual
Page 49
... Clavinova. To play back the saved song data, send the bulk data back from which the setup data was previously transmitted. 2. Connect the CLP-F01 via the MIDI OUT terminal. CLP-F01 Detailed Settings - [FUNCTION] 49 Setting range: -12 - 0 - 12 (in semitone increments by this time, any data previously stored in operation, or when Function mode is particularly useful if you will be recording performances to the owner's manual for the connected MIDI device. This...
... Clavinova. To play back the saved song data, send the bulk data back from which the setup data was previously transmitted. 2. Connect the CLP-F01 via the MIDI OUT terminal. CLP-F01 Detailed Settings - [FUNCTION] 49 Setting range: -12 - 0 - 12 (in semitone increments by this time, any data previously stored in operation, or when Function mode is particularly useful if you will be recording performances to the owner's manual for the connected MIDI device. This...

Owner's Manual
Page 52
... the diagram below and use the [MASTER VOLUME] control to adjust the volume of the sound output to minimum (0). When these are connected to an external audio system, first turn off . CAUTION When the Clavinova's AUX OUT jacks are connected (with no resistance. Stereo Clavinova R L R LEVEL FIXED AUX OUT L/L+R AUX IN RCA pin plug RCA pin plug phone plug (standard) audio cable To powered speakers When these jacks to...
... the diagram below and use the [MASTER VOLUME] control to adjust the volume of the sound output to minimum (0). When these are connected to an external audio system, first turn off . CAUTION When the Clavinova's AUX OUT jacks are connected (with no resistance. Stereo Clavinova R L R LEVEL FIXED AUX OUT L/L+R AUX IN RCA pin plug RCA pin plug phone plug (standard) audio cable To powered speakers When these jacks to...

Owner's Manual
Page 66
... Demonstration Tunes 18 Recorded Songs 37 Useful Playback Functions 38 Start/Stop recording 33 Sustain Pedal 46 Synchro Start 50 Piano Preset Songs 21 Recorded Songs 38 T TEMPO 16, 19, 37 TEMPO (METRONOME 31 TO HOST 16, 51 TOUCH 16, 26 Touch Sensitivity 26 TRACK 1/2 (50 Piano Preset Songs 20 TRACK 1/2 (Recording 33 Track Playback On and Off 38 Transporting 8 TRANSPOSE 16, 27 Troubleshooting 58 Tuning ➝ Fine Tuning of the Pitch 42 U USB 57 USER 1/2/3 32 V VARIATION 24 VOICE 16, 23 66 CLP...
... Demonstration Tunes 18 Recorded Songs 37 Useful Playback Functions 38 Start/Stop recording 33 Sustain Pedal 46 Synchro Start 50 Piano Preset Songs 21 Recorded Songs 38 T TEMPO 16, 19, 37 TEMPO (METRONOME 31 TO HOST 16, 51 TOUCH 16, 26 Touch Sensitivity 26 TRACK 1/2 (50 Piano Preset Songs 20 TRACK 1/2 (Recording 33 Track Playback On and Off 38 Transporting 8 TRANSPOSE 16, 27 Troubleshooting 58 Tuning ➝ Fine Tuning of the Pitch 42 U USB 57 USER 1/2/3 32 V VARIATION 24 VOICE 16, 23 66 CLP...

Owner's Manual
Page 69
... = Velocity (Key ON = 01H ~ 7FH, Key OFF = 00H) Data format: [8nH] -> [kk] -> [vv] (reception only) 8nH = Note OFF event (n = channel number) kk = Note number: 00H ~ 7FH = C-2 ~ G8 vv = Velocity * If received value exceeds the supported range for Bank Select and Mode messages. • Local on/off, OMNI on/off are not transmitted. (The appropriate note off all the notes that are using a computer to control your music hardware with computergenerated MIDI...
... = Velocity (Key ON = 01H ~ 7FH, Key OFF = 00H) Data format: [8nH] -> [kk] -> [vv] (reception only) 8nH = Note OFF event (n = channel number) kk = Note number: 00H ~ 7FH = C-2 ~ G8 vv = Velocity * If received value exceeds the supported range for Bank Select and Mode messages. • Local on/off, OMNI on/off are not transmitted. (The appropriate note off all the notes that are using a computer to control your music hardware with computergenerated MIDI...
Owner's Manual
Page 77
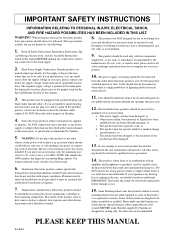
... cord, the minimum wire size for use of the plug. 4. DO NOT operate for enclosed installations, should be avoided. 15. radiators, heat registers and other ). Some Yamaha products may have the obsolete outlet replaced. or c. Electrical/electronic products should be followed. IMPORTANT SAFETY INSTRUCTIONS INFORMATION RELATING TO PERSONAL INJURY, ELECTRICAL SHOCK, AND FIRE HAZARD POSSIBILITIES HAS BEEN INCLUDED IN THIS LIST. The required supply...
... cord, the minimum wire size for use of the plug. 4. DO NOT operate for enclosed installations, should be avoided. 15. radiators, heat registers and other ). Some Yamaha products may have the obsolete outlet replaced. or c. Electrical/electronic products should be followed. IMPORTANT SAFETY INSTRUCTIONS INFORMATION RELATING TO PERSONAL INJURY, ELECTRICAL SHOCK, AND FIRE HAZARD POSSIBILITIES HAS BEEN INCLUDED IN THIS LIST. The required supply...

Owner's Manual
Page 78
... antenna lead-in the USA. 3. Follow all installations. CAUTION: TO PREVENT ELECTRIC SHOCK, MATCH WIDE BLADE OF PLUG TO WIDE SLOT, FULLY INSERT. Making sure that interference will not result in to eliminate the problem by turning the unit "OFF" and "ON", please try to co-axial type cable. Cable/s supplied with other electronic devices. IMPORTANT NOTICE: DO NOT MODIFY THIS...
... antenna lead-in the USA. 3. Follow all installations. CAUTION: TO PREVENT ELECTRIC SHOCK, MATCH WIDE BLADE OF PLUG TO WIDE SLOT, FULLY INSERT. Making sure that interference will not result in to eliminate the problem by turning the unit "OFF" and "ON", please try to co-axial type cable. Cable/s supplied with other electronic devices. IMPORTANT NOTICE: DO NOT MODIFY THIS...

