
Owner's Manual
Page 15
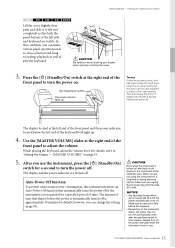
Playing the Clavinova as play the ...operations such as Voice selection and Song recording/ playback as well as a Piano 585 575 545 535 565GP Lift the cover slightly, then push and slide it to the end...volume. For details, refer to match other instruments). however, you use . 15 CLP-585/575/545/535/565GP Owner's Manual This is approximately 30 minutes by an expert (although the ...automatically, even after the specified period of digital instruments is not operated for a second to turn the power off . Tuning Unlike an acoustic piano, this happens. • Depending on...
Playing the Clavinova as play the ...operations such as Voice selection and Song recording/ playback as well as a Piano 585 575 545 535 565GP Lift the cover slightly, then push and slide it to the end...volume. For details, refer to match other instruments). however, you use . 15 CLP-585/575/545/535/565GP Owner's Manual This is approximately 30 minutes by an expert (although the ...automatically, even after the specified period of digital instruments is not operated for a second to turn the power off . Tuning Unlike an acoustic piano, this happens. • Depending on...
Owner's Manual
Page 111
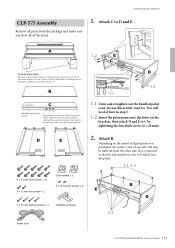
...; 20 mm tapping screws × 4 Headphone hanger 2-2 B D Power cord 111 CLP-585/575/545/535/565GP Owner's Manual Insert the protrusions into the holes on top of them. Depending on the bottom of digital piano you have all parts from the package and make sure to D and E. Untie and... so, position B so that they will need it later in color to C by tightening the four thick screws (6 × 20 mm). Assembling the Clavinova CLP-575 Assembly 1. D 1-2 1-1 1-1. Position the pads so that the side similar in step 5. 1-2. Attach B. Attach C to remove the cover from ...
...; 20 mm tapping screws × 4 Headphone hanger 2-2 B D Power cord 111 CLP-585/575/545/535/565GP Owner's Manual Insert the protrusions into the holes on top of them. Depending on the bottom of digital piano you have all parts from the package and make sure to D and E. Untie and... so, position B so that they will need it later in color to C by tightening the four thick screws (6 × 20 mm). Assembling the Clavinova CLP-575 Assembly 1. D 1-2 1-1 1-1. Position the pads so that the side similar in step 5. 1-2. Attach B. Attach C to remove the cover from ...
Owner's Manual
Page 114
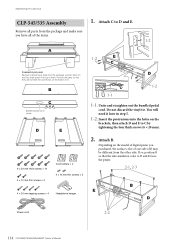
Assembling the Clavinova CLP-545/535 Assembly 1. Depending on the model of digital piano you have all of the items. 1-2 A 1-2 E C Foamed styrol pads Remove foamed styrol pads from the package, position them . Remove all parts from the ... 4 Headphone hanger D 1-2 1-1 1-1. If so, position B so that they will need it later in color to D and E faces the player. 2-1, 2-3 B E D Power cord 2-2 114 CLP-585/575/545/535/565GP Owner's Manual Attach C to C by tightening the four thick screws (6 × 20 mm). 2. Untie and straighten out the bundled pedal cord. Attach B. Do...
Assembling the Clavinova CLP-545/535 Assembly 1. Depending on the model of digital piano you have all of the items. 1-2 A 1-2 E C Foamed styrol pads Remove foamed styrol pads from the package, position them . Remove all parts from the ... 4 Headphone hanger D 1-2 1-1 1-1. If so, position B so that they will need it later in color to D and E faces the player. 2-1, 2-3 B E D Power cord 2-2 114 CLP-585/575/545/535/565GP Owner's Manual Attach C to C by tightening the four thick screws (6 × 20 mm). 2. Untie and straighten out the bundled pedal cord. Attach B. Do...


