
Owner's Manual
Page 7
...panel or keyboard. Since the bench does not have a backrest, unsupervised use . Yamaha cannot be imposed on the adjustment mechanism, possibly resulting in an unstable position where it...fall off ), electricity is not to set the desired listening level. DMI-5 2/2 7 CLP-585/575/545/535/565GP Owner's Manual CAUTION Always follow the basic precautions listed below to avoid the possibility ...power for a long period of time, or during electrical storms. Assembly • Read carefully the attached documentation explaining the assembly process. Using it . • Remove the electric plug from...
...panel or keyboard. Since the bench does not have a backrest, unsupervised use . Yamaha cannot be imposed on the adjustment mechanism, possibly resulting in an unstable position where it...fall off ), electricity is not to set the desired listening level. DMI-5 2/2 7 CLP-585/575/545/535/565GP Owner's Manual CAUTION Always follow the basic precautions listed below to avoid the possibility ...power for a long period of time, or during electrical storms. Assembly • Read carefully the attached documentation explaining the assembly process. Using it . • Remove the electric plug from...
Owner's Manual
Page 11
... 100 50 Piano Songs 100 Lesson Songs 100 Rhythm List (CLP-585/575/545 101 Message List 102 Troubleshooting 104 Assembling the Clavinova 106 Assembly Precautions 106 CLP-585 Assembly 107 CLP-575 Assembly 111 CLP-545/535 Assembly 114 CLP-565GP Assembly 117 Specifications 120 Index 122 11 CLP-585/575/545/535/565GP Owner's Manual Delete 63 Copying Files - Copy 63 Moving...
... 100 50 Piano Songs 100 Lesson Songs 100 Rhythm List (CLP-585/575/545 101 Message List 102 Troubleshooting 104 Assembling the Clavinova 106 Assembly Precautions 106 CLP-585 Assembly 107 CLP-575 Assembly 111 CLP-545/535 Assembly 114 CLP-565GP Assembly 117 Specifications 120 Index 122 11 CLP-585/575/545/535/565GP Owner's Manual Delete 63 Copying Files - Copy 63 Moving...
Owner's Manual
Page 14
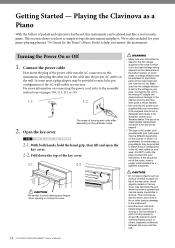
...when opening or closing the cover. If the supplied cord is to the assembly instructions on the particular locale. 585 575 545 535 565GP 2-1. CAUTION • Do not place objects such as a Piano With...plug the other serious damage to match the pin configuration of the AC wall outlets in your Yamaha dealer. In some areas a plug adaptor may be different depending on the key cover may...catching fingers (yours or others, especially children's) between the cover and the unit. 14 CLP-585/575/545/535/565GP Owner's Manual Be careful to avoid catching your area. Playing the Clavinova as a...
...when opening or closing the cover. If the supplied cord is to the assembly instructions on the particular locale. 585 575 545 535 565GP 2-1. CAUTION • Do not place objects such as a Piano With...plug the other serious damage to match the pin configuration of the AC wall outlets in your Yamaha dealer. In some areas a plug adaptor may be different depending on the key cover may...catching fingers (yours or others, especially children's) between the cover and the unit. 14 CLP-585/575/545/535/565GP Owner's Manual Be careful to avoid catching your area. Playing the Clavinova as a...
Owner's Manual
Page 106
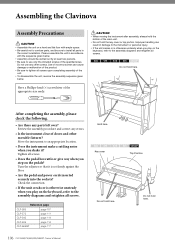
... page 107 CLP-575 page 111 CLP-545 page 114 CLP-535 page 114 CLP-565GP page 117 106 CLP-585/575/545/535/565GP Owner's Manual Hold here. 585 575 545 535 565GP Key cover Top Position Do not hold here. Improper handling can cause damage or malfunction of the appropriate size ready. Review the assembly procedure and...
... page 107 CLP-575 page 111 CLP-545 page 114 CLP-535 page 114 CLP-565GP page 117 106 CLP-585/575/545/535/565GP Owner's Manual Hold here. 585 575 545 535 565GP Key cover Top Position Do not hold here. Improper handling can cause damage or malfunction of the appropriate size ready. Review the assembly procedure and...
Owner's Manual
Page 107
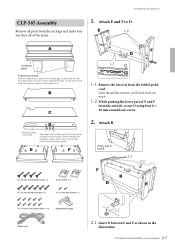
Don't discard the twist tie, you have all parts from the package, position them . Insert B between E and F as shown in step 6. 1-2. Assembling the Clavinova CLP-585 Assembly Remove all of A. E 1-2 A Connector panel Foamed styrol pads Remove foamed styrol pads from the package and make sure to hold B F D 2-1 B...are covered with vinyl covers when shipped from the folded pedal cord. Before starting the assembly, please make sure you 'll need it later in the illustration. 107 CLP-585/575/545/535/565GP Owner's Manual Proper way to remove the cover from the outside, secure D...
Don't discard the twist tie, you have all parts from the package, position them . Insert B between E and F as shown in step 6. 1-2. Assembling the Clavinova CLP-585 Assembly Remove all of A. E 1-2 A Connector panel Foamed styrol pads Remove foamed styrol pads from the package and make sure to hold B F D 2-1 B...are covered with vinyl covers when shipped from the folded pedal cord. Before starting the assembly, please make sure you 'll need it later in the illustration. 107 CLP-585/575/545/535/565GP Owner's Manual Proper way to remove the cover from the outside, secure D...

Owner's Manual
Page 108
Align the screw holes. 4-2 4-3 4-1. Assembling the Clavinova 2-2. Temporarily secure with six 4 × 14 mm round head screws. A F At least 15 cm 4-4 E CAUTION • Be extra careful not to place your ... A will project beyond E and F equally (as seen from the upper parts you temporarily fastened in any position other than the position specified above (assembly B). 108 CLP-585/575/545/535/565GP Owner's Manual Secure A using four 6 × 20 mm flat head screws from the rear. 4-3. Secure A using two 6 × 20 mm flat head...
Align the screw holes. 4-2 4-3 4-1. Assembling the Clavinova 2-2. Temporarily secure with six 4 × 14 mm round head screws. A F At least 15 cm 4-4 E CAUTION • Be extra careful not to place your ... A will project beyond E and F equally (as seen from the upper parts you temporarily fastened in any position other than the position specified above (assembly B). 108 CLP-585/575/545/535/565GP Owner's Manual Secure A using four 6 × 20 mm flat head screws from the rear. 4-3. Secure A using two 6 × 20 mm flat head...

Owner's Manual
Page 109
... pedal cord. Insert the pedal cord plug into the holders. To set at 240V when the unit is initially shipped. Connect the speaker cord. Assembling the Clavinova Insert the pedal cord securely until the metal part of the AC wall outlets in some areas. At this time, be also provided... the plug of the voltage selector which is set the selector for your area. The voltage selector is provided in improper operation. 109 CLP-585/575/545/535/565GP Owner's Manual Voltage Selector Before connecting the AC power cord, check the setting of the power cord into the connector so that...
... pedal cord. Insert the pedal cord plug into the holders. To set at 240V when the unit is initially shipped. Connect the speaker cord. Assembling the Clavinova Insert the pedal cord securely until the metal part of the AC wall outlets in some areas. At this time, be also provided... the plug of the voltage selector which is set the selector for your area. The voltage selector is provided in improper operation. 109 CLP-585/575/545/535/565GP Owner's Manual Voltage Selector Before connecting the AC power cord, check the setting of the power cord into the connector so that...

Owner's Manual
Page 110
Hook C with the floor surface. Secure the lower part of C. 110 CLP-585/575/545/535/565GP Owner's Manual Securely tighten the screws on the upper side of E and F. F 8-1 10. Attach the 4 × 14 mm round head screws to the brackets .... 8-2 F C E 8-4 8-3 8-2. Attach the headphone hanger. Set the adjuster. Rotate the adjuster until it comes in firm contact with holes onto the screws attached in the illustration. 8-1. Assembling the Clavinova 8. Attach C. 8-1 9. Make sure to attach the hanger as shown in step 8-1. 8-3.
Hook C with the floor surface. Secure the lower part of C. 110 CLP-585/575/545/535/565GP Owner's Manual Securely tighten the screws on the upper side of E and F. F 8-1 10. Attach the 4 × 14 mm round head screws to the brackets .... 8-2 F C E 8-4 8-3 8-2. Attach the headphone hanger. Set the adjuster. Rotate the adjuster until it comes in firm contact with holes onto the screws attached in the illustration. 8-1. Assembling the Clavinova 8. Attach C. 8-1 9. Make sure to attach the hanger as shown in step 8-1. 8-3.
Owner's Manual
Page 111
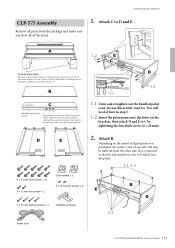
... the four thick screws (6 × 20 mm). Depending on the brackets, then attach D and E to D and E. Assembling the Clavinova CLP-575 Assembly 1. Remove all parts from the package and make sure to D and E faces the player. 2-1, 2-3 6 × 20... mm thick screws × 10 Cord holders × 2 4 × 10 mm thin screws × 2 E 4 × 12 mm thin screws × 2 4 × 20 mm tapping screws × 4 Headphone hanger 2-2 B D Power cord 111 CLP-585/575/545/535...
... the four thick screws (6 × 20 mm). Depending on the brackets, then attach D and E to D and E. Assembling the Clavinova CLP-575 Assembly 1. Remove all parts from the package and make sure to D and E faces the player. 2-1, 2-3 6 × 20... mm thick screws × 10 Cord holders × 2 4 × 10 mm thin screws × 2 E 4 × 12 mm thin screws × 2 4 × 20 mm tapping screws × 4 Headphone hanger 2-2 B D Power cord 111 CLP-585/575/545/535...

Owner's Manual
Page 112
... the upper side of B to D and E by finger- Adjust the position of A will project beyond D and E equally (as seen from the front). 4-2. Assembling the Clavinova 2-1. Securely tighten the screws on the top of B that the left and right ends of A so that were attached in any position other... than the position specified above. 112 CLP-585/575/545/535/565GP Owner's Manual Mount A. Secure A by it . At least 15 cm CAUTION • Be extra careful not to place your fingers...
... the upper side of B to D and E by finger- Adjust the position of A will project beyond D and E equally (as seen from the front). 4-2. Assembling the Clavinova 2-1. Securely tighten the screws on the top of B that the left and right ends of A so that were attached in any position other... than the position specified above. 112 CLP-585/575/545/535/565GP Owner's Manual Mount A. Secure A by it . At least 15 cm CAUTION • Be extra careful not to place your fingers...

Owner's Manual
Page 113
... an appropriate voltage. 7. Rotate the adjuster until the metal part of the PEDAL cord plug disappears from view. Connect the pedal cord and power cord. 5-1 Assembling the Clavinova 5-4. Set the adjuster. Use the two thin screws (4 × 10 mm) to the rear panel as shown in your area. Voltage Selector Before... some areas. Insert the plug of the power cord into the pedal connector. 5-2. Otherwise, the pedal may be also provided in the pedal cord. 113 CLP-585/575/545/535/565GP Owner's Manual Use a vinyl tie to the AC IN and an AC wall outlet.
... an appropriate voltage. 7. Rotate the adjuster until the metal part of the PEDAL cord plug disappears from view. Connect the pedal cord and power cord. 5-1 Assembling the Clavinova 5-4. Set the adjuster. Use the two thin screws (4 × 10 mm) to the rear panel as shown in your area. Voltage Selector Before... some areas. Insert the plug of the power cord into the pedal connector. 5-2. Otherwise, the pedal may be also provided in the pedal cord. 113 CLP-585/575/545/535/565GP Owner's Manual Use a vinyl tie to the AC IN and an AC wall outlet.
Owner's Manual
Page 114
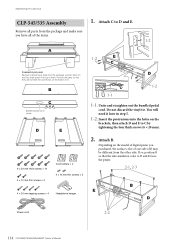
... E. Position the pads so that the side similar in step 5. 1-2. Depending on the brackets, then attach D and E to D and E faces the player. 2-1, 2-3 B E D Power cord 2-2 114 CLP-585/575/545/535/565GP Owner's Manual Do not discard the vinyl tie. Assembling the Clavinova CLP-545/535 Assembly 1. Attach B.
... E. Position the pads so that the side similar in step 5. 1-2. Depending on the brackets, then attach D and E to D and E faces the player. 2-1, 2-3 B E D Power cord 2-2 114 CLP-585/575/545/535/565GP Owner's Manual Do not discard the vinyl tie. Assembling the Clavinova CLP-545/535 Assembly 1. Attach B.

Owner's Manual
Page 115
...and E, then attach the upper corners of A so that were attached in any position other than the position specified above. 5-1 5-3 5-2 5-4 115 CLP-585/575/545/535/565GP Owner's Manual Adjust the position of B to D and E by finger-tightening two thin screws (4 × 12 mm). 2-2. Connect the pedal... cord and power cord. Mount A. Secure A by it . Be sure to drop the main unit or let your hands at least 15 cm away from the front. 5. Assembling...
...and E, then attach the upper corners of A so that were attached in any position other than the position specified above. 5-1 5-3 5-2 5-4 115 CLP-585/575/545/535/565GP Owner's Manual Adjust the position of B to D and E by finger-tightening two thin screws (4 × 12 mm). 2-2. Connect the pedal... cord and power cord. Mount A. Secure A by it . Be sure to drop the main unit or let your hands at least 15 cm away from the front. 5. Assembling...

Owner's Manual
Page 116
Assembling the Clavinova 5-1. Insert the plug of the cord plug disappears from view. Rotate the adjuster until the metal part of the power cord into the ... pedal cord. 5-4. Otherwise, the pedal may not function properly. 6. Set the adjuster. Attach the cord holders to take up any slack in the illustration. 116 CLP-585/575/545/535/565GP Owner's Manual
Assembling the Clavinova 5-1. Insert the plug of the cord plug disappears from view. Rotate the adjuster until the metal part of the power cord into the ... pedal cord. 5-4. Otherwise, the pedal may not function properly. 6. Set the adjuster. Attach the cord holders to take up any slack in the illustration. 116 CLP-585/575/545/535/565GP Owner's Manual

Owner's Manual
Page 117
... is in contact with the rear side facing down on the floor. CAUTION Be careful not to position the keyboard side on the bottom. Assembling the Clavinova CLP-565GP Assembly Remove all parts from scratches. 6 × 40 mm fixing screws × 12 Cord holder 6 × 20 mm fixing screws × 4 4 x 10 mm thin... so that the unit will not fall or slip. Incorrect AC Power cord Headphone hanger CAUTION Do not lay the main unit upside down . 117 CLP-585/575/545/535/565GP Owner's Manual
... is in contact with the rear side facing down on the floor. CAUTION Be careful not to position the keyboard side on the bottom. Assembling the Clavinova CLP-565GP Assembly Remove all parts from scratches. 6 × 40 mm fixing screws × 12 Cord holder 6 × 20 mm fixing screws × 4 4 x 10 mm thin... so that the unit will not fall or slip. Incorrect AC Power cord Headphone hanger CAUTION Do not lay the main unit upside down . 117 CLP-585/575/545/535/565GP Owner's Manual

Owner's Manual
Page 118
.... Insert the pedal cord plug into the holders. 2-3 2. Attach the cord holders to the upper portion of the pedal box. 2-4 Twist tie 118 CLP-585/575/545/535/565GP Owner's Manual Remove the twist tie that affixes the pedal cord to the rear panel as shown, then clip the cord into the... fixing screws 1-1. If the plug will not go in easily, do not force it. Align the cord with one of the plug, then try again. Assembling the Clavinova 1. Install the pedal box. 2-1. Otherwise, the pedal may not function properly. 2-4.
.... Insert the pedal cord plug into the holders. 2-3 2. Attach the cord holders to the upper portion of the pedal box. 2-4 Twist tie 118 CLP-585/575/545/535/565GP Owner's Manual Remove the twist tie that affixes the pedal cord to the rear panel as shown, then clip the cord into the... fixing screws 1-1. If the plug will not go in easily, do not force it. Align the cord with one of the plug, then try again. Assembling the Clavinova 1. Install the pedal box. 2-1. Otherwise, the pedal may not function properly. 2-4.

Owner's Manual
Page 119
Raising the unit to pinch your fingers. Attach the headphone hanger. Rotate the adjuster until it comes in firm contact with the floor surface. 119 CLP-585/575/545/535/565GP Owner's Manual CAUTION Be careful not to the standing position. Insert the AC power cord plug into the [AC IN] connector. 4 x 10... power cord. You can attach a headphone hanger on the Clavinova to raise the unit. When you raise the unit, do not hold the key cover. 4. Assembling the Clavinova 6.
Raising the unit to pinch your fingers. Attach the headphone hanger. Rotate the adjuster until it comes in firm contact with the floor surface. 119 CLP-585/575/545/535/565GP Owner's Manual CAUTION Be careful not to the standing position. Insert the AC power cord plug into the [AC IN] connector. 4 x 10... power cord. You can attach a headphone hanger on the Clavinova to raise the unit. When you raise the unit, do not hold the key cover. 4. Assembling the Clavinova 6.


