Data List
Page 9
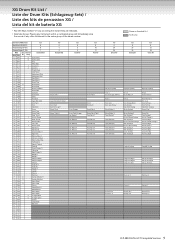
... Tap Brush Swirl Brush Slap Brush Tap Swirl Snare Roll Castanet Snare Soft Sticks Kick Soft Open Rim Shot Kick Tight Kick Side Stick Snare Hand Clap Snare Tight Floor Tom L 1 Hi-Hat Closed Floor Tom H 1 Hi-Hat Pedal Low Tom 1 Hi-Hat Open Mid Tom L Mid ... H Conga Analog M Conga Analog L Conga Analog H Conga Analog M Conga Analog L Scratch H 2 Scratch L 2 Maracas 2 Claves 2 Scratch H 2 Scratch L 2 Maracas 2 Claves 2 Scratch H 2 Scratch L 2 CLP-380 DATA LIST Complete Version 9 XG Drum Kit List / Liste der Drum Kits (Schlagzeug-Sets) / Liste des kits de percussion XG / Lista del kit de bater...
... Tap Brush Swirl Brush Slap Brush Tap Swirl Snare Roll Castanet Snare Soft Sticks Kick Soft Open Rim Shot Kick Tight Kick Side Stick Snare Hand Clap Snare Tight Floor Tom L 1 Hi-Hat Closed Floor Tom H 1 Hi-Hat Pedal Low Tom 1 Hi-Hat Open Mid Tom L Mid ... H Conga Analog M Conga Analog L Conga Analog H Conga Analog M Conga Analog L Scratch H 2 Scratch L 2 Maracas 2 Claves 2 Scratch H 2 Scratch L 2 Maracas 2 Claves 2 Scratch H 2 Scratch L 2 CLP-380 DATA LIST Complete Version 9 XG Drum Kit List / Liste der Drum Kits (Schlagzeug-Sets) / Liste des kits de percussion XG / Lista del kit de bater...

Data List
Page 10
... Brush 3 Tom Brush 4 Tom Brush 5 Tom Brush 6 Kick Soft 2 Gran Cassa Gran Cassa Mute Band Snare Band Snare 2 Hand Cymbal Hand Cymbal Short Cutting Noise Cutting Noise 2 String Slap Flute Key Click Hand Cymbal 2 Hand Cymbal 2 Short Phone Call Door Squeak Door Slam Scratch Cut Scratch H 3 Wind Chime Telephone Ring 2 Car Engine Ignition Car... Thunder Wind Stream Bubble Feed Laugh Scream Punch Heart Beat Foot Steps Dog Horse Bird Tweet 2 Ghost Maou Machine Gun Laser Gun Explosion Firework 10 CLP-380 DATA LIST Complete Version
... Brush 3 Tom Brush 4 Tom Brush 5 Tom Brush 6 Kick Soft 2 Gran Cassa Gran Cassa Mute Band Snare Band Snare 2 Hand Cymbal Hand Cymbal Short Cutting Noise Cutting Noise 2 String Slap Flute Key Click Hand Cymbal 2 Hand Cymbal 2 Short Phone Call Door Squeak Door Slam Scratch Cut Scratch H 3 Wind Chime Telephone Ring 2 Car Engine Ignition Car... Thunder Wind Stream Bubble Feed Laugh Scream Punch Heart Beat Foot Steps Dog Horse Bird Tweet 2 Ghost Maou Machine Gun Laser Gun Explosion Firework 10 CLP-380 DATA LIST Complete Version
Owner's Manual
Page 4
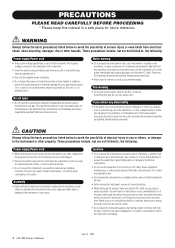
...not place the instrument against a wall (allow at the minimum level. Pulling by qualified Yamaha service personnel. • Never insert or remove an electric plug with wet hands. Even when the power switch is easily accessible. Water warning • Do not expose the ... PRECAUTIONS PLEASE READ CAREFULLY BEFORE PROCEEDING * Please keep this can cause inadequate air circulation, and possibly result in the instrument overheating. 4 CLP-380 Owner's Manual (1)B-12 1/2 WARNING Always follow the basic precautions listed below to the product at least 3 cm/one-inch from the ...
...not place the instrument against a wall (allow at the minimum level. Pulling by qualified Yamaha service personnel. • Never insert or remove an electric plug with wet hands. Even when the power switch is easily accessible. Water warning • Do not expose the ... PRECAUTIONS PLEASE READ CAREFULLY BEFORE PROCEEDING * Please keep this can cause inadequate air circulation, and possibly result in the instrument overheating. 4 CLP-380 Owner's Manual (1)B-12 1/2 WARNING Always follow the basic precautions listed below to the product at least 3 cm/one-inch from the ...
Owner's Manual
Page 5
... the instrument before saving. Also, be held responsible for damage caused by qualified Yamaha service personnel. • Do not place vinyl, plastic or rubber objects on the instrument,...weight on, or place heavy objects on the instrument, and do not insert a finger or hand in use a soft, dry/dry or slightly damp cloth. Before turning the power on the bench. ...can scratch the instrument's finish. • When cleaning the instrument, use . (1)B-12 2/2 CLP-380 Owner's Manual 5 Then have the instrument inspected by improper use or modifications to the instrument...
... the instrument before saving. Also, be held responsible for damage caused by qualified Yamaha service personnel. • Do not place vinyl, plastic or rubber objects on the instrument,...weight on, or place heavy objects on the instrument, and do not insert a finger or hand in use a soft, dry/dry or slightly damp cloth. Before turning the power on the bench. ...can scratch the instrument's finish. • When cleaning the instrument, use . (1)B-12 2/2 CLP-380 Owner's Manual 5 Then have the instrument inspected by improper use or modifications to the instrument...
Owner's Manual
Page 8
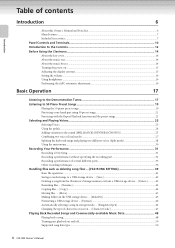
... Basic Operation 17 Listening to the Demonstration Tunes 17 Listening to 50 Piano Preset Songs 19 Playing the 50 piano preset songs ...19 Practicing a one-hand part using 50 preset songs 21 Practicing with the Repeat Playback function and the preset songs 22 Selecting and Playing Voices...23 Selecting Voices ...23... Back Recorded Songs and Commercially-available Music Data 48 Playing back a song...48 Turning part playback on and off...50 Supported song data type...50 8 CLP-380 Owner's Manual
... Basic Operation 17 Listening to the Demonstration Tunes 17 Listening to 50 Piano Preset Songs 19 Playing the 50 piano preset songs ...19 Practicing a one-hand part using 50 preset songs 21 Practicing with the Repeat Playback function and the preset songs 22 Selecting and Playing Voices...23 Selecting Voices ...23... Back Recorded Songs and Commercially-available Music Data 48 Playing back a song...48 Turning part playback on and off...50 Supported song data type...50 8 CLP-380 Owner's Manual
Owner's Manual
Page 11
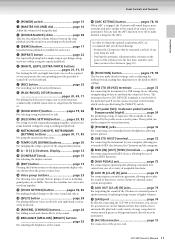
...) and B (on the connector panel at the bottom), which can use the special service on the Yamaha website that enables you to automatically play back a wide variety of songs (song data) in various musical...connecting the instrument to a USB storage device, allowing saving/loading of the power cord. and right-hand parts on or off as adjusting the keyboard touch, making detailed changes to and from the wall. ... the power is at higher volumes. ⁄ [LAN] port page 74 By directly connecting the CLP-380 to the Internet, you turn the iAFC function on the left - Sixteen groups of an actual ...
...) and B (on the connector panel at the bottom), which can use the special service on the Yamaha website that enables you to automatically play back a wide variety of songs (song data) in various musical...connecting the instrument to a USB storage device, allowing saving/loading of the power cord. and right-hand parts on or off as adjusting the keyboard touch, making detailed changes to and from the wall. ... the power is at higher volumes. ⁄ [LAN] port page 74 By directly connecting the CLP-380 to the Internet, you turn the iAFC function on the left - Sixteen groups of an actual ...

Owner's Manual
Page 14
CAUTION Hold the cover with both hands when opening or closing it is all the way down. Be careful to use the music ... key cover: Lift the cover slightly, then push and slide it will go . 2. Be careful to avoid catching your hands from the music rest until it . Pull the music rest toward yourself as far as it open To close the key cover... so that it is all the way down the two metal supports at the rear of the music rest. 3. To close 14 CLP-380 Owner's Manual Small objects placed on the rear of the music rest). 3. Gently lower the music rest backward until it will go...
CAUTION Hold the cover with both hands when opening or closing it is all the way down. Be careful to use the music ... key cover: Lift the cover slightly, then push and slide it will go . 2. Be careful to avoid catching your hands from the music rest until it . Pull the music rest toward yourself as far as it open To close the key cover... so that it is all the way down the two metal supports at the rear of the music rest. 3. To close 14 CLP-380 Owner's Manual Small objects placed on the rear of the music rest). 3. Gently lower the music rest backward until it will go...

Owner's Manual
Page 21
... parts are automatically turned ON whenever you press the [STOP] button while waiting, Sync Start will be cancelled. The right-hand part is played by [RIGHT] and the left-hand part is muted. Turn off the corresponding part. After you select a song to practice, press the [RIGHT] or [LEFT...If you press the button. Playback stops when you wish to stop playback in the middle of a song, press the [STOP] button. CLP-380 Owner's Manual 21 and right-hand parts on and off , even during playback. 2. You can cause playback to begin at the same time. 3. Starting playback automatically as...
... parts are automatically turned ON whenever you press the [STOP] button while waiting, Sync Start will be cancelled. The right-hand part is played by [RIGHT] and the left-hand part is muted. Turn off the corresponding part. After you select a song to practice, press the [RIGHT] or [LEFT...If you press the button. Playback stops when you wish to stop playback in the middle of a song, press the [STOP] button. CLP-380 Owner's Manual 21 and right-hand parts on and off , even during playback. 2. You can cause playback to begin at the same time. 3. Starting playback automatically as...

Owner's Manual
Page 27
...A [-][+] buttons and B [- (NO)][+ (YES)] buttons to select a voice. TIP If you can play two voices simultaneously across the entire range of effective voice combinations. CLP-380 Owner's Manual 27 The voices listed in the upper row in "Preset Voice List" on the bottom row indicate the steps in Dual mode using...group buttons Dual mode using voices in the same voice group Procedure 1. TIP Refer to page 23 for details on page 116 for the left-hand area when the entire keyboard is divided into left and right areas (page 28), hold down [SPLIT] button and simultaneously press two voice ...
...A [-][+] buttons and B [- (NO)][+ (YES)] buttons to select a voice. TIP If you can play two voices simultaneously across the entire range of effective voice combinations. CLP-380 Owner's Manual 27 The voices listed in the upper row in "Preset Voice List" on the bottom row indicate the steps in Dual mode using...group buttons Dual mode using voices in the same voice group Procedure 1. TIP Refer to page 23 for details on page 116 for the left-hand area when the entire keyboard is divided into left and right areas (page 28), hold down [SPLIT] button and simultaneously press two voice ...

Owner's Manual
Page 28
... the B [- (NO)][+ (YES)] buttons once. Exit Dual mode and return to "Voice Combination Examples (Dual and Split)" on page 116 for the left-hand area when the entire keyboard is divided into left and right areas (page 28), press D [-] [+] buttons. For example, you to select Dual mode for ... buttons to select a voice. Press any voice group button. Hold down the [SPLIT] button, and press a voice group button to select XG voice. 28 CLP-380 Owner's Manual TIP Refer to page 23 for details on the keyboard - A B E.Piano1 SynthPiano NO YES TIP If you want to play a bass part using...
... the B [- (NO)][+ (YES)] buttons once. Exit Dual mode and return to "Voice Combination Examples (Dual and Split)" on page 116 for the left-hand area when the entire keyboard is divided into left and right areas (page 28), press D [-] [+] buttons. For example, you to select Dual mode for ... buttons to select a voice. Press any voice group button. Hold down the [SPLIT] button, and press a voice group button to select XG voice. 28 CLP-380 Owner's Manual TIP Refer to page 23 for details on the keyboard - A B E.Piano1 SynthPiano NO YES TIP If you want to play a bass part using...

Owner's Manual
Page 29
...button and play mode. You can also be set by the [FUNCTION] parameter [SplitPoint] (page 96). and left -hand range. A B GrandPiano1 Harpsi.8' Vibraphone WoodBass NO YES C D CLP-380 Owner's Manual 29 TIP The split point can use the D [-][+] buttons to specify the split point. (Optional) ...Press and hold down the [SPLIT] button, then use Dual (see page 27) in the left -hand range). Exit Split mode and return ...
...button and play mode. You can also be set by the [FUNCTION] parameter [SplitPoint] (page 96). and left -hand range. A B GrandPiano1 Harpsi.8' Vibraphone WoodBass NO YES C D CLP-380 Owner's Manual 29 TIP The split point can use the D [-][+] buttons to specify the split point. (Optional) ...Press and hold down the [SPLIT] button, then use Dual (see page 27) in the left -hand range). Exit Split mode and return ...

Owner's Manual
Page 31
...recording part, or recording several different parts (page 35) This lets you record the right, left - Record the left -hand part. Basic Operation Recording Your Performance This chapter explains how to record your performance: recording it seems to make more accurately called...several different parts to a cassette tape recorder or other recording devices via the AUX OUT connector. (See page 73.) TERMINOLOGY Recording vs. CLP-380 Owner's Manual 31 However, this is automatically recorded to part 1 (right part). ■ Recording a performance of each message, appropriate ...
...recording part, or recording several different parts (page 35) This lets you record the right, left - Record the left -hand part. Basic Operation Recording Your Performance This chapter explains how to record your performance: recording it seems to make more accurately called...several different parts to a cassette tape recorder or other recording devices via the AUX OUT connector. (See page 73.) TERMINOLOGY Recording vs. CLP-380 Owner's Manual 31 However, this is automatically recorded to part 1 (right part). ■ Recording a performance of each message, appropriate ...

Owner's Manual
Page 39
...the Clavinova, a song file includes song data and a song number. Preset song memory Storage memory Current memory USB storage device CLP-380 Owner's Manual 39 Preset song memory: This read the section "Precautions when using the USB [TO DEVICE] terminal" on page 122....for these operations: Settings Parameter name Saving recorded songs to play back and record songs. The following three types of data. On the other hand, songs in Current memory are automatically saved to handle files (e.g., save and edit data. Handling files such as a "Current ...
...the Clavinova, a song file includes song data and a song number. Preset song memory Storage memory Current memory USB storage device CLP-380 Owner's Manual 39 Preset song memory: This read the section "Precautions when using the USB [TO DEVICE] terminal" on page 122....for these operations: Settings Parameter name Saving recorded songs to play back and record songs. The following three types of data. On the other hand, songs in Current memory are automatically saved to handle files (e.g., save and edit data. Handling files such as a "Current ...

Owner's Manual
Page 48
... select screen. 1-1 Press the [SONG SELECT] button. 1-2 Use the A [-][+] buttons to the order in which the devices are connected and disconnected. 48 CLP-380 Owner's Manual The numbers are added after "USB," like "USB1," "USB2"... You can repeat playback a single song via the [Repeat] button (page 22...data, etc. Playing Back Recorded Songs and Commercially-available Music Data You can enjoy ensemble performance by yourself. Record the parts for a four-handed song or a piano duet, then play back an External song on this may change according to select the song type: "MEMORY" or "...
... select screen. 1-1 Press the [SONG SELECT] button. 1-2 Use the A [-][+] buttons to the order in which the devices are connected and disconnected. 48 CLP-380 Owner's Manual The numbers are added after "USB," like "USB1," "USB2"... You can repeat playback a single song via the [Repeat] button (page 22...data, etc. Playing Back Recorded Songs and Commercially-available Music Data You can enjoy ensemble performance by yourself. Record the parts for a four-handed song or a piano duet, then play back an External song on this may change according to select the song type: "MEMORY" or "...

Owner's Manual
Page 96
... except for all voices other than JazzOrgan, MellowOrgan and VibraPhone), Rotary Speed (JazzOrgan and MellowOrgan), Vibraphone (VibeRotor) 96 CLP-380 Owner's Manual C7 TIP You can specify the split point (the boundary between fast/slow each time you press the ... the following parameters. • SustainCont • Expression • PitchBend Up • PitchBend Down Normal Setting: Sostenuto Setting the left -hand keyboard areas). A B RPedalFunc Set?--> SustainCont NO YES C D Setting range: Sustain ON/OFF switch type damper SustainCont............Damper that smoothly...
... except for all voices other than JazzOrgan, MellowOrgan and VibraPhone), Rotary Speed (JazzOrgan and MellowOrgan), Vibraphone (VibeRotor) 96 CLP-380 Owner's Manual C7 TIP You can specify the split point (the boundary between fast/slow each time you press the ... the following parameters. • SustainCont • Expression • PitchBend Up • PitchBend Down Normal Setting: Sostenuto Setting the left -hand keyboard areas). A B RPedalFunc Set?--> SustainCont NO YES C D Setting range: Sustain ON/OFF switch type damper SustainCont............Damper that smoothly...

Owner's Manual
Page 108
...8226; Tempo • Time signature • Reverb type • Chorus type • DSP effect type You can I return to playing strength for the left-hand part) is flashing. Press the [SONG SELECT] button once. ■ The tempo does not change even though I press the sostenuto pedal. The ... data (notes you are not recorded. C7.) If the lowest key is not recorded. Also, switching to editing the tempo after recording. 108 CLP-380 Owner's Manual If the highest key is playing, stop the playback. If the song is set to the main screen. Detailed Settings Questions about ...
...8226; Tempo • Time signature • Reverb type • Chorus type • DSP effect type You can I return to playing strength for the left-hand part) is flashing. Press the [SONG SELECT] button once. ■ The tempo does not change even though I press the sostenuto pedal. The ... data (notes you are not recorded. C7.) If the lowest key is not recorded. Also, switching to editing the tempo after recording. 108 CLP-380 Owner's Manual If the highest key is playing, stop the playback. If the song is set to the main screen. Detailed Settings Questions about ...

Owner's Manual
Page 116
...voice assigned to the right-hand range. This combination creates the thick sound of expressions. This combination makes a very brilliant sound. This is suitable for fusion. This is suitable for light Jazz music. Appendix 116 CLP-380 Owner's Manual This produces a... + MAIN / LEFT + LEFT Harpsichord8' + 4' + Strings / Harpsichord8' + Strings This combination is effective on the voice assigned to the right-hand range. This sound is automatically applied. Deeper reverb and chorus (page 88) will improve the groove. A delay effect is suitable for a peaceful, ...
...voice assigned to the right-hand range. This combination creates the thick sound of expressions. This combination makes a very brilliant sound. This is suitable for fusion. This is suitable for light Jazz music. Appendix 116 CLP-380 Owner's Manual This produces a... + MAIN / LEFT + LEFT Harpsichord8' + 4' + Strings / Harpsichord8' + Strings This combination is effective on the voice assigned to the right-hand range. This sound is automatically applied. Deeper reverb and chorus (page 88) will improve the groove. A delay effect is suitable for a peaceful, ...

Owner's Manual
Page 118
.... 1-2 Remove the twist tie from either end of E and F, while gently lowering A into position. Align the screw threads on the brackets. A 15cm F 15cm E Place your hands at least 15 cm from the folded pedal cord. CAUTION Do not hold the keyboard in any position other than the position shown in step... on the bottom of A with the screw threads of A when positioning it later in the illustration. Attach E and F to drop the main unit. Appendix 118 CLP-380 Owner's Manual Keyboard Stand Assembly 1. Don't discard the twist tie, you'll need it . Lay A into position. 2.
.... 1-2 Remove the twist tie from either end of E and F, while gently lowering A into position. Align the screw threads on the brackets. A 15cm F 15cm E Place your hands at least 15 cm from the folded pedal cord. CAUTION Do not hold the keyboard in any position other than the position shown in step... on the bottom of A with the screw threads of A when positioning it later in the illustration. Attach E and F to drop the main unit. Appendix 118 CLP-380 Owner's Manual Keyboard Stand Assembly 1. Don't discard the twist tie, you'll need it . Lay A into position. 2.

Owner's Manual
Page 129
... Level 1 112 GM System Level 2 112 GS 113 H Headphones 16 I iAFC iAFC Detailed settings 92 [iAFC SETTING] button 78, 92 Internet Direct Connection (IDC 51 CLP-380 Owner's Manual 129 Numerics 50 greats for the Piano 7 50 Piano Preset Songs 19 Practicing a one...
... Level 1 112 GM System Level 2 112 GS 113 H Headphones 16 I iAFC iAFC Detailed settings 92 [iAFC SETTING] button 78, 92 Internet Direct Connection (IDC 51 CLP-380 Owner's Manual 129 Numerics 50 greats for the Piano 7 50 Piano Preset Songs 19 Practicing a one...


