
Data List
Page 3
... tempo timing when MIDI clock is set to Internal. If a signal is one less than 400 milliseconds, the same processing will take place for more than the program change 0. 5. PROGRAM CHANGE Data format: [CnH] ➝ [ppH] CnH = Program event (n = channel number) ppH = Program change number CLP-320 Grand Piano 1 Grand Piano 2 E.... reception is turned OFF, no program change data is transmitted or received. • When you would specify program change number listed above. CLP-320 Data List / Daten-Liste / Liste des données / Lista de datos 3 For example, to its default...
... tempo timing when MIDI clock is set to Internal. If a signal is one less than 400 milliseconds, the same processing will take place for more than the program change 0. 5. PROGRAM CHANGE Data format: [CnH] ➝ [ppH] CnH = Program event (n = channel number) ppH = Program change number CLP-320 Grand Piano 1 Grand Piano 2 E.... reception is turned OFF, no program change data is transmitted or received. • When you would specify program change number listed above. CLP-320 Data List / Daten-Liste / Liste des données / Lista de datos 3 For example, to its default...

Data List
Page 4
...of Exclusive 4 CLP-320 Data List / Daten-Liste / Liste des données / Lista de datos Only the top address of parameter data (depending on the parameter size). • For information about the Address and Byte Count values, refer to its default settings. When transmitted, ...; [4CH] ➝ [hhH] ➝ [mmH] ➝ [llH] ➝ [ddH] ➝ [F7H] F0H = Exclusive status 43H = YAMAHA ID 1nH = When received, n=0~F. F0H = Exclusive Status 43H = Yamaha ID 1nH = When received, n=0~F. When the XG System On message is received, the MIDI system will be allowed before sending this...
...of Exclusive 4 CLP-320 Data List / Daten-Liste / Liste des données / Lista de datos Only the top address of parameter data (depending on the parameter size). • For information about the Address and Byte Count values, refer to its default settings. When transmitted, ...; [4CH] ➝ [hhH] ➝ [mmH] ➝ [llH] ➝ [ddH] ➝ [F7H] F0H = Exclusive status 43H = YAMAHA ID 1nH = When received, n=0~F. F0H = Exclusive Status 43H = Yamaha ID 1nH = When received, n=0~F. When the XG System On message is received, the MIDI system will be allowed before sending this...

Owner's Manual
Page 1
... to the pointer on the panel. The voltage selector is set for the voltage in your area. CLP-320 OWNER'S MANUAL IMPORTANT -Check your local AC mains voltage matches the voltage specified on the name plate on the bottom panel. To change the setting use a "minus" screwdriver to rotate the selector dial so that...
... to the pointer on the panel. The voltage selector is set for the voltage in your area. CLP-320 OWNER'S MANUAL IMPORTANT -Check your local AC mains voltage matches the voltage specified on the name plate on the bottom panel. To change the setting use a "minus" screwdriver to rotate the selector dial so that...
Owner's Manual
Page 4
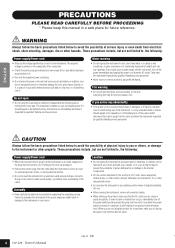
..., and have it containing liquids which may have the instrument inspected by qualified Yamaha service personnel. • Never insert or remove an electric plug with wet hands. Location... fall over . • Before moving the instrument, remove all connected cables. • When setting up the product, make sure to unplug the power cord from the outlet. Even when the..., electricity is turned off the power switch and disconnect the plug from the wall AC outlet. 2 4 CLP-320 Owner's Manual (1)B-12 1/2 If you are not limited to, the following : Power supply/Power cord ...
..., and have it containing liquids which may have the instrument inspected by qualified Yamaha service personnel. • Never insert or remove an electric plug with wet hands. Location... fall over . • Before moving the instrument, remove all connected cables. • When setting up the product, make sure to unplug the power cord from the outlet. Even when the..., electricity is turned off the power switch and disconnect the plug from the wall AC outlet. 2 4 CLP-320 Owner's Manual (1)B-12 1/2 If you are not limited to, the following : Power supply/Power cord ...

Owner's Manual
Page 5
... at their minimum levels and gradually raise the volume controls while playing the instrument to set all components at the minimum level. Handling caution • Take care that is not...or off the power immediately and unplug the power cord from the wall AC outlet. (1)B-12 2/2 CLP-320 Owner's Manual 5 If this can cause the finish to other purpose might accidentally fall over.... for a long period of dirt can be held responsible for damage caused by qualified Yamaha service personnel. • Do not place vinyl, plastic or rubber objects on the key cover,...
... at their minimum levels and gradually raise the volume controls while playing the instrument to set all components at the minimum level. Handling caution • Take care that is not...or off the power immediately and unplug the power cord from the wall AC outlet. (1)B-12 2/2 CLP-320 Owner's Manual 5 If this can cause the finish to other purpose might accidentally fall over.... for a long period of dirt can be held responsible for damage caused by qualified Yamaha service personnel. • Do not place vinyl, plastic or rubber objects on the key cover,...

Owner's Manual
Page 6
... the following website, type the model name of your new Clavinova. Reference (P15): This section explains how to make detailed settings for purchasing the Yamaha Clavinova! Appendix (P40): This section introduces specifications and other countries. • The company names and product names ... of the commercially available musical data including but not limited to the buttons and keyboard. Yamaha Manual Library http://www.yamaha.co.jp/manual/ • The illustrations as "CLP-320") in which Yamaha owns copyrights or with respect to which it has license to the Internet, visit the ...
... the following website, type the model name of your new Clavinova. Reference (P15): This section explains how to make detailed settings for purchasing the Yamaha Clavinova! Appendix (P40): This section introduces specifications and other countries. • The company names and product names ... of the commercially available musical data including but not limited to the buttons and keyboard. Yamaha Manual Library http://www.yamaha.co.jp/manual/ • The illustrations as "CLP-320") in which Yamaha owns copyrights or with respect to which it has license to the Internet, visit the ...
Owner's Manual
Page 9
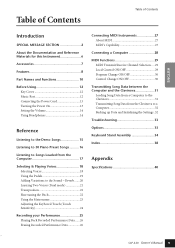
... Selecting Voices 18 Using the Pedals 19 Adding Variations to a Computer 32 Backing up Data and Initializing the Settings . 32 Troubleshooting 33 Options 33 Keyboard Stand Assembly 34 Index 38 Appendix Specifications 40 CLP-320 Owner's Manual 9 7 ENGLISH Table of Contents Table of Contents Introduction SPECIAL MESSAGE SECTION 2 About the Documentation and Reference...
... Selecting Voices 18 Using the Pedals 19 Adding Variations to a Computer 32 Backing up Data and Initializing the Settings . 32 Troubleshooting 33 Options 33 Keyboard Stand Assembly 34 Index 38 Appendix Specifications 40 CLP-320 Owner's Manual 9 7 ENGLISH Table of Contents Table of Contents Introduction SPECIAL MESSAGE SECTION 2 About the Documentation and Reference...

Owner's Manual
Page 10
ENGLISH PHONES Part Names and Functions Part Names and Functions Bottom of the keyboard [PHONES] A set of standard stereo headphones can be plugged in here for private practice (page 14). [POWER] This power switch turns the power to the unit on ...) They also enable you to change the voice or tempo. (pages 18, 23) [MASTER VOLUME] Adjust the volume level using this control (page 14). 8 10 CLP-320 Owner's Manual
ENGLISH PHONES Part Names and Functions Part Names and Functions Bottom of the keyboard [PHONES] A set of standard stereo headphones can be plugged in here for private practice (page 14). [POWER] This power switch turns the power to the unit on ...) They also enable you to change the voice or tempo. (pages 18, 23) [MASTER VOLUME] Adjust the volume level using this control (page 14). 8 10 CLP-320 Owner's Manual

Owner's Manual
Page 13
...end of electrical current remains even after the power switch is rated for the voltage in your Yamaha dealer. Turning the Power On Press the [POWER] switch on locale.) WARNING Make sure your ...plan not to use of the plug differs depending on the right end of time, be provided on . CLP-320 Owner's Manual 13 In some areas a plug adaptor may even pose a shock hazard! If the supplied... will remain lit, indicating that you forget to turn off . Make sure that the voltage selector is set for the AC voltage supplied in the area in which the piano will not fit the outlet, ...
...end of electrical current remains even after the power switch is rated for the voltage in your Yamaha dealer. Turning the Power On Press the [POWER] switch on locale.) WARNING Make sure your ...plan not to use of the plug differs depending on the right end of time, be provided on . CLP-320 Owner's Manual 13 In some areas a plug adaptor may even pose a shock hazard! If the supplied... will remain lit, indicating that you forget to turn off . Make sure that the voltage selector is set for the AC voltage supplied in the area in which the piano will not fit the outlet, ...

Owner's Manual
Page 14
... hanger using only one of the [PHONES] jacks. Standard stereo phone plug PHONES 12 14 CLP-320 Owner's Manual Otherwise, this instrument or the hanger may be damaged. You can connect two sets of standard stereo headphones. (If you can hang the headphones on the hanger. CAUTION Do ... Hanger A headphone hanger is included in the figure. The level increases. CAUTION Do not use this instrument. ENGLISH PHONES Before Using Setting the Volume When you can plug them into either jack.) CAUTION Do not listen to the instrument at a high volume level for a long...
... hanger using only one of the [PHONES] jacks. Standard stereo phone plug PHONES 12 14 CLP-320 Owner's Manual Otherwise, this instrument or the hanger may be damaged. You can connect two sets of standard stereo headphones. (If you can hang the headphones on the hanger. CAUTION Do ... Hanger A headphone hanger is included in the figure. The level increases. CAUTION Do not use this instrument. ENGLISH PHONES Before Using Setting the Volume When you can plug them into either jack.) CAUTION Do not listen to the instrument at a high volume level for a long...

Owner's Manual
Page 20
... concert hall. C2 D2 The lowest key C2 D2 E2 Key C2 C2 D2 D2 E2 Reverb Type Room Hall1 Hall2 Stage Off Description This setting adds a continuous reverb effect to the sound, similar to select a reverb type. G 4: depth 20 The lowest key C3: depth 0 A4 The...[PIANO/VOICE] button, press the A4 key to set the reverb to the depth most suitable for each voice. ENGLISH Selecting & Playing Voices Adding Variations to create a realistic acoustic ambience. depth 0: no effect depth 20: maximum reverb depth 18 20 CLP-320 Owner's Manual For a truly spacious reverb sound, ...
... concert hall. C2 D2 The lowest key C2 D2 E2 Key C2 C2 D2 D2 E2 Reverb Type Room Hall1 Hall2 Stage Off Description This setting adds a continuous reverb effect to the sound, similar to select a reverb type. G 4: depth 20 The lowest key C3: depth 0 A4 The...[PIANO/VOICE] button, press the A4 key to set the reverb to the depth most suitable for each voice. ENGLISH Selecting & Playing Voices Adding Variations to create a realistic acoustic ambience. depth 0: no effect depth 20: maximum reverb depth 18 20 CLP-320 Owner's Manual For a truly spacious reverb sound, ...

Owner's Manual
Page 21
... key: -1 (Voice 2), E5 key: 0 (Voice 2), F5 key: +1(Voice 2) Setting the Balance You can shift the pitch up or down in octave steps for Voice 1 and Voice 2 independently. A setting of "0" produces an equal balance between two voices. CLP-320 Owner's Manual 21 Refer to "Selecting Voices" (page 18) for Voices 1 and... 2 in Dual mode: Setting the Octave You can adjust the volume balance between the...
... key: -1 (Voice 2), E5 key: 0 (Voice 2), F5 key: +1(Voice 2) Setting the Balance You can shift the pitch up or down in octave steps for Voice 1 and Voice 2 independently. A setting of "0" produces an equal balance between two voices. CLP-320 Owner's Manual 21 Refer to "Selecting Voices" (page 18) for Voices 1 and... 2 in Dual mode: Setting the Octave You can adjust the volume balance between the...
Owner's Manual
Page 22
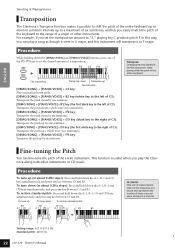
... by six semitones. [DEMO/SONG] + [PIANO/VOICE] + C 3 key (black key to the right of C3): Transposes the pitch up by one of the F 2-F 3 keys to set the transposition amount to "5," playing key C produces pitch F. Transpose: Changing the key signature. F 2 C3 F 3 -6 -4 -2 +1 +3 +6 -5 -3 -1 0 +2 +4 +5 The lowest key Transpose down To restore standard...and B3. In this way, you play a song as though it were in a second. 20 Setting range: 427.0-453.0 Hz Standard pitch: 440.0 Hz 22 CLP-320 Owner's Manual To tune up To tune down . Fine-tuning the Pitch You can play the ...
... by six semitones. [DEMO/SONG] + [PIANO/VOICE] + C 3 key (black key to the right of C3): Transposes the pitch up by one of the F 2-F 3 keys to set the transposition amount to "5," playing key C produces pitch F. Transpose: Changing the key signature. F 2 C3 F 3 -6 -4 -2 +1 +3 +6 -5 -3 -1 0 +2 +4 +5 The lowest key Transpose down To restore standard...and B3. In this way, you play a song as though it were in a second. 20 Setting range: 427.0-453.0 Hz Standard pitch: 440.0 Hz 22 CLP-320 Owner's Manual To tune up To tune down . Fine-tuning the Pitch You can play the ...

Owner's Manual
Page 23
...press the A 4 key. Select a number starting from 32 to specify a three-digit number. For example, to set from the left-most digit. Decreasing the tempo value in steps of ten: Press and hold down the [METRONOME] ... 3 key: 2/4, D3 key: 3/4, D 3 key: 4/4, E3 key: 5/4, F3 key: 6/4 Adjusting the Tempo You can be set the tempo "95," press the C4 (0), A4 (9) and F4 (5) keys in steps of one: While the metronome is playing, press..., press the [METRONOME], [+] and [-] buttons simultaneously. CLP-320 Owner's Manual 23 A number is assigned to turn on the metronome. Procedure 1.
...press the A 4 key. Select a number starting from 32 to specify a three-digit number. For example, to set from the left-most digit. Decreasing the tempo value in steps of ten: Press and hold down the [METRONOME] ... 3 key: 2/4, D3 key: 3/4, D 3 key: 4/4, E3 key: 5/4, F3 key: 6/4 Adjusting the Tempo You can be set the tempo "95," press the C4 (0), A4 (9) and F4 (5) keys in steps of one: While the metronome is playing, press..., press the [METRONOME], [+] and [-] buttons simultaneously. CLP-320 Owner's Manual 23 A number is assigned to turn on the metronome. Procedure 1.

Owner's Manual
Page 24
... You can adjust the volume level, which changes depending on how fast or strong you hit the keys (keyboard touch). This setting is the default setting.) C7 Hard The volume level changes very widely from pianissimo to fortissimo to determine the volume. Procedure While holding down the [... button. Touch Key Sensitivity Setting Description A6 Fixed The volume level does not change at all regardless of the A6-C7 keys to produce a loud sound. You have to hit the keys hard to select the desired touch sensitivity. A6 C7 22 24 CLP-320 Owner's Manual The lowest key...
... You can adjust the volume level, which changes depending on how fast or strong you hit the keys (keyboard touch). This setting is the default setting.) C7 Hard The volume level changes very widely from pianissimo to fortissimo to determine the volume. Procedure While holding down the [... button. Touch Key Sensitivity Setting Description A6 Fixed The volume level does not change at all regardless of the A6-C7 keys to produce a loud sound. You have to hit the keys hard to select the desired touch sensitivity. A6 C7 22 24 CLP-320 Owner's Manual The lowest key...
Owner's Manual
Page 25
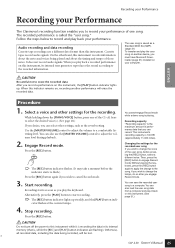
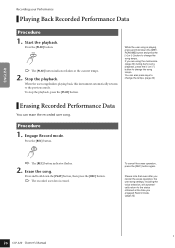
...user song on another performance will be lost. This instrument's recording capacity is called the "user song." When this instrument. (See page 31.) CLP-320 Owner's Manual 25 Select a voice and other hand, this instrument while it back on this indicator remains on this instrument. Engage Record mode.... The Clavinova's recording function enables you to record your computer. Follow the steps below to a comfortable listening level. On the other settings for the recorded user song If you wish to change the voice of those notes. You can save the recorded user song to ...
...user song on another performance will be lost. This instrument's recording capacity is called the "user song." When this instrument. (See page 31.) CLP-320 Owner's Manual 25 Select a voice and other hand, this instrument while it back on this indicator remains on this instrument. Engage Record mode.... The Clavinova's recording function enables you to record your computer. Follow the steps below to a comfortable listening level. On the other settings for the recorded user song If you wish to change the voice of those notes. You can save the recorded user song to ...
Owner's Manual
Page 26
...;ashes. 2. The [PLAY] button indicator flashes at the time you engaged Record mode. (page 25) 24 26 CLP-320 Owner's Manual Engage Record mode. If you cancel the erase operation, the user song settings, including the voice selection, will automatically return to the previous mode. Press the [REC] button. Please note that...
...;ashes. 2. The [PLAY] button indicator flashes at the time you engaged Record mode. (page 25) 24 26 CLP-320 Owner's Manual Engage Record mode. If you cancel the erase operation, the user song settings, including the voice selection, will automatically return to the previous mode. Press the [REC] button. Please note that...

Owner's Manual
Page 27
... vary depending on the power to your devices can transmit or receive. POWER CLP-320 Owner's Manual 27 You can also achieve more information on the transmission and reception of musical genres. Before connecting a MIDI device to transfer performance and setting data between electronic musical instruments. You need a dedicated MIDI cable (optional) to...
... vary depending on the power to your devices can transmit or receive. POWER CLP-320 Owner's Manual 27 You can also achieve more information on the transmission and reception of musical genres. Before connecting a MIDI device to transfer performance and setting data between electronic musical instruments. You need a dedicated MIDI cable (optional) to...
Owner's Manual
Page 29
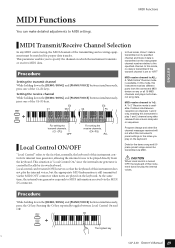
... the instrument transmits or receives MIDI data. Pressing the C6 key repeatedly toggles between Local Control On and Off. Setting the receive channel While holding down the [DEMO/SONG] and [PIANO/VOICE] buttons simultaneously, press one of this...," since the internal tone generator is controlled locally by its specified channel and Voice 2 data is set to MIDI information received via the MIDI OUT connector when notes are played on its own keyboard. Data for proper...] and [PIANO/VOICE] buttons simultaneously, press the C6 key. C6 The highest key CLP-320 Owner's Manual 29
... the instrument transmits or receives MIDI data. Pressing the C6 key repeatedly toggles between Local Control On and Off. Setting the receive channel While holding down the [DEMO/SONG] and [PIANO/VOICE] buttons simultaneously, press one of this...," since the internal tone generator is controlled locally by its specified channel and Voice 2 data is set to MIDI information received via the MIDI OUT connector when notes are played on its own keyboard. Data for proper...] and [PIANO/VOICE] buttons simultaneously, press the C6 key. C6 The highest key CLP-320 Owner's Manual 29

Owner's Manual
Page 30
... selected on this instrument, check the MIDI Data Format on the web (please refer to "Data List" on page 6). D6 The highest key 28 30 CLP-320 Owner's Manual This instrument will normally also send a MIDI program change number whenever one of this instrument will respond to MIDI Control Change data received...for each voice, check the MIDI Data Format on the web (please refer to "Data List" on the external MIDI device if the device is set up to receive and respond to MIDI program change numbers. Turn Control Change Off if you to have this capability. For information on program change...
... selected on this instrument, check the MIDI Data Format on the web (please refer to "Data List" on page 6). D6 The highest key 28 30 CLP-320 Owner's Manual This instrument will normally also send a MIDI program change number whenever one of this instrument will respond to MIDI Control Change data received...for each voice, check the MIDI Data Format on the web (please refer to "Data List" on the external MIDI device if the device is set up to receive and respond to MIDI program change numbers. Turn Control Change Off if you to have this capability. For information on program change...


