
Owner's Manual
Page 1
... Disc/Disc Play....... 8 Random-Sequence Play ........ 12 Repeat Play 12 Program Play 13 Index Search 14 Track Programming for selecting this YAMAHA Compact Disc Player. CAUTION RISK OF ELECTRIC SHOCK DO NOT OPEN CAUTION: TO REDUCE THE RISK OF ELECTRIC SHOCK, DO NOT REMOVE ...Remote Control Capability Thank you for Recording to Tape 15 CD Synchronized Recording ...... 19 Notes about the Remote Control Transmitter 20 Notes about Handling Compact Discs 20 Troubleshooting 21 Specifications 21 IMPORTANT! CDX-880/580/480 Natural Sound Compact Disc Player Random Access Programmable Play...
... Disc/Disc Play....... 8 Random-Sequence Play ........ 12 Repeat Play 12 Program Play 13 Index Search 14 Track Programming for selecting this YAMAHA Compact Disc Player. CAUTION RISK OF ELECTRIC SHOCK DO NOT OPEN CAUTION: TO REDUCE THE RISK OF ELECTRIC SHOCK, DO NOT REMOVE ...Remote Control Capability Thank you for Recording to Tape 15 CD Synchronized Recording ...... 19 Notes about the Remote Control Transmitter 20 Notes about Handling Compact Discs 20 Troubleshooting 21 Specifications 21 IMPORTANT! CDX-880/580/480 Natural Sound Compact Disc Player Random Access Programmable Play...
Owner's Manual
Page 4
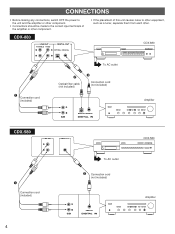
... as a tuner, separate them from each other. CDX-880 LINE OUT VARIABLE FIXED DIGITAL OUT OPTICAL COAXIAL CDX-880 – Connection cord (included) To AC outlet — Optical fiber cable (not included) ˜ Connection cord (not included) CD OPTICAL COAXIAL DIGITAL IN Amplifier CDX-580 LINE OUT DIGITAL OUT CDX-580 – Connection cord (included) 4 To AC...
... as a tuner, separate them from each other. CDX-880 LINE OUT VARIABLE FIXED DIGITAL OUT OPTICAL COAXIAL CDX-880 – Connection cord (included) To AC outlet — Optical fiber cable (not included) ˜ Connection cord (not included) CD OPTICAL COAXIAL DIGITAL IN Amplifier CDX-580 LINE OUT DIGITAL OUT CDX-580 – Connection cord (included) 4 To AC...
Owner's Manual
Page 5
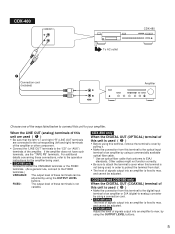
...order to protect the terminal from dust. • The level of signals output into an amplifier is not variable. and cannot be adjusted. • CDX-580 only Adjust the level of signals output into an amplifier is used ( — ) • Before using this terminal, remove the terminal's cover ... CDX-480 Amplifier CD Choose one of the ways listed below to connect this unit are used ( – ) • Be sure that conforms to EIAJ standards. If the amplifier does not have such terminals, use the "TAPE PB" terminals. FIXED: The output level of the amplifier. CDX-880 and CDX-580...
...order to protect the terminal from dust. • The level of signals output into an amplifier is not variable. and cannot be adjusted. • CDX-580 only Adjust the level of signals output into an amplifier is used ( — ) • Before using this terminal, remove the terminal's cover ... CDX-480 Amplifier CD Choose one of the ways listed below to connect this unit are used ( – ) • Be sure that conforms to EIAJ standards. If the amplifier does not have such terminals, use the "TAPE PB" terminals. FIXED: The output level of the amplifier. CDX-880 and CDX-580...

Owner's Manual
Page 15
... A and side B separately considering the tape's total time. 6 Begin recording on the tape deck and press the PLAY button on a disc for each side. • CD synchronized recording function can also enter the tape's total possible recording time manually. In this unit's remote control transmitter. By only memorizing the tape's total...
... A and side B separately considering the tape's total time. 6 Begin recording on the tape deck and press the PLAY button on a disc for each side. • CD synchronized recording function can also enter the tape's total possible recording time manually. In this unit's remote control transmitter. By only memorizing the tape's total...
Owner's Manual
Page 16
... this unit. Notes on the tape. Turn the tape over to side B. Resume recording and, at the end of side A of the next program. • CD synchronized recording function can be used if your tape deck is not enough time remaining on tape programming • To check, cancel or correct program...
... this unit. Notes on the tape. Turn the tape over to side B. Resume recording and, at the end of side A of the next program. • CD synchronized recording function can be used if your tape deck is not enough time remaining on tape programming • To check, cancel or correct program...

Owner's Manual
Page 17
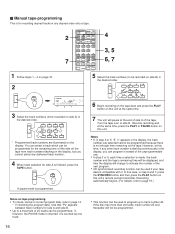
... 2 3, 4 1 Follow steps 1 - 4 on this unit at the same time. 4 The unit will pause at the end of side A of programmed tracks for each side. • CD synchronized recording function can be used if your tape deck is not enough, all tracks cannot be programmed. Turn the tape over to side B.
... 2 3, 4 1 Follow steps 1 - 4 on this unit at the same time. 4 The unit will pause at the end of side A of programmed tracks for each side. • CD synchronized recording function can be used if your tape deck is not enough, all tracks cannot be programmed. Turn the tape over to side B.

Owner's Manual
Page 19
...Notes • To finish or stop recording temporarily and restart recording from this function Press the STOP button. This recording method needs a YAMAHA tape deck compatible with this function. (Refer to the tape deck's operation manual to know whether it is useful for the programming ...procedure.) • This function can also be used together with CD play automatically. To cancel this unit's remote control transmitter at the same time. 1 OPEN/CLOSE DIMMER TIME PROG TAPE CLEAR PEAK SPACE 1...
...Notes • To finish or stop recording temporarily and restart recording from this function Press the STOP button. This recording method needs a YAMAHA tape deck compatible with this function. (Refer to the tape deck's operation manual to know whether it is useful for the programming ...procedure.) • This function can also be used together with CD play automatically. To cancel this unit's remote control transmitter at the same time. 1 OPEN/CLOSE DIMMER TIME PROG TAPE CLEAR PEAK SPACE 1...

Owner's Manual
Page 20
... in contact with a circular motion; with a finger through the center hole and the outer edges held as shown in the inner recessed area of a 8-cm CD. To play . 20 • Do not try to work correctly. Clean the battery compartment thoroughly before installing new batteries. 30° Within approximately 7 m (23 ... or high humidity for a long period of disc into the unit. Do not wipe with clothing, etc. Do not put a normal (12-cm/5-inch) CD on their playing surface, but damage to the disc surface when the disc is being handled can adversely affect the disc's play a 8-cm (3-inch...
... in contact with a circular motion; with a finger through the center hole and the outer edges held as shown in the inner recessed area of a 8-cm CD. To play . 20 • Do not try to work correctly. Clean the battery compartment thoroughly before installing new batteries. 30° Within approximately 7 m (23 ... or high humidity for a long period of disc into the unit. Do not wipe with clothing, etc. Do not put a normal (12-cm/5-inch) CD on their playing surface, but damage to the disc surface when the disc is being handled can adversely affect the disc's play a 8-cm (3-inch...


