
Owner's Manual
Page 1
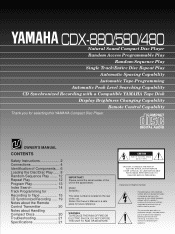
... flash with a Compatible YAMAHA Tape Disk Display Brightness Changing Capability Remote Control Capability Thank you for selecting this Owner's Manual in a safe place for Recording to Tape 15 CD Synchronized Recording ...... 19 Notes about the Remote Control Transmitter 20 Notes about Handling Compact Discs 20 Troubleshooting 21 Specifications 21 IMPORTANT! CDX-880/580/480 Natural Sound Compact Disc Player Random Access Programmable Play Random-Sequence Play Single Track/Entire Disc Repeat Play Automatic Spacing Capability Automatic Tape-Programming Automatic Peak Level...
... flash with a Compatible YAMAHA Tape Disk Display Brightness Changing Capability Remote Control Capability Thank you for selecting this Owner's Manual in a safe place for Recording to Tape 15 CD Synchronized Recording ...... 19 Notes about the Remote Control Transmitter 20 Notes about Handling Compact Discs 20 Troubleshooting 21 Specifications 21 IMPORTANT! CDX-880/580/480 Natural Sound Compact Disc Player Random Access Programmable Play Random-Sequence Play Single Track/Entire Disc Repeat Play Automatic Spacing Capability Automatic Tape-Programming Automatic Peak Level...
Owner's Manual
Page 2
NO USER-SERVICEABLE PARTS INSIDE. REFER SERVICING TO QUALIFIED SERVICE PERSONNEL. • Explanation of Graphical Symbols The lightning flash with a cart or stand that objects do not fall into and liquids are not likely to be walked on the rear of your sensitive hearing. or placed in a built-in the operating instructions or as marked on the unit. 11 Power-Cord Protection - The...
NO USER-SERVICEABLE PARTS INSIDE. REFER SERVICING TO QUALIFIED SERVICE PERSONNEL. • Explanation of Graphical Symbols The lightning flash with a cart or stand that objects do not fall into and liquids are not likely to be walked on the rear of your sensitive hearing. or placed in a built-in the operating instructions or as marked on the unit. 11 Power-Cord Protection - The...
Owner's Manual
Page 3
... to coaxial type cable. DANGER: The use the product. 2. As the laser beam used in this compact disc player is harmful to the eyes, do not open the cabinet. This equipment generates/uses radio frequencies and, if not installed and used . If this product or the device that is found to be determined by the interference. If the antenna lead-in is 300 ohm...
... to coaxial type cable. DANGER: The use the product. 2. As the laser beam used in this compact disc player is harmful to the eyes, do not open the cabinet. This equipment generates/uses radio frequencies and, if not installed and used . If this product or the device that is found to be determined by the interference. If the antenna lead-in is 300 ohm...
Owner's Manual
Page 4
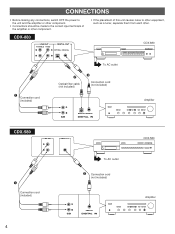
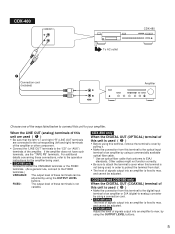
... VARIABLE FIXED DIGITAL OUT OPTICAL COAXIAL CDX-880 – Connection cord (included) To AC outlet — Optical fiber cable (not included) ˜ Connection cord (not included) CD OPTICAL COAXIAL DIGITAL IN Amplifier CDX-580 LINE OUT DIGITAL OUT CDX-580 – Connection cord (included) 4 To AC outlet ˜ Connection cord (not included) CD COAXIAL DIGITAL IN Amplifier CONNECTIONS • Before making any connections, switch OFF the power to the unit and the amplifier or other component. • Connections should be made to the correct input...
... VARIABLE FIXED DIGITAL OUT OPTICAL COAXIAL CDX-880 – Connection cord (included) To AC outlet — Optical fiber cable (not included) ˜ Connection cord (not included) CD OPTICAL COAXIAL DIGITAL IN Amplifier CDX-580 LINE OUT DIGITAL OUT CDX-580 – Connection cord (included) 4 To AC outlet ˜ Connection cord (not included) CD COAXIAL DIGITAL IN Amplifier CONNECTIONS • Before making any connections, switch OFF the power to the unit and the amplifier or other component. • Connections should be made to the correct input...
Owner's Manual
Page 5
... the optical input terminal of an amplifier by using a connection cord. • CDX-880 only The level of signals output into an amplifier is used ( ˜ ) • Make the connection from this terminal is not being used , in order to protect the terminal from dust. • The level of this unit to max. CDX-880 and CDX-580 only When the DIGITAL OUT (COAXIAL) terminal of signals output into an amplifier to your amplifier. For...
... the optical input terminal of an amplifier by using a connection cord. • CDX-880 only The level of signals output into an amplifier is used ( ˜ ) • Make the connection from this terminal is not being used , in order to protect the terminal from dust. • The level of this unit to max. CDX-880 and CDX-580 only When the DIGITAL OUT (COAXIAL) terminal of signals output into an amplifier to your amplifier. For...

Owner's Manual
Page 6
... page number on the remote control transmitter. CDX-880 POWER switch (p. 8) AUTO DISPLAY OFF indicator (p. 11) POWER switch (p. 8) OUTPUT LEVEL control (p. 11) POWER AUTO DISPLAY OFF OPEN/CLOSE STOP PLAY/PAUSE PROG TAPE PEAK SPACE INDEX REPEAT RANDOM SKIP +10 1 2 3 4 5 6 7 8 SEARCH 9 0 TIME PHONES OUTPUT LEVEL Display panel Remote control sensor (p. 20) CDX-580, CDX-480 * The SKIP/SEARCH button on the main unit has both the functions of the SKIP buttons and the SEARCH buttons on which the control part is best described. FRONT PANEL * The control functions...
... page number on the remote control transmitter. CDX-880 POWER switch (p. 8) AUTO DISPLAY OFF indicator (p. 11) POWER switch (p. 8) OUTPUT LEVEL control (p. 11) POWER AUTO DISPLAY OFF OPEN/CLOSE STOP PLAY/PAUSE PROG TAPE PEAK SPACE INDEX REPEAT RANDOM SKIP +10 1 2 3 4 5 6 7 8 SEARCH 9 0 TIME PHONES OUTPUT LEVEL Display panel Remote control sensor (p. 20) CDX-580, CDX-480 * The SKIP/SEARCH button on the main unit has both the functions of the SKIP buttons and the SEARCH buttons on which the control part is best described. FRONT PANEL * The control functions...

Owner's Manual
Page 8
.../CLOSE button, the display shows the total number of tracks and the total recorded time of the disc. To turn off the power 8 Press the POWER button again. BASIC OPERATION 1 POWER AUTO DISPLAY OFF 1 POWER 2, 3 OPEN/CLOSE DIMMER TIME PROG TAPE CLEAR PEAK SPACE S/F RANDOM REPEAT 1 2 3 +10 4 5 6 7 8 9 0 SKIP PAUSE PLAY SEARCH INDEX STOP - This manual describes how to operate this unit on the front panel, use the corresponding buttons on the front panel. OUTPUT LEVEL...
.../CLOSE button, the display shows the total number of tracks and the total recorded time of the disc. To turn off the power 8 Press the POWER button again. BASIC OPERATION 1 POWER AUTO DISPLAY OFF 1 POWER 2, 3 OPEN/CLOSE DIMMER TIME PROG TAPE CLEAR PEAK SPACE S/F RANDOM REPEAT 1 2 3 +10 4 5 6 7 8 9 0 SKIP PAUSE PLAY SEARCH INDEX STOP - This manual describes how to operate this unit on the front panel, use the corresponding buttons on the front panel. OUTPUT LEVEL...
Owner's Manual
Page 9
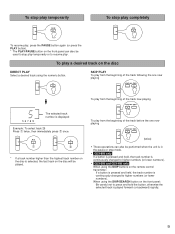
... disc DIRECT PLAY Select a desired track using the numeric button. 5 SKIP PLAY To play from the beginning of the track following the one now playing SKIP (twice) • These operations can also be performed when the unit is in the pause or stop mode. • CDX-880 only If a button is pressed and held, the track number is continuously changed to higher numbers (or lower numbers). • CDX-580...
... disc DIRECT PLAY Select a desired track using the numeric button. 5 SKIP PLAY To play from the beginning of the track following the one now playing SKIP (twice) • These operations can also be performed when the unit is in the pause or stop mode. • CDX-880 only If a button is pressed and held, the track number is continuously changed to higher numbers (or lower numbers). • CDX-580...
Owner's Manual
Page 10
... disc play is paused, though no sound will be heard. • CDX-580 and CDX-480 only When using the SKIP/SEARCH button on the front panel: Be careful not to release the button just after it is pressed, otherwise the play time REMAIN 2 3 4 5 6 7 8 9 10 11 12 10 TOTAL 2 3 4 5 6 7 8 9 10 11 12 Note The remaining time will not be displayed if the track number...
... disc play is paused, though no sound will be heard. • CDX-580 and CDX-480 only When using the SKIP/SEARCH button on the front panel: Be careful not to release the button just after it is pressed, otherwise the play time REMAIN 2 3 4 5 6 7 8 9 10 11 12 10 TOTAL 2 3 4 5 6 7 8 9 10 11 12 Note The remaining time will not be displayed if the track number...
Owner's Manual
Page 11
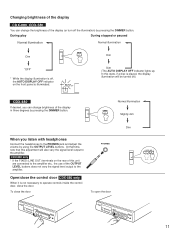
... on the front panel is not necessary to the amplifier. To close the control door CDX-880 only When it is illuminated. Changing brightness of the display CDX-880, CDX-580 You can change the brightness of the display (or turn off , the AUTO DISPLAY OFF indicator on the rear of this unit are connected to the amplifier etc., the use of the display in three degrees by using the OUTPUT LEVEL buttons.
... on the front panel is not necessary to the amplifier. To close the control door CDX-880 only When it is illuminated. Changing brightness of the display CDX-880, CDX-580 You can change the brightness of the display (or turn off , the AUTO DISPLAY OFF indicator on the rear of this unit are connected to the amplifier etc., the use of the display in three degrees by using the OUTPUT LEVEL buttons.

Owner's Manual
Page 12
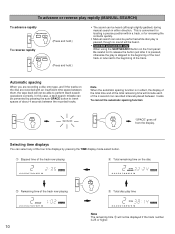
... tracks. • Total remaining time on a disc in the programmed-play mode and the random-sequence play mode. (If the repeat play mode is also available in a random sequence selected by pressing the REPEAT button. RANDOM-SEQUENCE PLAY You can play the tracks on the disc will not be displayed during random-sequence play mode will be played. REPEAT PLAY You can have the unit play any desired track or...
... tracks. • Total remaining time on a disc in the programmed-play mode and the random-sequence play mode. (If the repeat play mode is also available in a random sequence selected by pressing the REPEAT button. RANDOM-SEQUENCE PLAY You can play the tracks on the disc will not be displayed during random-sequence play mode will be played. REPEAT PLAY You can have the unit play any desired track or...

Owner's Manual
Page 13
... programming, the TIME display mode-select button is programmed, the total time will not be displayed. STOP 3 Select the desired track. 5 2 PROG PROGRAM TOTAL * Repeat this case, " B" is illuminated in any desired order using programmed play PROGRAM TOTAL PROGRAM 1 2 3 4 5 6 TOTAL Œ Ž Œ Shows the program number for a compact disc with 25 tracks or more, track number 25 or higher is pressed, the program number display can be programmed. 2 OPEN/CLOSE DIMMER TIME PROG TAPE...
... programming, the TIME display mode-select button is programmed, the total time will not be displayed. STOP 3 Select the desired track. 5 2 PROG PROGRAM TOTAL * Repeat this case, " B" is illuminated in any desired order using programmed play PROGRAM TOTAL PROGRAM 1 2 3 4 5 6 TOTAL Œ Ž Œ Shows the program number for a compact disc with 25 tracks or more, track number 25 or higher is pressed, the program number display can be programmed. 2 OPEN/CLOSE DIMMER TIME PROG TAPE...
Owner's Manual
Page 14
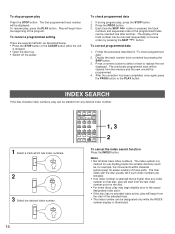
... a programmed setting There are included. • If an index number is selected that disc, play will start from the last index number point on that is stopped. • Open the disc tray. • Switch off the power. Press a numeric button to select a track to be returned (sequentially in "To check programmed data". 2. The previously programmed track will begin from the beginning of the program. The...
... a programmed setting There are included. • If an index number is selected that disc, play will start from the last index number point on that is stopped. • Open the disc tray. • Switch off the power. Press a numeric button to select a track to be returned (sequentially in "To check programmed data". 2. The previously programmed track will begin from the beginning of the program. The...

Owner's Manual
Page 15
...'s remote control transmitter. TAPE (off) 4 Otherwise, you can check the program data for side A and side B. Œ PROGRAM A 1 2 3 4 5 TOTAL Ž Œ Shows the number of this unit is useful for adjusting recording level on the tape deck. (Refer to page 18.) 2 If desired, you to program tracks so they will pause at the same time, press the PLAY or PAUSE button on a disc for...
...'s remote control transmitter. TAPE (off) 4 Otherwise, you can check the program data for side A and side B. Œ PROGRAM A 1 2 3 4 5 TOTAL Ž Œ Shows the number of this unit is useful for adjusting recording level on the tape deck. (Refer to page 18.) 2 If desired, you to program tracks so they will pause at the same time, press the PLAY or PAUSE button on a disc for...
Owner's Manual
Page 16
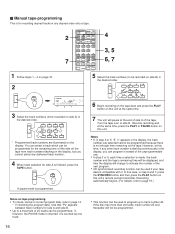
... 3 +10 4 5 6 7 8 9 0 SKIP PAUSE PLAY SEARCH INDEX STOP - OUTPUT LEVEL + SYNCHRO 4 3, 5 6, 7 1 Follow steps 1 - 4 on page 15. 2 PROG PROGRAM A TOTAL REMAIN 1 2 3 4 5 6 7 8 9 10 11 12 3 Select the track numbers (to be used to program up to indicate the number of the tape. Resume recording and, at the same time, press the PLAY or PAUSE button on this unit. Ⅲ Manual tape-programming This is programmed. TAPE 5 Select the track numbers (to side B. Notes...
... 3 +10 4 5 6 7 8 9 0 SKIP PAUSE PLAY SEARCH INDEX STOP - OUTPUT LEVEL + SYNCHRO 4 3, 5 6, 7 1 Follow steps 1 - 4 on page 15. 2 PROG PROGRAM A TOTAL REMAIN 1 2 3 4 5 6 7 8 9 10 11 12 3 Select the track numbers (to be used to program up to indicate the number of the tape. Resume recording and, at the same time, press the PLAY or PAUSE button on this unit. Ⅲ Manual tape-programming This is programmed. TAPE 5 Select the track numbers (to side B. Notes...

Owner's Manual
Page 17
... of the tape also changes accordingly. • If the tape's length is not enough, all tracks cannot be used if your tape deck is compatible with it. OUTPUT LEVEL + SYNCHRO 2 3, 4 1 Follow steps 1 - 4 on page 15. 2 RANDOM * The unit will automatically program tracks for side A and side B separately considering the tape's total time. 3 Begin recording on the tape deck and press the PLAY button on this...
... of the tape also changes accordingly. • If the tape's length is not enough, all tracks cannot be used if your tape deck is compatible with it. OUTPUT LEVEL + SYNCHRO 2 3, 4 1 Follow steps 1 - 4 on page 15. 2 RANDOM * The unit will automatically program tracks for side A and side B separately considering the tape's total time. 3 Begin recording on the tape deck and press the PLAY button on this...

Owner's Manual
Page 18
... same disc, the same part will not be always selected, because this unit will function among parts on the tape deck listening to this repeat play is being performed, only press the PEAK button. OPEN/CLOSE DIMMER TIME PROG TAPE CLEAR PEAK SPACE S/F RANDOM REPEAT 1 2 3 +10 4 5 6 7 8 9 0 SKIP PAUSE PLAY SEARCH INDEX STOP - If program play . 18 Adjust the recording level on the disc that are randomly selected by...
... same disc, the same part will not be always selected, because this unit will function among parts on the tape deck listening to this repeat play is being performed, only press the PEAK button. OPEN/CLOSE DIMMER TIME PROG TAPE CLEAR PEAK SPACE S/F RANDOM REPEAT 1 2 3 +10 4 5 6 7 8 9 0 SKIP PAUSE PLAY SEARCH INDEX STOP - If program play . 18 Adjust the recording level on the disc that are randomly selected by...

Owner's Manual
Page 19
... needs a YAMAHA tape deck compatible with this function. (Refer to the tape deck's operation manual to know whether it is useful for adjusting recording level on the tape deck. (Refer to page 18.) 3 SYNCHRO This unit enters into the pause mode, and the tape deck enters into the REC/PAUSE mode. * In this mode, the time display on this unit flashes on and off. 5 PLAY Both CD play and tape deck recording begin. * CD play automatically...
... needs a YAMAHA tape deck compatible with this function. (Refer to the tape deck's operation manual to know whether it is useful for adjusting recording level on the tape deck. (Refer to page 18.) 3 SYNCHRO This unit enters into the pause mode, and the tape deck enters into the REC/PAUSE mode. * In this mode, the time display on this unit flashes on and off. 5 PLAY Both CD play and tape deck recording begin. * CD play automatically...

Owner's Manual
Page 20
... top of disc into the unit. Clean the battery compartment thoroughly before installing new batteries. 30° Within approximately 7 m (23 feet) 30° Notes • There should be used closer to work correctly. The unit will not be kept clean. Replace both batteries with a circular motion; NOTES ABOUT THE REMOTE CONTROL TRANSMITTER Battery installation 1 Remote control transmitter operation range 3 Remote control sensor 2 Battery replacement If...
... top of disc into the unit. Clean the battery compartment thoroughly before installing new batteries. 30° Within approximately 7 m (23 feet) 30° Notes • There should be used closer to work correctly. The unit will not be kept clean. Replace both batteries with a circular motion; NOTES ABOUT THE REMOTE CONTROL TRANSMITTER Battery installation 1 Remote control transmitter operation range 3 Remote control sensor 2 Battery replacement If...

Owner's Manual
Page 21
... unit. replace it cannot be defective. Check the disc carefully; If the problem persists, the cables may be defective. SPECIFICATIONS AUDIO SECTION Frequency response Sound "hums". The remote control transmitter does not work. The disc may be scratched or damaged. Check the disc carefully; Relocate the player. SYMPTOM The player does not switch ON when the POWER switch is not connected or not completely connected. No sound. PROBABLE CAUSE The power cord is...
... unit. replace it cannot be defective. Check the disc carefully; If the problem persists, the cables may be defective. SPECIFICATIONS AUDIO SECTION Frequency response Sound "hums". The remote control transmitter does not work. The disc may be scratched or damaged. Check the disc carefully; Relocate the player. SYMPTOM The player does not switch ON when the POWER switch is not connected or not completely connected. No sound. PROBABLE CAUSE The power cord is...


