

Owner's Manual
Page 2
... INSTRUCTIONS CAUTION RISK OF ELECTRIC SHOCK DO␣ NOT OPEN CAUTION: TO REDUCE THE RISK OF ELECTRIC SHOCK, DO NOT REMOVE COVER (OR BACK). Please record the serial number of time. 14 Object and Liquid Entry - for a long period of this Owner's Manual in the operating instructions should be read before...
... INSTRUCTIONS CAUTION RISK OF ELECTRIC SHOCK DO␣ NOT OPEN CAUTION: TO REDUCE THE RISK OF ELECTRIC SHOCK, DO NOT REMOVE COVER (OR BACK). Please record the serial number of time. 14 Object and Liquid Entry - for a long period of this Owner's Manual in the operating instructions should be read before...

Owner's Manual
Page 4
... ADDITIONAL INFORMATION 29 CD preventive care 29 Display messages 30 Troubleshooting 31 SCMS copy protection 32 CD-Recorder system notes and limitations .......... 33 Specifications 34 E-1 We hope it will guide you in operating your YAMAHA product. It will give you for a track 24 Scanning forward or backward rapidly 24 Program play 25...
... ADDITIONAL INFORMATION 29 CD preventive care 29 Display messages 30 Troubleshooting 31 SCMS copy protection 32 CD-Recorder system notes and limitations .......... 33 Specifications 34 E-1 We hope it will guide you in operating your YAMAHA product. It will give you for a track 24 Scanning forward or backward rapidly 24 Program play 25...
Owner's Manual
Page 6
... suppliers accept no circumstances does Yamaha and suppliers guarantee the reliability of CD discs. Do not use a ball-point pen, pencil, or other than those shown above , commercially available pre-recorded CD discs bearing the mark shown below can be recorded on, have been written to use...laws. As a precaution, it possible to read "CD preventive care" on page 29 for recording Be sure to record from records, compact discs, radio, etc. Recording of copyright material may aversely affect further recording on the disc. • Be sure to play them on the proper care and handling ...
... suppliers accept no circumstances does Yamaha and suppliers guarantee the reliability of CD discs. Do not use a ball-point pen, pencil, or other than those shown above , commercially available pre-recorded CD discs bearing the mark shown below can be recorded on, have been written to use...laws. As a precaution, it possible to read "CD preventive care" on page 29 for recording Be sure to record from records, compact discs, radio, etc. Recording of copyright material may aversely affect further recording on the disc. • Be sure to play them on the proper care and handling ...
Owner's Manual
Page 8
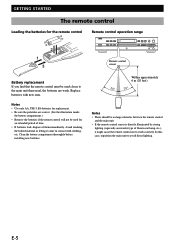
... weak. Replace batteries with clothing, etc. Notes • Use only AA, UM-3, R6 batteries for the remote control 2 1 3 Remote control operation range NATURAL SOUND CD RECORDER CDR-S1000 TRACK NO. In this case, reposition the main unit to work correctly. E-5 Avoid touching the leaked material or letting it might cause the remote control...
... weak. Replace batteries with clothing, etc. Notes • Use only AA, UM-3, R6 batteries for the remote control 2 1 3 Remote control operation range NATURAL SOUND CD RECORDER CDR-S1000 TRACK NO. In this case, reposition the main unit to work correctly. E-5 Avoid touching the leaked material or letting it might cause the remote control...

Owner's Manual
Page 9
... be sure to analog line jacks. If connection is made to the correct input and output jacks of the amplifier or other components. • To record a wider variety of sources, it is recommended to make both analog and digital connections to this unit. • Arrow marks ( ) in this unit to the...
... be sure to analog line jacks. If connection is made to the correct input and output jacks of the amplifier or other components. • To record a wider variety of sources, it is recommended to make both analog and digital connections to this unit. • Arrow marks ( ) in this unit to the...

Owner's Manual
Page 10
...LINE OUT (PLAY) jacks are connected correctly. • Connect the LINE IN (REC) and LINE OUT (PLAY) jacks to the instructions supplied with a YAMAHA amplifier or receiver whose jacks on the rear panel are numbered as 1, 2, 3, etc., connect the LINE IN (REC) and LINE OUT (PLAY) ...IN (REC) and LINE OUT (PLAY) jacks of the INPUT setting. INPUT OPTICAL COAXIAL ANALOG • This recorder outputs both analog and digital signals simultaneously regardless of this recorder, it is set to either OPTICAL or COAXIAL, the sampling rate indicator corresponding to the digital sampling rate of...
...LINE OUT (PLAY) jacks are connected correctly. • Connect the LINE IN (REC) and LINE OUT (PLAY) jacks to the instructions supplied with a YAMAHA amplifier or receiver whose jacks on the rear panel are numbered as 1, 2, 3, etc., connect the LINE IN (REC) and LINE OUT (PLAY) ...IN (REC) and LINE OUT (PLAY) jacks of the INPUT setting. INPUT OPTICAL COAXIAL ANALOG • This recorder outputs both analog and digital signals simultaneously regardless of this recorder, it is set to either OPTICAL or COAXIAL, the sampling rate indicator corresponding to the digital sampling rate of...
Owner's Manual
Page 11
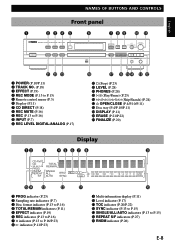
...; REC MUTE (P.16) $ REC (P.13 to P.15) fl REPEAT S/F indicators (P.27) & RNDM indicator (P.26) E-8 English NAMES OF BUTTONS AND CONTROLS Front panel NATURAL SOUND CD RECORDER CDR-S1000 TRACK NO.
...; REC MUTE (P.16) $ REC (P.13 to P.15) fl REPEAT S/F indicators (P.27) & RNDM indicator (P.26) E-8 English NAMES OF BUTTONS AND CONTROLS Front panel NATURAL SOUND CD RECORDER CDR-S1000 TRACK NO.
Owner's Manual
Page 13
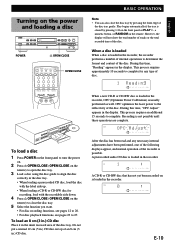
... tray by pressing ^ on the front panel or PLAY #, a numeric button, or RANDOM on the power and loading a disc NATURAL SOUND CD RECORDER CDR-S1000 TRACK NO. During this time, "OPC Adjust" appears in the inner recessed area of disc. A prerecorded audio CD disc is loaded in the ...display. To load an 8 cm (3 in.) CD disc Place it in the display. During this time, "Reading" appears in the recorder. OPEN/ REC MODE WRITE DIMMER DISPLAY CLOSE EFFECT REPEAT RANDOM CLEAR PROG 1 2 3 INDEX 4 5 6 +10 7 8 9 0 FINALIZE ERASE REC REC MUTE SEARCH...
... tray by pressing ^ on the front panel or PLAY #, a numeric button, or RANDOM on the power and loading a disc NATURAL SOUND CD RECORDER CDR-S1000 TRACK NO. During this time, "OPC Adjust" appears in the inner recessed area of disc. A prerecorded audio CD disc is loaded in the ...display. To load an 8 cm (3 in.) CD disc Place it in the display. During this time, "Reading" appears in the recorder. OPEN/ REC MODE WRITE DIMMER DISPLAY CLOSE EFFECT REPEAT RANDOM CLEAR PROG 1 2 3 INDEX 4 5 6 +10 7 8 9 0 FINALIZE ERASE REC REC MUTE SEARCH...

Owner's Manual
Page 14
.../CLOSE (OPEN/CLOSE on the remote) again to close the disc tray. 3 Press POWER on finalization of a CD-R or CD-RW disc (after recording). NATURAL SOUND CD RECORDER CDR-S1000 TRACK NO. BASIC OPERATION Removing the disc and turning the power off Important Do not turn the power off the power during finalization of...
.../CLOSE (OPEN/CLOSE on the remote) again to close the disc tray. 3 Press POWER on finalization of a CD-R or CD-RW disc (after recording). NATURAL SOUND CD RECORDER CDR-S1000 TRACK NO. BASIC OPERATION Removing the disc and turning the power off Important Do not turn the power off the power during finalization of...

Owner's Manual
Page 15
... indicating that a CD disc or finalized CD-R disc is loaded in the recorder. • When the CD-RW and TOC indicators are recorded and the recording automatically stops after the manual recording is automatically started and stopped manually. See page 15 for the source to...be recognized during analog input signal recording and will no recording time remaining on the disc and "Disc Full" appears in the display. • When 99 tracks have finished recording on page 7. Recording is started. Notes for recording a mix of recording. Manual recording is continued. See page 14 for...
... indicating that a CD disc or finalized CD-R disc is loaded in the recorder. • When the CD-RW and TOC indicators are recorded and the recording automatically stops after the manual recording is automatically started and stopped manually. See page 15 for the source to...be recognized during analog input signal recording and will no recording time remaining on the disc and "Disc Full" appears in the display. • When 99 tracks have finished recording on page 7. Recording is started. Notes for recording a mix of recording. Manual recording is continued. See page 14 for...
Owner's Manual
Page 16
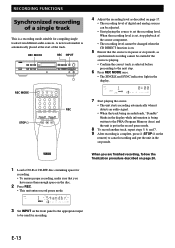
...CD RECORDER CDR-S1000 TRACK NO. When the recording level is set, stop playback of digital and analog sources can be changed when the CD DIRECT function is on the remote) to cancel recording and put in the record pause mode. 8 To record another track, repeat steps 5, 6, and 7. 9 After recording ...2 3 INDEX 4 5 6 +10 7 8 9 0 FINALIZE ERASE REC REC MUTE SEARCH SKIP STOP PAUSE PLAY REC 4 Adjust the recording level as synchronized recording cannot be used for compiling single tracks from different audio sources. When you have more than enough space on the disc. 2 Press REC. ...
...CD RECORDER CDR-S1000 TRACK NO. When the recording level is set, stop playback of digital and analog sources can be changed when the CD DIRECT function is on the remote) to cancel recording and put in the record pause mode. 8 To record another track, repeat steps 5, 6, and 7. 9 After recording ...2 3 INDEX 4 5 6 +10 7 8 9 0 FINALIZE ERASE REC REC MUTE SEARCH SKIP STOP PAUSE PLAY REC 4 Adjust the recording level as synchronized recording cannot be used for compiling single tracks from different audio sources. When you have more than enough space on the disc. 2 Press REC. ...
Owner's Manual
Page 17
...source such as track separations, and a new track marker is automatically placed when a new audio signal is detected. RECORDING FUNCTIONS 4 Adjust the recording level as synchronized recording cannot be adjusted. • Start playing the source to set , stop mode, as described on page 20. CD...OVER 3 Set INPUT on the disc. 2 Press REC. • This unit enters record pause mode. Track markers are interpreted as a CD, MD, cassette, or LP. REC MODE REC INPUT NATURAL SOUND CD RECORDER CDR-S1000 TRACK NO. When you have more than enough space on the front panel to the ...
...source such as track separations, and a new track marker is automatically placed when a new audio signal is detected. RECORDING FUNCTIONS 4 Adjust the recording level as synchronized recording cannot be adjusted. • Start playing the source to set , stop mode, as described on page 20. CD...OVER 3 Set INPUT on the disc. 2 Press REC. • This unit enters record pause mode. Track markers are interpreted as a CD, MD, cassette, or LP. REC MODE REC INPUT NATURAL SOUND CD RECORDER CDR-S1000 TRACK NO. When you have more than enough space on the front panel to the ...

Owner's Manual
Page 18
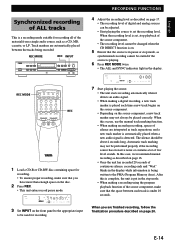
... be canceled by pressing & (STOP & on the disc. 2 Press REC. • This unit enters record pause mode. REC MODE REC INPUT NATURAL SOUND CD RECORDER CDR-S1000 TRACK NO. After this is performed.) Refer to page 20 for more information on finalization. EFFECT REC MODE POWER FINALIZE ERASE DISPLAY CD DIRECT REC ...
... be canceled by pressing & (STOP & on the disc. 2 Press REC. • This unit enters record pause mode. REC MODE REC INPUT NATURAL SOUND CD RECORDER CDR-S1000 TRACK NO. After this is performed.) Refer to page 20 for more information on finalization. EFFECT REC MODE POWER FINALIZE ERASE DISPLAY CD DIRECT REC ...

Owner's Manual
Page 19
... complete, press & (STOP & on the remote) to be used when the record pause mode is activated from CD or MD, etc.) REC MUTE REC INPUT NATURAL SOUND CD RECORDER CDR-S1000 TRACK NO. To resume recording, press ^ (PAUSE * or PLAY # on page 20. When you have more than 4 seconds by pressing and... holding REC MUTE. To record blank space at the end of a track Press REC MUTE. CD-R ...
... complete, press & (STOP & on the remote) to be used when the record pause mode is activated from CD or MD, etc.) REC MUTE REC INPUT NATURAL SOUND CD RECORDER CDR-S1000 TRACK NO. To resume recording, press ^ (PAUSE * or PLAY # on page 20. When you have more than 4 seconds by pressing and... holding REC MUTE. To record blank space at the end of a track Press REC MUTE. CD-R ...

Owner's Manual
Page 20
...indicators light as it is possible to change the volume of the input digital signal. • Please note that the digital recording level cannot be adjusted when the CD DIRECT function is on (the CD DIRECT indicator is lit on the front panel), ...-10 R -6 4 -2 -1 0 OVER Should not light E-17 Setting the analog recording level To select the analog signal, set the recording level so that the highest peak causes the 0 dB level indicators to a level that of the digital signal to flicker. RECORDING FUNCTIONS Setting the recording levels NATURAL SOUND CD RECORDER CDR-S1000 TRACK NO.
...indicators light as it is possible to change the volume of the input digital signal. • Please note that the digital recording level cannot be adjusted when the CD DIRECT function is on (the CD DIRECT indicator is lit on the front panel), ...-10 R -6 4 -2 -1 0 OVER Should not light E-17 Setting the analog recording level To select the analog signal, set the recording level so that the highest peak causes the 0 dB level indicators to a level that of the digital signal to flicker. RECORDING FUNCTIONS Setting the recording levels NATURAL SOUND CD RECORDER CDR-S1000 TRACK NO.

Owner's Manual
Page 21
...DIGITAL/ANALOG MIN MAX / / PHONES LEVEL 0 10 TRACK NO. NATURAL SOUND CD RECORDER CDR-S1000 TRACK NO. WRITE on the remote). • A new track number is added at the beginning of a track (start recording on the CD-R disc after pausing the source at the location on the disc ...corresponding to the time TRACK NO. (TRACK NO. CD DIRECT NATURAL SOUND CD RECORDER CDR-S1000 TRACK NO. Notes • When digitally recording DAT sources, be sure to start ID, etc.). • Manual track marking is recommended for 3 seconds and then turn...
...DIGITAL/ANALOG MIN MAX / / PHONES LEVEL 0 10 TRACK NO. NATURAL SOUND CD RECORDER CDR-S1000 TRACK NO. WRITE on the remote). • A new track number is added at the beginning of a track (start recording on the CD-R disc after pausing the source at the location on the disc ...corresponding to the time TRACK NO. (TRACK NO. CD DIRECT NATURAL SOUND CD RECORDER CDR-S1000 TRACK NO. Notes • When digitally recording DAT sources, be sure to start ID, etc.). • Manual track marking is recommended for 3 seconds and then turn...

Owner's Manual
Page 22
...remedy this problem, this recorder features an effect that essentially records a compressed sound range in the display. EFFECT NATURAL SOUND CD RECORDER CDR-S1000 TRACK NO. Note • Dynamic range compression cannot be heard during the recording process. 3 Press EFFECT again to a recording when the CD DIRECT ... 3 INDEX 4 5 6 +10 7 8 9 0 FINALIZE ERASE REC REC MUTE SEARCH SKIP STOP PAUSE PLAY 1 Press EFFECT in record or record pause mode. • The EFFECT indicator lights in which soft sounds are boosted and louder sounds are lowered and produces music that can ...
...remedy this problem, this recorder features an effect that essentially records a compressed sound range in the display. EFFECT NATURAL SOUND CD RECORDER CDR-S1000 TRACK NO. Note • Dynamic range compression cannot be heard during the recording process. 3 Press EFFECT again to a recording when the CD DIRECT ... 3 INDEX 4 5 6 +10 7 8 9 0 FINALIZE ERASE REC REC MUTE SEARCH SKIP STOP PAUSE PLAY 1 Press EFFECT in record or record pause mode. • The EFFECT indicator lights in which soft sounds are boosted and louder sounds are lowered and produces music that can ...
Owner's Manual
Page 23
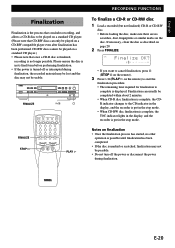
...possible until finalization has been completed. • If the disc is turned off the power or disconnect the power during finalization, the recorded material may be lost and the disc may not be played on finalization • Once the finalization process has started, no longer ...standard CD player.) • Please note that CD-RW discs can usually be played on page 29. 2 Press FINALIZE. NATURAL SOUND CD RECORDER CDR-S1000 TRACK NO. Notes on a CD-RW compatible player even after finalization has been performed. Finalization can only be usable. E-20 Please ensure ...
...possible until finalization has been completed. • If the disc is turned off the power or disconnect the power during finalization, the recorded material may be lost and the disc may not be played on finalization • Once the finalization process has started, no longer ...standard CD player.) • Please note that CD-RW discs can usually be played on page 29. 2 Press FINALIZE. NATURAL SOUND CD RECORDER CDR-S1000 TRACK NO. Notes on a CD-RW compatible player even after finalization has been performed. Finalization can only be usable. E-20 Please ensure ...

Owner's Manual
Page 24
...this function, however, it again. All Track Erase Erases all data on the disc. It is usually not necessary to recover a disc that has been recorded on. • This function is not possible on a finalized CD-RW disc. 2 Press ERASE. • "Erase LAST?", appears in the display...= All Track Erase ± Finalized CD-RW discs: Erase off the power during a finalization or erase operation, etc. E-21 NATURAL SOUND CD RECORDER CDR-S1000 TRACK NO. Last Track Erase 1 Load a CD-RW disc that was stopped during an erase procedure as follows. EFFECT REC MODE POWER FINALIZE ERASE...
...this function, however, it again. All Track Erase Erases all data on the disc. It is usually not necessary to recover a disc that has been recorded on. • This function is not possible on a finalized CD-RW disc. 2 Press ERASE. • "Erase LAST?", appears in the display...= All Track Erase ± Finalized CD-RW discs: Erase off the power during a finalization or erase operation, etc. E-21 NATURAL SOUND CD RECORDER CDR-S1000 TRACK NO. Last Track Erase 1 Load a CD-RW disc that was stopped during an erase procedure as follows. EFFECT REC MODE POWER FINALIZE ERASE...

Owner's Manual
Page 25
... the remote) to start the All Track Erase process. • This process requires from several seconds up to 3 minutes depending on the amount of recorded material. • During All Track Erase, "Erase" and the remaining time to completion appear in the display. • If you want to completion... "Erase ALL?" TOC Erase 1 Load a CD-RW disc that has been finalized. 2 Press ERASE. • "Erase TOC?" appears in the display. 4 The recorder stops when All Track Erase is complete. appears in the display. • If you want to cancel the Erase mode, press & (STOP & on the remote...
... the remote) to start the All Track Erase process. • This process requires from several seconds up to 3 minutes depending on the amount of recorded material. • During All Track Erase, "Erase" and the remaining time to completion appear in the display. • If you want to completion... "Erase ALL?" TOC Erase 1 Load a CD-RW disc that has been finalized. 2 Press ERASE. • "Erase TOC?" appears in the display. 4 The recorder stops when All Track Erase is complete. appears in the display. • If you want to cancel the Erase mode, press & (STOP & on the remote...


