Owner's Manual
Page 2
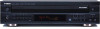
NO USER-SERVICEABLE PARTS INSIDE. Please record the serial number of Graphical Symbols The lightning flash with the apparatus. Install in the space below. If the provided plug does not fit into the apparatus, the apparatus has been exposed to persons. REFER SERVICING TO QUALIFIED SERVICE PERSONNEL. • Explanation of this Owner's Manual in the literature accompanying the appliance. The exclamation point within an equilateral triangle is damaged, liquid has been spilled or objects have fallen into your safety. Retain this unit in accordance with the manufacturer...
NO USER-SERVICEABLE PARTS INSIDE. Please record the serial number of Graphical Symbols The lightning flash with the apparatus. Install in the space below. If the provided plug does not fit into the apparatus, the apparatus has been exposed to persons. REFER SERVICING TO QUALIFIED SERVICE PERSONNEL. • Explanation of this Owner's Manual in the literature accompanying the appliance. The exclamation point within an equilateral triangle is damaged, liquid has been spilled or objects have fallen into your safety. Retain this unit in accordance with the manufacturer...

Owner's Manual
Page 3
...measures do not produce satisfactory results, please contact the local retailer authorized to coaxial type cable. Modifications not expressly approved by Yamaha may cause interference harmful to eliminate the problem by using one of other electronic devices. IMPORTANT: When connecting this product to... This product has been tested and found to be the source of interference, which can not locate the appropriate retailer, please contact Yamaha Electronics Corp., U.S.A. 6660 Orangethorpe Ave, Buena Park, CA 90620. In the case of your sensitive hearing. Follow all installations. ...
...measures do not produce satisfactory results, please contact the local retailer authorized to coaxial type cable. Modifications not expressly approved by Yamaha may cause interference harmful to eliminate the problem by using one of other electronic devices. IMPORTANT: When connecting this product to... This product has been tested and found to be the source of interference, which can not locate the appropriate retailer, please contact Yamaha Electronics Corp., U.S.A. 6660 Orangethorpe Ave, Buena Park, CA 90620. In the case of your sensitive hearing. Follow all installations. ...
Owner's Manual
Page 4
... an electrical shock, fire damage to this unit, and/or personal injury. 5 Do not cover this unit on a level surface. Contact the qualified YAMAHA service personnel when any damage resulting from the disc table and close to the opening of the disc tray and other than specified is coloured... Only voltage specified on the rear panel of this appliance, it in a well ventilated, cool, dry, and clean place with the letter N or coloured BLACK. YAMAHA will not be connected to the terminal which is connected to the earth terminal of the three pin plug. Keep it should never be used...
... an electrical shock, fire damage to this unit, and/or personal injury. 5 Do not cover this unit on a level surface. Contact the qualified YAMAHA service personnel when any damage resulting from the disc table and close to the opening of the disc tray and other than specified is coloured... Only voltage specified on the rear panel of this appliance, it in a well ventilated, cool, dry, and clean place with the letter N or coloured BLACK. YAMAHA will not be connected to the terminal which is connected to the earth terminal of the three pin plug. Keep it should never be used...
Owner's Manual
Page 5
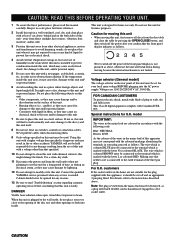
... will give you many years of trouble-free enjoyment. GETTING STARTED PLAYING CDS FUNCTIONS FOR RECORDING Getting Started ENGLISH Introduction Thank you in operating your YAMAHA product. We hope it will guide you for purchasing this manual carefully. Disc Changing Capability while Playing Another q Repeat, Random and Program Play q Remote Control... 18 Random Tape Programming 20 Automatic Peak Level Searching ........ 21 ADDITIONAL INFORMATION Troubleshooting 22 Specifications 23 ADDITIONAL INFORMATION English E-1 For the best performance, read this YAMAHA product.
... will give you many years of trouble-free enjoyment. GETTING STARTED PLAYING CDS FUNCTIONS FOR RECORDING Getting Started ENGLISH Introduction Thank you in operating your YAMAHA product. We hope it will guide you for purchasing this manual carefully. Disc Changing Capability while Playing Another q Repeat, Random and Program Play q Remote Control... 18 Random Tape Programming 20 Automatic Peak Level Searching ........ 21 ADDITIONAL INFORMATION Troubleshooting 22 Specifications 23 ADDITIONAL INFORMATION English E-1 For the best performance, read this YAMAHA product.

Owner's Manual
Page 6
Never attempt to the disc surface when the disc is designed for a long period of time, because these could damage the unit. To prevent a malfunction of this unit • Do not use any other type of these might warp or otherwise damage the disc. E-2 The unit will also play 8-cm (3-inch) compact discs. • Compact discs are not affected by small particles of dust or fingerprints on it may result. • Do not try to direct sunlight, high temperature or high humidity for playing compact discs bearing the and marks only. Wipe by using a clean, dry cloth. ...
Never attempt to the disc surface when the disc is designed for a long period of time, because these could damage the unit. To prevent a malfunction of this unit • Do not use any other type of these might warp or otherwise damage the disc. E-2 The unit will also play 8-cm (3-inch) compact discs. • Compact discs are not affected by small particles of dust or fingerprints on it may result. • Do not try to direct sunlight, high temperature or high humidity for playing compact discs bearing the and marks only. Wipe by using a clean, dry cloth. ...

Owner's Manual
Page 7
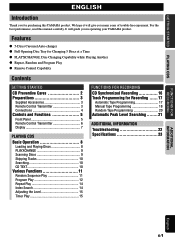
GETTING STARTED PREPARATIONS Supplied Accessories Remote Control Transmitter Batteries (size AA, UM-3, R6) (2) OPEN/ SYNCHRO DIMMER CLOSE TEXT/ TIME PEAK TAPE CLEAR PROG 1 2 3 4 5 6 - - 7 8 9 0 -10 INDEX MODE - OUTPUT LEVEL - E-3 English Avoid touching the leaked material or letting it might cause the remote control transmitter not to work correctly. In this case, reposition the main unit to the main unit, the batteries are correct. (See the illustration inside the battery compartment.) • Remove the batteries if the remote control transmitter will not...
GETTING STARTED PREPARATIONS Supplied Accessories Remote Control Transmitter Batteries (size AA, UM-3, R6) (2) OPEN/ SYNCHRO DIMMER CLOSE TEXT/ TIME PEAK TAPE CLEAR PROG 1 2 3 4 5 6 - - 7 8 9 0 -10 INDEX MODE - OUTPUT LEVEL - E-3 English Avoid touching the leaked material or letting it might cause the remote control transmitter not to work correctly. In this case, reposition the main unit to the main unit, the batteries are correct. (See the illustration inside the battery compartment.) • Remove the batteries if the remote control transmitter will not...
Owner's Manual
Page 8
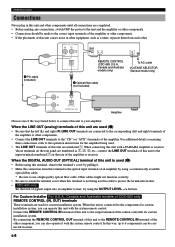
...terminal of this unit to 6 components can operate this unit with the system remote control. When connecting this unit with a YAMAHA amplifier or receiver whose terminals on the rear of the amplifier. For additional details concerning these connections, refer to the input ...1 LINE OUT R L 1 OPTICAL DIGITAL AUDIO OUT REMOTE CONTROL IN OUT VOLTAGE SELECTOR 1 Pin cable (included) OPTICAL DIGITAL AUDIO OUT REMOTE CONTROL (CDC-685 U.S.A., Canada and Australia models only) To AC outlet VOLTAGE SELECTOR (General model only) 2 Optical fiber cable (not included) L R CD ANALOG IN ...
...terminal of this unit to 6 components can operate this unit with the system remote control. When connecting this unit with a YAMAHA amplifier or receiver whose terminals on the rear of the amplifier. For additional details concerning these connections, refer to the input ...1 LINE OUT R L 1 OPTICAL DIGITAL AUDIO OUT REMOTE CONTROL IN OUT VOLTAGE SELECTOR 1 Pin cable (included) OPTICAL DIGITAL AUDIO OUT REMOTE CONTROL (CDC-685 U.S.A., Canada and Australia models only) To AC outlet VOLTAGE SELECTOR (General model only) 2 Optical fiber cable (not included) L R CD ANALOG IN ...
Owner's Manual
Page 9
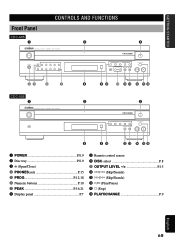
GETTING STARTED CONTROLS AND FUNCTIONS Front Panel CDC-685 1 NATURAL SOUND COMPACT DISC PLAYER POWER PHONES PROG 1 2 3 4 5 +10 6 7 8 9 0 PEAK 2 3 DISC 1 2 3 4 5 OUTPUT LEVEL PLAYXCHANGE 45 6 7 CDC-585 1 NATURAL SOUND COMPACT DISC PLAYER POWER 8 9 0 q w e r ty 2 3 DISC 1 2 3 4 5 PLAYXCHANGE 8 90 w e r ty 1 POWER P.8,9 2 Disc tray P.8,9 3 v (Open/Close) 4 PHONES jack P.15 5 PROG P.12,18 6 Numeric buttons P....
GETTING STARTED CONTROLS AND FUNCTIONS Front Panel CDC-685 1 NATURAL SOUND COMPACT DISC PLAYER POWER PHONES PROG 1 2 3 4 5 +10 6 7 8 9 0 PEAK 2 3 DISC 1 2 3 4 5 OUTPUT LEVEL PLAYXCHANGE 45 6 7 CDC-585 1 NATURAL SOUND COMPACT DISC PLAYER POWER 8 9 0 q w e r ty 2 3 DISC 1 2 3 4 5 PLAYXCHANGE 8 90 w e r ty 1 POWER P.8,9 2 Disc tray P.8,9 3 v (Open/Close) 4 PHONES jack P.15 5 PROG P.12,18 6 Numeric buttons P....

Owner's Manual
Page 10
CONTROLS AND FUNCTIONS Remote Control Transmitter Parts in the shaded areas are provided for CDC-685 only . 1 OPEN/ SYNCHRO DIMMER CLOSE 2 r TEXT/ TIME PEAK 3 t TAPE CLEAR PROG 4 y u 1 2 3 4 5 6 5 7 8 9 - - 0 -10 INDEX i MODE - OUTPUT LEVEL - 6 o DISC SCAN 7 8 REPEAT 9 0 q w e DISC SKIP p RANDOM a s d 1 DIMMER P.7 2 SYNCHRO P.16 3 ...
CONTROLS AND FUNCTIONS Remote Control Transmitter Parts in the shaded areas are provided for CDC-685 only . 1 OPEN/ SYNCHRO DIMMER CLOSE 2 r TEXT/ TIME PEAK 3 t TAPE CLEAR PROG 4 y u 1 2 3 4 5 6 5 7 8 9 - - 0 -10 INDEX i MODE - OUTPUT LEVEL - 6 o DISC SCAN 7 8 REPEAT 9 0 q w e DISC SKIP p RANDOM a s d 1 DIMMER P.7 2 SYNCHRO P.16 3 ...

Owner's Manual
Page 11
... addition to trays that correspond to the numbers of the selected disc for a few seconds. 12345 12 5DISCS 123 4 5 6 7 8 9 10 5 3 : 3 8 1112 s Display information at a glance. 6 CDC-685 only Shows the level of signals output into an amplifier or the headphones level adjusted by using the DISC SKIP buttons when this unit is...
... addition to trays that correspond to the numbers of the selected disc for a few seconds. 12345 12 5DISCS 123 4 5 6 7 8 9 10 5 3 : 3 8 1112 s Display information at a glance. 6 CDC-685 only Shows the level of signals output into an amplifier or the headphones level adjusted by using the DISC SKIP buttons when this unit is...
Owner's Manual
Page 12
To operate this unit by using the DISC SKIP buttons, or a DISC-select button on the tray in these ways, play will begin automatically, however, the display will not show the total number of tracks and the total recorded time of the first selected disc. 4 Select a desired disc play a designated disc only. MODE 1DISC REP RN 5DISCS S F P SEARCH TITLE ARTIST Shows the selected disc mode. "5DISCS" mode: The unit will play all discs on the front panel. DISC SKIP DISC or 2 3 4 On the front panel Play will play mode (1DISC or 5DISCS) confirming it in the tray. Do not put a ...
To operate this unit by using the DISC SKIP buttons, or a DISC-select button on the tray in these ways, play will begin automatically, however, the display will not show the total number of tracks and the total recorded time of the first selected disc. 4 Select a desired disc play a designated disc only. MODE 1DISC REP RN 5DISCS S F P SEARCH TITLE ARTIST Shows the selected disc mode. "5DISCS" mode: The unit will play all discs on the front panel. DISC SKIP DISC or 2 3 4 On the front panel Play will play mode (1DISC or 5DISCS) confirming it in the tray. Do not put a ...
Owner's Manual
Page 13
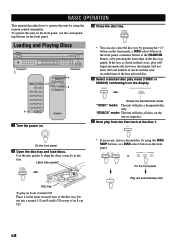
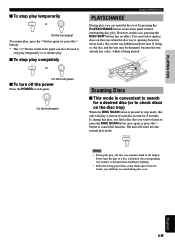
You can load or replace discs on the trays when the disc tray is opening, however, never load a disc on the tray hidden inside the unit. If doing so, the disc and the unit may be used to stop play temporarily or to lighting. • If the disc being played. The unit will enter into the normal play . Every time the play of each disc in the display. POWER On the front panel BASIC OPERATION PLAYXCHANGE During play, you can open the disc tray by pressing the PLAYXCHANGE button on the front panel without interrupting disc play mode. If, during disc scan. English E-9 Scanning...
You can load or replace discs on the trays when the disc tray is opening, however, never load a disc on the tray hidden inside the unit. If doing so, the disc and the unit may be used to stop play temporarily or to lighting. • If the disc being played. The unit will enter into the normal play . Every time the play of each disc in the display. POWER On the front panel BASIC OPERATION PLAYXCHANGE During play, you can open the disc tray by pressing the PLAYXCHANGE button on the front panel without interrupting disc play mode. If, during disc scan. English E-9 Scanning...
Owner's Manual
Page 14
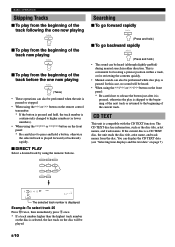
Example: To select track 25 Press 0 twice, then immediately press 5 once. * If a track number higher than the highest track number on the disc is paused. This is convenient for locating a precise position within a track, or for reviewing the contents quickly. • Manual search can also be performed while disc play is selected, the last track on the disc will be heard. • When using the t/e or r/y button on the front panel: * Be careful not to release the button just after it is pressed, otherwise the play from the beginning of the track before the one now playing s ...
Example: To select track 25 Press 0 twice, then immediately press 5 once. * If a track number higher than the highest track number on the disc is paused. This is convenient for locating a precise position within a track, or for reviewing the contents quickly. • Manual search can also be performed while disc play is selected, the last track on the disc will be heard. • When using the t/e or r/y button on the front panel: * Be careful not to release the button just after it is pressed, otherwise the play from the beginning of the track before the one now playing s ...
Owner's Manual
Page 15
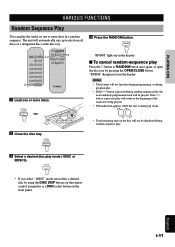
OUTPUT LEVEL - 3 DISC SCAN DISC SKIP 1 Load one or more discs. "RNDM" disappears from all discs or a designated disc on one or more discs in the display. DISC SCAN DISC SKIP OPEN/ SYNCHRO DIMMER CLOSE TEXT/ TIME PEAK 1,2 REPEAT RANDOM 4 TAPE CLEAR PROG 1 2 3 4 5 6 - - 7 8 9 0 -10 INDEX MODE - s To cancel random-sequence play Press the a button or RANDOM button once again, or open the disc tray by using the DISC SKIP buttons on the remote control transmitter or a DISC-select button on the disc will not function during programming, or during program ...
OUTPUT LEVEL - 3 DISC SCAN DISC SKIP 1 Load one or more discs. "RNDM" disappears from all discs or a designated disc on one or more discs in the display. DISC SCAN DISC SKIP OPEN/ SYNCHRO DIMMER CLOSE TEXT/ TIME PEAK 1,2 REPEAT RANDOM 4 TAPE CLEAR PROG 1 2 3 4 5 6 - - 7 8 9 0 -10 INDEX MODE - s To cancel random-sequence play Press the a button or RANDOM button once again, or open the disc tray by using the DISC SKIP buttons on the remote control transmitter or a DISC-select button on the disc will not function during programming, or during program ...
Owner's Manual
Page 16
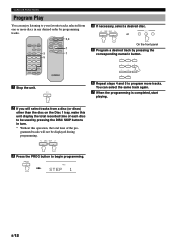
VARIOUS FUNCTIONS Program Play You can select the same track again. 7 When the programming is completed, start playing. 2 If you will not be used by pressing the DISC SKIP buttons in any desired order by pressing the corresponding numeric button. 1 2 3 4 5 6 7 8 9 0 -10 1 Stop the unit. 6 Repeat steps 4 and 5 to program more discs in turn. * Without this unit display the total recorded time of the pro- OUTPUT LEVEL - DISC SKIP 3 Press the PROG button to be displayed during programming. OPEN/ SYNCHRO DIMMER CLOSE TEXT/ TIME PEAK TAPE CLEAR PROG 3 1 2 ...
VARIOUS FUNCTIONS Program Play You can select the same track again. 7 When the programming is completed, start playing. 2 If you will not be used by pressing the DISC SKIP buttons in any desired order by pressing the corresponding numeric button. 1 2 3 4 5 6 7 8 9 0 -10 1 Stop the unit. 6 Repeat steps 4 and 5 to program more discs in turn. * Without this unit display the total recorded time of the pro- OUTPUT LEVEL - DISC SKIP 3 Press the PROG button to be displayed during programming. OPEN/ SYNCHRO DIMMER CLOSE TEXT/ TIME PEAK TAPE CLEAR PROG 3 1 2 ...
Owner's Manual
Page 17
Notes • You can program as many as described below. • Press the a button or the CLEAR button while the unit is pressed, the track numbers and sequential order of the programmed tracks can be programmed. 4 After the correction has been completed, press the PROG button or w button once again. VARIOUS FUNCTIONS s To stop program play , press the w button. The first programmed track number will not be cleared from the beginning of the program. s To check program data 1 During program play . • The e and r buttons can be checked one will be displayed. The...
Notes • You can program as many as described below. • Press the a button or the CLEAR button while the unit is pressed, the track numbers and sequential order of the programmed tracks can be programmed. 4 After the correction has been completed, press the PROG button or w button once again. VARIOUS FUNCTIONS s To stop program play , press the w button. The first programmed track number will not be cleared from the beginning of the program. s To check program data 1 During program play . • The e and r buttons can be checked one will be displayed. The...
Owner's Manual
Page 18
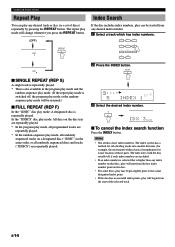
The repeat play mode will change whenever you press the REPEAT button. (OFF) 1DISC REP RNDM SA 5DISCS S F PROG C RCH T T E ART ST TRAC REPEAT Index Search If the disc includes index numbers, play can play any desired index number. 1 Select a track which has index numbers. 1 2 3 4 5 6 7 8 9 0 - -10 1DISC REP RNDM SA 5DISCS S F PROG C RCH T T E ART ST TRAC s SINGLE REPEAT (REP S) A single track is repeatedly played. * This is also available in the same order, or all randomly sequenced discs and tracks ("5DISCS") are repeatedly played. 2 Press the INDEX button. In the "...
The repeat play mode will change whenever you press the REPEAT button. (OFF) 1DISC REP RNDM SA 5DISCS S F PROG C RCH T T E ART ST TRAC REPEAT Index Search If the disc includes index numbers, play can play any desired index number. 1 Select a track which has index numbers. 1 2 3 4 5 6 7 8 9 0 - -10 1DISC REP RNDM SA 5DISCS S F PROG C RCH T T E ART ST TRAC s SINGLE REPEAT (REP S) A single track is repeatedly played. * This is also available in the same order, or all randomly sequenced discs and tracks ("5DISCS") are repeatedly played. 2 Press the INDEX button. In the "...
Owner's Manual
Page 19
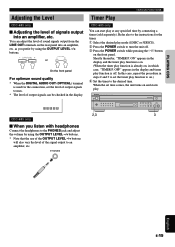
... start play function is already on, in the display. CK 6 7 8 9 10 11 12 13 14 15 16 17 18 19 20 VARIOUS FUNCTIONS Timer Play CDC-685 only You can be checked in which case, "TIMER P. ON" appears in steps 2 and 3 to set the timer play function to on.) 4 Set the ... For optimum sound quality * When the DIGITAL AUDIO OUT (OPTICAL) terminal is used for the timer. 1 Select the desired play . PLAYING CDS Adjusting the Level CDC-685 only s Adjusting the level of the signal output to an amplifier, etc. as you listen with headphones Connect the headphones to the PHONES jack and...
... start play function is already on, in the display. CK 6 7 8 9 10 11 12 13 14 15 16 17 18 19 20 VARIOUS FUNCTIONS Timer Play CDC-685 only You can be checked in which case, "TIMER P. ON" appears in steps 2 and 3 to set the timer play function to on.) 4 Set the ... For optimum sound quality * When the DIGITAL AUDIO OUT (OPTICAL) terminal is used for the timer. 1 Select the desired play . PLAYING CDS Adjusting the Level CDC-685 only s Adjusting the level of the signal output to an amplifier, etc. as you listen with headphones Connect the headphones to the PHONES jack and...
Owner's Manual
Page 20
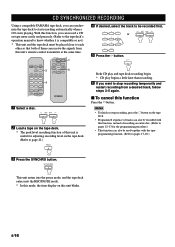
... and tape deck recording begin. * CD play begins a little later than recording. 6 If you want to start recording automatically when a CD starts playing. Using a compatible YAMAHA tape deck, you can receive the signals from a desired track, follow steps 3-5 again. OPEN/ SYNCHRO DIMMER CLOSE TEXT/ TIME PEAK 2 TAPE CLEAR PROG 1 2 3 4 5 6 4 7 8 9 0 -10 INDEX...
... and tape deck recording begin. * CD play begins a little later than recording. 6 If you want to start recording automatically when a CD starts playing. Using a compatible YAMAHA tape deck, you can receive the signals from a desired track, follow steps 3-5 again. OPEN/ SYNCHRO DIMMER CLOSE TEXT/ TIME PEAK 2 TAPE CLEAR PROG 1 2 3 4 5 6 4 7 8 9 0 -10 INDEX...
Owner's Manual
Page 21
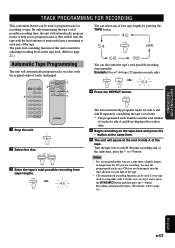
OPEN/ SYNCHRO DIMMER CLOSE TEXT/ TIME PEAK TAPE CLEAR PROG 3 1 2 3 4 5 6 7 8 9 0 -10 INDEX MODE - Resume recording and, at the end of side A of the tape. Recording automatically begins. (For details, refer to program tracks so they will fit onto the tape with the least amount of unrecorded space remaining at each end of the tape. By only memorizing the tape's total possible recording time, the unit will automatically program tracks or help you to page 16.) English E-17 DISC SCAN DISC SKIP - - Example: For a C-64 tape (32 minutes on a disc with the original ...
OPEN/ SYNCHRO DIMMER CLOSE TEXT/ TIME PEAK TAPE CLEAR PROG 3 1 2 3 4 5 6 7 8 9 0 -10 INDEX MODE - Resume recording and, at the end of side A of the tape. Recording automatically begins. (For details, refer to program tracks so they will fit onto the tape with the least amount of unrecorded space remaining at each end of the tape. By only memorizing the tape's total possible recording time, the unit will automatically program tracks or help you to page 16.) English E-17 DISC SCAN DISC SKIP - - Example: For a C-64 tape (32 minutes on a disc with the original ...
