Owner's Manual
Page 2
...apparatus complies with dry cloth. 7 Do not block any heat sources such as power-supply cord or plug is too late, Yamaha and the Electronic Industries Association's Consumer Electronics Group recommend you to avoid prolonged exposure from tip-over. 13 Unplug this apparatus during ... (servicing) instructions in any way, such as radiators, heat registers, stoves, or other . We Want You Listening For A Lifetime Yamaha and the Electronic Industries Association's Consumer Electronics Group want you to get the most importantly, without annoying blaring or distortion - NO USER-...
...apparatus complies with dry cloth. 7 Do not block any heat sources such as power-supply cord or plug is too late, Yamaha and the Electronic Industries Association's Consumer Electronics Group recommend you to avoid prolonged exposure from tip-over. 13 Unplug this apparatus during ... (servicing) instructions in any way, such as radiators, heat registers, stoves, or other . We Want You Listening For A Lifetime Yamaha and the Electronic Industries Association's Consumer Electronics Group want you to get the most importantly, without annoying blaring or distortion - NO USER-...
Owner's Manual
Page 3
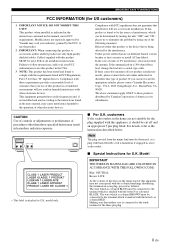
...terminal of America or its subsidiaries. CAUTION Use of controls or adjustments or performance of procedures other than those products distributed by Yamaha Corporation of the three pin plug. ii En IMPORTANT SAFETY INSTRUCTIONS FCC INFORMATION (for U.K. If this product is marked with...; For U.K. customers If the socket outlets in the mains lead of interference, which can not locate the appropriate retailer, please contact Yamaha Electronics Corp., U.S.A. 6660 Orangethorpe Ave., Buena Park, CA 90620. Model IMPORTANT THE WIRES IN MAINS LEAD ARE COLOURED IN ACCORDANCE WITH...
...terminal of America or its subsidiaries. CAUTION Use of controls or adjustments or performance of procedures other than those products distributed by Yamaha Corporation of the three pin plug. ii En IMPORTANT SAFETY INSTRUCTIONS FCC INFORMATION (for U.K. If this product is marked with...; For U.K. customers If the socket outlets in the mains lead of interference, which can not locate the appropriate retailer, please contact Yamaha Electronics Corp., U.S.A. 6660 Orangethorpe Ave., Buena Park, CA 90620. Model IMPORTANT THE WIRES IN MAINS LEAD ARE COLOURED IN ACCORDANCE WITH...
Owner's Manual
Page 4
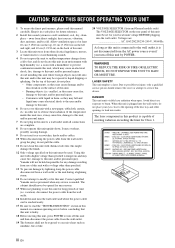
... to the wall outlet, it in a safe place for long periods of this unit. in a well ventilated, cool, dry, clean place - Contact qualified Yamaha service personnel when any damage resulting from a wall outlet or the unit during a lightning storm. 14 Do not attempt to modify or fix this unit...liquid may be reached easily. 17 Be sure to service this unit is needed. CAUTION: READ THIS BEFORE OPERATING YOUR UNIT. Burning objects (i.e. Yamaha will not be held responsible for any service is faulty. 18 Before moving this unit, press POWER to turn off this unit and then disconnect...
... to the wall outlet, it in a safe place for long periods of this unit. in a well ventilated, cool, dry, clean place - Contact qualified Yamaha service personnel when any damage resulting from a wall outlet or the unit during a lightning storm. 14 Do not attempt to modify or fix this unit...liquid may be reached easily. 17 Be sure to service this unit is needed. CAUTION: READ THIS BEFORE OPERATING YOUR UNIT. Burning objects (i.e. Yamaha will not be held responsible for any service is faulty. 18 Before moving this unit, press POWER to turn off this unit and then disconnect...
Owner's Manual
Page 5
...between the manual and the product, the product has priority. 1 En English Design and specifications are referred to as "Audio CD", MP3/WMA discs as "Data Disc", and MP3/WMA files stored on the USB device as "USB". • This manual is printed prior to change in the remote...Repeating a selected item 13 Repeat A-B 14 PROGRAM PLAY 15 Stopping program playback 16 Clearing programmed track 16 ADDITIONAL INFORMATION NOTES ABOUT DISCS/MP3, WMA FILES .... 17 TROUBLESHOOTING 19 SPECIFICATIONS 20 ■ About this manual • y indicates a tip for your operation. • In this ...
...between the manual and the product, the product has priority. 1 En English Design and specifications are referred to as "Audio CD", MP3/WMA discs as "Data Disc", and MP3/WMA files stored on the USB device as "USB". • This manual is printed prior to change in the remote...Repeating a selected item 13 Repeat A-B 14 PROGRAM PLAY 15 Stopping program playback 16 Clearing programmed track 16 ADDITIONAL INFORMATION NOTES ABOUT DISCS/MP3, WMA FILES .... 17 TROUBLESHOOTING 19 SPECIFICATIONS 20 ■ About this manual • y indicates a tip for your operation. • In this ...
Owner's Manual
Page 6
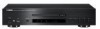
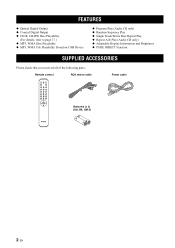
INTRODUCTION FEATURES ◆ Optical Digital Output ◆ Coaxial Digital Output ◆ CD-R, CD-RW Disc Playability (For details, refer to page 17.) ◆ MP3, WMA Disc Playability ◆ MP3, WMA File Playability Stored on USB Device ◆ Program Play (Audio CD only) ◆ Random-Sequence Play ◆ Single Track/Entire Disc Repeat Play ◆ Repeat A-B Play...
INTRODUCTION FEATURES ◆ Optical Digital Output ◆ Coaxial Digital Output ◆ CD-R, CD-RW Disc Playability (For details, refer to page 17.) ◆ MP3, WMA Disc Playability ◆ MP3, WMA File Playability Stored on USB Device ◆ Program Play (Audio CD only) ◆ Random-Sequence Play ◆ Single Track/Entire Disc Repeat Play ◆ Repeat A-B Play...

Owner's Manual
Page 7
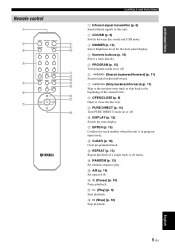
See page 10 for details. 3 PURE DIRECT Turn PURE DIRECT mode on or off when this unit is in PURE DIRECT mode. A Front panel display Shows the current status of the current track. / (twice): Skip to search backward/ forward. y The POWER indicator above lights up when this unit is turned on /off to ON/OFF. Press and hold / or / , the search speed increases by 2 levels. 7 (Play) Start playback. 8 (Pause) Pause playback. y Each time you press and hold / or / to the previous track. See page 8 for details. 4 Disc tray Load a disc. 5 (Open/Close) Open or ...
See page 10 for details. 3 PURE DIRECT Turn PURE DIRECT mode on or off when this unit is in PURE DIRECT mode. A Front panel display Shows the current status of the current track. / (twice): Skip to search backward/ forward. y The POWER indicator above lights up when this unit is turned on /off to ON/OFF. Press and hold / or / , the search speed increases by 2 levels. 7 (Play) Start playback. 8 (Pause) Pause playback. y Each time you press and hold / or / to the previous track. See page 8 for details. 4 Disc tray Load a disc. 5 (Open/Close) Open or ...

Owner's Manual
Page 8
CONTROLS AND FUNCTIONS Front panel display Audio CD Data Disc USB 1 Lights up the icon for the selected playback mode. 2 Shows the time displays. (Refer to page 12.) 3 Shows the track number selected or being played back. 4 Shows the file number. 5 Lights up when this unit is in disc mode (refer to page 9) and also when an Audio CD is recognized on the tray. 6 Lights up when MP3 file is played back. 7 Lights up when WMA file is played back. 4 En
CONTROLS AND FUNCTIONS Front panel display Audio CD Data Disc USB 1 Lights up the icon for the selected playback mode. 2 Shows the time displays. (Refer to page 12.) 3 Shows the track number selected or being played back. 4 Shows the file number. 5 Lights up when this unit is in disc mode (refer to page 9) and also when an Audio CD is recognized on the tray. 6 Lights up when MP3 file is played back. 7 Lights up when WMA file is played back. 4 En
Owner's Manual
Page 9
A ENTER (p. 15) Confirm the track number when this unit. 2 CD/USB (p. 9) Switch between disc mode and USB mode. 3 DIMMER (p. 12) Select brightness level for the front panel display. 4 Numeric buttons (p. 10) Select a track directly. 5 PROGRAM (p. ...
A ENTER (p. 15) Confirm the track number when this unit. 2 CD/USB (p. 9) Switch between disc mode and USB mode. 3 DIMMER (p. 12) Select brightness level for the front panel display. 4 Numeric buttons (p. 10) Select a track directly. 5 PROGRAM (p. ...
Owner's Manual
Page 10
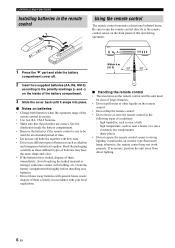
dispose of them immediately. If necessary, position the unit away from direct lighting. 6 En high temperature, such as these different types of this unit during operation. 1 Press the part and slide the battery compartment cover off. extremely low temperatures - Read the packaging carefully as near a bath - high humidity, such as alkaline and manganese batteries) together. See the illustration inside of the battery compartment. 3 Slide the cover back until it come into place. ■ Notes on the inside the battery compartment. • Remove the batteries if the ...
dispose of them immediately. If necessary, position the unit away from direct lighting. 6 En high temperature, such as these different types of this unit during operation. 1 Press the part and slide the battery compartment cover off. extremely low temperatures - Read the packaging carefully as near a bath - high humidity, such as alkaline and manganese batteries) together. See the illustration inside of the battery compartment. 3 Slide the cover back until it come into place. ■ Notes on the inside the battery compartment. • Remove the batteries if the ...
Owner's Manual
Page 11
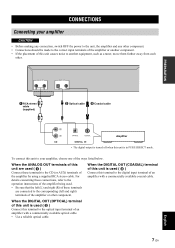
... other . PREPARATION RCA stereo cable (supplied) Optical cable Coaxial cable Amplifier • The digital output is turned off when this unit causes noise to the CD (or AUX) terminals of this unit is used ( ) Connect these terminals are used ( ) Connect this unit to your amplifier CAUTION • Before making any connection...
... other . PREPARATION RCA stereo cable (supplied) Optical cable Coaxial cable Amplifier • The digital output is turned off when this unit causes noise to the CD (or AUX) terminals of this unit is used ( ) Connect these terminals are used ( ) Connect this unit to your amplifier CAUTION • Before making any connection...
Owner's Manual
Page 12
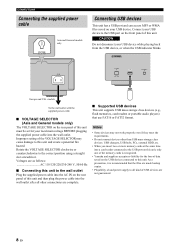
... use FAT16 or FAT32 format. Europe and U.K. As a precaution, it is recognized. • Yamaha and suppliers accepts no liability for your USB device to the correct position using a straight slot screwdriver... This unit supports USB mass storage class devices (e.g., flash memories, card readers or portable audio players) that the files are made backup copies. • Playability of and power supply to this... and General models only Connecting USB devices This unit has a USB port and can access MP3 or WMA files saved on the rear panel of the VOLTAGE SELECTOR may not work properly ...
... use FAT16 or FAT32 format. Europe and U.K. As a precaution, it is recognized. • Yamaha and suppliers accepts no liability for your USB device to the correct position using a straight slot screwdriver... This unit supports USB mass storage class devices (e.g., flash memories, card readers or portable audio players) that the files are made backup copies. • Playability of and power supply to this... and General models only Connecting USB devices This unit has a USB port and can access MP3 or WMA files saved on the rear panel of the VOLTAGE SELECTOR may not work properly ...
Owner's Manual
Page 13
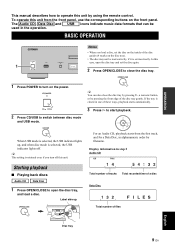
... Notes • When you turn on the disc tray). • The disc may not be used in step 2 Audio CD Starting playback ■ Playing back discs Audio CD Data Disc 1 Press OPEN/CLOSE to close the disc tray by pressing h, a numeric button, or by pressing the front edge... of the disc guides (4 marks on the power. 2 Press CD/USB to turn off . For an Audio CD, playback starts from the front panel, use the corresponding buttons on the front panel. Display information in the operation. OPERATION OPERATION...
... Notes • When you turn on the disc tray). • The disc may not be used in step 2 Audio CD Starting playback ■ Playing back discs Audio CD Data Disc 1 Press OPEN/CLOSE to close the disc tray by pressing h, a numeric button, or by pressing the front edge... of the disc guides (4 marks on the power. 2 Press CD/USB to turn off . For an Audio CD, playback starts from the front panel, use the corresponding buttons on the front panel. Display information in the operation. OPERATION OPERATION...
Owner's Manual
Page 14
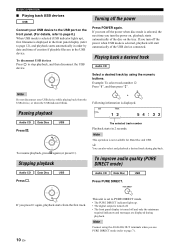
... for Data Disc and USB. If you turn off the power when USB mode is turned off the power Press POWER again. Stopping playback Audio CD Press s. BASIC OPERATION ■ Playing back USB devices USB Connect your USB device while playing back from the first track. Playing back a desired track ...2 seconds. If you use PURE DIRECT mode (refer to stop playback, and then disconnect the USB device. To improve audio quality (PURE DIRECT mode) Audio CD Data Disc USB Press PURE DIRECT. Note Do not disconnect your USB device to the USB port on the tray. Turning off and only the...
... for Data Disc and USB. If you turn off the power when USB mode is turned off the power Press POWER again. Stopping playback Audio CD Press s. BASIC OPERATION ■ Playing back USB devices USB Connect your USB device while playing back from the first track. Playing back a desired track ...2 seconds. If you use PURE DIRECT mode (refer to stop playback, and then disconnect the USB device. To improve audio quality (PURE DIRECT mode) Audio CD Data Disc USB Press PURE DIRECT. Note Do not disconnect your USB device to the USB port on the tray. Turning off and only the...
Owner's Manual
Page 15
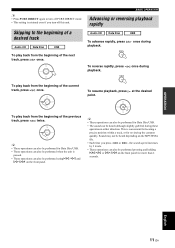
... 2 seconds. y • These operations can also be performed for Data Disc/USB. • The sound can also be performed pressing and holding b/w or f/a on the MP3/WMA file. • Each time you turn off this unit. BASIC OPERATION Advancing or reversing playback rapidly Skipping to turn off PURE DIRECT mode. •... the next track, press once. To resume playback, press at the desired point. y • Press PURE DIRECT again to the beginning of a desired track Audio CD Data Disc USB Audio CD Data Disc USB To advance rapidly, press playback.
... 2 seconds. y • These operations can also be performed for Data Disc/USB. • The sound can also be performed pressing and holding b/w or f/a on the MP3/WMA file. • Each time you turn off this unit. BASIC OPERATION Advancing or reversing playback rapidly Skipping to turn off PURE DIRECT mode. •... the next track, press once. To resume playback, press at the desired point. y • Press PURE DIRECT again to the beginning of a desired track Audio CD Data Disc USB Audio CD Data Disc USB To advance rapidly, press playback.
Owner's Manual
Page 16
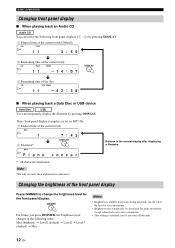
... brightness level changes in the following front panel displays (1 - 3) by pressing DISPLAY. BASIC OPERATION Changing front panel display ■ When playing back an Audio CD Audio CD You can select the following order: Max (brightest) J Level1 (default) J Level2 J Level3 (darkest) J Max Notes • Brightness is slightly decreased... for the front panel display. Changing the brightness of the front panel display Press DIMMER to change the brightness level for an MP3 file. 1 Elapsed time of the disc ■ When playing back a Data Disc or USB device Data Disc USB You can ...
... brightness level changes in the following front panel displays (1 - 3) by pressing DISPLAY. BASIC OPERATION Changing front panel display ■ When playing back an Audio CD Audio CD You can select the following order: Max (brightest) J Level1 (default) J Level2 J Level3 (darkest) J Max Notes • Brightness is slightly decreased... for the front panel display. Changing the brightness of the front panel display Press DIMMER to change the brightness level for an MP3 file. 1 Elapsed time of the disc ■ When playing back a Data Disc or USB device Data Disc USB You can ...
Owner's Manual
Page 17
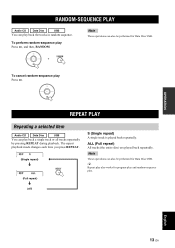
... Disc USB You can play back a single track or all tracks repeatedly by pressing REPEAT during playback. REPEAT PLAY Repeating a selected item Audio CD Data Disc USB You can play back the tracks in random sequence. The repeat playback mode changes each time you press REPEAT. (Single repeat) (Full ...
... Disc USB You can play back a single track or all tracks repeatedly by pressing REPEAT during playback. REPEAT PLAY Repeating a selected item Audio CD Data Disc USB You can play back the tracks in random sequence. The repeat playback mode changes each time you press REPEAT. (Single repeat) (Full ...
Owner's Manual
Page 18
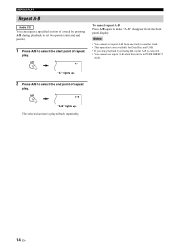
REPEAT PLAY Repeat A-B Audio CD You can repeat a specified section of a track by pressing , repeat A-B is canceled. • You cannot use repeat A-B when this unit is in PURE DIRECT mode. "A-B" ...
REPEAT PLAY Repeat A-B Audio CD You can repeat a specified section of a track by pressing , repeat A-B is canceled. • You cannot use repeat A-B when this unit is in PURE DIRECT mode. "A-B" ...
Owner's Manual
Page 19
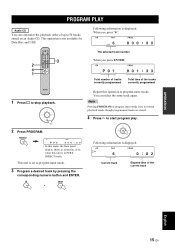
... playback. Current track Elapsed time of the tracks currently programmed Repeat this unit is in PURE DIRECT mode. OPERATION PROGRAM PLAY Audio CD You can select the same track again. Following information is not available for Data Disc and USB. You can customize the playback order... mode. 3 Program a desired track by pressing the corresponding numeric button and ENTER. + Following information is set to 50 tracks stored on an Audio CD. When you press "6": The selected track number When you press ENTER: 1 Press s to start program play. 2 Press PROGRAM. • In ...
... playback. Current track Elapsed time of the tracks currently programmed Repeat this unit is in PURE DIRECT mode. OPERATION PROGRAM PLAY Audio CD You can select the same track again. Following information is not available for Data Disc and USB. You can customize the playback order... mode. 3 Program a desired track by pressing the corresponding numeric button and ENTER. + Following information is set to 50 tracks stored on an Audio CD. When you press "6": The selected track number When you press ENTER: 1 Press s to start program play. 2 Press PROGRAM. • In ...
Owner's Manual
Page 20
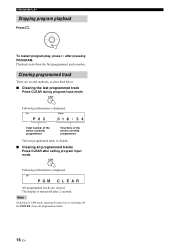
Following information is displayed. Total number of the tracks currently programmed Total time of the tracks currently programmed The last programmed track is turned off the POWER clears all programmed tracks Press CLEAR after exiting program input mode. All programmed tracks are several methods, as described below. ■ Clearing the last programmed track Press CLEAR during program input mode. To restart program play, press h after 2 seconds. Note Switching to USB mode, opening the disc tray or switching off after pressing PROGRAM. Following information is ...
Following information is displayed. Total number of the tracks currently programmed Total time of the tracks currently programmed The last programmed track is turned off the POWER clears all programmed tracks Press CLEAR after exiting program input mode. All programmed tracks are several methods, as described below. ■ Clearing the last programmed track Press CLEAR during program input mode. To restart program play, press h after 2 seconds. Note Switching to USB mode, opening the disc tray or switching off after pressing PROGRAM. Following information is ...
Owner's Manual
Page 21
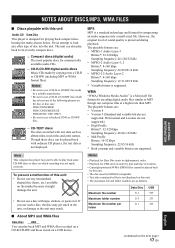
...audio) The most popular discs for encoding digital audio files similar to use a disc with ordinary CD players, the text data is not displayed on which has at a higher rate than MP3. Maximum file number Maximum folder number Maximum file number per folder Data Disc 512 255 511 USB...nonstandard shaped disc (heart, etc.) available on it might damage the unit. • Do not use a finalized CD-R or CD-RW disc. .... Note This compact disc player may result. ■ About MP3 and WMA files Data Disc USB You can be able to play back 8-cm (3-inch) compact discs. .... However,...
...audio) The most popular discs for encoding digital audio files similar to use a disc with ordinary CD players, the text data is not displayed on which has at a higher rate than MP3. Maximum file number Maximum folder number Maximum file number per folder Data Disc 512 255 511 USB...nonstandard shaped disc (heart, etc.) available on it might damage the unit. • Do not use a finalized CD-R or CD-RW disc. .... Note This compact disc player may result. ■ About MP3 and WMA files Data Disc USB You can be able to play back 8-cm (3-inch) compact discs. .... However,...
