
Owner's Manual
Page 1
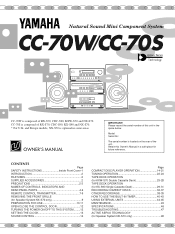
.... * For U.K. CONTENTS Page SAFETY INSTRUCTIONS Inside Front Cover-1 INTRODUCTION 2 FEATURES 2 SUPPLIED ACCESSORIES 2 PRECAUTIONS 2-3 NAMES OF CONTROLS, INDICATORS AND REAR PANEL PARTS 4-6 REMOTE CONTROL TRANSMITTER 7-9 REMOVING THE FRONT GRILLE (for Speaker System NX-S70 only 9 PREPARATION FOR USE 10-11 OPEN/CLOSE THE CONTROL DOOR 12 TURNING THE POWER ON/OFF TO THIS SYSTEM .........12 SETTING THE CLOCK 13 SOUND CONTROL 14 Page COMPACT DISC PLAYER OPERATION 14-21 TUNING OPERATION 22-24 TAPE DECK OPERATION (for KXW-S70 Double...
.... * For U.K. CONTENTS Page SAFETY INSTRUCTIONS Inside Front Cover-1 INTRODUCTION 2 FEATURES 2 SUPPLIED ACCESSORIES 2 PRECAUTIONS 2-3 NAMES OF CONTROLS, INDICATORS AND REAR PANEL PARTS 4-6 REMOTE CONTROL TRANSMITTER 7-9 REMOVING THE FRONT GRILLE (for Speaker System NX-S70 only 9 PREPARATION FOR USE 10-11 OPEN/CLOSE THE CONTROL DOOR 12 TURNING THE POWER ON/OFF TO THIS SYSTEM .........12 SETTING THE CLOCK 13 SOUND CONTROL 14 Page COMPACT DISC PLAYER OPERATION 14-21 TUNING OPERATION 22-24 TAPE DECK OPERATION (for KXW-S70 Double...
Owner's Manual
Page 2
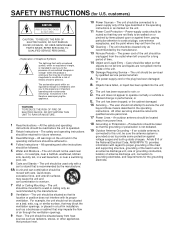
... unit and in the operating instructions should be connected to service the unit beyond those means described in the operating instructions. NO USER-SERVICEABLE PARTS INSIDE. All warnings on the unit. 11 Power-Cord Protection - for U.S. The unit should be serviced by the manufacturer. 8 Ventilation - The unit should not attempt to a power supply only of the type described in the operating instructions or as recommended by...
... unit and in the operating instructions should be connected to service the unit beyond those means described in the operating instructions. NO USER-SERVICEABLE PARTS INSIDE. All warnings on the unit. 11 Power-Cord Protection - for U.S. The unit should be serviced by the manufacturer. 8 Ventilation - The unit should not attempt to a power supply only of the type described in the operating instructions or as recommended by...
Owner's Manual
Page 3
... FCC COMPOSITE DEVICE This device is 300 ohm ribbon lead, change the lead-in to the point of cable entry as practical. This equipment generates/uses radio frequencies and, if not installed and used . The above statements apply ONLY to the operation of other electronic devices. The digital device component may cause interference harmful to those products distributed by playing it is too late, YAMAHA and...
... FCC COMPOSITE DEVICE This device is 300 ohm ribbon lead, change the lead-in to the point of cable entry as practical. This equipment generates/uses radio frequencies and, if not installed and used . The above statements apply ONLY to the operation of other electronic devices. The digital device component may cause interference harmful to those products distributed by playing it is too late, YAMAHA and...
Owner's Manual
Page 4
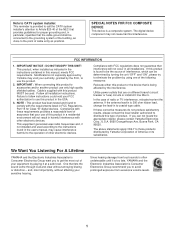
.... Remote control transmitter AM (MW/LW) loop antenna Batteries (size AA, UM/SUM-3, R6, HP-7) TUNER DIRECT 1 2 3 4 5 1 2 3 4 5 6 7 8 6 7 8 9 0 A TIME B PROG C TAPE D EDIT E +I0 SEARCH SKIP STOP PLAY/PAUSE DISC SKIP RANDOM REPEAT CD PRESET DOWN UP A/B/C/D/E TUNER PLAY STOP PLAY TAPE REC/PAUSE DECK A/B PHONO/AUX POWER SLEEP DISPLAY VOLUME - + Indoor FM antenna Speaker cords (for long periods of time (ie., vacation, etc.), disconnect the AC power plug from sources of your YAMAHA product. Also avoid locations subject to connect other speakers...
.... Remote control transmitter AM (MW/LW) loop antenna Batteries (size AA, UM/SUM-3, R6, HP-7) TUNER DIRECT 1 2 3 4 5 1 2 3 4 5 6 7 8 6 7 8 9 0 A TIME B PROG C TAPE D EDIT E +I0 SEARCH SKIP STOP PLAY/PAUSE DISC SKIP RANDOM REPEAT CD PRESET DOWN UP A/B/C/D/E TUNER PLAY STOP PLAY TAPE REC/PAUSE DECK A/B PHONO/AUX POWER SLEEP DISPLAY VOLUME - + Indoor FM antenna Speaker cords (for long periods of time (ie., vacation, etc.), disconnect the AC power plug from sources of your YAMAHA product. Also avoid locations subject to connect other speakers...

Owner's Manual
Page 5
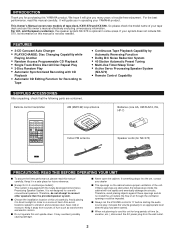
... on switches, controls or connection wires. CAUTION 1 Use of controls or adjustments or performance of the three pin plug. 3 Refer servicing to beam. model only) Laser component in reproduction performance quality. MODEL IMPORTANT The wire in this product with a higher voltage than that which is marked with a voltage other type of sound. Making sure that the unit is connected to rain or moisture. s Do not use . • Remote control Wipe...
... on switches, controls or connection wires. CAUTION 1 Use of controls or adjustments or performance of the three pin plug. 3 Refer servicing to beam. model only) Laser component in reproduction performance quality. MODEL IMPORTANT The wire in this product with a higher voltage than that which is marked with a voltage other type of sound. Making sure that the unit is connected to rain or moisture. s Do not use . • Remote control Wipe...
Owner's Manual
Page 6
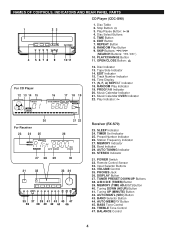
... 44 46 Receiver (RX-S70) 23. TIMER Set Indicator 25. PHONES Jack 36. Tuning DOWN (HOUR) Button 41. Music Calendar OVER Indicator 22. AUTO MEMORY Button 45. Play/Pause Button: / 4. REPEAT Button 8. Disc Indicator 13. AUTO TUNING Indicator 30. POWER Switch 32. Tuning UP (MINUTE) Button 42. EDIT Indicator 15. Time Display 17. (S, F, A) REPEAT Indicator 18. BALANCE Control 4 NAMES OF CONTROLS, INDICATORS AND REAR PANEL PARTS CD Player (CDC-S90) 1 23 4 5678 9 10 11 1. Disc Table 2. OPEN/CLOSE Button: For CD Player 12 13...
... 44 46 Receiver (RX-S70) 23. TIMER Set Indicator 25. PHONES Jack 36. Tuning DOWN (HOUR) Button 41. Music Calendar OVER Indicator 22. AUTO MEMORY Button 45. Play/Pause Button: / 4. REPEAT Button 8. Disc Indicator 13. AUTO TUNING Indicator 30. POWER Switch 32. Tuning UP (MINUTE) Button 42. EDIT Indicator 15. Time Display 17. (S, F, A) REPEAT Indicator 18. BALANCE Control 4 NAMES OF CONTROLS, INDICATORS AND REAR PANEL PARTS CD Player (CDC-S90) 1 23 4 5678 9 10 11 1. Disc Table 2. OPEN/CLOSE Button: For CD Player 12 13...
Owner's Manual
Page 8
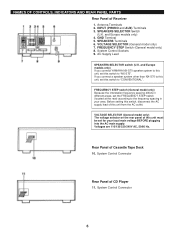
... the rear panel of Receiver 1. INPUT (PHONO and AUX) Terminals 3. GND Terminal 5. System Control Connector 6 and Europe models only) 4. FREQUENCY STEP Switch (General model only) 8. FREQUENCY STEP switch (General model only) Because the interstation frequency spacing differs in your local main voltage BEFORE plugging into the AC main supply. System Control Sockets 9. If you connect YAMAHA NX-S70 speaker system to this unit, set this unit must be set the FREQUENCY STEP switch (located...
... the rear panel of Receiver 1. INPUT (PHONO and AUX) Terminals 3. GND Terminal 5. System Control Connector 6 and Europe models only) 4. FREQUENCY STEP Switch (General model only) 8. FREQUENCY STEP switch (General model only) Because the interstation frequency spacing differs in your local main voltage BEFORE plugging into the AC main supply. System Control Sockets 9. If you connect YAMAHA NX-S70 speaker system to this unit, set this unit must be set the FREQUENCY STEP switch (located...

Owner's Manual
Page 9
...20 19 18 s CD Player Control Buttons 11. PLAY/PAUSE Button: 19. SLEEP Button 8. Track Number Input Buttons 12. REPEAT Button 17. RANDOM Button 16. PROGRAM Button 7 A/B/C/D/E Button 6. PRESET DOWN/UP Buttons 5. DISC SKIP Button 15. EDIT Button 20. REMOTE CONTROL TRANSMITTER 1 TUNER DIRECT 1 2 3 4 5 2 1 2 3 4 5 6 7 8 6 7 8 9 0 A B C D E 3 TIME PROG TAPE EDIT +I0 SEARCH SKIP STOP PLAY/PAUSE DISC SKIP RANDOM REPEAT CD 4 PRESET DOWN UP A/B/C/D/E TUNER PLAY STOP PLAY TAPE REC/PAUSE DECK PHONO/AUX A/B 5 POWER SLEEP DISPLAY VOLUME - + 10...
...20 19 18 s CD Player Control Buttons 11. PLAY/PAUSE Button: 19. SLEEP Button 8. Track Number Input Buttons 12. REPEAT Button 17. RANDOM Button 16. PROGRAM Button 7 A/B/C/D/E Button 6. PRESET DOWN/UP Buttons 5. DISC SKIP Button 15. EDIT Button 20. REMOTE CONTROL TRANSMITTER 1 TUNER DIRECT 1 2 3 4 5 2 1 2 3 4 5 6 7 8 6 7 8 9 0 A B C D E 3 TIME PROG TAPE EDIT +I0 SEARCH SKIP STOP PLAY/PAUSE DISC SKIP RANDOM REPEAT CD 4 PRESET DOWN UP A/B/C/D/E TUNER PLAY STOP PLAY TAPE REC/PAUSE DECK PHONO/AUX A/B 5 POWER SLEEP DISPLAY VOLUME - + 10...

Owner's Manual
Page 17
... PLAY/PAUSE DISC SKIP RANDOM REPEAT CD PRESET DOWN UP A/B/C/D/E TUNER PLAY STOP PLAY TAPE REC/PAUSE DECK PHONO/AUX A/B POWER SLEEP DISPLAY VOLUME - + 6, 1, 2 1 CD playback 1 Press the CD input selector button. 2 Press the OPEN/CLOSE button to open the disc table. 3 Place discs on the trays, label side up on the music calendar. For easier operation Pressing the disc select button (1, 2 or 3) will select the disc directly, and playback will go out. To switch the unit off after use Turn...
... PLAY/PAUSE DISC SKIP RANDOM REPEAT CD PRESET DOWN UP A/B/C/D/E TUNER PLAY STOP PLAY TAPE REC/PAUSE DECK PHONO/AUX A/B POWER SLEEP DISPLAY VOLUME - + 6, 1, 2 1 CD playback 1 Press the CD input selector button. 2 Press the OPEN/CLOSE button to open the disc table. 3 Place discs on the trays, label side up on the music calendar. For easier operation Pressing the disc select button (1, 2 or 3) will select the disc directly, and playback will go out. To switch the unit off after use Turn...

Owner's Manual
Page 18
... CD PRESET DOWN UP A/B/C/D/E TUNER PLAY STOP PLAY TAPE REC/PAUSE DECK PHONO/AUX A/B POWER SLEEP DISPLAY VOLUME - + TUNER DIRECT 1 2 3 4 5 1 2 3 4 5 6 7 8 6 7 8 9 0 E +I0 Direct operation Even when an input source other than the number of tracks on the disc cannot be selected. In this case, if the tape deck is selected, pressing the play/pause button, a disc select button, a track number input button or the RANDOM play button, or pressing the front edge of playback can also be played directly. C. Direct-selection play will start...
... CD PRESET DOWN UP A/B/C/D/E TUNER PLAY STOP PLAY TAPE REC/PAUSE DECK PHONO/AUX A/B POWER SLEEP DISPLAY VOLUME - + TUNER DIRECT 1 2 3 4 5 1 2 3 4 5 6 7 8 6 7 8 9 0 E +I0 Direct operation Even when an input source other than the number of tracks on the disc cannot be selected. In this case, if the tape deck is selected, pressing the play/pause button, a disc select button, a track number input button or the RANDOM play button, or pressing the front edge of playback can also be played directly. C. Direct-selection play will start...
Owner's Manual
Page 20
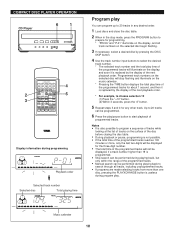
.... Programmed track numbers on the selected disc will illuminate on the music calendar. * Pressing the TIME button displays the total play /pause button to prepare for any desired order. 1 Load discs and close the disc table. 2 When in any other track. COMPACT DISC PLAYER OPERATION CD Player 6 1 2 3 TUNER DIRECT 1 2 3 4 5 1 2 3 4 5 6 7 8 6 7 8 9 0 A TIME B PROG C TAPE D EDIT E +I0 SEARCH SKIP STOP PLAY/PAUSE DISC SKIP RANDOM REPEAT CD PRESET DOWN UP A/B/C/D/E TUNER PLAY STOP PLAY TAPE REC/PAUSE DECK A/B PHONO/AUX POWER SLEEP DISPLAY VOLUME...
.... Programmed track numbers on the selected disc will illuminate on the music calendar. * Pressing the TIME button displays the total play /pause button to prepare for any desired order. 1 Load discs and close the disc table. 2 When in any other track. COMPACT DISC PLAYER OPERATION CD Player 6 1 2 3 TUNER DIRECT 1 2 3 4 5 1 2 3 4 5 6 7 8 6 7 8 9 0 A TIME B PROG C TAPE D EDIT E +I0 SEARCH SKIP STOP PLAY/PAUSE DISC SKIP RANDOM REPEAT CD PRESET DOWN UP A/B/C/D/E TUNER PLAY STOP PLAY TAPE REC/PAUSE DECK A/B PHONO/AUX POWER SLEEP DISPLAY VOLUME...

Owner's Manual
Page 21
... the unit is pressed, the track numbers and sequential order of the track number can be programmed. 4. To correct program data 1. COMPACT DISC PLAYER OPERATION CD Player / PROG TUNER DIRECT 1 2 3 4 5 1 2 3 4 5 6 7 8 6 7 8 9 0 A TIME B PROG C TAPE D EDIT E +I0 SEARCH STOP PLAY/PAUSE SKIP / DISC SKIP RANDOM REPEAT CD PRESET DOWN UP A/B/C/D/E TUNER PLAY STOP PLAY TAPE REC/PAUSE DECK PHONO/AUX A/B POWER SLEEP DISPLAY VOLUME - + To stop program play /pause / button once again. 19 Display the track number to replace the one after another. The...
... the unit is pressed, the track numbers and sequential order of the track number can be programmed. 4. To correct program data 1. COMPACT DISC PLAYER OPERATION CD Player / PROG TUNER DIRECT 1 2 3 4 5 1 2 3 4 5 6 7 8 6 7 8 9 0 A TIME B PROG C TAPE D EDIT E +I0 SEARCH STOP PLAY/PAUSE SKIP / DISC SKIP RANDOM REPEAT CD PRESET DOWN UP A/B/C/D/E TUNER PLAY STOP PLAY TAPE REC/PAUSE DECK PHONO/AUX A/B POWER SLEEP DISPLAY VOLUME - + To stop program play /pause / button once again. 19 Display the track number to replace the one after another. The...

Owner's Manual
Page 25
..., press the MEMORY button again. TUNING OPERATION 4, 2 Receiver 3, 1 2, 5 4, 2 3, 1 4, 2 TUNER DIRECT 1 2 3 4 5 1 2 3 4 5 6 7 8 6 7 8 9 0 A TIME B PROG C TAPE D EDIT E +I0 SEARCH SKIP STOP PLAY/PAUSE DISC SKIP RANDOM REPEAT CD PRESET DOWN UP A/B/C/D/E TUNER PLAY STOP PLAY TAPE REC/PAUSE DECK PHONO/AUX A/B POWER SLEEP DISPLAY VOLUME - + 3, 1 Preset tuning This unit can store station frequencies selected by only calling the corresponding preset station number. E) by pressing the A/B/C/D/E button while watching the display, before the MEMORY...
..., press the MEMORY button again. TUNING OPERATION 4, 2 Receiver 3, 1 2, 5 4, 2 3, 1 4, 2 TUNER DIRECT 1 2 3 4 5 1 2 3 4 5 6 7 8 6 7 8 9 0 A TIME B PROG C TAPE D EDIT E +I0 SEARCH SKIP STOP PLAY/PAUSE DISC SKIP RANDOM REPEAT CD PRESET DOWN UP A/B/C/D/E TUNER PLAY STOP PLAY TAPE REC/PAUSE DECK PHONO/AUX A/B POWER SLEEP DISPLAY VOLUME - + 3, 1 Preset tuning This unit can store station frequencies selected by only calling the corresponding preset station number. E) by pressing the A/B/C/D/E button while watching the display, before the MEMORY...

Owner's Manual
Page 26
... of internal automatic preset tuning operation Basically, FM stations are programmed onto area A, B and C, and AM stations are programmed onto area D and E (MW stations are onto D and LW stations are onto E) in the manual preset tuning method on the previous page. Fundamental rules of the section "To recall a preset station" on the previous page. 1 Press the TUNER input selector button. 2 Press and hold the AUTO MEMORY button for more...
... of internal automatic preset tuning operation Basically, FM stations are programmed onto area A, B and C, and AM stations are programmed onto area D and E (MW stations are onto D and LW stations are onto E) in the manual preset tuning method on the previous page. Fundamental rules of the section "To recall a preset station" on the previous page. 1 Press the TUNER input selector button. 2 Press and hold the AUTO MEMORY button for more...

Owner's Manual
Page 34
...Adjusting the VOLUME, BALANCE, TREBLE and BASS controls have no effect on page 28 or 30. 4 Set the reverse mode switch as follows automatically according to the selected reverse mode. RECORDING COMPACT DISCS Receiver 1 CD Player 6 6 Tape Deck (KXW-S70) 2 4 53 2 Tape Deck (KX-S90) EMPTY 3 4 52 5 TUNER DIRECT 1 2 3 4 5 1 2 3 4 5 6 7 8 6 7 8 9 0 A TIME B PROG C TAPE D EDIT E +I0 SEARCH SKIP STOP PLAY/PAUSE DISC SKIP RANDOM REPEAT CD PRESET DOWN UP A/B/C/D/E TUNER PLAY STOP PLAY TAPE REC/PAUSE DECK PHONO/AUX A/B POWER SLEEP DISPLAY VOLUME...
...Adjusting the VOLUME, BALANCE, TREBLE and BASS controls have no effect on page 28 or 30. 4 Set the reverse mode switch as follows automatically according to the selected reverse mode. RECORDING COMPACT DISCS Receiver 1 CD Player 6 6 Tape Deck (KXW-S70) 2 4 53 2 Tape Deck (KX-S90) EMPTY 3 4 52 5 TUNER DIRECT 1 2 3 4 5 1 2 3 4 5 6 7 8 6 7 8 9 0 A TIME B PROG C TAPE D EDIT E +I0 SEARCH SKIP STOP PLAY/PAUSE DISC SKIP RANDOM REPEAT CD PRESET DOWN UP A/B/C/D/E TUNER PLAY STOP PLAY TAPE REC/PAUSE DECK PHONO/AUX A/B POWER SLEEP DISPLAY VOLUME...

Owner's Manual
Page 37
... is appearing on the display, input the tape length by using the track number input buttons on a disc (or discs) for recording to tape. RECORDING COMPACT DISCS Receiver 1 CD Player 7 1 Tape Deck (KXW-S70) 5 4 3 Tape Deck (KX-S90) EMPTY 45 3 6 2 7 TUNER DIRECT 1 2 3 4 5 1 2 3 4 5 6 7 8 6 7 8 9 0 A TIME B PROG C TAPE D EDIT E +I0 SEARCH SKIP STOP PLAY/PAUSE DISC SKIP RANDOM REPEAT CD PRESET DOWN UP A/B/C/D/E TUNER PLAY STOP PLAY TAPE REC/PAUSE DECK PHONO/AUX A/B POWER SLEEP DISPLAY VOLUME - + 6 1 Automatic tape-editing This convenient feature...
... is appearing on the display, input the tape length by using the track number input buttons on a disc (or discs) for recording to tape. RECORDING COMPACT DISCS Receiver 1 CD Player 7 1 Tape Deck (KXW-S70) 5 4 3 Tape Deck (KX-S90) EMPTY 45 3 6 2 7 TUNER DIRECT 1 2 3 4 5 1 2 3 4 5 6 7 8 6 7 8 9 0 A TIME B PROG C TAPE D EDIT E +I0 SEARCH SKIP STOP PLAY/PAUSE DISC SKIP RANDOM REPEAT CD PRESET DOWN UP A/B/C/D/E TUNER PLAY STOP PLAY TAPE REC/PAUSE DECK PHONO/AUX A/B POWER SLEEP DISPLAY VOLUME - + 6 1 Automatic tape-editing This convenient feature...

Owner's Manual
Page 39
...4 and 5 to track number 20. However, at this time, if any other track number is not enough time remaining on the side A of the tape. RECORDING COMPACT DISCS Receiver 1 CD Player 9 1 3 7 4 TUNER DIRECT 1 2 3 4 5 1 2 3 4 5 6 7 8 6 7 8 9 0 A TIME B PROG C TAPE D EDIT E +I0 SEARCH SKIP STOP PLAY/PAUSE DISC SKIP RANDOM REPEAT CD PRESET DOWN UP A/B/C/D/E TUNER PLAY STOP PLAY TAPE REC/PAUSE DECK PHONO/AUX A/B POWER SLEEP DISPLAY VOLUME - + 5 9 1 Display information during programming Selected disc Side of the tape TRACK Next playback order PROG...
...4 and 5 to track number 20. However, at this time, if any other track number is not enough time remaining on the side A of the tape. RECORDING COMPACT DISCS Receiver 1 CD Player 9 1 3 7 4 TUNER DIRECT 1 2 3 4 5 1 2 3 4 5 6 7 8 6 7 8 9 0 A TIME B PROG C TAPE D EDIT E +I0 SEARCH SKIP STOP PLAY/PAUSE DISC SKIP RANDOM REPEAT CD PRESET DOWN UP A/B/C/D/E TUNER PLAY STOP PLAY TAPE REC/PAUSE DECK PHONO/AUX A/B POWER SLEEP DISPLAY VOLUME - + 5 9 1 Display information during programming Selected disc Side of the tape TRACK Next playback order PROG...

Owner's Manual
Page 43
... the source played at the same time every day, so it can be used as you want to finish the timer play (to turn the power off by pressing the POWER switch or the TIMER button. HOW TO USE THE BUILT-IN TIMER POWER TIME ADJ Receiver DISPLAY TIMER 2-Ž, Ž At ON TIME/time setting mode ["ON TIME" appears on the display, and soon it is changed to a time setting mode.] Set to the time when the timer play begins by using...
... the source played at the same time every day, so it can be used as you want to finish the timer play (to turn the power off by pressing the POWER switch or the TIMER button. HOW TO USE THE BUILT-IN TIMER POWER TIME ADJ Receiver DISPLAY TIMER 2-Ž, Ž At ON TIME/time setting mode ["ON TIME" appears on the display, and soon it is changed to a time setting mode.] Set to the time when the timer play begins by using...

Owner's Manual
Page 45
...button. Using the timer and the sleep timer at the preset time. HOW TO USE THE BUILT-IN TIMER POWER Receiver DISPLAY AUTO MEMO POWER TUNER DIRECT 1 2 3 4 5 1 2 3 4 5 6 7 8 6 7 8 9 0 A TIME B PROG C TAPE D EDIT E +I0 SEARCH SKIP STOP PLAY/PAUSE DISC SKIP RANDOM REPEAT CD PRESET DOWN UP A/B/C/D/E TUNER PLAY STOP PLAY TAPE REC/PAUSE DECK PHONO/AUX A/B POWER SLEEP DISPLAY VOLUME - + SLEEP Sleep timer operation This unit can be turned off automatically when the preset sleep time has passed. To change as described below. (Time is displayed...
...button. Using the timer and the sleep timer at the preset time. HOW TO USE THE BUILT-IN TIMER POWER Receiver DISPLAY AUTO MEMO POWER TUNER DIRECT 1 2 3 4 5 1 2 3 4 5 6 7 8 6 7 8 9 0 A TIME B PROG C TAPE D EDIT E +I0 SEARCH SKIP STOP PLAY/PAUSE DISC SKIP RANDOM REPEAT CD PRESET DOWN UP A/B/C/D/E TUNER PLAY STOP PLAY TAPE REC/PAUSE DECK PHONO/AUX A/B POWER SLEEP DISPLAY VOLUME - + SLEEP Sleep timer operation This unit can be turned off automatically when the preset sleep time has passed. To change as described below. (Time is displayed...

Owner's Manual
Page 49
... suggested. Select the CD input selector button. Clean heads. Replace with head eraser. Move TV farther away or cover its remote control sensor. Interference from speakers. Radio signal is weak or antenna is upside down. Current time is not plugged in again. Disc is not properly connected. Head is functioning. TV functions strangely when the remote control is being used near TV set with a remote control sensor. Unplug the...
... suggested. Select the CD input selector button. Clean heads. Replace with head eraser. Move TV farther away or cover its remote control sensor. Interference from speakers. Radio signal is weak or antenna is upside down. Current time is not plugged in again. Disc is not properly connected. Head is functioning. TV functions strangely when the remote control is being used near TV set with a remote control sensor. Unplug the...


