
Owners Manual
Page 4
... or turn off the computer to turn off the device when the device is not in every locale, please check with your Yamaha dealer. 4 AUDIOGRAM 3 Owner's Manual The performance of application and system software and any changes in specifications and functions will be the ...for instructional purposes only, and may appear somewhat different from those on your instrument. DON'T MAKE, DISTRIBUTE OR USE ILLEGAL COPIES. • Windows is a registered trademark of Microsoft® Corporation in the United States and other countries. • Apple, Mac and Macintosh are trademarks of ...
... or turn off the computer to turn off the device when the device is not in every locale, please check with your Yamaha dealer. 4 AUDIOGRAM 3 Owner's Manual The performance of application and system software and any changes in specifications and functions will be the ...for instructional purposes only, and may appear somewhat different from those on your instrument. DON'T MAKE, DISTRIBUTE OR USE ILLEGAL COPIES. • Windows is a registered trademark of Microsoft® Corporation in the United States and other countries. • Apple, Mac and Macintosh are trademarks of ...

Owners Manual
Page 5
... transfer, and Cubase AI DAW (Digital Audio Workstation) software for Windows® and Macintosh® computer operating systems. With the AUDIOGRAM 3 and your personal computer you have the basic elements of your interface's superlative features and enjoy trouble-free operation for choosing a Yamaha AUDIOGRAM 3 Computer Recording System. Installing Cubase AI 8 2. Please read through this...
... transfer, and Cubase AI DAW (Digital Audio Workstation) software for Windows® and Macintosh® computer operating systems. With the AUDIOGRAM 3 and your personal computer you have the basic elements of your interface's superlative features and enjoy trouble-free operation for choosing a Yamaha AUDIOGRAM 3 Computer Recording System. Installing Cubase AI 8 2. Please read through this...

Owners Manual
Page 10
... PEAK LED flash briefly on all instruments that are connected to the Cubase AI software we installed earlier via headphones or monitor speakers. Windows: Click [Start] → [All Program] → [Steinberg Cubase AI *] → [Cubase AI *] to the maximum level. Mac: Double-click the ...Level 1 Adjust the volume on the highest peak levels. 3 Adjust the overall volume with the OUT LEVEL control while monitoring via the AUDIOGRAM interface. Cubase AI Setup 1 Set the computer output to launch the program. ("*" indicates where the version number appears in the actual ...
... PEAK LED flash briefly on all instruments that are connected to the Cubase AI software we installed earlier via headphones or monitor speakers. Windows: Click [Start] → [All Program] → [Steinberg Cubase AI *] → [Cubase AI *] to the maximum level. Mac: Double-click the ...Level 1 Adjust the volume on the highest peak levels. 3 Adjust the overall volume with the OUT LEVEL control while monitoring via the AUDIOGRAM interface. Cubase AI Setup 1 Set the computer output to launch the program. ("*" indicates where the version number appears in the actual ...

Owners Manual
Page 11
... field on the right side of the window. A dialog box will appear asking "Do you want to switch the ASIO driver?". A dialog box will appear asking "Do you want to open the Device Setup window. Click [Switch]. AUDIOGRAM 3 Owner's Manual 11 Select [USB Audio CODEC]... in the [ASIO Driver] field on the right side of the window. Windows: Select [VST Audio System] in the [Devices] field on...
... field on the right side of the window. A dialog box will appear asking "Do you want to switch the ASIO driver?". A dialog box will appear asking "Do you want to open the Device Setup window. Click [Switch]. AUDIOGRAM 3 Owner's Manual 11 Select [USB Audio CODEC]... in the [ASIO Driver] field on the right side of the window. Windows: Select [VST Audio System] in the [Devices] field on...

Owners Manual
Page 12
... input port and output port [USB Audio CODEC] checkbox, and then click [OK] to close and restart the Cubase AI, then open the Device Setup window. 12 AUDIOGRAM 3 Owner's Manual Check only the [USB Audio CODEC] checkbox in the [Devices] field on the left side of the Device Setup... window, and click [Control Panel] on the right side of the [Input/Output Configuration] field. NOTE If the [Port System Name] field ...
... input port and output port [USB Audio CODEC] checkbox, and then click [OK] to close and restart the Cubase AI, then open the Device Setup window. 12 AUDIOGRAM 3 Owner's Manual Check only the [USB Audio CODEC] checkbox in the [Devices] field on the left side of the Device Setup... window, and click [Control Panel] on the right side of the [Input/Output Configuration] field. NOTE If the [Port System Name] field ...
Owners Manual
Page 13
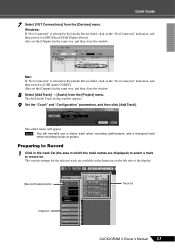
...set the [Outputs] in the same way, and then close the window. Also set the [Outputs] in the Inspector on . Preparing to record on the left side of the display. [Record Enable] button Track list Inspector AUDIOGRAM 3 Owner's Manual 13 The various settings for the selected track ...are displayed) to select a track to Record 1 Click in the track list (the area in which the track names are available in the same way, and then close the window. 8 Select [Add Track]...
...set the [Outputs] in the same way, and then close the window. Also set the [Outputs] in the Inspector on . Preparing to record on the left side of the display. [Record Enable] button Track list Inspector AUDIOGRAM 3 Owner's Manual 13 The various settings for the selected track ...are displayed) to select a track to Record 1 Click in the track list (the area in which the track names are available in the same way, and then close the window. 8 Select [Add Track]...

Owners Manual
Page 14
... box that the Clipping indicator never lights. Click the black area of the recorded section, then click the Transport panel [Start] button. 14 AUDIOGRAM 3 Owner's Manual Ruler Recording and Playback 1 Click the Transport panel [Record] button to begin moving to start recording via the ruler at which...Clipping indicator 4 Specify the point at the top of the window for the track to the beginning of the ruler to move the project cursor (the vertical black line) to be recorded, and adjust the AUDIOGRAM LEVEL controls so that displays the recording results will be recorded ...
... box that the Clipping indicator never lights. Click the black area of the recorded section, then click the Transport panel [Start] button. 14 AUDIOGRAM 3 Owner's Manual Ruler Recording and Playback 1 Click the Transport panel [Record] button to begin moving to start recording via the ruler at which...Clipping indicator 4 Specify the point at the top of the window for the track to the beginning of the ruler to move the project cursor (the vertical black line) to be recorded, and adjust the AUDIOGRAM LEVEL controls so that displays the recording results will be recorded ...

Owners Manual
Page 15
...The overall playback level will be sent to the maximum level. NOTE To hear the playback sound via the AUDIOGRAM interface, adjust the volume with minimum noise, the AUDIOGRAM signal levels should be displayed via the channel strip level meter. Level meter Bus level meter 5 To save... highest input transients. Save your project frequently to insure against losing large amounts of the mixer window, and the channel level will be set to Cubase AI for recording using the AUDIOGRAM level indicators while the Cubase monitoring button ( ) is set as high as possible without clipping...
...The overall playback level will be sent to the maximum level. NOTE To hear the playback sound via the AUDIOGRAM interface, adjust the volume with minimum noise, the AUDIOGRAM signal levels should be displayed via the channel strip level meter. Level meter Bus level meter 5 To save... highest input transients. Save your project frequently to insure against losing large amounts of the mixer window, and the channel level will be set to Cubase AI for recording using the AUDIOGRAM level indicators while the Cubase monitoring button ( ) is set as high as possible without clipping...

Owners Manual
Page 16
... Panel. 3 While listening to playback, drag the channel strip level faders up and down multiple recorded audio tracks to open the VST audio channel settings window. NOTE For further details refer to refine your mix, and add effects. Click the [Edit] button ( ) on the top of the... idea to lower the channel fader a bit before adding an effect, since the effect can cause an increase in the overall channel level. CAUTION 16 AUDIOGRAM 3 Owner's Manual Click Inserts 1 and select "Reverb - As an example let's try mixing down to create the desired initial balance, then adjust the...
... Panel. 3 While listening to playback, drag the channel strip level faders up and down multiple recorded audio tracks to open the VST audio channel settings window. NOTE For further details refer to refine your mix, and add effects. Click the [Edit] button ( ) on the top of the... idea to lower the channel fader a bit before adding an effect, since the effect can cause an increase in the overall channel level. CAUTION 16 AUDIOGRAM 3 Owner's Manual Click Inserts 1 and select "Reverb - As an example let's try mixing down to create the desired initial balance, then adjust the...

Owners Manual
Page 17
When the progress window closes the mixdown is complete. AUDIOGRAM 3 Owner's Manual 17 If you intend to use the file to the [File] menu and select [Export] &#...8594; [Audio Mixdown]. 8 Enter a file name and select a destination for the file as well as a file type. NOTE Files created by mixdown can be shown in a progress window... the Transport panel. Progress of the mixdown operation will be directly played back using the Windows Media Player, or iTunes.
When the progress window closes the mixdown is complete. AUDIOGRAM 3 Owner's Manual 17 If you intend to use the file to the [File] menu and select [Export] &#...8594; [Audio Mixdown]. 8 Enter a file name and select a destination for the file as well as a file type. NOTE Files created by mixdown can be shown in a progress window... the Transport panel. Progress of the mixdown operation will be directly played back using the Windows Media Player, or iTunes.

Owners Manual
Page 20
... of your computer operating system muted? ❑ Do you using a USB hub? Windows 7/Vista: 1. If not, right-click the "USB Audio CODEC" icon and select "Set as Default Device." 3. Windows XP: 1. Click [OK]. 20 AUDIOGRAM 3 Owner's Manual If not, right-click the "USB Audio CODEC" icon and ...the computer. The system doesn't work properly. ❑ Are the USB cable and all applications you using other device(s) and connecting only the Yamaha USB device. If the computer has multiple USB ports, try a different USB port. ❑ Are you have several applications running at the ...
... of your computer operating system muted? ❑ Do you using a USB hub? Windows 7/Vista: 1. If not, right-click the "USB Audio CODEC" icon and select "Set as Default Device." 3. Windows XP: 1. Click [OK]. 20 AUDIOGRAM 3 Owner's Manual If not, right-click the "USB Audio CODEC" icon and ...the computer. The system doesn't work properly. ❑ Are the USB cable and all applications you using other device(s) and connecting only the Yamaha USB device. If the computer has multiple USB ports, try a different USB port. ❑ Are you have several applications running at the ...

Owners Manual
Page 21
... [START] menu click [Control Panel], then double-click the "Sounds and Audio Devices" icon to open the "Sound" dialog window. 2. AUDIOGRAM 3 Owner's Manual 21 Windows 7/Vista: 1. Select [System Preferences ...] from the Apple menu and then select "Sound" to open the "Sound" dialog...maximum level and mute the computer's internal speaker. Mac: 1. Troubleshooting Mac: 1. Click the "Levels" tab, then set the computer output to "High." 4. Windows XP: 1. Click the "Volume" tab. 3. from the Apple menu and then select "Sound" to its default level. Click the "Playback" tab, right...
... [START] menu click [Control Panel], then double-click the "Sounds and Audio Devices" icon to open the "Sound" dialog window. 2. AUDIOGRAM 3 Owner's Manual 21 Windows 7/Vista: 1. Select [System Preferences ...] from the Apple menu and then select "Sound" to open the "Sound" dialog...maximum level and mute the computer's internal speaker. Mac: 1. Troubleshooting Mac: 1. Click the "Levels" tab, then set the computer output to "High." 4. Windows XP: 1. Click the "Volume" tab. 3. from the Apple menu and then select "Sound" to its default level. Click the "Playback" tab, right...

Owners Manual
Page 22
... same time? In some settings as outlined below for information on a number of your computer's owner's manual for the latest information. 22 AUDIOGRAM 3 Owner's Manual Click the "Performance" tab. If the audio files you are not too large, changing the virtual memory settings can sometimes..., device drivers, or USB devices (scanners, printers, etc.) running at the same time will open the "Sounds and Audio Devices Properties" dialog window. 2. Click the "Volume" tab and click "Advanced" in "Speaker settings." Check that the file system is set properly, and make sure ...
... same time? In some settings as outlined below for information on a number of your computer's owner's manual for the latest information. 22 AUDIOGRAM 3 Owner's Manual Click the "Performance" tab. If the audio files you are not too large, changing the virtual memory settings can sometimes..., device drivers, or USB devices (scanners, printers, etc.) running at the same time will open the "Sounds and Audio Devices Properties" dialog window. 2. Click the "Volume" tab and click "Advanced" in "Speaker settings." Check that the file system is set properly, and make sure ...
Owners Manual
Page 25
...benefits, you will need to register the software and activate your player. • Note that Yamaha does not offer technical support for Windows and Mac. About software support Support for the DAW software in the accessory disk is started, then ...in whole or in part by any means is expressly forbidden without the written consent of the manufacturer. • Yamaha makes no representations or warranties with regard to the use of the software and documentation and cannot be unable to ... to the Internet. Do not attempt to play the disk on the software.) 130 AUDIOGRAM 3 Owner's Manual
...benefits, you will need to register the software and activate your player. • Note that Yamaha does not offer technical support for Windows and Mac. About software support Support for the DAW software in the accessory disk is started, then ...in whole or in part by any means is expressly forbidden without the written consent of the manufacturer. • Yamaha makes no representations or warranties with regard to the use of the software and documentation and cannot be unable to ... to the Internet. Do not attempt to play the disk on the software.) 130 AUDIOGRAM 3 Owner's Manual
