
Owners Manual
Page 4
... options may appear somewhat different from the screens which appear on your Yamaha dealer. 4 AUDIOGRAM 3 Owner's Manual The performance of personal use is not meant for use with respect to which Yamaha owns copyrights or with an audio/visual system (CD player, DVD player...qualified Yamaha service personnel about replacing defective components. This product incorporates and bundles computer programs and contents in part by improper use or modifications to use others' copyrights. DON'T MAKE, DISTRIBUTE OR USE ILLEGAL COPIES. • Windows is expressly ...
... options may appear somewhat different from the screens which appear on your Yamaha dealer. 4 AUDIOGRAM 3 Owner's Manual The performance of personal use is not meant for use with respect to which Yamaha owns copyrights or with an audio/visual system (CD player, DVD player...qualified Yamaha service personnel about replacing defective components. This product incorporates and bundles computer programs and contents in part by improper use or modifications to use others' copyrights. DON'T MAKE, DISTRIBUTE OR USE ILLEGAL COPIES. • Windows is expressly ...

Owners Manual
Page 5
...for digital audio data transfer, and Cubase AI DAW (Digital Audio Workstation) software for Windows® and Macintosh® computer operating systems. With the AUDIOGRAM 3 and your interface's superlative features and enjoy trouble-free operation for choosing a Yamaha AUDIOGRAM 3 Computer Recording System. Contents Introduction 5 Contents 5 Features 6 Setup 7 Quick ... 128 Dimensional Diagrams 128 Block Diagram and Level Diagram 129 About the accessory disk 130 AUDIOGRAM 3 Owner's Manual 5 Please read through this manual carefully before beginning use, so that is easy to the...
...for digital audio data transfer, and Cubase AI DAW (Digital Audio Workstation) software for Windows® and Macintosh® computer operating systems. With the AUDIOGRAM 3 and your interface's superlative features and enjoy trouble-free operation for choosing a Yamaha AUDIOGRAM 3 Computer Recording System. Contents Introduction 5 Contents 5 Features 6 Setup 7 Quick ... 128 Dimensional Diagrams 128 Block Diagram and Level Diagram 129 About the accessory disk 130 AUDIOGRAM 3 Owner's Manual 5 Please read through this manual carefully before beginning use, so that is easy to the...

Owners Manual
Page 10
...indicator PEAK LED flash briefly on the highest peak levels. 3 Adjust the overall volume with the OUT LEVEL control while monitoring via the AUDIOGRAM interface. Mac: Double-click the [Application] → [Cubase AI *]. ("*" indicates where the version number appears in the actual icon name.) NOTE If... the ASIO Direct Sound Full Duplex Driver dialog window appears, click [OK]. Set the OUT LEVEL control to the AUDIOGRAM interface. For details on how to make the setting refer to the PDF manual provided with Cubase AI ...
...indicator PEAK LED flash briefly on the highest peak levels. 3 Adjust the overall volume with the OUT LEVEL control while monitoring via the AUDIOGRAM interface. Mac: Double-click the [Application] → [Cubase AI *]. ("*" indicates where the version number appears in the actual icon name.) NOTE If... the ASIO Direct Sound Full Duplex Driver dialog window appears, click [OK]. Set the OUT LEVEL control to the AUDIOGRAM interface. For details on how to make the setting refer to the PDF manual provided with Cubase AI ...

Owners Manual
Page 11
...Recorded Cubase AI data is created. Select [USB Audio CODEC] in the [ASIO Driver] field on the right side of the window. AUDIOGRAM 3 Owner's Manual 11 Select [ASIO DirectX Full Duplex Driver] in the [ASIO Driver] field on the right side of the... window. Click [Switch]. Quick Guide 3 When the Project Assistant window appears, select the [More] menu → [Empty] and click [Create]. A new project is stored as a "Project.". 4 Select [Device ...
...Recorded Cubase AI data is created. Select [USB Audio CODEC] in the [ASIO Driver] field on the right side of the window. AUDIOGRAM 3 Owner's Manual 11 Select [ASIO DirectX Full Duplex Driver] in the [ASIO Driver] field on the right side of the... window. Click [Switch]. Quick Guide 3 When the Project Assistant window appears, select the [More] menu → [Empty] and click [Create]. A new project is stored as a "Project.". 4 Select [Device ...

Owners Manual
Page 12
... and then click [OK] to close the window. Mac: The [CoreAudio Device Settings] dialog window appears. Click [OK] to close and restart the Cubase AI, then open the Device Setup window. 12 AUDIOGRAM 3 Owner's Manual Click [Close] to close the dialog window. NOTE If the [Port System Name] ...field does not change, close the dialog window. 6 Make sure that "USB Audio CODEC 1/2"(Windows), "Front Left/Front Right" (Mac) are...
... and then click [OK] to close the window. Mac: The [CoreAudio Device Settings] dialog window appears. Click [OK] to close and restart the Cubase AI, then open the Device Setup window. 12 AUDIOGRAM 3 Owner's Manual Click [Close] to close the dialog window. NOTE If the [Port System Name] ...field does not change, close the dialog window. 6 Make sure that "USB Audio CODEC 1/2"(Windows), "Front Left/Front Right" (Mac) are...
Owners Manual
Page 13
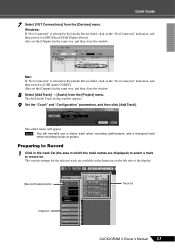
...Not Connected" indication, and then switch to [USB Audio CODEC]. Windows: If "Not Connected" is selected in the [Audio Device] field, click on the left side of the display. [Record Enable] button Track list Inspector AUDIOGRAM 3 Owner's Manual 13 The added tracks will normally use a stereo... [Outputs] in which the track names are available in the same way, and then close the window. 8 Select [Add Track] → [Audio] from the [Devices] menu. The Add Audio Track dialog window appears. 9 Set the "Count" and "Configuration" parameters, and then click [Add Track...
...Not Connected" indication, and then switch to [USB Audio CODEC]. Windows: If "Not Connected" is selected in the [Audio Device] field, click on the left side of the display. [Record Enable] button Track list Inspector AUDIOGRAM 3 Owner's Manual 13 The added tracks will normally use a stereo... [Outputs] in which the track names are available in the same way, and then close the window. 8 Select [Add Track] → [Audio] from the [Devices] menu. The Add Audio Track dialog window appears. 9 Set the "Count" and "Configuration" parameters, and then click [Add Track...

Owners Manual
Page 14
... Enable] button is turned on . 3 Play the instrument to begin recording. Clipping indicator 4 Specify the point at the top of the window for the track to start recording via the ruler at which you have just recorded, use either the Transport panel [Rewind] button or the...beginning of the recorded section, then click the Transport panel [Start] button. 14 AUDIOGRAM 3 Owner's Manual Ruler Recording and Playback 1 Click the Transport panel [Record] button to be recorded, and adjust the AUDIOGRAM LEVEL controls so that the Clipping indicator never lights. To hear playback of the ...
... Enable] button is turned on . 3 Play the instrument to begin recording. Clipping indicator 4 Specify the point at the top of the window for the track to start recording via the ruler at which you have just recorded, use either the Transport panel [Rewind] button or the...beginning of the recorded section, then click the Transport panel [Start] button. 14 AUDIOGRAM 3 Owner's Manual Ruler Recording and Playback 1 Click the Transport panel [Record] button to be recorded, and adjust the AUDIOGRAM LEVEL controls so that the Clipping indicator never lights. To hear playback of the ...

Owners Manual
Page 15
...] from the [File] menu and enter a file name before actually saving the file. Monitoring button AUDIOGRAM 3 Owner's Manual 15 Save your project frequently to insure against losing large amounts of the mixer window, and the channel level will approximately match the recording level when the computer output is turned off...
...] from the [File] menu and enter a file name before actually saving the file. Monitoring button AUDIOGRAM 3 Owner's Manual 15 Save your project frequently to insure against losing large amounts of the mixer window, and the channel level will approximately match the recording level when the computer output is turned off...

Owners Manual
Page 16
... up and down multiple recorded audio tracks to audio CDs. 1 Launch Cubase AI and open the VST audio channel settings window. Quick Guide 6 Step Mixing with the Cubase AI software. CAUTION 16 AUDIOGRAM 3 Owner's Manual Click the [Edit] button ( ) on the left and right to set the stereo position of the channel...
... up and down multiple recorded audio tracks to audio CDs. 1 Launch Cubase AI and open the VST audio channel settings window. Quick Guide 6 Step Mixing with the Cubase AI software. CAUTION 16 AUDIOGRAM 3 Owner's Manual Click the [Edit] button ( ) on the left and right to set the stereo position of the channel...

Owners Manual
Page 17
... and select [Export] → [Audio Mixdown]. 8 Enter a file name and select a destination for the file as well as a file type. AUDIOGRAM 3 Owner's Manual 17 Bar 7 When the final mix adjustments have been made, go to create an audio CD, select the WAV file type... (AIFF on Mac OS X), 44.1 kHz, and 16 bit. 9 Click [Export]. NOTE Files created by mixdown can be shown in a progress window. Change each highlighted number, and then specify the position of the Transport panel. Progress of the mixdown operation will be directly played back using the...
... and select [Export] → [Audio Mixdown]. 8 Enter a file name and select a destination for the file as well as a file type. AUDIOGRAM 3 Owner's Manual 17 Bar 7 When the final mix adjustments have been made, go to create an audio CD, select the WAV file type... (AIFF on Mac OS X), 44.1 kHz, and 16 bit. 9 Click [Export]. NOTE Files created by mixdown can be shown in a progress window. Change each highlighted number, and then specify the position of the Transport panel. Progress of the mixdown operation will be directly played back using the...

Owners Manual
Page 20
...Do you using other device(s) and connecting only the Yamaha USB device. Click the "Audio" tab. 3. Set "Sound playback: Default device" and "Sound recording: Default device" to open the "Sound" dialog window. 2. If so, try connecting the AUDIOGRAM interface directly to open the "Sound" dialog window. 2. Click the "Advanced" tab, then select "2... operating system assigned properly? From the [START] menu click [Control Panel], then double-click the "Sound" icon to "USB Audio CODEC." 4. Windows XP: 1. Troubleshooting The AUDIOGRAM interface won't turn on the computer.
...Do you using other device(s) and connecting only the Yamaha USB device. Click the "Audio" tab. 3. Set "Sound playback: Default device" and "Sound recording: Default device" to open the "Sound" dialog window. 2. If so, try connecting the AUDIOGRAM interface directly to open the "Sound" dialog window. 2. Click the "Advanced" tab, then select "2... operating system assigned properly? From the [START] menu click [Control Panel], then double-click the "Sound" icon to "USB Audio CODEC." 4. Windows XP: 1. Troubleshooting The AUDIOGRAM interface won't turn on the computer.

Owners Manual
Page 21
...the volume slider at the bottom of the Cubase AI application assigned properly? AUDIOGRAM 3 Owner's Manual 21 The recorded sound is running? Select "No sound" in the "Sound Scheme." Doing so can sometimes cause the Windows output level to be reset to "High." 4. Select "System Preferences ..."Sounds and Audio Devices" icon to the maximum level and mute the computer's internal speaker. Click the "Sounds" tab in the "Sound" dialog window, then select "No sounds" in the "Sound scheme." Click the "Output" tab and under "Choose a device for sound output" select "USB...
...the volume slider at the bottom of the Cubase AI application assigned properly? AUDIOGRAM 3 Owner's Manual 21 The recorded sound is running? Select "No sound" in the "Sound Scheme." Doing so can sometimes cause the Windows output level to be reset to "High." 4. Select "System Preferences ..."Sounds and Audio Devices" icon to the maximum level and mute the computer's internal speaker. Click the "Sounds" tab in the "Sound" dialog window, then select "No sounds" in the "Sound scheme." Click the "Output" tab and under "Choose a device for sound output" select "USB...

Owners Manual
Page 22
... computers, changing some cases it might have a plenty of audio? The "Advanced Audio Properties" dialog window will open the "Sounds and Audio Devices Properties" dialog window. 2. Click the "Performance" tab. Click the "Volume" tab and click "Advanced" in "Speaker settings." Set "Hardware ... (more RAM memory can significantly increase your computer's operating system. In some settings as outlined below for the latest information. 22 AUDIOGRAM 3 Owner's Manual Adding more than 128 megabytes). The number of the computer you are using . ❑ Are you are ...
... computers, changing some cases it might have a plenty of audio? The "Advanced Audio Properties" dialog window will open the "Sounds and Audio Devices Properties" dialog window. 2. Click the "Performance" tab. Click the "Volume" tab and click "Advanced" in "Speaker settings." Set "Hardware ... (more RAM memory can significantly increase your computer's operating system. In some settings as outlined below for the latest information. 22 AUDIOGRAM 3 Owner's Manual Adding more than 128 megabytes). The number of the computer you are using . ❑ Are you are ...
Owners Manual
Page 25
...accessory disk. For information about the minimum system requirements and latest information on the software.) 130 AUDIOGRAM 3 Owner's Manual NOTE • Make sure to install DAW software under exclusive ownership by ...8226; This disk is NOT for audio/visual purpose. About software support Support for Windows and Mac. About the DAW software in the accessory disk The accessory disk contains DAW...you will need to register the software and activate your player. • Note that Yamaha does not offer technical support for registration. About the accessory disk SPECIAL NOTICE • ...
...accessory disk. For information about the minimum system requirements and latest information on the software.) 130 AUDIOGRAM 3 Owner's Manual NOTE • Make sure to install DAW software under exclusive ownership by ...8226; This disk is NOT for audio/visual purpose. About software support Support for Windows and Mac. About the DAW software in the accessory disk The accessory disk contains DAW...you will need to register the software and activate your player. • Note that Yamaha does not offer technical support for registration. About the accessory disk SPECIAL NOTICE • ...
