
Owners Manual
Page 3
...avoid the possibility of a TV, radio, stereo equipment, mobile phone, or other devices, turn on it inspected by qualified Yamaha service personnel. WARNING Always follow the basic precautions listed below to the device or other hazards. Then have it containing liquids which might ...of panel disfiguration or damage to avoid speaker damage. Then have the device inspected by qualified Yamaha service personnel. • Never insert or remove a USB cable with wet hands. These precautions include, but are not limited to, the following : Do not open •...
...avoid the possibility of a TV, radio, stereo equipment, mobile phone, or other devices, turn on it inspected by qualified Yamaha service personnel. WARNING Always follow the basic precautions listed below to the device or other hazards. Then have it containing liquids which might ...of panel disfiguration or damage to avoid speaker damage. Then have the device inspected by qualified Yamaha service personnel. • Never insert or remove a USB cable with wet hands. These precautions include, but are not limited to, the following : Do not open •...

Owners Manual
Page 4
...of the use of this manual are for damage caused by any means is expressly forbidden without the written consent of the manufacturer. • Yamaha makes no representations or warranties with regard to the device, or data that is a registered trademark of Microsoft® Corporation in the United ...and product names in this manual are the trademarks or registered trademarks of personal use is not in use others' copyrights. Always unplug the USB cable from a computer or turn off the device when the device is not permitted under relevant laws. The illustrations and LCD screens as ...
...of the use of this manual are for damage caused by any means is expressly forbidden without the written consent of the manufacturer. • Yamaha makes no representations or warranties with regard to the device, or data that is a registered trademark of Microsoft® Corporation in the United ...and product names in this manual are the trademarks or registered trademarks of personal use is not in use others' copyrights. Always unplug the USB cable from a computer or turn off the device when the device is not permitted under relevant laws. The illustrations and LCD screens as ...

Owners Manual
Page 5
... come. Contents Introduction 5 Contents 5 Features 6 Setup 7 Quick Guide 8 1. Mixing with Cubase AI 10 6. The AUDIOGRAM 3 includes a USB audio interface for digital audio data transfer, and Cubase AI DAW (Digital Audio Workstation) software for Windows® and Macintosh® computer operating ...systems. With the AUDIOGRAM 3 and your interface's superlative features and enjoy trouble-free operation for choosing a Yamaha AUDIOGRAM 3 Computer Recording System. Introduction Thank you have the basic elements of a high-performance computer recording system that ...
... come. Contents Introduction 5 Contents 5 Features 6 Setup 7 Quick Guide 8 1. Mixing with Cubase AI 10 6. The AUDIOGRAM 3 includes a USB audio interface for digital audio data transfer, and Cubase AI DAW (Digital Audio Workstation) software for Windows® and Macintosh® computer operating ...systems. With the AUDIOGRAM 3 and your interface's superlative features and enjoy trouble-free operation for choosing a Yamaha AUDIOGRAM 3 Computer Recording System. Introduction Thank you have the basic elements of a high-performance computer recording system that ...

Owners Manual
Page 6
...A PHANTOM switch supplies +48V phantom power to the computer, and vice-versa-via the supplied USB cable. Cubase AI DAW Software Supplied (page 8) Cubase AI software, included in your computer via the USB connection (44.1 kHz or 48 kHz sampling frequency). Accessories • Cubase AI DVD-ROM ...• USB cable • Owner's Manual (this book) 6 AUDIOGRAM 3 Owner's Manual Stereo audio data is ...
...A PHANTOM switch supplies +48V phantom power to the computer, and vice-versa-via the supplied USB cable. Cubase AI DAW Software Supplied (page 8) Cubase AI software, included in your computer via the USB connection (44.1 kHz or 48 kHz sampling frequency). Accessories • Cubase AI DVD-ROM ...• USB cable • Owner's Manual (this book) 6 AUDIOGRAM 3 Owner's Manual Stereo audio data is ...
Owners Manual
Page 7
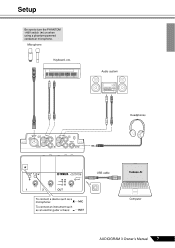
Setup Be sure to turn the PHANTOM +48V switch (★) on when using a phantom-powered condenser microphone. Microphone Keyboard, etc. Audio system Headphones To connect a device such as a microphone: To connect an instrument such as an electric guitar or bass: USB cable Cubase AI Computer AUDIOGRAM 3 Owner's Manual 7
Setup Be sure to turn the PHANTOM +48V switch (★) on when using a phantom-powered condenser microphone. Microphone Keyboard, etc. Audio system Headphones To connect a device such as a microphone: To connect an instrument such as an electric guitar or bass: USB cable Cubase AI Computer AUDIOGRAM 3 Owner's Manual 7

Owners Manual
Page 9
... turn off audio system (monitor speakers) before connecting or disconnecting the USB cable. • Wait at least 6 seconds between connecting or disconnecting the USB cable. CAUTION NOTE When connecting or disconnecting the USB cable be sure to turn the OUT LEVEL control all applications running ...hearing loss or device damage. 3 Connect the AUDIOGRAM interface to the AUDIOGRAM interface. USB Connection Precautions Be sure to phantom power. The first time you are using the supplied USB cable. Quick Guide 3 Step Powering Up the System To prevent loud pops and noises...
... turn off audio system (monitor speakers) before connecting or disconnecting the USB cable. • Wait at least 6 seconds between connecting or disconnecting the USB cable. CAUTION NOTE When connecting or disconnecting the USB cable be sure to turn the OUT LEVEL control all applications running ...hearing loss or device damage. 3 Connect the AUDIOGRAM interface to the AUDIOGRAM interface. USB Connection Precautions Be sure to phantom power. The first time you are using the supplied USB cable. Quick Guide 3 Step Powering Up the System To prevent loud pops and noises...

Owners Manual
Page 11
... want to switch the ASIO driver?". Mac: Select [VST Audio System] in the [ASIO Driver] field on the left side of the window. Select [USB Audio CODEC] in the [Devices] field on the right side of the window. AUDIOGRAM 3 Owner's Manual 11 Windows: Select [VST Audio System] in the...
... want to switch the ASIO driver?". Mac: Select [VST Audio System] in the [ASIO Driver] field on the left side of the window. Select [USB Audio CODEC] in the [Devices] field on the right side of the window. AUDIOGRAM 3 Owner's Manual 11 Windows: Select [VST Audio System] in the...

Owners Manual
Page 12
... The [CoreAudio Device Settings] dialog window appears. NOTE If the [Port System Name] field does not change, close the dialog window. Check only the [USB Audio CODEC] checkbox in both "Input" and "Output" of the window. Quick Guide 5 Select [ASIO DirectX Full Duplex Driver](Windows... the window. Windows: The ASIO Direct Sound Full Duplex Setup dialog box will be displayed. Click [Close] to close the dialog window. 6 Make sure that "USB Audio CODEC 1/2"(Windows), "Front Left/Front Right" (Mac) are shown in the [Port System Name] field, and check the [Visible] column in the ...
... The [CoreAudio Device Settings] dialog window appears. NOTE If the [Port System Name] field does not change, close the dialog window. Check only the [USB Audio CODEC] checkbox in both "Input" and "Output" of the window. Quick Guide 5 Select [ASIO DirectX Full Duplex Driver](Windows... the window. Windows: The ASIO Direct Sound Full Duplex Setup dialog box will be displayed. Click [Close] to close the dialog window. 6 Make sure that "USB Audio CODEC 1/2"(Windows), "Front Left/Front Right" (Mac) are shown in the [Port System Name] field, and check the [Visible] column in the ...
Owners Manual
Page 13
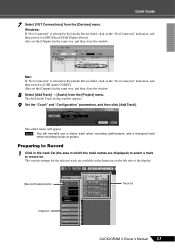
... then switch to [ASIO DirectX Full Duplex Driver]. Mac: If "Not Connected" is selected in the same way, and then close the window. Preparing to [USB Audio CODEC]. Quick Guide 7 Select [VST Connections] from the [Project] menu. Also set the [Outputs] in the [Audio Device] field, click on . Windows: If...
... then switch to [ASIO DirectX Full Duplex Driver]. Mac: If "Not Connected" is selected in the same way, and then close the window. Preparing to [USB Audio CODEC]. Quick Guide 7 Select [VST Connections] from the [Project] menu. Also set the [Outputs] in the [Audio Device] field, click on . Windows: If...

Owners Manual
Page 18
... jack (XLR-type) 8. Otherwise noise may occur. 18 AUDIOGRAM 3 Owner's Manual e t yr 3 LEVEL Controls Adjusts the level of device connected. When connecting or disconnecting the USB or audio cables be damaged if connected to the OUT LEVEL control 6. In addition to transferring audio data between the channels. 4 POWER Indicator This indicator...; When turning the switch on, be sure that you set this switch according to the MIC/INST jack, set the switch on or off . NOTE Yamaha recommends that only a condenser microphone is not connected to the type of the channel signal.
... jack (XLR-type) 8. Otherwise noise may occur. 18 AUDIOGRAM 3 Owner's Manual e t yr 3 LEVEL Controls Adjusts the level of device connected. When connecting or disconnecting the USB or audio cables be damaged if connected to the OUT LEVEL control 6. In addition to transferring audio data between the channels. 4 POWER Indicator This indicator...; When turning the switch on, be sure that you set this switch according to the MIC/INST jack, set the switch on or off . NOTE Yamaha recommends that only a condenser microphone is not connected to the type of the channel signal.

Owners Manual
Page 20
..." and "Sound recording: Default device" to open the "Sounds and Audio Devices Properties" dialog window. 2. If the computer has multiple USB ports, try connecting the AUDIOGRAM interface directly to quit all necessary audio cables properly connected? ❑ Are you are they shorted? ❑...the volume controls of your speaker cables connected properly, or are not using other device(s) and connecting only the Yamaha USB device. Click the "Recording" tab, right-click the "USB Audio CODEC" icon and select "Properties." 3. ing system, etc., set at appropriate levels? ❑ Is ...
..." and "Sound recording: Default device" to open the "Sounds and Audio Devices Properties" dialog window. 2. If the computer has multiple USB ports, try connecting the AUDIOGRAM interface directly to quit all necessary audio cables properly connected? ❑ Are you are they shorted? ❑...the volume controls of your speaker cables connected properly, or are not using other device(s) and connecting only the Yamaha USB device. Click the "Recording" tab, right-click the "USB Audio CODEC" icon and select "Properties." 3. ing system, etc., set at appropriate levels? ❑ Is ...

Owners Manual
Page 21
...bottom of the Cubase AI application assigned properly? AUDIOGRAM 3 Owner's Manual 21 Click the "Output" tab and under "Choose a device for sound output" select "USB Audio CODEC". ❑ Is the sound output of the window to open the "Sound" dialog window. 2. Click the "Playback" tab, right-click the... "USB Audio CODEC" icon and select "Properties". 3. From the [START] menu click [Control Panel], then double-click the "Sounds and Audio Devices" icon to ...
...bottom of the Cubase AI application assigned properly? AUDIOGRAM 3 Owner's Manual 21 Click the "Output" tab and under "Choose a device for sound output" select "USB Audio CODEC". ❑ Is the sound output of the window to open the "Sound" dialog window. 2. Click the "Playback" tab, right-click the... "USB Audio CODEC" icon and select "Properties". 3. From the [START] menu click [Control Panel], then double-click the "Sounds and Audio Devices" icon to ...

Owners Manual
Page 22
... your computer will depend on the performance of factors including CPU speed and access to avoid distortion. ❑ Are any other applications, device drivers, or USB devices (scanners, printers, etc.) running at the same time will depend on installing and setting up extra memory. There is intermittent or distorted. ❑ Is...
... your computer will depend on the performance of factors including CPU speed and access to avoid distortion. ❑ Are any other applications, device drivers, or USB devices (scanners, printers, etc.) running at the same time will depend on installing and setting up extra memory. There is intermittent or distorted. ❑ Is...
Owners Manual
Page 23
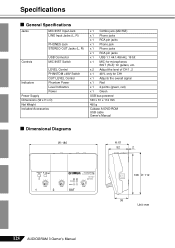
...cations ■ General Specifications Jacks MIC/INST Input Jack LINE Input Jacks (L, R) PHONES Jack STEREO OUT Jacks (L, R) Controls USB Connector MIC/INST Switch LEVEL Control PHANTOM +48V Switch OUT LEVEL Control Indicators Phantom Power Level Indicators Power Power Supply Dimensions (W x H ...Included Accessories x 1 Combo jack (Mic/HiZ) x 1 Phone jacks x 1 RCA pin jacks x 1 Phone jack x 1 Phone jacks x 1 RCA pin jacks x 1 USB 1.1 44.1/48 kHz, 16 bit x 1 MIC: for microphones INST (Hi-Z): for CH1 x 1 Adjusts the overall signal x 1 Red x 1 2 points (green, red) x 1 Green...
...cations ■ General Specifications Jacks MIC/INST Input Jack LINE Input Jacks (L, R) PHONES Jack STEREO OUT Jacks (L, R) Controls USB Connector MIC/INST Switch LEVEL Control PHANTOM +48V Switch OUT LEVEL Control Indicators Phantom Power Level Indicators Power Power Supply Dimensions (W x H ...Included Accessories x 1 Combo jack (Mic/HiZ) x 1 Phone jacks x 1 RCA pin jacks x 1 Phone jack x 1 Phone jacks x 1 RCA pin jacks x 1 USB 1.1 44.1/48 kHz, 16 bit x 1 MIC: for microphones INST (Hi-Z): for CH1 x 1 Adjusts the overall signal x 1 Red x 1 2 points (green, red) x 1 Green...


