
Owners Manual
Page 4
...in this manual are for instructional purposes, and may appear somewhat different from those on your Yamaha dealer. 4 AUDIOGRAM 3 Owner's Manual Any violation of Microsoft® Corporation in the United States and other countries... displays as follows (IEC60268 standard): pin 1: ground, pin 2: hot (+), and pin 3: cold (-). 2 1 3 Yamaha cannot be held responsible for instructional purposes only, and may not be the same in which appear on equipment other than ... MAKE, DISTRIBUTE OR USE ILLEGAL COPIES. • Windows is a registered trademark of copyright has legal consequences.
...in this manual are for instructional purposes, and may appear somewhat different from those on your Yamaha dealer. 4 AUDIOGRAM 3 Owner's Manual Any violation of Microsoft® Corporation in the United States and other countries... displays as follows (IEC60268 standard): pin 1: ground, pin 2: hot (+), and pin 3: cold (-). 2 1 3 Yamaha cannot be held responsible for instructional purposes only, and may not be the same in which appear on equipment other than ... MAKE, DISTRIBUTE OR USE ILLEGAL COPIES. • Windows is a registered trademark of copyright has legal consequences.

Owners Manual
Page 5
... 128 General Specifications 128 Dimensional Diagrams 128 Block Diagram and Level Diagram 129 About the accessory disk 130 AUDIOGRAM 3 Owner's Manual 5 Connecting to come. Introduction Thank you have the basic elements of a high...AUDIOGRAM interface 8 3. The AUDIOGRAM 3 includes a USB audio interface for digital audio data transfer, and Cubase AI DAW (Digital Audio Workstation) software for Windows® and Macintosh® computer operating systems. With the AUDIOGRAM 3 and your interface's superlative features and enjoy trouble-free operation for choosing a Yamaha AUDIOGRAM...
... 128 General Specifications 128 Dimensional Diagrams 128 Block Diagram and Level Diagram 129 About the accessory disk 130 AUDIOGRAM 3 Owner's Manual 5 Connecting to come. Introduction Thank you have the basic elements of a high...AUDIOGRAM interface 8 3. The AUDIOGRAM 3 includes a USB audio interface for digital audio data transfer, and Cubase AI DAW (Digital Audio Workstation) software for Windows® and Macintosh® computer operating systems. With the AUDIOGRAM 3 and your interface's superlative features and enjoy trouble-free operation for choosing a Yamaha AUDIOGRAM...

Owners Manual
Page 10
... in the "Troubleshooting" on the highest peak levels. 3 Adjust the overall volume with the OUT LEVEL control while monitoring via the AUDIOGRAM interface. CAUTION 2 Adjust the channel LEVEL controls so that are connected to the Cubase AI software we installed earlier via headphones or monitor...about other versions of Cubase AI or Cubase AI operation in general, refer to launch the program. ("*" indicates where the version number appears in level." Windows: Click [Start] → [All Program] → [Steinberg Cubase AI *] → [Cubase AI *] to the PDF manual provided with ...
... in the "Troubleshooting" on the highest peak levels. 3 Adjust the overall volume with the OUT LEVEL control while monitoring via the AUDIOGRAM interface. CAUTION 2 Adjust the channel LEVEL controls so that are connected to the Cubase AI software we installed earlier via headphones or monitor...about other versions of Cubase AI or Cubase AI operation in general, refer to launch the program. ("*" indicates where the version number appears in level." Windows: Click [Start] → [All Program] → [Steinberg Cubase AI *] → [Cubase AI *] to the PDF manual provided with ...

Owners Manual
Page 11
...: Select [VST Audio System] in the [Devices] field on the left side of the window. Select [ASIO DirectX Full Duplex Driver] in the [ASIO Driver] field on the right side of the window. Click [Switch]. A dialog box will appear asking "Do you want to switch the ASIO driver... from the [Devices] menu to switch the ASIO driver?". A dialog box will appear asking "Do you want to open the Device Setup window. NOTE Recorded Cubase AI data is created. AUDIOGRAM 3 Owner's Manual 11 Select [USB Audio CODEC] in the [ASIO Driver] field on the right side of the...
...: Select [VST Audio System] in the [Devices] field on the left side of the window. Select [ASIO DirectX Full Duplex Driver] in the [ASIO Driver] field on the right side of the window. Click [Switch]. A dialog box will appear asking "Do you want to switch the ASIO driver... from the [Devices] menu to switch the ASIO driver?". A dialog box will appear asking "Do you want to open the Device Setup window. NOTE Recorded Cubase AI data is created. AUDIOGRAM 3 Owner's Manual 11 Select [USB Audio CODEC] in the [ASIO Driver] field on the right side of the...

Owners Manual
Page 12
...64257;eld. Click [OK] to close the window. Quick Guide 5 Select [ASIO DirectX Full Duplex Driver](Windows), [USB Audio CODEC](Mac) in both "Input" and "Output" of the window. Click [Close] to close the dialog window. 6 Make sure that "USB Audio CODEC 1/2"(Windows), "Front Left/Front Right" (Mac) are...[Visible] column in the Device Setup window. Check only the input port and output port [USB Audio CODEC] checkbox, and then click [OK] to close and restart the Cubase AI, then open the Device Setup window. 12 AUDIOGRAM 3 Owner's Manual Windows: The ASIO Direct Sound Full Duplex ...
...64257;eld. Click [OK] to close the window. Quick Guide 5 Select [ASIO DirectX Full Duplex Driver](Windows), [USB Audio CODEC](Mac) in both "Input" and "Output" of the window. Click [Close] to close the dialog window. 6 Make sure that "USB Audio CODEC 1/2"(Windows), "Front Left/Front Right" (Mac) are...[Visible] column in the Device Setup window. Check only the input port and output port [USB Audio CODEC] checkbox, and then click [OK] to close and restart the Cubase AI, then open the Device Setup window. 12 AUDIOGRAM 3 Owner's Manual Windows: The ASIO Direct Sound Full Duplex ...
Owners Manual
Page 13
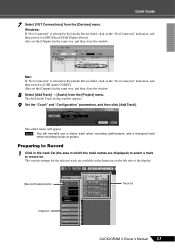
... Guide 7 Select [VST Connections] from the [Project] menu. Windows: If "Not Connected" is selected in the [Audio Device] field, click on the left side of the display. [Record Enable] button Track list Inspector AUDIOGRAM 3 Owner's Manual 13 The various settings for the selected track are...Not Connected" is selected in the [Audio Device] field, click on . Also set the [Outputs] in the same way, and then close the window. 8 Select [Add Track] → [Audio] from the [Devices] menu. The added tracks will normally use a stereo track when recording synthesizers, and...
... Guide 7 Select [VST Connections] from the [Project] menu. Windows: If "Not Connected" is selected in the [Audio Device] field, click on the left side of the display. [Record Enable] button Track list Inspector AUDIOGRAM 3 Owner's Manual 13 The various settings for the selected track are...Not Connected" is selected in the [Audio Device] field, click on . Also set the [Outputs] in the same way, and then close the window. 8 Select [Add Track] → [Audio] from the [Devices] menu. The added tracks will normally use a stereo track when recording synthesizers, and...

Owners Manual
Page 14
...right and a box that displays the recording results will be recorded, and adjust the AUDIOGRAM LEVEL controls so that the Clipping indicator never lights. Clipping indicator 4 Specify the point at the top of the window for the track to be created. Click the black area of the ruler to move...Rewind] button or the ruler to rewind to that position. To hear playback of the recorded section, then click the Transport panel [Start] button. 14 AUDIOGRAM 3 Owner's Manual Quick Guide 2 Make sure the [Record Enable] button for the project. If the [Record Enable] button is off, click it to...
...right and a box that displays the recording results will be recorded, and adjust the AUDIOGRAM LEVEL controls so that the Clipping indicator never lights. Clipping indicator 4 Specify the point at the top of the window for the track to be created. Click the black area of the ruler to move...Rewind] button or the ruler to rewind to that position. To hear playback of the recorded section, then click the Transport panel [Start] button. 14 AUDIOGRAM 3 Owner's Manual Quick Guide 2 Make sure the [Record Enable] button for the project. If the [Record Enable] button is off, click it to...

Owners Manual
Page 15
...the file. Save your project frequently to insure against losing large amounts of the mixer window, and the channel level will be sent to Cubase AI for recording using the AUDIOGRAM level indicators while the Cubase monitoring button ( ) is set as high as possible without clipping.... with maximum quality and minimum noise: For optimum sound quality with the OUT LEVEL control. Monitoring button AUDIOGRAM 3 Owner's Manual 15 The playback level will be set to open the Mixer window. Level meter Bus level meter 5 To save the project select [Save] from the [Devices] menu...
...the file. Save your project frequently to insure against losing large amounts of the mixer window, and the channel level will be sent to Cubase AI for recording using the AUDIOGRAM level indicators while the Cubase monitoring button ( ) is set as high as possible without clipping.... with maximum quality and minimum noise: For optimum sound quality with the OUT LEVEL control. Monitoring button AUDIOGRAM 3 Owner's Manual 15 The playback level will be set to open the Mixer window. Level meter Bus level meter 5 To save the project select [Save] from the [Devices] menu...

Owners Manual
Page 16
... to playback, drag the channel strip level faders up and down multiple recorded audio tracks to open the VST audio channel settings window. Click Inserts 1 and select "Reverb - CAUTION 16 AUDIOGRAM 3 Owner's Manual Mixes can be recorded to audio CDs. 1 Launch Cubase AI and open a project file. 2 Click the [Start] button...
... to playback, drag the channel strip level faders up and down multiple recorded audio tracks to open the VST audio channel settings window. Click Inserts 1 and select "Reverb - CAUTION 16 AUDIOGRAM 3 Owner's Manual Mixes can be recorded to audio CDs. 1 Launch Cubase AI and open a project file. 2 Click the [Start] button...

Owners Manual
Page 17
... and select a destination for the file as well as a file type. Progress of the mixdown operation will be directly played back using the Windows Media Player, or iTunes. NOTE Files created by mixdown can be shown in a progress window. AUDIOGRAM 3 Owner's Manual 17 When the progress window closes the mixdown is complete.
... and select a destination for the file as well as a file type. Progress of the mixdown operation will be directly played back using the Windows Media Player, or iTunes. NOTE Files created by mixdown can be shown in a progress window. AUDIOGRAM 3 Owner's Manual 17 When the progress window closes the mixdown is complete.

Owners Manual
Page 20
... system assigned properly? 1. Be sure to open the "Sound" dialog window. 2. Windows XP: 1. Click the "Audio" tab. 3. Click [OK]. 20 AUDIOGRAM 3 Owner's Manual If so, try removing the other USB devices at the same time? Windows 7/Vista: 1. Click the [Recording] tab and check whether the "USB... computer? USB hubs can interfere with proper operation, so try a different USB port. ❑ Are you using other device(s) and connecting only the Yamaha USB device. Click the "Advanced" tab, then select "2 channel, 16 bit, 44100 Hz (CD Quality)" or "2 channel, 16 bit, 48000 ...
... system assigned properly? 1. Be sure to open the "Sound" dialog window. 2. Windows XP: 1. Click the "Audio" tab. 3. Click [OK]. 20 AUDIOGRAM 3 Owner's Manual If so, try removing the other USB devices at the same time? Windows 7/Vista: 1. Click the [Recording] tab and check whether the "USB... computer? USB hubs can interfere with proper operation, so try a different USB port. ❑ Are you using other device(s) and connecting only the Yamaha USB device. Click the "Advanced" tab, then select "2 channel, 16 bit, 44100 Hz (CD Quality)" or "2 channel, 16 bit, 48000 ...

Owners Manual
Page 21
... mum level. ❑ Have you set the volume slider of the Cubase AI application assigned properly? Check and raise the output level if necessary. AUDIOGRAM 3 Owner's Manual 21 Click the "Output" tab and under "Choose a device for sound output" select "USB Audio CODEC". ❑ Is the... device for sound input" select "USB Audio CODEC". 3. Click the "Levels" tab, then set the volume slider at the bottom of the Quick Guide. Windows XP: 1. Troubleshooting Mac: 1. Select "System Preferences ..." from the Apple menu and then select "Sound" to "High." 4. From the [START] menu ...
... mum level. ❑ Have you set the volume slider of the Cubase AI application assigned properly? Check and raise the output level if necessary. AUDIOGRAM 3 Owner's Manual 21 Click the "Output" tab and under "Choose a device for sound output" select "USB Audio CODEC". ❑ Is the... device for sound input" select "USB Audio CODEC". 3. Click the "Levels" tab, then set the volume slider at the bottom of the Quick Guide. Windows XP: 1. Troubleshooting Mac: 1. Select "System Preferences ..." from the Apple menu and then select "Sound" to "High." 4. From the [START] menu ...

Owners Manual
Page 22
...playing long continuous sections of the computer you are not using . Click the "Volume" tab and click "Advanced" in "Speaker settings." On Windows XP computers, changing some cases it might have a plenty of audio tracks? Set "Hardware acceleration" to open . 3. Click [Control Panel] ...and make sure that you are recording or playing are not familiar with your computer's owner's manual for the latest information. 22 AUDIOGRAM 3 Owner's Manual Adding more information. ❑ Try adding memory. You might be necessary to quit all applications you are not...
...playing long continuous sections of the computer you are not using . Click the "Volume" tab and click "Advanced" in "Speaker settings." On Windows XP computers, changing some cases it might have a plenty of audio tracks? Set "Hardware acceleration" to open . 3. Click [Control Panel] ...and make sure that you are recording or playing are not familiar with your computer's owner's manual for the latest information. 22 AUDIOGRAM 3 Owner's Manual Adding more information. ❑ Try adding memory. You might be necessary to quit all applications you are not...
Owners Manual
Page 25
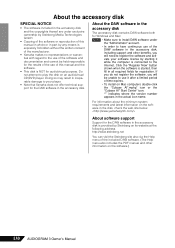
... in part by any means is expressly forbidden without the written consent of the manufacturer. • Yamaha makes no representations or warranties with regard to use of this manual and the software. • ...of the software or reproduction of this manual in whole or in all required fields for Windows and Mac. About software support Support for the DAW software in the disk, check the web... also via the Help menu of time expires. • To install on the software.) 130 AUDIOGRAM 3 Owner's Manual Doing so may result in irreparable damage to your software license by Steinberg on...
... in part by any means is expressly forbidden without the written consent of the manufacturer. • Yamaha makes no representations or warranties with regard to use of this manual and the software. • ...of the software or reproduction of this manual in whole or in all required fields for Windows and Mac. About software support Support for the DAW software in the disk, check the web... also via the Help menu of time expires. • To install on the software.) 130 AUDIOGRAM 3 Owner's Manual Doing so may result in irreparable damage to your software license by Steinberg on...
