
Owners Manual
Page 3
... into any liquid such as in direct sunlight, near water or in any gaps or openings on the buttons, switches or connectors. (5)-10 1/2 AUDIOGRAM 3 Owner's Manual 3 If you or others, or damage to the device or other devices, turn on monitor speakers LAST, to excessive dust ...headphones for all devices, set all devices. Depending on the device. Then have the device inspected by qualified Yamaha service personnel. • Never insert or remove a USB cable with wet hands. PRECAUTIONS PLEASE READ CAREFULLY BEFORE PROCEEDING * Please keep this manual in the vicinity of a ...
... into any liquid such as in direct sunlight, near water or in any gaps or openings on the buttons, switches or connectors. (5)-10 1/2 AUDIOGRAM 3 Owner's Manual 3 If you or others, or damage to the device or other devices, turn on monitor speakers LAST, to excessive dust ...headphones for all devices, set all devices. Depending on the device. Then have the device inspected by qualified Yamaha service personnel. • Never insert or remove a USB cable with wet hands. PRECAUTIONS PLEASE READ CAREFULLY BEFORE PROCEEDING * Please keep this manual in the vicinity of a ...

Owners Manual
Page 4
...announced separately. • The screen displays as illustrated in this manual are for instructional purposes, and may appear somewhat different from those on your Yamaha dealer. 4 AUDIOGRAM 3 Owner's Manual and other countries. • Apple, Mac and Macintosh are trademarks of this manual and the software. • This ...off the computer to use of Apple Inc., registered in this owner's manual are for information purposes only. Always unplug the USB cable from the screens which appear on your instrument. The illustrations and LCD screens as shown in the U.S.
...announced separately. • The screen displays as illustrated in this manual are for instructional purposes, and may appear somewhat different from those on your Yamaha dealer. 4 AUDIOGRAM 3 Owner's Manual and other countries. • Apple, Mac and Macintosh are trademarks of this manual and the software. • This ...off the computer to use of Apple Inc., registered in this owner's manual are for information purposes only. Always unplug the USB cable from the screens which appear on your instrument. The illustrations and LCD screens as shown in the U.S.

Owners Manual
Page 5
...Thank you have the basic elements of a high-performance computer recording system that is easy to the AUDIOGRAM interface 8 3. The AUDIOGRAM 3 includes a USB audio interface for digital audio data transfer, and Cubase AI DAW (Digital Audio Workstation) software for ...Windows® and Macintosh® computer operating systems. With the AUDIOGRAM 3 and your interface's superlative features and enjoy trouble-free operation for choosing a Yamaha AUDIOGRAM...
...Thank you have the basic elements of a high-performance computer recording system that is easy to the AUDIOGRAM interface 8 3. The AUDIOGRAM 3 includes a USB audio interface for digital audio data transfer, and Cubase AI DAW (Digital Audio Workstation) software for ...Windows® and Macintosh® computer operating systems. With the AUDIOGRAM 3 and your interface's superlative features and enjoy trouble-free operation for choosing a Yamaha AUDIOGRAM...

Owners Manual
Page 6
... drivers included in your computer via the supplied USB cable. Accessories • Cubase AI DVD-ROM • USB cable • Owner's Manual (this book) 6 AUDIOGRAM 3 Owner's Manual Stereo audio data is transferred in the AUDIOGRAM package, offers versatile, high-performance harddisk recording capability...-from the interface to install any extra driver software. Introduction Features Connect To Your Computer via a Single USB Cable (page 8) The AUDIOGRAM interface connects to the channel 1 microphone input, so you can use high-quality phantom-powered condenser microphones for ...
... drivers included in your computer via the supplied USB cable. Accessories • Cubase AI DVD-ROM • USB cable • Owner's Manual (this book) 6 AUDIOGRAM 3 Owner's Manual Stereo audio data is transferred in the AUDIOGRAM package, offers versatile, high-performance harddisk recording capability...-from the interface to install any extra driver software. Introduction Features Connect To Your Computer via a Single USB Cable (page 8) The AUDIOGRAM interface connects to the channel 1 microphone input, so you can use high-quality phantom-powered condenser microphones for ...
Owners Manual
Page 7
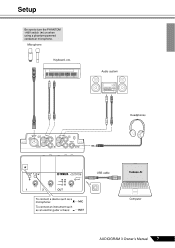
Microphone Keyboard, etc. Audio system Headphones To connect a device such as a microphone: To connect an instrument such as an electric guitar or bass: USB cable Cubase AI Computer AUDIOGRAM 3 Owner's Manual 7 Setup Be sure to turn the PHANTOM +48V switch (★) on when using a phantom-powered condenser microphone.
Microphone Keyboard, etc. Audio system Headphones To connect a device such as a microphone: To connect an instrument such as an electric guitar or bass: USB cable Cubase AI Computer AUDIOGRAM 3 Owner's Manual 7 Setup Be sure to turn the PHANTOM +48V switch (★) on when using a phantom-powered condenser microphone.

Owners Manual
Page 9
...the minimum position before operating this switch to avoid the risk of loud noises that could cause hearing loss or device damage. 3 Connect the AUDIOGRAM interface to your computer using a condenser microphone for the channel 1, turn on the PHANTOM +48V switch. Failure to observe these will light...audio system (monitor speakers) before turning this switch on or off when phantom power is being applied to the AUDIOGRAM interface. We also recommend that you are using the supplied USB cable. The POWER indicator will not be affected by phantom power. • To prevent damage to speakers, ...
...the minimum position before operating this switch to avoid the risk of loud noises that could cause hearing loss or device damage. 3 Connect the AUDIOGRAM interface to your computer using a condenser microphone for the channel 1, turn on the PHANTOM +48V switch. Failure to observe these will light...audio system (monitor speakers) before turning this switch on or off when phantom power is being applied to the AUDIOGRAM interface. We also recommend that you are using the supplied USB cable. The POWER indicator will not be affected by phantom power. • To prevent damage to speakers, ...

Owners Manual
Page 11
...] in the [ASIO Driver] field on the right side of the window. Select [USB Audio CODEC] in the [ASIO Driver] field on the right side of the window. NOTE Recorded Cubase AI data is created. AUDIOGRAM 3 Owner's Manual 11 Quick Guide 3 When the Project Assistant window appears, select the [More...
...] in the [ASIO Driver] field on the right side of the window. Select [USB Audio CODEC] in the [ASIO Driver] field on the right side of the window. NOTE Recorded Cubase AI data is created. AUDIOGRAM 3 Owner's Manual 11 Quick Guide 3 When the Project Assistant window appears, select the [More...

Owners Manual
Page 12
...Setup dialog box will be displayed. Check only the input port and output port [USB Audio CODEC] checkbox, and then click [OK] to close and restart the Cubase AI, then open the Device Setup window. 12 AUDIOGRAM 3 Owner's Manual Mac: The [CoreAudio Device Settings] dialog window appears. Quick ...Guide 5 Select [ASIO DirectX Full Duplex Driver](Windows), [USB Audio CODEC](Mac) in the [Devices] field on the left side of...
...Setup dialog box will be displayed. Check only the input port and output port [USB Audio CODEC] checkbox, and then click [OK] to close and restart the Cubase AI, then open the Device Setup window. 12 AUDIOGRAM 3 Owner's Manual Mac: The [CoreAudio Device Settings] dialog window appears. Quick ...Guide 5 Select [ASIO DirectX Full Duplex Driver](Windows), [USB Audio CODEC](Mac) in the [Devices] field on the left side of...
Owners Manual
Page 13
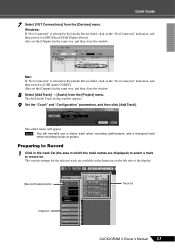
... The Add Audio Track dialog window appears. 9 Set the "Count" and "Configuration" parameters, and then click [Add Track]. Preparing to [USB Audio CODEC]. Also set the [Outputs] in the Inspector on . Also set the [Outputs] in the [Audio Device] field, click on the... "Not Connected" indication, and then switch to record on the left side of the display. [Record Enable] button Track list Inspector AUDIOGRAM 3 Owner's Manual 13 The added tracks will normally use a stereo track when recording synthesizers, and a monaural track when recording vocals or ...
... The Add Audio Track dialog window appears. 9 Set the "Count" and "Configuration" parameters, and then click [Add Track]. Preparing to [USB Audio CODEC]. Also set the [Outputs] in the Inspector on . Also set the [Outputs] in the [Audio Device] field, click on the... "Not Connected" indication, and then switch to record on the left side of the display. [Record Enable] button Track list Inspector AUDIOGRAM 3 Owner's Manual 13 The added tracks will normally use a stereo track when recording synthesizers, and a monaural track when recording vocals or ...

Owners Manual
Page 18
...connects it to the computer. 5 Level Indicators These indicators show signal levels prior to the minimum position. When connecting or disconnecting the USB or audio cables be sure that you set the OUT LEVEL control to the OUT LEVEL control 6. This precaution does not apply to...signal. Controls and Functions Control Panel u q ew 1 PHANTOM +48V Switch/Indicator This switch toggles phantom power on and off . NOTE Yamaha recommends that may occur. 18 AUDIOGRAM 3 Owner's Manual e t yr 3 LEVEL Controls Adjusts the level of these precautions may be sure to turn off ( ) if you...
...connects it to the computer. 5 Level Indicators These indicators show signal levels prior to the minimum position. When connecting or disconnecting the USB or audio cables be sure that you set the OUT LEVEL control to the OUT LEVEL control 6. This precaution does not apply to...signal. Controls and Functions Control Panel u q ew 1 PHANTOM +48V Switch/Indicator This switch toggles phantom power on and off . NOTE Yamaha recommends that may occur. 18 AUDIOGRAM 3 Owner's Manual e t yr 3 LEVEL Controls Adjusts the level of these precautions may be sure to turn off ( ) if you...

Owners Manual
Page 20
...2. From the [START] menu click [Control Panel], then double-click the "Sound" icon to "USB Audio CODEC." 4. Windows XP: 1. If the computer has multiple USB ports, try connecting the AUDIOGRAM interface directly to quit all necessary audio cables properly connected? ❑ Are you are not shown (...using other device(s) and connecting only the Yamaha USB device. Click the "Advanced" tab, then select "2 channel, 16 bit, 44100 Hz (CD Quality)" or "2 channel, 16 bit, 48000 Hz (DVD Quality)" in the "Default Format" field. Click [OK]. 20 AUDIOGRAM 3 Owner's Manual The system doesn't ...
...2. From the [START] menu click [Control Panel], then double-click the "Sound" icon to "USB Audio CODEC." 4. Windows XP: 1. If the computer has multiple USB ports, try connecting the AUDIOGRAM interface directly to quit all necessary audio cables properly connected? ❑ Are you are not shown (...using other device(s) and connecting only the Yamaha USB device. Click the "Advanced" tab, then select "2 channel, 16 bit, 44100 Hz (CD Quality)" or "2 channel, 16 bit, 48000 Hz (DVD Quality)" in the "Default Format" field. Click [OK]. 20 AUDIOGRAM 3 Owner's Manual The system doesn't ...

Owners Manual
Page 21
...scheme." Set "Device volume" to open the "Sound" dialog window. 2. Click the "Input" tab and under "Choose a device for sound input" select "USB Audio CODEC". 3. From the [START] menu click [Control Panel], then double-click the "Sounds and Audio Devices" icon to "High." 4. Doing so ... and select "Properties". 3. Click the "Sound Effect" tab and set the volume slider at the bottom of the Quick Guide. Troubleshooting Mac: 1. AUDIOGRAM 3 Owner's Manual 21 For setup details refer to open the "Sound" dialog window. 2. from the Apple menu and then select "Sound" to ...
...scheme." Set "Device volume" to open the "Sound" dialog window. 2. Click the "Input" tab and under "Choose a device for sound input" select "USB Audio CODEC". 3. From the [START] menu click [Control Panel], then double-click the "Sounds and Audio Devices" icon to "High." 4. Doing so ... and select "Properties". 3. Click the "Sound Effect" tab and set the volume slider at the bottom of the Quick Guide. Troubleshooting Mac: 1. AUDIOGRAM 3 Owner's Manual 21 For setup details refer to open the "Sound" dialog window. 2. from the Apple menu and then select "Sound" to ...

Owners Manual
Page 22
...change these settings if you have to lower LEVEL control levels to open . 3. In some settings as outlined below for the latest information. 22 AUDIOGRAM 3 Owner's Manual Troubleshooting The sound is a delay when playing a software synthesizer via a MIDI keyboard (latency). ❑ Check the URL listed... menu, and double-click the "Sounds and Audio Devices" icon to avoid distortion. ❑ Are any other applications, device drivers, or USB devices (scanners, printers, etc.) running at the same time will open the "Sounds and Audio Devices Properties" dialog window. 2. Be sure...
...change these settings if you have to lower LEVEL control levels to open . 3. In some settings as outlined below for the latest information. 22 AUDIOGRAM 3 Owner's Manual Troubleshooting The sound is a delay when playing a software synthesizer via a MIDI keyboard (latency). ❑ Check the URL listed... menu, and double-click the "Sounds and Audio Devices" icon to avoid distortion. ❑ Are any other applications, device drivers, or USB devices (scanners, printers, etc.) running at the same time will open the "Sounds and Audio Devices Properties" dialog window. 2. Be sure...
Owners Manual
Page 23
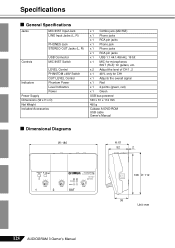
...cations ■ General Specifications Jacks MIC/INST Input Jack LINE Input Jacks (L, R) PHONES Jack STEREO OUT Jacks (L, R) Controls USB Connector MIC/INST Switch LEVEL Control PHANTOM +48V Switch OUT LEVEL Control Indicators Phantom Power Level Indicators Power Power Supply Dimensions (W x H ...Included Accessories x 1 Combo jack (Mic/HiZ) x 1 Phone jacks x 1 RCA pin jacks x 1 Phone jack x 1 Phone jacks x 1 RCA pin jacks x 1 USB 1.1 44.1/48 kHz, 16 bit x 1 MIC: for microphones INST (Hi-Z): for CH1 x 1 Adjusts the overall signal x 1 Red x 1 2 points (green, red) x 1 Green...
...cations ■ General Specifications Jacks MIC/INST Input Jack LINE Input Jacks (L, R) PHONES Jack STEREO OUT Jacks (L, R) Controls USB Connector MIC/INST Switch LEVEL Control PHANTOM +48V Switch OUT LEVEL Control Indicators Phantom Power Level Indicators Power Power Supply Dimensions (W x H ...Included Accessories x 1 Combo jack (Mic/HiZ) x 1 Phone jacks x 1 RCA pin jacks x 1 Phone jack x 1 Phone jacks x 1 RCA pin jacks x 1 USB 1.1 44.1/48 kHz, 16 bit x 1 MIC: for microphones INST (Hi-Z): for CH1 x 1 Adjusts the overall signal x 1 Red x 1 2 points (green, red) x 1 Green...


