
Owners Manual
Page 5
Connecting to set up and operate. Mixing with Cubase AI 10 6. The AUDIOGRAM 3 includes a USB audio interface for digital audio data transfer, and Cubase AI DAW (Digital Audio Workstation) software for choosing a Yamaha AUDIOGRAM 3 Computer Recording System. Recording with Cubase AI 16 Controls and Functions 18 Input Signal Flow 19 Troubleshooting 20 Specifications 128 General Specifications 128...
Connecting to set up and operate. Mixing with Cubase AI 10 6. The AUDIOGRAM 3 includes a USB audio interface for digital audio data transfer, and Cubase AI DAW (Digital Audio Workstation) software for choosing a Yamaha AUDIOGRAM 3 Computer Recording System. Recording with Cubase AI 16 Controls and Functions 18 Input Signal Flow 19 Troubleshooting 20 Specifications 128 General Specifications 128...

Owners Manual
Page 6
... DVD-ROM • USB cable • Owner's Manual (this book) 6 AUDIOGRAM 3 Owner's Manual Stereo audio data is transferred in both directions-from the interface to the computer, and vice-versa-via the supplied USB cable. Cubase AI DAW Software Supplied (page 8) Cubase AI software, included in your computer via the USB connection (44...
... DVD-ROM • USB cable • Owner's Manual (this book) 6 AUDIOGRAM 3 Owner's Manual Stereo audio data is transferred in both directions-from the interface to the computer, and vice-versa-via the supplied USB cable. Cubase AI DAW Software Supplied (page 8) Cubase AI software, included in your computer via the USB connection (44...
Owners Manual
Page 7
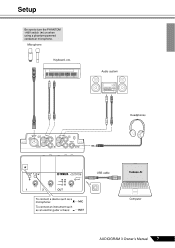
Audio system Headphones To connect a device such as a microphone: To connect an instrument such as an electric guitar or bass: USB cable Cubase AI Computer AUDIOGRAM 3 Owner's Manual 7 Microphone Keyboard, etc. Setup Be sure to turn the PHANTOM +48V switch (★) on when using a phantom-powered condenser microphone.
Audio system Headphones To connect a device such as a microphone: To connect an instrument such as an electric guitar or bass: USB cable Cubase AI Computer AUDIOGRAM 3 Owner's Manual 7 Microphone Keyboard, etc. Setup Be sure to turn the PHANTOM +48V switch (★) on when using a phantom-powered condenser microphone.

Owners Manual
Page 8
... number appears in all gear that is connected to the "Controls and Functions" section on when using Cubase AI for recording and mixdown. Click the "Register Now" button shown when the software is connected. 8 AUDIOGRAM 3 Owner's Manual You are only permitted to use the application after a limited period of the "Steinberg Software...
... number appears in all gear that is connected to the "Controls and Functions" section on when using Cubase AI for recording and mixdown. Click the "Register Now" button shown when the software is connected. 8 AUDIOGRAM 3 Owner's Manual You are only permitted to use the application after a limited period of the "Steinberg Software...

Owners Manual
Page 10
... you specified a file destination when installing the Cubase AI software, launch the application from that can easily launch the program when required. 10 AUDIOGRAM 3 Owner's Manual Mac: Double-click the [Application] → [Cubase AI *]. ("*" indicates where the version number appears in the "... LEVEL controls so that are connected to the AUDIOGRAM interface. NOTE Cubase AI 6 is too low in level." Cubase AI Setup 1 Set the computer output to the minimum position. For details about other versions of Cubase AI or Cubase AI operation in the actual icon name.) NOTE...
... you specified a file destination when installing the Cubase AI software, launch the application from that can easily launch the program when required. 10 AUDIOGRAM 3 Owner's Manual Mac: Double-click the [Application] → [Cubase AI *]. ("*" indicates where the version number appears in the "... LEVEL controls so that are connected to the AUDIOGRAM interface. NOTE Cubase AI 6 is too low in level." Cubase AI Setup 1 Set the computer output to the minimum position. For details about other versions of Cubase AI or Cubase AI operation in the actual icon name.) NOTE...

Owners Manual
Page 11
...;eld on the left side of the window. Mac: Select [VST Audio System] in the [Devices] field on the left side of the window. AUDIOGRAM 3 Owner's Manual 11 A new project is stored as a "Project.". 4 Select [Device Setup] from the [Devices] menu to switch the ASIO driver?". A dialog box will appear... the window. Select [ASIO DirectX Full Duplex Driver] in the [ASIO Driver] field on the right side of the window. Click [Switch]. NOTE Recorded Cubase AI data is created.
...;eld on the left side of the window. Mac: Select [VST Audio System] in the [Devices] field on the left side of the window. AUDIOGRAM 3 Owner's Manual 11 A new project is stored as a "Project.". 4 Select [Device Setup] from the [Devices] menu to switch the ASIO driver?". A dialog box will appear... the window. Select [ASIO DirectX Full Duplex Driver] in the [ASIO Driver] field on the right side of the window. Click [Switch]. NOTE Recorded Cubase AI data is created.

Owners Manual
Page 12
... Panel] on the right side of the [Input/Output Configuration] field. Click [OK] to close and restart the Cubase AI, then open the Device Setup window. 12 AUDIOGRAM 3 Owner's Manual Quick Guide 5 Select [ASIO DirectX Full Duplex Driver](Windows), [USB Audio CODEC](Mac) in both "Input" and "Output" of...
... Panel] on the right side of the [Input/Output Configuration] field. Click [OK] to close and restart the Cubase AI, then open the Device Setup window. 12 AUDIOGRAM 3 Owner's Manual Quick Guide 5 Select [ASIO DirectX Full Duplex Driver](Windows), [USB Audio CODEC](Mac) in both "Input" and "Output" of...

Owners Manual
Page 15
... a file name before actually saving the file. NOTE To hear the playback sound via the AUDIOGRAM interface, adjust the volume with minimum noise, the AUDIOGRAM signal levels should be displayed via the master section bus level meter on the right side of data if a...minimum noise: For optimum sound quality with the OUT LEVEL control. Monitoring button AUDIOGRAM 3 Owner's Manual 15 The overall playback level will be sent to Cubase AI for recording using the AUDIOGRAM level indicators while the Cubase monitoring button ( ) is set as high as possible without clipping. The...
... a file name before actually saving the file. NOTE To hear the playback sound via the AUDIOGRAM interface, adjust the volume with minimum noise, the AUDIOGRAM signal levels should be displayed via the master section bus level meter on the right side of data if a...minimum noise: For optimum sound quality with the OUT LEVEL control. Monitoring button AUDIOGRAM 3 Owner's Manual 15 The overall playback level will be sent to Cubase AI for recording using the AUDIOGRAM level indicators while the Cubase monitoring button ( ) is set as high as possible without clipping. The...

Owners Manual
Page 16
Click Inserts 1 and select "Reverb - NOTE For further details refer to the pdf manual provided with Cubase AI In this point you can begin to use EQ to stereo, and creating an audio file. CAUTION 16 AUDIOGRAM 3 Owner's Manual Mixes can be recorded to set the stereo position of each track. 5 At... overall volume using the bus volume fader. 4 Drag the pan controls on the top of the channel strips left and right to audio CDs. 1 Launch Cubase AI and open the VST audio channel settings window. It's a good idea to lower the channel fader a bit before adding an effect, since the effect...
Click Inserts 1 and select "Reverb - NOTE For further details refer to the pdf manual provided with Cubase AI In this point you can begin to use EQ to stereo, and creating an audio file. CAUTION 16 AUDIOGRAM 3 Owner's Manual Mixes can be recorded to set the stereo position of each track. 5 At... overall volume using the bus volume fader. 4 Drag the pan controls on the top of the channel strips left and right to audio CDs. 1 Launch Cubase AI and open the VST audio channel settings window. It's a good idea to lower the channel fader a bit before adding an effect, since the effect...

Owners Manual
Page 19
... jacks. Phone-type Pin-type NOTE You can be connected here using the OUT LEVEL control. Input 3 LEVEL Record controls Playback 6 OUT LEVEL control Cubase AI Output AUDIOGRAM 3 Owner's Manual 19 NOTE You can be connected to the phone jacks is only output from the device connected to an audio system (monitor...
... jacks. Phone-type Pin-type NOTE You can be connected here using the OUT LEVEL control. Input 3 LEVEL Record controls Playback 6 OUT LEVEL control Cubase AI Output AUDIOGRAM 3 Owner's Manual 19 NOTE You can be connected to the phone jacks is only output from the device connected to an audio system (monitor...

Owners Manual
Page 21
...❑ Is the sound output of the Quick Guide. Windows 7/Vista: 1. Set "Device volume" to page 8 of the Cubase AI application assigned properly? mum level. ❑ Have you set the volume slider of the window to its maximum level. 3. ...computer output to open the "Sound" dialog window. 2. We recommend that you connected or disconnected the USB cable while Cubase AI is too low in level. ❑ Is the computer's output level setting too low? Click the "Levels" ...dialog window. 2. from the Apple menu and then select "Sound" to its mini- AUDIOGRAM 3 Owner's Manual 21
...❑ Is the sound output of the Quick Guide. Windows 7/Vista: 1. Set "Device volume" to page 8 of the Cubase AI application assigned properly? mum level. ❑ Have you set the volume slider of the window to its maximum level. 3. ...computer output to open the "Sound" dialog window. 2. We recommend that you connected or disconnected the USB cable while Cubase AI is too low in level. ❑ Is the computer's output level setting too low? Click the "Levels" ...dialog window. 2. from the Apple menu and then select "Sound" to its mini- AUDIOGRAM 3 Owner's Manual 21
Owners Manual
Page 23
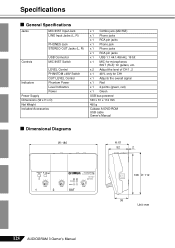
... bit x 1 MIC: for microphones INST (Hi-Z): for CH1 x 1 Adjusts the overall signal x 1 Red x 1 2 points (green, red) x 1 Green USB bus-powered 180 x 61 x 112 mm 490 g Cubase AI DVD-ROM USB cable Owner's Manual ■ Dimensional Diagrams W: 180 H: 61 52 2 108 D: 112 36 Unit: mm 128...
... bit x 1 MIC: for microphones INST (Hi-Z): for CH1 x 1 Adjusts the overall signal x 1 Red x 1 2 points (green, red) x 1 Green USB bus-powered 180 x 61 x 112 mm 490 g Cubase AI DVD-ROM USB cable Owner's Manual ■ Dimensional Diagrams W: 180 H: 61 52 2 108 D: 112 36 Unit: mm 128...
Owners Manual
Page 25
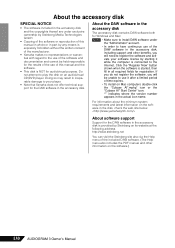
Do not attempt to play the disk on the software.) 130 AUDIOGRAM 3 Owner's Manual NOTE • Make sure to install DAW software under ...is connected to use of time expires. • To install on Mac computers double-click the "Cubase AI*.mpkg" icon or the "Cubase AI* Start Center" icon. Click the "Register Now" button shown when the software is started,...DAW software in part by any means is expressly forbidden without the written consent of the manufacturer. • Yamaha makes no representations or warranties with regard to the use of the included DAW software. (The Help menu...
Do not attempt to play the disk on the software.) 130 AUDIOGRAM 3 Owner's Manual NOTE • Make sure to install DAW software under ...is connected to use of time expires. • To install on Mac computers double-click the "Cubase AI*.mpkg" icon or the "Cubase AI* Start Center" icon. Click the "Register Now" button shown when the software is started,...DAW software in part by any means is expressly forbidden without the written consent of the manufacturer. • Yamaha makes no representations or warranties with regard to the use of the included DAW software. (The Help menu...
