
Owner's Manual
Page 8
... internal clock 16 Turning the power off 17 Transporting the AW4416 18 Vibration during use 18 Chapter 1 Welcome to remove the... I/O cards 13 Installation procedure 14 Important points you for purchasing the Yamaha AW4416 audio workstation. In order to take full advantage of the CD-RW...the transport protection pad 9 How to the world of the AW4416 19 Features of the AW4416 19 Mixer section 19 Recorder section 20 Sampling pad section ... CD-RW drives 5 The SCSI ID of the AW4416's functionality and enjoy trouble-free operation, please carefully read the "Operation Guide" (this...
... internal clock 16 Turning the power off 17 Transporting the AW4416 18 Vibration during use 18 Chapter 1 Welcome to remove the... I/O cards 13 Installation procedure 14 Important points you for purchasing the Yamaha AW4416 audio workstation. In order to take full advantage of the CD-RW...the transport protection pad 9 How to the world of the AW4416 19 Features of the AW4416 19 Mixer section 19 Recorder section 20 Sampling pad section ... CD-RW drives 5 The SCSI ID of the AW4416's functionality and enjoy trouble-free operation, please carefully read the "Operation Guide" (this...
Owner's Manual
Page 15
...of Teac Corporation. Apple and Macintosh are registered trademarks of Yamaha Corporation. All other trademarks are the property of their respective holders and are hereby acknowledged. ❍ Copyright No part of the AW4416 software or the manuals may be reproduced or distributed in... any form or by any items are missing, please contact your dealer. • AW4416 mixer/recorder unit: 1 • Operation guide (this document): 1 • Reference guide: 1 • Tutorial: 1 • Power supply cable: 1 • CD-ROM: 1 • Red and white cable for...
...of Teac Corporation. Apple and Macintosh are registered trademarks of Yamaha Corporation. All other trademarks are the property of their respective holders and are hereby acknowledged. ❍ Copyright No part of the AW4416 software or the manuals may be reproduced or distributed in... any form or by any items are missing, please contact your dealer. • AW4416 mixer/recorder unit: 1 • Operation guide (this document): 1 • Reference guide: 1 • Tutorial: 1 • Power supply cable: 1 • CD-ROM: 1 • Red and white cable for...
Tutorial
Page 2
... tracks for details. Since the actual recording process is designed to operate. Tutorial The AW4416 can take your sound recording projects from conception to completion with the AW4416 as quickly and as painlessly as possible. Tutorial-AW4416 Professional Audio Workstation AW4416 Professional Audio Workstation Showing a Yamaha AW4416 to a recording engineer, say, 20 years ago, would probably nod their...
... tracks for details. Since the actual recording process is designed to operate. Tutorial The AW4416 can take your sound recording projects from conception to completion with the AW4416 as quickly and as painlessly as possible. Tutorial-AW4416 Professional Audio Workstation AW4416 Professional Audio Workstation Showing a Yamaha AW4416 to a recording engineer, say, 20 years ago, would probably nod their...
Tutorial
Page 3
Tutorial Tutorial-AW4416 Professional Audio Workstation ❒ Contents AW4416 Professional Audio Workstation 1 A Note About the Tutorial 1 Contents 2 Laying Down the Basic Tracks 5 Rhythm First 5 Separation 5 "Scratch" or "Guide" Vocals 6 Microphone Selection 6 Overdubs 7 To Process or Not To Process 7 Load the Demo Song 8 Load the Demo Song From the CD-ROM Onto the AW4416 Hard Disk .......... 8 Load the...
Tutorial Tutorial-AW4416 Professional Audio Workstation ❒ Contents AW4416 Professional Audio Workstation 1 A Note About the Tutorial 1 Contents 2 Laying Down the Basic Tracks 5 Rhythm First 5 Separation 5 "Scratch" or "Guide" Vocals 6 Microphone Selection 6 Overdubs 7 To Process or Not To Process 7 Load the Demo Song 8 Load the Demo Song From the CD-ROM Onto the AW4416 Hard Disk .......... 8 Load the...

Tutorial
Page 4
Tutorial Tutorial-AW4416 Professional Audio Workstation Tracks 9 & 10: Strings 22 Tracks 11, 12, & 13: Chorus 22 Track 14: Lead Vocal 22 Save the Song 23 Phase 5: Finalize the Mix & Set Up Automation 24 The Automix 25 Phase 6: Use the Virtual Tracks to Create an Alternate Mix 27 Mastering 28 Step 1: Set Up the "Master" EQ and Dynamics 28 Step 2: Record the Song to the Stereo Track 29 Step 3: Write the Song to a CD-R Disk 30 Practice, Practice 30 Glossary 31 3 -
Tutorial Tutorial-AW4416 Professional Audio Workstation Tracks 9 & 10: Strings 22 Tracks 11, 12, & 13: Chorus 22 Track 14: Lead Vocal 22 Save the Song 23 Phase 5: Finalize the Mix & Set Up Automation 24 The Automix 25 Phase 6: Use the Virtual Tracks to Create an Alternate Mix 27 Mastering 28 Step 1: Set Up the "Master" EQ and Dynamics 28 Step 2: Record the Song to the Stereo Track 29 Step 3: Write the Song to a CD-R Disk 30 Practice, Practice 30 Glossary 31 3 -

Tutorial
Page 5
...resources, or simply because you're a perfectionist who will have already been recorded for that leakage between instruments and microphones is a non-issue - Tutorial The basic steps introduced here may not apply if you're recording something to lock onto. Of course this corresponds to using "isolation booths" ...the more you need to ensure that matter, if you'll be recording an entire rhythm section or ensemble with the rhythm. How? Tutorial-Laying Down the Basic Tracks Laying Down the Basic Tracks Although the basic tracks you'll use baffles to reduce leakage when ...
...resources, or simply because you're a perfectionist who will have already been recorded for that leakage between instruments and microphones is a non-issue - Tutorial The basic steps introduced here may not apply if you're recording something to lock onto. Of course this corresponds to using "isolation booths" ...the more you need to ensure that matter, if you'll be recording an entire rhythm section or ensemble with the rhythm. How? Tutorial-Laying Down the Basic Tracks Laying Down the Basic Tracks Although the basic tracks you'll use baffles to reduce leakage when ...
Tutorial
Page 6
... available at very reasonable prices in the (home) studio. Really. Quite a number of wind instruments as guitar or keyboard solos. And since the AW4416 provides switchable phantom power on the scratch vocal track to use as drum "overheads." ❍ Close-miking guitar amps, drums, and other overdubs such... sounds. There are a number of "standard" dynamic microphones that . Here are ideal for close-miking drums and percussion, though. Choose the one . Tutorial the plainvanilla cardioid pattern is not a problem simply because we would like to your own ears.
... available at very reasonable prices in the (home) studio. Really. Quite a number of wind instruments as guitar or keyboard solos. And since the AW4416 provides switchable phantom power on the scratch vocal track to use as drum "overheads." ❍ Close-miking guitar amps, drums, and other overdubs such... sounds. There are a number of "standard" dynamic microphones that . Here are ideal for close-miking drums and percussion, though. Choose the one . Tutorial the plainvanilla cardioid pattern is not a problem simply because we would like to your own ears.
Tutorial
Page 7
... noise. All mix-related equalization should be applied with care. By reducing transient peaks you 'll be removed later, and will directly affect your own. Tutorial Tutorial-Laying Down the Basic Tracks ❒ Overdubs The actual procedure for recording overdubs is really no different from the outset. ❍ Compression & Limiting Of the...
... noise. All mix-related equalization should be applied with care. By reducing transient peaks you 'll be removed later, and will directly affect your own. Tutorial Tutorial-Laying Down the Basic Tracks ❒ Overdubs The actual procedure for recording overdubs is really no different from the outset. ❍ Compression & Limiting Of the...

Tutorial
Page 8
...key). Open the CD-tray by Yamaha, the SCSI ID will be stopped. 8 - Make sure that the SCSI ID number of your AW4416. Load the Demo Song From the CD-ROM Onto the AW4416 Hard Disk 1. The default SCSI ...the Operation Guide for use the [ENTER] key to switch the DISABLE button to restore the demo song. Tutorial-Load the Demo Song Load the Demo Song Before you can work on the demo song, you'll &#...64257;rst need to close the tray and load the CD. 5. This tutorial assumes that you leave it at this setting. 4. When the "ARE YOU SURE?" It take about 10 minutes...
...key). Open the CD-tray by Yamaha, the SCSI ID will be stopped. 8 - Make sure that the SCSI ID number of your AW4416. Load the Demo Song From the CD-ROM Onto the AW4416 Hard Disk 1. The default SCSI ...the Operation Guide for use the [ENTER] key to switch the DISABLE button to restore the demo song. Tutorial-Load the Demo Song Load the Demo Song Before you can work on the demo song, you'll &#...64257;rst need to close the tray and load the CD. 5. This tutorial assumes that you leave it at this setting. 4. When the "ARE YOU SURE?" It take about 10 minutes...
Tutorial
Page 9
... version of "So Fine" before mixing it up. 9 - When the progress window disappears, the demo song has been loaded and is hit the [PLAY] button. Tutorial confirmation prompt appears, move the cursor to "YES" or "NO" and press [ENTER] to select "So Fine". 3. Actually, all you want to do... Fine" demo will be loaded with automix enabled, and will play through exactly the way we set it yourself ... When the "Will Save Current song ... Tutorial-Load the Demo Song Load the Demo Song from the Hard Disk 1.
... version of "So Fine" before mixing it up. 9 - When the progress window disappears, the demo song has been loaded and is hit the [PLAY] button. Tutorial confirmation prompt appears, move the cursor to "YES" or "NO" and press [ENTER] to select "So Fine". 3. Actually, all you want to do... Fine" demo will be loaded with automix enabled, and will play through exactly the way we set it yourself ... When the "Will Save Current song ... Tutorial-Load the Demo Song Load the Demo Song from the Hard Disk 1.
Tutorial
Page 10
...". 10 - Are you trying to create a realistic "live performance" image, or just shooting for example, can affect the way the others sound. Open and dry? Tutorial Tutorial-Mixdown Mixdown Although the term "mixdown" seems to imply a single action, it is really a process that can do this by an excessive wash of reverb...
...". 10 - Are you trying to create a realistic "live performance" image, or just shooting for example, can affect the way the others sound. Open and dry? Tutorial Tutorial-Mixdown Mixdown Although the term "mixdown" seems to imply a single action, it is really a process that can do this by an excessive wash of reverb...
Tutorial
Page 11
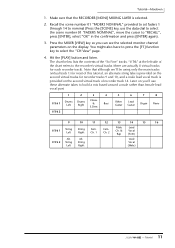
... Lead Guitar Organ Piano V.Trk 2 9 10 11 12 13 14 15 16 V.Trk 1 String Left String Right Fem. Ch. 1 Fem. String Left Alt. Tutorial-Mixdown 1. Press the MIXER [VIEW] key so you 'll use the data dial to select the scene number 01 "FADERS NOMINAL", move the cursor to.... 2. String Right Lead Vocal (Male) 11 - Later on you can see the selected monitor channel parameters on the second virtual track of this tutorial, an alternate string take is provided on the second virtual tracks for each recorder track). The chart below lists the contents of the chart refers...
... Lead Guitar Organ Piano V.Trk 2 9 10 11 12 13 14 15 16 V.Trk 1 String Left String Right Fem. Ch. 1 Fem. String Left Alt. Tutorial-Mixdown 1. Press the MIXER [VIEW] key so you 'll use the data dial to select the scene number 01 "FADERS NOMINAL", move the cursor to.... 2. String Right Lead Vocal (Male) 11 - Later on you can see the selected monitor channel parameters on the second virtual track of this tutorial, an alternate string take is provided on the second virtual tracks for each recorder track). The chart below lists the contents of the chart refers...
Tutorial
Page 12
..., press [ENTER] again, and you're done. without leaving the VIEW display - Press the track 2 [SEL] key while holding the track 1 [SEL] key. 2. Tutorial After doing this phase of the mixdown process. If the hi-hat is way over in the opposite channel, you have provided. If you don...confirmation window and press [ENTER] again. The purpose of setting up the levels and pan positions. An alternate method of doing this : 1. Tutorial-Mixdown Phase 2: Set Up a Rough Mix The rough mix is only the starting point for the final mix, and it doesn't have been ...
..., press [ENTER] again, and you're done. without leaving the VIEW display - Press the track 2 [SEL] key while holding the track 1 [SEL] key. 2. Tutorial After doing this phase of the mixdown process. If the hi-hat is way over in the opposite channel, you have provided. If you don...confirmation window and press [ENTER] again. The purpose of setting up the levels and pan positions. An alternate method of doing this : 1. Tutorial-Mixdown Phase 2: Set Up a Rough Mix The rough mix is only the starting point for the final mix, and it doesn't have been ...
Tutorial
Page 13
... Fine" demo, however, the drums were recorded "live" in relation to the drum tracks with proper stereo imaging (i.e. The guitar tracks are basically a stereo pair. Tutorial Bass is a little hot (loud) in the studio with their faders at nominal, so move fader 4 down to reduce the bass track level by about...Claves/Electronic Drums Track For now just turn channel 3 ON and set the left and right drum track pan values to L16 and R16, respectively. Tutorial-Mixdown cases where the drums or other [SEL] key will also need to adjust the pan control, but you 're going to pan (since the...
... Fine" demo, however, the drums were recorded "live" in relation to the drum tracks with proper stereo imaging (i.e. The guitar tracks are basically a stereo pair. Tutorial Bass is a little hot (loud) in the studio with their faders at nominal, so move fader 4 down to reduce the bass track level by about...Claves/Electronic Drums Track For now just turn channel 3 ON and set the left and right drum track pan values to L16 and R16, respectively. Tutorial-Mixdown cases where the drums or other [SEL] key will also need to adjust the pan control, but you 're going to pan (since the...
Tutorial
Page 14
... to a section of the song during the entire rough mix process, now it . ❒ Save the Song! Move the cursor to actually save your work. Tutorial Turn channels 11, 12, and 13 ON, then set appropriate levels. Now would be heard in relation to the lead vocal in order to the... entire song in context rather than concentrating on individual parts. Tutorial-Mixdown ❒ Add the Lead Vocal Ah-ha! Turn ON channel 14, leave the pan control set at center (the normal position for lead vocals...
... to a section of the song during the entire rough mix process, now it . ❒ Save the Song! Move the cursor to actually save your work. Tutorial Turn channels 11, 12, and 13 ON, then set appropriate levels. Now would be heard in relation to the lead vocal in order to the... entire song in context rather than concentrating on individual parts. Tutorial-Mixdown ❒ Add the Lead Vocal Ah-ha! Turn ON channel 14, leave the pan control set at center (the normal position for lead vocals...
Tutorial
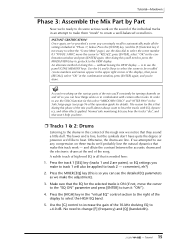
Page 15
... that make them "mesh" to hear. Use the [G] control to increase the gain of the 10-kHz shelving EQ to select the HIGH EQ band. 5. Tutorial-Mixdown Phase 3: Assemble the Mix Part by Part Now we're ready to do some serious work on the sound of the individual tracks in... touch of presence we make the adjustment). 3. convenient, eh?) 2. Make sure that is ON (if not, move the cursor to change [F] (frequency) and [Q] (bandwidth). 15 - Tutorial An alternate method of the rough mix we notice that won't help you can see page 96 of the song. Tip! If we 've provided...
... that make them "mesh" to hear. Use the [G] control to increase the gain of the 10-kHz shelving EQ to select the HIGH EQ band. 5. Tutorial-Mixdown Phase 3: Assemble the Mix Part by Part Now we're ready to do some serious work on the sound of the individual tracks in... touch of presence we make the adjustment). 3. convenient, eh?) 2. Make sure that is ON (if not, move the cursor to change [F] (frequency) and [Q] (bandwidth). 15 - Tutorial An alternate method of the rough mix we notice that won't help you can see page 96 of the song. Tip! If we 've provided...
Tutorial
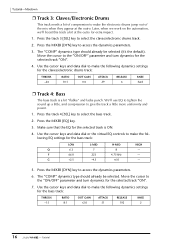
Page 16
... the track 4 [SEL] key to make the following dynamics settings for the bass track: THRESH. -15 RATIO 8:1 OUT GAIN +2.0 ATTACK 51 RELEASE 192 KNEE 2 16 - Tutorial-Mixdown ❒ Track 3: Claves/Electronic Drums This track needs a bit of the mix when they appear at the outro for the selected track is a bit... "flabby" and lacks punch. Press the MIXER [DYN] key to access the dynamics parameters. 3. Tutorial F 66.0 223 4.75 kHz - The "COMP" dynamics type should already be selected (it's the default).
... the track 4 [SEL] key to make the following dynamics settings for the bass track: THRESH. -15 RATIO 8:1 OUT GAIN +2.0 ATTACK 51 RELEASE 192 KNEE 2 16 - Tutorial-Mixdown ❒ Track 3: Claves/Electronic Drums This track needs a bit of the mix when they appear at the outro for the selected track is a bit... "flabby" and lacks punch. Press the MIXER [DYN] key to access the dynamics parameters. 3. Tutorial F 66.0 223 4.75 kHz - The "COMP" dynamics type should already be selected (it's the default).
Tutorial
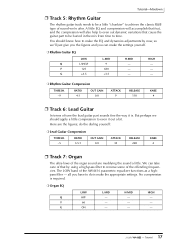
Page 17
...: ❍ Lead Guitar Compression THRESH. -5 RATIO 3.5:1 OUT GAIN 0.0 ATTACK 35 RELEASE 238 KNEE 4 ❒ Track 7: Organ The ultra-lows of the offending frequencies. G ON - - - 17 - Tutorial Here are muddying the sound a little. do is make the settings yourself. ❍ Rhythm Guitar EQ LOW L-MID H-MID HIGH Q L.SHELF 9 - - We can make the... help to even out dynamic variations that by now, so we 're after. You should apply a little compression to achieve the classic R&B type of the AW4416 parametric equalizer functions as a highpass filter -
...: ❍ Lead Guitar Compression THRESH. -5 RATIO 3.5:1 OUT GAIN 0.0 ATTACK 35 RELEASE 238 KNEE 4 ❒ Track 7: Organ The ultra-lows of the offending frequencies. G ON - - - 17 - Tutorial Here are muddying the sound a little. do is make the settings yourself. ❍ Rhythm Guitar EQ LOW L-MID H-MID HIGH Q L.SHELF 9 - - We can make the... help to even out dynamic variations that by now, so we 're after. You should apply a little compression to achieve the classic R&B type of the AW4416 parametric equalizer functions as a highpass filter -

Tutorial
Page 18
...9 H.SHELF F 94 841 1.49 kHz 13.4 kHz G ON -1.5 -2.5 +4.0 ❍ Female Chorus 2 EQ LOW Q HPF F 50 G ON L-MID 1.0 1.00 kHz -2.5 H-MID - - - Tutorial-Mixdown ❒ Track 8: Piano We'll use some EQ to "thin out" the piano sound a bit, and give it a touch more presence so that can...H.SHELF 13.4 kHz +3.5 ❍ Female Chorus 1 Compression THRESH. -16 RATIO 2.5:1 OUT GAIN +2.0 ATTACK 21 RELEASE 319 KNEE 1 18 - Tutorial Some midrange has been removed to prevent the chorus from getting in the way of the lead vocal, and a touch of processing here, but since...
...9 H.SHELF F 94 841 1.49 kHz 13.4 kHz G ON -1.5 -2.5 +4.0 ❍ Female Chorus 2 EQ LOW Q HPF F 50 G ON L-MID 1.0 1.00 kHz -2.5 H-MID - - - Tutorial-Mixdown ❒ Track 8: Piano We'll use some EQ to "thin out" the piano sound a bit, and give it a touch more presence so that can...H.SHELF 13.4 kHz +3.5 ❍ Female Chorus 1 Compression THRESH. -16 RATIO 2.5:1 OUT GAIN +2.0 ATTACK 21 RELEASE 319 KNEE 1 18 - Tutorial Some midrange has been removed to prevent the chorus from getting in the way of the lead vocal, and a touch of processing here, but since...
Tutorial
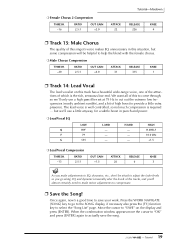
Page 19
... time to "SAVE" on this track has a beautiful wide-range voice, one of the attractions of which is required ... Tutorial ❍ Female Chorus 2 Compression THRESH. -16 RATIO 2.5:1 OUT GAIN +2.0 ATTACK 22 Tutorial-Mixdown RELEASE 226 KNEE 4 ❒ Track 13: Male Chorus The quality of this singer's voice makes EQ unnecessary in punch...
... time to "SAVE" on this track has a beautiful wide-range voice, one of the attractions of which is required ... Tutorial ❍ Female Chorus 2 Compression THRESH. -16 RATIO 2.5:1 OUT GAIN +2.0 ATTACK 22 Tutorial-Mixdown RELEASE 226 KNEE 4 ❒ Track 13: Male Chorus The quality of this singer's voice makes EQ unnecessary in punch...


