
Additions And Changes In Version 1.2, 1.3
Page 1
...explains the functions and specifications that have been added or changed in AW4416 version 1.2 and 1.3. Please also refer to the pages of the Operation Guide / Reference Guide as specified within a virtual track 12 WAVE DISPLAY popup window linked with Locate operations 13 Changed procedure for ...range for the Fade Time setting 17 Lit/dark status of the [UNDO]/[REDO] keys 17 Shortcut for saving the current song 17 Use the TRACK [CUE] key to temporarily cancel fader grouping 18 Synchronized operation as MTC and word clock slave 19 E The rest are "Mastering" and ...
...explains the functions and specifications that have been added or changed in AW4416 version 1.2 and 1.3. Please also refer to the pages of the Operation Guide / Reference Guide as specified within a virtual track 12 WAVE DISPLAY popup window linked with Locate operations 13 Changed procedure for ...range for the Fade Time setting 17 Lit/dark status of the [UNDO]/[REDO] keys 17 Shortcut for saving the current song 17 Use the TRACK [CUE] key to temporarily cancel fader grouping 18 Synchronized operation as MTC and word clock slave 19 E The rest are "Mastering" and ...
Additions And Changes In Version 1.2, 1.3
Page 2
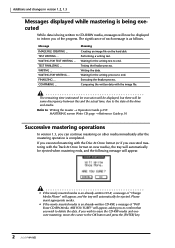
WAITING FOR WRITING ... Performing a writing test. Comparing the written data with the Track At Once format on new media), the tray will automatically be ejected when mastering ends, and the following message will now be ejected. The signi&#...
WAITING FOR WRITING ... Performing a writing test. Comparing the written data with the Track At Once format on new media), the tray will automatically be ejected when mastering ends, and the following message will now be ejected. The signi&#...
Additions And Changes In Version 1.2, 1.3
Page 5
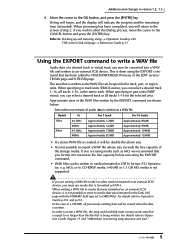
...] key. This is done using media such as FAT16. Approximate sizes of the EDIT screen / TR Edit page and V.TR Edit page. MO), or to TRACK/PART/REGION menu of the WAV files written by the EXPORT command are writing a WAV file to MO or other media formatted on... of the storage media. e.g. For details refer to or longer than the file that is written as the WAV file can select a desired track or all previously-existing data will return to an external SCSI device. In order to write a WAV file, the song and hard disk must...
...] key. This is done using media such as FAT16. Approximate sizes of the EDIT screen / TR Edit page and V.TR Edit page. MO), or to TRACK/PART/REGION menu of the WAV files written by the EXPORT command are writing a WAV file to MO or other media formatted on... of the storage media. e.g. For details refer to or longer than the file that is written as the WAV file can select a desired track or all previously-existing data will return to an external SCSI device. In order to write a WAV file, the song and hard disk must...
Additions And Changes In Version 1.2, 1.3
Page 6
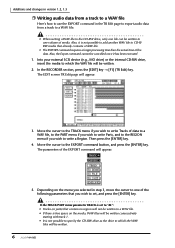
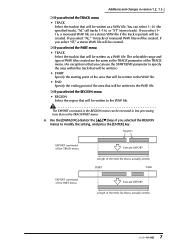
... wish to write a Region. Additions and changes in version 1.2, 1.3 Ì Writing audio data from a track to a WAV file Here's how to use the EXPORT command in step 3, move the cursor to... one volume of media. Also, it has been executed. 1. Move the cursor to write Tracks of the EXPORT command will appear. 3. Into your external SCSI device (e.g., MO drive) or the internal...le can be written to one of the following parameters that you wish to set to "AL": • Tracks (or parts) that already contains a WAV file. • The EXPORT command requires a longer ...
... wish to write a Region. Additions and changes in version 1.2, 1.3 Ì Writing audio data from a track to a WAV file Here's how to use the EXPORT command in step 3, move the cursor to... one volume of media. Also, it has been executed. 1. Move the cursor to write Tracks of the EXPORT command will appear. 3. Into your external SCSI device (e.g., MO drive) or the internal...le can be written to one of the following parameters that you wish to set to "AL": • Tracks (or parts) that already contains a WAV file. • The EXPORT command requires a longer ...
Additions And Changes In Version 1.2, 1.3
Page 7
... be written to the WAV file. If you select "ST," a stereo WAV file will be executed in less processing time than in the TRACK/PART menu. 6. r If you selected the REGION menu • REGION Select the region that will be written to modify the setting, and press the [... (or the [v]/[w] keys if you selected the REGION menu) to the WAV file. Additions and changes in version 1.2, 1.3 r If you selected the TRACK menu • TRACK Select the track(s) that will be written as a WAV file. The selectable range and type of WAV files created are the same as the...
... be written to the WAV file. If you select "ST," a stereo WAV file will be executed in less processing time than in the TRACK/PART menu. 6. r If you selected the REGION menu • REGION Select the region that will be written to modify the setting, and press the [... (or the [v]/[w] keys if you selected the REGION menu) to the WAV file. Additions and changes in version 1.2, 1.3 r If you selected the TRACK menu • TRACK Select the track(s) that will be written as a WAV file. The selectable range and type of WAV files created are the same as the...
Additions And Changes In Version 1.2, 1.3
Page 8
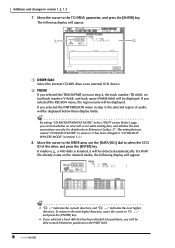
...following display will occur while writing data, and whether the data was named "CD BACKUP MODE" in step 4, the track number (TR field), virtual track number (V field), and track name (NAME field) will be displayed. To return to the next higher directory, move the cursor to select ... changes in the PART field. 8 Tip By setting "CD BACKUP/WAV-EXP MODE" in the UTILITY screen Prefer.3 page, you selected the TRACK/PART menu in version 1.0 has been changed to Reference Guide p.37. (The setting that has been divided into partitions, you selected the REGION menu,...
...following display will occur while writing data, and whether the data was named "CD BACKUP MODE" in step 4, the track number (TR field), virtual track number (V field), and track name (NAME field) will be displayed. To return to the next higher directory, move the cursor to select ... changes in the PART field. 8 Tip By setting "CD BACKUP/WAV-EXP MODE" in the UTILITY screen Prefer.3 page, you selected the TRACK/PART menu in version 1.0 has been changed to Reference Guide p.37. (The setting that has been divided into partitions, you selected the REGION menu,...
Additions And Changes In Version 1.2, 1.3
Page 9
..., asking you whether you selected "AL" for setting parameters of the WAV file. The NAME EDIT popup window will be the name of the track or region you to p.60 of the EXPORT command. Tip If a file of the identical name already exists on operations in the NAME EDIT.... Change the filename as necessary. 9 The drive to which the WAV file will be written will be converted to the screen for the TRACK parameter, it is it will appear, allowing you selected in version 1.2, 1.3 9. Move the cursor to 16, and press the [ENTER] key. Additions and changes in...
..., asking you whether you selected "AL" for setting parameters of the WAV file. The NAME EDIT popup window will be the name of the track or region you to p.60 of the EXPORT command. Tip If a file of the identical name already exists on operations in the NAME EDIT.... Change the filename as necessary. 9 The drive to which the WAV file will be written will be converted to the screen for the TRACK parameter, it is it will appear, allowing you selected in version 1.2, 1.3 9. Move the cursor to 16, and press the [ENTER] key. Additions and changes in...
Additions And Changes In Version 1.2, 1.3
Page 10
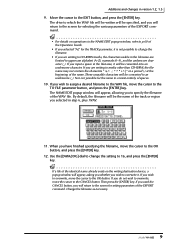
..., move the cursor to the EXECUTE button and press the [ENTER] key. A popup window will be written. Ì Writing audio from a desired virtual track to a WAV file. Move the cursor to the preceding explanation for the EXPORT command. APPEND command 10 To write the WAV file, move... is 16 bit, the TO SIZE parameter will be used in version 1.2, 1.3 13. If you to join regions Multiple regions in a desired track or virtual track can also be converted and written as silent audio data. The WAV file will appear, asking you are not necessary. • If ...
..., move the cursor to the EXECUTE button and press the [ENTER] key. A popup window will be written. Ì Writing audio from a desired virtual track to a WAV file. Move the cursor to the preceding explanation for the EXPORT command. APPEND command 10 To write the WAV file, move... is 16 bit, the TO SIZE parameter will be used in version 1.2, 1.3 13. If you to join regions Multiple regions in a desired track or virtual track can also be converted and written as silent audio data. The WAV file will appear, asking you are not necessary. • If ...
Additions And Changes In Version 1.2, 1.3
Page 11
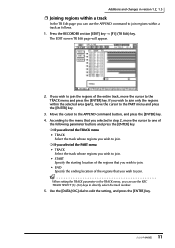
... → [F1] (TR Edit) key. Tip When setting the TRACK parameter in the TRACK menu, you can use the REC TRACK SELECT [1]-[16] keys to directly select the track number. 5. r If you selected the TRACK menu • TRACK Select the track whose regions you wish to join. • START Specify the starting ...location of the regions that you wish to join. Additions and changes in version 1.2, 1.3 Ì Joining regions within a track In the TR Edit page you can use the APPEND command to join regions within the selected area (part), move the cursor to one of...
... → [F1] (TR Edit) key. Tip When setting the TRACK parameter in the TRACK menu, you can use the REC TRACK SELECT [1]-[16] keys to directly select the track number. 5. r If you selected the TRACK menu • TRACK Select the track whose regions you wish to join. • START Specify the starting ...location of the regions that you wish to join. Additions and changes in version 1.2, 1.3 Ì Joining regions within a track In the TR Edit page you can use the APPEND command to join regions within the selected area (part), move the cursor to one of...
Additions And Changes In Version 1.2, 1.3
Page 12
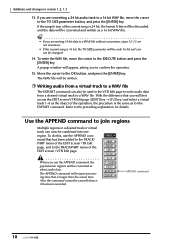
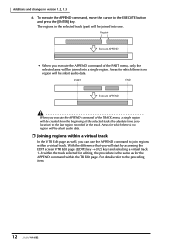
...Edit page. With the difference that you will start by accessing the EDIT screen V.TR Edit page ([EDIT] key → [F2] key) and selecting a virtual track 1-8 within the track selected for editing, the procedure is the same as well, you execute the APPEND command of the selected... page as for which there is no region will be created from the beginning of the TRACK menu, a single region will be silent audio data. Ì Joining regions within a virtual track. Additions and changes in the track. To execute the APPEND command, move the cursor to the preceding item. 12 Areas for ...
...Edit page. With the difference that you will start by accessing the EDIT screen V.TR Edit page ([EDIT] key → [F2] key) and selecting a virtual track 1-8 within the track selected for editing, the procedure is the same as well, you execute the APPEND command of the selected... page as for which there is no region will be created from the beginning of the TRACK menu, a single region will be silent audio data. Ì Joining regions within a virtual track. Additions and changes in the track. To execute the APPEND command, move the cursor to the preceding item. 12 Areas for ...
Additions And Changes In Version 1.2, 1.3
Page 14
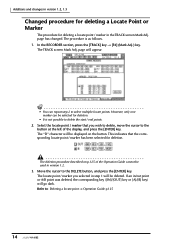
... Changed procedure for deleting a Locate Point or Marker The procedure for deleting a locate point / marker in version 1.2. 3. page will be used in the TRACK screen Mark Adj. The "D" character will go dark. This indicates that you selected in /out point or A/B point was deleted, the corresponding key ([IN...be deleted. However, only one marker can repeat step 2 to delete the start / end points. 2. In the RECORDER section, press the [TRACK] key → [F4] (Mark Adj.) key. If an in step 1 will appear. The procedure is not possible to select multiple locate points. ...
... Changed procedure for deleting a Locate Point or Marker The procedure for deleting a locate point / marker in version 1.2. 3. page will be used in the TRACK screen Mark Adj. The "D" character will go dark. This indicates that you selected in /out point or A/B point was deleted, the corresponding key ([IN...be deleted. However, only one marker can repeat step 2 to delete the start / end points. 2. In the RECORDER section, press the [TRACK] key → [F4] (Mark Adj.) key. If an in step 1 will appear. The procedure is not possible to select multiple locate points. ...
Additions And Changes In Version 1.2, 1.3
Page 15
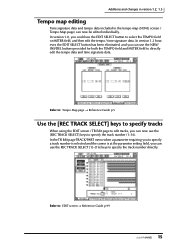
...tempo map (SONG screen / Tempo Map page) can use the EDIT SELECT button to specify the track number (1-16). In version 1.2 however, the EDIT SELECT button has been eliminated, and you can use the [REC TRACK SELECT] keys to select the TEMPO field or METER field, and then edit ...the tempo / time signature data. Refer to specify the track number directly. In the TR Edit page TRACK/PART menu when a parameter requiring you to specify a track number is selected and the cursor is at the parameter setting field, you could use the REC...
...tempo map (SONG screen / Tempo Map page) can use the EDIT SELECT button to specify the track number (1-16). In version 1.2 however, the EDIT SELECT button has been eliminated, and you can use the [REC TRACK SELECT] keys to select the TEMPO field or METER field, and then edit ...the tempo / time signature data. Refer to specify the track number directly. In the TR Edit page TRACK/PART menu when a parameter requiring you to specify a track number is selected and the cursor is at the parameter setting field, you could use the REC...
Additions And Changes In Version 1.2, 1.3
Page 16
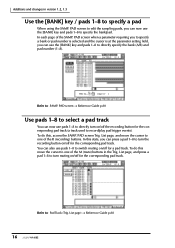
...cursor is at the parameter setting field, you can use the [BANK] key and pads 1-8 to turn muting on /off for the corresponding pad track (a track used to record/play pad trigger events). List page, and move the cursor to specify a pad When using the SAMP. List page, and press a ... / pads 1-8 to one of the SAMP. PAD screen → Reference Guide p.80 Use pads 1-8 to select a pad track You can also use pads 1-8 to switch muting on /off for the corresponding pad track. You can now use pads 1-8 to directly turn the recording button on /off the recording button for a pad...
...cursor is at the parameter setting field, you can use the [BANK] key and pads 1-8 to turn muting on /off for the corresponding pad track (a track used to record/play pad trigger events). List page, and move the cursor to specify a pad When using the SAMP. List page, and press a ... / pads 1-8 to one of the SAMP. PAD screen → Reference Guide p.80 Use pads 1-8 to select a pad track You can also use pads 1-8 to switch muting on /off for the corresponding pad track. You can now use pads 1-8 to directly turn the recording button on /off the recording button for a pad...
Additions And Changes In Version 1.2, 1.3
Page 17
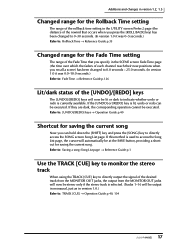
... song (Song List page) → Reference Guide p.1 Use the TRACK [CUE] key to monitor the stereo track When using the TRACK [CUE] key to directly output the signal of the desired track from the MONITOR OUT jacks, the output from the MONITOR OUT jacks... will now be stereo only if the stereo track is used to access the Song List page, the cursor will now be lit or dark ... page (the distance of the rewind that you specify in version 1.0.) Refer to: TRACK [CUE] → Operation Guide p.40, 104 17 If the [UNDO] or [REDO] key is currently available.
... song (Song List page) → Reference Guide p.1 Use the TRACK [CUE] key to monitor the stereo track When using the TRACK [CUE] key to directly output the signal of the desired track from the MONITOR OUT jacks, the output from the MONITOR OUT jacks... will now be stereo only if the stereo track is used to access the Song List page, the cursor will now be lit or dark ... page (the distance of the rewind that you specify in version 1.0.) Refer to: TRACK [CUE] → Operation Guide p.40, 104 17 If the [UNDO] or [REDO] key is currently available.
Additions And Changes In Version 1.2, 1.3
Page 18
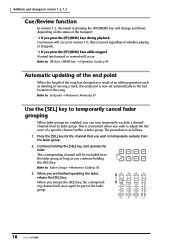
... editing operation such as follows. 1. When you are enabled, you wish to the last location in the song. The procedure is as deleting or moving a track, the end point is convenient when you can now temporarily exclude a desired channel from the fader group. 2. Additions and changes in version 1.2, 1.3 Cue/Review function...
... editing operation such as follows. 1. When you are enabled, you wish to the last location in the song. The procedure is as deleting or moving a track, the end point is convenient when you can now temporarily exclude a desired channel from the fader group. 2. Additions and changes in version 1.2, 1.3 Cue/Review function...
Additions And Changes In Version 1.2, 1.3
Page 19
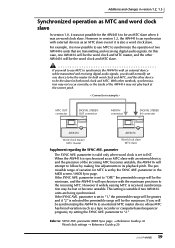
... may be the word clock and MTC master, and the other methods, synchronization may not occur correctly, or the tracks of the AW4416 may not play back at the correct pitch. < Connection example > MTC OUT connector DIGITAL STEREO OUT connector PROFESSIONAL AUDIO... WORKSTATION MIDI IN connector DIGITAL STEREO IN connector PROFESSIONAL AUDIO WORKSTATION AW4416 AW4416 Word clock master MTC master Word clock slave MTC slave Supplement regarding the SYNC AVE. parameter (MIDI Sync page) →...
... may be the word clock and MTC master, and the other methods, synchronization may not occur correctly, or the tracks of the AW4416 may not play back at the correct pitch. < Connection example > MTC OUT connector DIGITAL STEREO OUT connector PROFESSIONAL AUDIO... WORKSTATION MIDI IN connector DIGITAL STEREO IN connector PROFESSIONAL AUDIO WORKSTATION AW4416 AW4416 Word clock master MTC master Word clock slave MTC slave Supplement regarding the SYNC AVE. parameter (MIDI Sync page) →...
Owner's Manual
Page 10
...62 Selecting channels 63 Chapter 4 Connections and setup 67 Connections 67 Word clock settings 68 Chapter 5 Recording on the AW4416 73 Preparations for recording 73 Connections and start-up 73 Creating a new song 75 Recording the first tracks 78 Set the input level 78 Assign the signals to buses 81 Set the... mode 82 Make monitor settings 83 Let's record 85 Overdubbing 87 Set the input level 87 Assign the signal to a bus 88 Put the track in record-ready mode 89 Make monitor settings 90 Using EQ and the dynamics processor 91 Using the four-band EQ 91 Using the dynamics...
...62 Selecting channels 63 Chapter 4 Connections and setup 67 Connections 67 Word clock settings 68 Chapter 5 Recording on the AW4416 73 Preparations for recording 73 Connections and start-up 73 Creating a new song 75 Recording the first tracks 78 Set the input level 78 Assign the signals to buses 81 Set the... mode 82 Make monitor settings 83 Let's record 85 Overdubbing 87 Set the input level 87 Assign the signal to a bus 88 Put the track in record-ready mode 89 Make monitor settings 90 Using EQ and the dynamics processor 91 Using the four-band EQ 91 Using the dynamics...
Owner's Manual
Page 11
Operation Guide Table of contents Recording the stereo track 102 Saving a scene/song 105 Saving a scene 105 Saving a song 106 Chapter 6 Transport/locate operations 109 Table of transport key operations 109 Shuttle function (cue/...
Operation Guide Table of contents Recording the stereo track 102 Saving a scene/song 105 Saving a scene 105 Saving a song 106 Chapter 6 Transport/locate operations 109 Table of transport key operations 109 Shuttle function (cue/...
Owner's Manual
Page 12
... the Quick Rec function 143 Chapter 9 Track and virtual track operations 147 The track structure of the AW4416 147 Switching virtual tracks 149 Pairing tracks 151 Editing tracks and virtual tracks 152 Tracks, parts, and regions 152 Naming a virtual track or region 153 Naming a virtual track 153 Naming a region 155 Track editing procedure 156 Virtual track editing procedure 159 Editing command list 161...
... the Quick Rec function 143 Chapter 9 Track and virtual track operations 147 The track structure of the AW4416 147 Switching virtual tracks 149 Pairing tracks 151 Editing tracks and virtual tracks 152 Tracks, parts, and regions 152 Naming a virtual track or region 153 Naming a virtual track 153 Naming a region 155 Track editing procedure 156 Virtual track editing procedure 159 Editing command list 161...
Owner's Manual
Page 14
...Connections 233 Setting the PORT SELECT parameter 234 Switching AW4416 scenes from an external device 235 Using MTC to synchronize the AW4416 and a MIDI sequencer . . 238 Using MIDI Clock to synchronize the AW4416 and a MIDI sequencer 240 Using MMC to control the AW4416 243 Chapter 16 Backing up and restoring songs ...such as an MO drive 253 Erasing CD-RW media 254 Chapter 17 Mastering 255 About mastering 255 Stereo tracks that can be mastered 255 CD-R and CD-RW 256 Track At Once and Disc At Once 257 Preparations for mastering 258 Mastering mode settings 258 Writing the master ...
...Connections 233 Setting the PORT SELECT parameter 234 Switching AW4416 scenes from an external device 235 Using MTC to synchronize the AW4416 and a MIDI sequencer . . 238 Using MIDI Clock to synchronize the AW4416 and a MIDI sequencer 240 Using MMC to control the AW4416 243 Chapter 16 Backing up and restoring songs ...such as an MO drive 253 Erasing CD-RW media 254 Chapter 17 Mastering 255 About mastering 255 Stereo tracks that can be mastered 255 CD-R and CD-RW 256 Track At Once and Disc At Once 257 Preparations for mastering 258 Mastering mode settings 258 Writing the master ...


