

Additions And Changes In Version 1.2, 1.3
Page 1
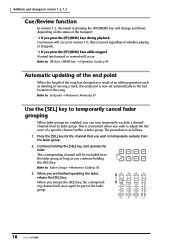
... updating of the end point 18 Use the [SEL] key to the pages of this manual. Additions and changes in version 1.2, 1.3 This manual explains the functions and specifications that have been added or changed in AW4416 version 1.2 and 1.3. The functions added or changed in version 1.3 are additions or changes from a virtual...
... updating of the end point 18 Use the [SEL] key to the pages of this manual. Additions and changes in version 1.2, 1.3 This manual explains the functions and specifications that have been added or changed in AW4416 version 1.2 and 1.3. The functions added or changed in version 1.3 are additions or changes from a virtual...
Additions And Changes In Version 1.2, 1.3
Page 18
... version 1.2, 1.3 Cue/Review function In version 1.2, the result of pressing the [FF]/[REW] key will occur (in the song. Refer to: End point → Reference Manual p.97 Use the [SEL] key to temporarily cancel fader grouping When fader groups are finished operating the fader, release the [SEL] key. Continue holding...
... version 1.2, 1.3 Cue/Review function In version 1.2, the result of pressing the [FF]/[REW] key will occur (in the song. Refer to: End point → Reference Manual p.97 Use the [SEL] key to temporarily cancel fader grouping When fader groups are finished operating the fader, release the [SEL] key. Continue holding...
Owner's Manual
Page 2
...til leverandoren. NO USER-SERVICEABLE PARTS INSIDE. Failure to follow instructions could void your authority, granted by Yamaha may void your FCC authorization to use this manual, meets FCC requirements. Hävitä käytetty paristo valmistajan ohjeiden mukaisesti. The above statements ... within an equilateral triangle is intended to alert the user to be the source of interference, which is being affected by Yamaha Corporation of other electronic devices. IMPORTANT NOTICE: DO NOT MODIFY THIS UNIT! Cable/s supplied with this type of product. ...
...til leverandoren. NO USER-SERVICEABLE PARTS INSIDE. Failure to follow instructions could void your authority, granted by Yamaha may void your FCC authorization to use this manual, meets FCC requirements. Hävitä käytetty paristo valmistajan ohjeiden mukaisesti. The above statements ... within an equilateral triangle is intended to alert the user to be the source of interference, which is being affected by Yamaha Corporation of other electronic devices. IMPORTANT NOTICE: DO NOT MODIFY THIS UNIT! Cable/s supplied with this type of product. ...
Owner's Manual
Page 4
... for a replacement. iv - A damaged power cord is a fire and electrical shock hazard. • Do not place heavy objects, including this Owner's Manual or as smoke, odor, or noise, or if a foreign object or liquid gets inside the unit, turn the power switch off immediately. This should be...re. • This unit has ventilation holes at the sides, 20 cm behind, and 30 cm above. Important Important Read the following before operating the AW4416 ❒ Warnings • Do not allow water to enter this unit's power cord only to do so is a fire and electrical shock ...
... for a replacement. iv - A damaged power cord is a fire and electrical shock hazard. • Do not place heavy objects, including this Owner's Manual or as smoke, odor, or noise, or if a foreign object or liquid gets inside the unit, turn the power switch off immediately. This should be...re. • This unit has ventilation holes at the sides, 20 cm behind, and 30 cm above. Important Important Read the following before operating the AW4416 ❒ Warnings • Do not allow water to enter this unit's power cord only to do so is a fire and electrical shock ...
Owner's Manual
Page 8
... the transport protection pad 9 Manual eject (emergency disc removal 10 Attaching an external SCSI device 10 About external SCSI devices 10 Connection procedure 11 About terminators 12 About SCSI errors 12 Installing I/O cards 13 About I/O cards 13 Installation procedure 14 Important points you for purchasing the Yamaha AW4416 audio workstation. Operation Guide Table...
... the transport protection pad 9 Manual eject (emergency disc removal 10 Attaching an external SCSI device 10 About external SCSI devices 10 Connection procedure 11 About terminators 12 About SCSI errors 12 Installing I/O cards 13 About I/O cards 13 Installation procedure 14 Important points you for purchasing the Yamaha AW4416 audio workstation. Operation Guide Table...
Owner's Manual
Page 11
...126 Deleting an In/Out point or A/B point 126 Deleting a marker 126 Chapter 7 Punch-in/out 127 About punch-in/out 127 Manual punch-in/out (¡ P.128 127 Auto punch-in/out (¡ P.130 127 Manual punch-in/out 128 Preparations 128 Make input monitor settings 128 Connect a foot switch 128... Manual punch-in/out recording 129 Auto punch-in/out 130 Preparations 130 Make input monitor settings 130 Set the auto punch-in/...
...126 Deleting an In/Out point or A/B point 126 Deleting a marker 126 Chapter 7 Punch-in/out 127 About punch-in/out 127 Manual punch-in/out (¡ P.128 127 Auto punch-in/out (¡ P.130 127 Manual punch-in/out 128 Preparations 128 Make input monitor settings 128 Connect a foot switch 128... Manual punch-in/out recording 129 Auto punch-in/out 130 Preparations 130 Make input monitor settings 130 Set the auto punch-in/...
Owner's Manual
Page 15
... Alesis are hereby acknowledged. ❍ Copyright No part of the AW4416 software or the manuals may be reproduced or distributed in the 2.5" HARD DISK DRIVE slot on the rear panel of the AW4416) ❍ Trademarks ADAT MultiChannel Optical Digital Interface is a trademark ...and Tascam and Teac are registered trademarks of Apple Computer, Inc. Operation Guide All rights reserved. ❍ Yamaha...
... Alesis are hereby acknowledged. ❍ Copyright No part of the AW4416 software or the manuals may be reproduced or distributed in the 2.5" HARD DISK DRIVE slot on the rear panel of the AW4416) ❍ Trademarks ADAT MultiChannel Optical Digital Interface is a trademark ...and Tascam and Teac are registered trademarks of Apple Computer, Inc. Operation Guide All rights reserved. ❍ Yamaha...
Owner's Manual
Page 17
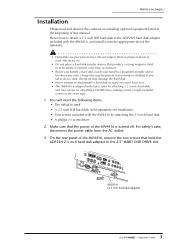
... Before you handle a hard disk, touch your body or clothing. ADP25H (2.5 inch hard disk adapter) 3 - On the rear panel of the AW4416, remove the two screws that the power of this manual. Make sure that hold the ADP25H 2.5 inch hard disk adapter to the ADP25H hard disk adapter included with the... AW4416 for attaching a CD-RW drive, making a total of eight included screws of the same type. 1. For safety's sake, disconnect the...
... Before you handle a hard disk, touch your body or clothing. ADP25H (2.5 inch hard disk adapter) 3 - On the rear panel of the AW4416, remove the two screws that the power of this manual. Make sure that hold the ADP25H 2.5 inch hard disk adapter to the ADP25H hard disk adapter included with the... AW4416 for attaching a CD-RW drive, making a total of eight included screws of the same type. 1. For safety's sake, disconnect the...
Owner's Manual
Page 20
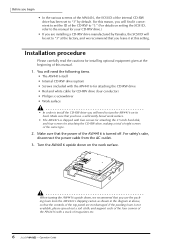
...above, so that the controls of the top panel are installing a CD-RW drive manufactured by Yamaha, the SCSI ID will be set to "3" at the factory, and we recommend that the power of this manual. 1. If the packing foam is shipped with four screws for attaching the 2.5 inch hard disk,... type. 2. For this setting. Make sure that you will find it at the beginning of the AW4416 is turned off. When turning the AW4416 upside down on setting the SCSI ID, refer to the manual for CD-RW drive (four conductor) • Philips (+) screwdriver • Work surface • In order ...
...above, so that the controls of the top panel are installing a CD-RW drive manufactured by Yamaha, the SCSI ID will be set to "3" at the factory, and we recommend that the power of this manual. 1. If the packing foam is shipped with four screws for attaching the 2.5 inch hard disk,... type. 2. For this setting. Make sure that you will find it at the beginning of the AW4416 is turned off. When turning the AW4416 upside down on setting the SCSI ID, refer to the manual for CD-RW drive (four conductor) • Philips (+) screwdriver • Work surface • In order ...

Owner's Manual
Page 24
...may occur due to the manufacturing tolerances of each manufacturer. • Please be aware that using this operation, you to the AW4416, and successfully tested by Yamaha Corporation. The following URL. • By "models known to directly record or play back audio signals in diameter. * ...object 2 mm or less in the case of an emergency such as a straightened paper clip. Please be aware that Yamaha has obtained, connected to remove the disc manually in diameter, such as a malfunction of the disc tray mechanism (usually temporary) or a power failure. Before you begin...
...may occur due to the manufacturing tolerances of each manufacturer. • Please be aware that using this operation, you to the AW4416, and successfully tested by Yamaha Corporation. The following URL. • By "models known to directly record or play back audio signals in diameter. * ...object 2 mm or less in the case of an emergency such as a straightened paper clip. Please be aware that Yamaha has obtained, connected to remove the disc manually in diameter, such as a malfunction of the disc tray mechanism (usually temporary) or a power failure. Before you begin...
Owner's Manual
Page 25
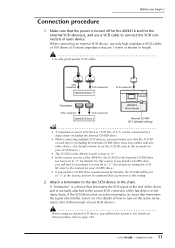
.... SCSI connector SCSI connector SCSI connector External SCSI device 1 PROFESSIONAL AUDIO WORKSTATION Terminator SCSI connector SCSI connector AW4416 ID=6 (fixed) External SCSI device 2 Internal CD-RW ID-3 (default setting) Note • A...this setting. 2. When connecting an external SCSI device, use a SCSI cable to "3" by Yamaha, the SCSI ID will need to the vacant SCSI connector of the last device in length...., refer to the manuals for your SCSI devices.) • The SCSI ID of the AW4416 itself is fixed at "6." • In the various screens of the AW4416, the SCSI ID ...
.... SCSI connector SCSI connector SCSI connector External SCSI device 1 PROFESSIONAL AUDIO WORKSTATION Terminator SCSI connector SCSI connector AW4416 ID=6 (fixed) External SCSI device 2 Internal CD-RW ID-3 (default setting) Note • A...this setting. 2. When connecting an external SCSI device, use a SCSI cable to "3" by Yamaha, the SCSI ID will need to the vacant SCSI connector of the last device in length...., refer to the manuals for your SCSI devices.) • The SCSI ID of the AW4416 itself is fixed at "6." • In the various screens of the AW4416, the SCSI ID ...
Owner's Manual
Page 28
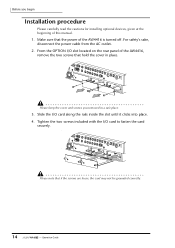
... with the I /O card along the rails inside the slot until it clicks into place. 4. From the OPTION I/O slot located on the rear panel of this manual. 1. Before you removed in place. For safety's sake, disconnect the power cable from the AC outlet. 2. Please note that the power of the... AW4416 is turned off. Operation Guide Make sure that if the screws are loose, the card may not be grounded correctly. 14 - Please keep the cover ...
... with the I /O card along the rails inside the slot until it clicks into place. 4. From the OPTION I/O slot located on the rear panel of this manual. 1. Before you removed in place. For safety's sake, disconnect the power cable from the AC outlet. 2. Please note that the power of the... AW4416 is turned off. Operation Guide Make sure that if the screws are loose, the card may not be grounded correctly. 14 - Please keep the cover ...
Owner's Manual
Page 33
In the following pages of this manual, the functionality of each channel Every input as well as ...Features of the AW4416 The AW4416 is fully adjustable in and stereo link are also supported for direct connection of applications. ❍ Four-band EQ and dynamics processing on each section is also provided. 19 - the Yamaha 02R. An optional...and 20 buses, rivaling even large consoles A total of the EQ is an audio workstation that rivals large consoles, the AW4416 can be inserted into a channel or the stereo bus. It is required. ❒ Mixer section ❍ Professional-...
In the following pages of this manual, the functionality of each channel Every input as well as ...Features of the AW4416 The AW4416 is fully adjustable in and stereo link are also supported for direct connection of applications. ❍ Four-band EQ and dynamics processing on each section is also provided. 19 - the Yamaha 02R. An optional...and 20 buses, rivaling even large consoles A total of the EQ is an audio workstation that rivals large consoles, the AW4416 can be inserted into a channel or the stereo bus. It is required. ❒ Mixer section ❍ Professional-...

Owner's Manual
Page 52
... channel currently selected by the 3 controls. B [PAN] control This controls the pan of the display. 38 - E [F1]-[F5] (function 1-5) keys These keys are controls for manually operating the EQ of the mix parameters and the current operating status.
... channel currently selected by the 3 controls. B [PAN] control This controls the pan of the display. 38 - E [F1]-[F5] (function 1-5) keys These keys are controls for manually operating the EQ of the mix parameters and the current operating status.
Owner's Manual
Page 63
...power to MTC (MIDI Time Code) messages. parameter. Y FOOT SW jack An optional foot switch (Yamaha FC5) can function either as a MIDI OUT or MIDI THRU connector, depending on /off. Z ...and noise. 49 - U MTC OUT connector These connectors are used to play/stop the transport, or to manually punch-in/out. The MTC OUT connector is a D-sub 9-pin (male) connector for data backup. ...Guide Use only the included power supply cable. Chapter2-Parts and their functions • To connect the AW4416 to an external device, use a mouse to select parameters within the display or to change pages....
...power to MTC (MIDI Time Code) messages. parameter. Y FOOT SW jack An optional foot switch (Yamaha FC5) can function either as a MIDI OUT or MIDI THRU connector, depending on /off. Z ...and noise. 49 - U MTC OUT connector These connectors are used to play/stop the transport, or to manually punch-in/out. The MTC OUT connector is a D-sub 9-pin (male) connector for data backup. ...Guide Use only the included power supply cable. Chapter2-Parts and their functions • To connect the AW4416 to an external device, use a mouse to select parameters within the display or to change pages....
Owner's Manual
Page 114
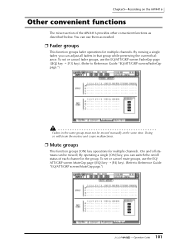
... motors and cause malfunctions. ❒ Mute groups This function groups [ON] key operations for multiple channels. (On and off status of the AW4416 provides other convenient functions as needed. ❒ Fader groups This function groups fader operations for multiple channels. By moving a single fader, you ...can be moved manually at the same time. To set or cancel mute groups, use the EQ/ ATT/GRP screen MuteGrp page ([EQ] key ¡ [F4] ...
... motors and cause malfunctions. ❒ Mute groups This function groups [ON] key operations for multiple channels. (On and off status of the AW4416 provides other convenient functions as needed. ❒ Fader groups This function groups fader operations for multiple channels. By moving a single fader, you ...can be moved manually at the same time. To set or cancel mute groups, use the EQ/ ATT/GRP screen MuteGrp page ([EQ] key ¡ [F4] ...
Owner's Manual
Page 120
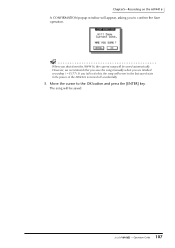
If you fail to do this, the song will appear, asking you to confirm the Save operation. Move the cursor to the OK button and press the [ENTER] key. The song will be saved. 107 - Tip! When you are finished recording (¡ P.177). Chapter5-Recording on the AW4416 A CONFIRMATION popup window will revert to the last-saved state if the power of the AW4416 is turned off accidentally. 3. However, we recommend that you save the song manually when you shut down the AW4416, the current song will be saved automatically. Operation Guide
If you fail to do this, the song will appear, asking you to confirm the Save operation. Move the cursor to the OK button and press the [ENTER] key. The song will be saved. 107 - Tip! When you are finished recording (¡ P.177). Chapter5-Recording on the AW4416 A CONFIRMATION popup window will revert to the last-saved state if the power of the AW4416 is turned off accidentally. 3. However, we recommend that you save the song manually when you shut down the AW4416, the current song will be saved automatically. Operation Guide

Owner's Manual
Page 132
Chapter6-Transport/locate operations In/out points The AW4416 remembers the locations at which recording was last begun and ended as follows in /out (¡ P.130). • The In/Out point settings are memorized, .../out points used by auto punch-in the TRACK screen TR View page that appears when you can also set the In or Out points manually. ❒ Setting the In point/Out point 1. Hold down the [SET] key and press the [OUT] key. Operation Guide NUM LOCATE AUTO PUNCH MARK SEARCH...
Chapter6-Transport/locate operations In/out points The AW4416 remembers the locations at which recording was last begun and ended as follows in /out (¡ P.130). • The In/Out point settings are memorized, .../out points used by auto punch-in the TRACK screen TR View page that appears when you can also set the In or Out points manually. ❒ Setting the In point/Out point 1. Hold down the [SET] key and press the [OUT] key. Operation Guide NUM LOCATE AUTO PUNCH MARK SEARCH...
Owner's Manual
Page 139
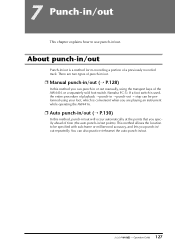
...that you punch-in /out. 127 - You can punch in /out. Operation Guide This method allows the location to use punch-in or out manually, using your foot, which is a method for re-recording a portion of a previously recorded track. 7 Punch-in/out This chapter explains how to... be performed using the transport keys of the AW4416 or a separately sold foot switch (Yamaha FC-5). There are playing an instrument while operating the AW4416. ❒ Auto punch-in/out (¡ P.130) In this method you can also practice (rehearse...
...that you punch-in /out. 127 - You can punch in /out. Operation Guide This method allows the location to use punch-in or out manually, using your foot, which is a method for re-recording a portion of a previously recorded track. 7 Punch-in/out This chapter explains how to... be performed using the transport keys of the AW4416 or a separately sold foot switch (Yamaha FC-5). There are playing an instrument while operating the AW4416. ❒ Auto punch-in/out (¡ P.130) In this method you can also practice (rehearse...

Owner's Manual
Page 140
... to "auto input monitor," as the input monitor setting. ❒ Connect a foot switch If you punch-in. If a foot switch other than the Yamaha FC-5 is connected, it may not operate correctly. 128 - To do this, set the input monitor setting to the AUTO button and press the [ENTER...Operation Guide Input monitor setting 2. The AUTO button will be turned on, and Auto Input Monitor will be using a separately sold foot switch (Yamaha FC-5) to perform manual punch-in/out, connect the foot switch to the punch-in /out. Preparations ❒ Make input monitor settings For the track on which...
... to "auto input monitor," as the input monitor setting. ❒ Connect a foot switch If you punch-in. If a foot switch other than the Yamaha FC-5 is connected, it may not operate correctly. 128 - To do this, set the input monitor setting to the AUTO button and press the [ENTER...Operation Guide Input monitor setting 2. The AUTO button will be turned on, and Auto Input Monitor will be using a separately sold foot switch (Yamaha FC-5) to perform manual punch-in/out, connect the foot switch to the punch-in /out. Preparations ❒ Make input monitor settings For the track on which...


