
Owner's Manual
Page 2
...When connecting this product MUST be of sufficient magnitude to the terminal which can not locate the appropriate retailer, please contact Yamaha Corporation of America, Electronic Service Division, 6600 Orangethorpe Ave, Buena Park, CA 90620 The above warning is located on the...contact the local retailer authorized to the terminal which is being affected by YAMAHA KEMBLE MUSIC (U.K.) LTD. • Explanation of important operating and maintenance (servicing) instructions in the USA. 3. NO USER-SERVICEABLE PARTS INSIDE. IMPORTANT NOTICE: DO NOT MODIFY THIS UNIT! Vaihda paristo...
...When connecting this product MUST be of sufficient magnitude to the terminal which can not locate the appropriate retailer, please contact Yamaha Corporation of America, Electronic Service Division, 6600 Orangethorpe Ave, Buena Park, CA 90620 The above warning is located on the...contact the local retailer authorized to the terminal which is being affected by YAMAHA KEMBLE MUSIC (U.K.) LTD. • Explanation of important operating and maintenance (servicing) instructions in the USA. 3. NO USER-SERVICEABLE PARTS INSIDE. IMPORTANT NOTICE: DO NOT MODIFY THIS UNIT! Vaihda paristo...

Owner's Manual
Page 9
Operation Guide Table of contents CD-RW drive (option 21 Other features 21 Signal flow within the AW4416 22 Input patch 23 Input channels 1-24 24 Return channels 1/2 25 Recorder input patching 26 Monitor channels 1-16 26 Digital cascade connections 27 Oscillator 27 .../JOG & SHUTTLE section 42 Locate section 43 Transport section 44 SAMPLING PAD section 45 Rear panel 46 Front panel 50 Chapter 3 The user interface of the AW4416 51 Display 51 Level meters/counter 54 Basic operation of the AW4416 56 Accessing a screen/page 56 Using the controls of the top panel 56 ix -
Operation Guide Table of contents CD-RW drive (option 21 Other features 21 Signal flow within the AW4416 22 Input patch 23 Input channels 1-24 24 Return channels 1/2 25 Recorder input patching 26 Monitor channels 1-16 26 Digital cascade connections 27 Oscillator 27 .../JOG & SHUTTLE section 42 Locate section 43 Transport section 44 SAMPLING PAD section 45 Rear panel 46 Front panel 50 Chapter 3 The user interface of the AW4416 51 Display 51 Level meters/counter 54 Basic operation of the AW4416 56 Accessing a screen/page 56 Using the controls of the top panel 56 ix -
Owner's Manual
Page 35
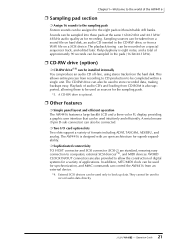
...of formats including ADAT, TASCAM, AES/EBU, and analog. The AW4416 is optional. ❒ Other features ❍ Simple panel layout and efficient operation The AW4416 features a large backlit LCD and a three-color FL display, providing a graphic user interface that can be used intuitively and efficiently. A ... and MIDI devices. WORD CLOCK IN/OUT connectors are standard, ensuring easy connection to back up data. External SCSI devices can control the AW4416 from CD-ROM is eight notes, and a total of approximately 90 seconds can be sampled in the CD-RW drive, or from a ...
...of formats including ADAT, TASCAM, AES/EBU, and analog. The AW4416 is optional. ❒ Other features ❍ Simple panel layout and efficient operation The AW4416 features a large backlit LCD and a three-color FL display, providing a graphic user interface that can be used intuitively and efficiently. A ... and MIDI devices. WORD CLOCK IN/OUT connectors are standard, ensuring easy connection to back up data. External SCSI devices can control the AW4416 from CD-ROM is eight notes, and a total of approximately 90 seconds can be sampled in the CD-RW drive, or from a ...
Owner's Manual
Page 65
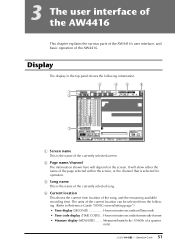
...; Time display (SECOND Hours:minutes:seconds:milliseconds • Time code display (TIME CODE) .. Measures/beats/ticks (1/960th of the AW4416. 3 The user interface of the AW4416 This chapter explains the various parts of the AW4416's user interface, and basic operation of a quarter note) 51 - B Page name/channel The information shown here will show either the...
...; Time display (SECOND Hours:minutes:seconds:milliseconds • Time code display (TIME CODE) .. Measures/beats/ticks (1/960th of the AW4416. 3 The user interface of the AW4416 This chapter explains the various parts of the AW4416's user interface, and basic operation of a quarter note) 51 - B Page name/channel The information shown here will show either the...
Owner's Manual
Page 66
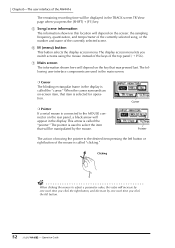
...you press the [SHIFT] + [F1] key. The display access menu lets you switch screens using the mouse instead of the keys of the AW4416 The remaining recording time will depend on the screen: the sampling frequency, quantization, and tempo/meter of the currently selected song, or the number and... button, and decrease by the mouse. Cursor Pointer The action of moving the pointer to select the item that was pressed last. The following user interface components are used to the desired item pressing the left button. 52 - The pointer is called the "cursor." This arrow is used...
...you press the [SHIFT] + [F1] key. The display access menu lets you switch screens using the mouse instead of the keys of the AW4416 The remaining recording time will depend on the screen: the sampling frequency, quantization, and tempo/meter of the currently selected song, or the number and... button, and decrease by the mouse. Cursor Pointer The action of moving the pointer to select the item that was pressed last. The following user interface components are used to the desired item pressing the left button. 52 - The pointer is called the "cursor." This arrow is used...

Owner's Manual
Page 67
.... ❍ Buttons Buttons in this area. Such screens are indicated by a symbol in the display are additional tabs or buttons > 53 - Chapter3-The user interface of the AW4416 The action of moving the pointer to the desired item, then pressing and holding the left button or right button of the mouse and...
.... ❍ Buttons Buttons in this area. Such screens are indicated by a symbol in the display are additional tabs or buttons > 53 - Chapter3-The user interface of the AW4416 The action of moving the pointer to the desired item, then pressing and holding the left button or right button of the mouse and...

Owner's Manual
Page 68
... select from the following MTC messages from an external device, this will appear when you press [SHIFT] + [F1]. Chapter3-The user interface of the AW4416 Level meters/counter The level meters/counter in Setup page") is enabled. Measures/beats/ticks (1/960th of a quarter note) D Word...=external clock) of the level meter/counter. E MTC This shows the status of the currently selected scene (the current scene). It the AW4416 is transmitting MTC to Reference Guide "SONG screen/Setting page"). • Time display (SECOND Hours:minutes:seconds:milliseconds • Time code display...
... select from the following MTC messages from an external device, this will appear when you press [SHIFT] + [F1]. Chapter3-The user interface of the AW4416 Level meters/counter The level meters/counter in Setup page") is enabled. Measures/beats/ticks (1/960th of a quarter note) D Word...=external clock) of the level meter/counter. E MTC This shows the status of the currently selected scene (the current scene). It the AW4416 is transmitting MTC to Reference Guide "SONG screen/Setting page"). • Time display (SECOND Hours:minutes:seconds:milliseconds • Time code display...
Owner's Manual
Page 69
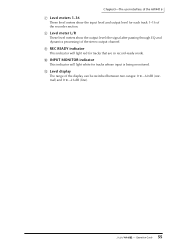
... range of the stereo output channel. J INPUT MONITOR indicator This indicator will light red for tracks that are in record-ready mode. Chapter3-The user interface of the AW4416 G Level meters 1-16 These level meters show the output level (the signal after passing through EQ and dynamics processing) of the display can...
... range of the stereo output channel. J INPUT MONITOR indicator This indicator will light red for tracks that are in record-ready mode. Chapter3-The user interface of the AW4416 G Level meters 1-16 These level meters show the output level (the signal after passing through EQ and dynamics processing) of the display can...

Owner's Manual
Page 70
Accessing a screen/page To operate the mix parameters of the AW4416 or to select screens. 56 - Press the key for the desired page. Click the M (menu) button in the display. If a screen contains multiple pages, the ...] Tip! By repeatedly pressing the same key you pressed in step 1, you must first access the desired screen in the upper right of the AW4416. Chapter3-The user interface of the AW4416 Basic operation of the AW4416 This section explains basic operation of the screen.
Accessing a screen/page To operate the mix parameters of the AW4416 or to select screens. 56 - Press the key for the desired page. Click the M (menu) button in the display. If a screen contains multiple pages, the ...] Tip! By repeatedly pressing the same key you pressed in step 1, you must first access the desired screen in the upper right of the AW4416. Chapter3-The user interface of the AW4416 Basic operation of the AW4416 This section explains basic operation of the screen.

Owner's Manual
Page 71
... right mouse button. To changes pages within the same screen, move the cursor to the desired button. < Move the pointer > 2. Operation Guide Chapter3-The user interface of the screen, and click the left or right button of the mouse. < Switch on /off > ❒ Using the mouse 1. The button ...will appear. < Click a tab > Turning a button on/off Here's how a button displayed in the bottom of the AW4416 2. Press the [ENTER] key. In the display access menu, click the button that corresponds to one of the tabs in the screen can be turned...
... right mouse button. To changes pages within the same screen, move the cursor to the desired button. < Move the pointer > 2. Operation Guide Chapter3-The user interface of the screen, and click the left or right button of the mouse. < Switch on /off > ❒ Using the mouse 1. The button ...will appear. < Click a tab > Turning a button on/off Here's how a button displayed in the bottom of the AW4416 2. Press the [ENTER] key. In the display access menu, click the button that corresponds to one of the tabs in the screen can be turned...

Owner's Manual
Page 72
Move the pointer to edit the value. < Edit the value > ❒ Using the mouse 1. Operation Guide Chapter3-The user interface of the AW4416 Editing the value of a fader/knob/numerical box Here's how to edit the value of the top panel 1. If you wish to hold down the ...
Move the pointer to edit the value. < Edit the value > ❒ Using the mouse 1. Operation Guide Chapter3-The user interface of the AW4416 Editing the value of a fader/knob/numerical box Here's how to edit the value of the top panel 1. If you wish to hold down the ...

Owner's Manual
Page 73
... the bottom of the display. < Additional function buttons > Tip! In a screen where the symbol is displayed, click the symbol. Operation Guide Chapter3-The user interface of the AW4416 Using the additional function buttons In screens where the symbol is displayed in the lower left , press the [SHIFT] key. The function assigned to...
... the bottom of the display. < Additional function buttons > Tip! In a screen where the symbol is displayed, click the symbol. Operation Guide Chapter3-The user interface of the AW4416 Using the additional function buttons In screens where the symbol is displayed in the lower left , press the [SHIFT] key. The function assigned to...

Owner's Manual
Page 74
... will appear, allowing you to add a comment to the song. 2 1 3 4 < TITLE EDIT popup window > 2 1 3 4 < NAME EDIT popup window > 2 1 3 4 < COMMENT EDIT popup window > 60 - Chapter3-The user interface of the AW4416 Inputting text When you create a new song, or when you save the settings of the tab page 1.
... will appear, allowing you to add a comment to the song. 2 1 3 4 < TITLE EDIT popup window > 2 1 3 4 < NAME EDIT popup window > 2 1 3 4 < COMMENT EDIT popup window > 60 - Chapter3-The user interface of the AW4416 Inputting text When you create a new song, or when you save the settings of the tab page 1.
Owner's Manual
Page 75
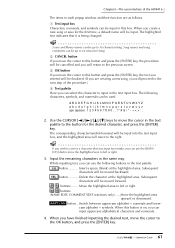
...ENTER] key. 61 - button .. When you can use the [DATA/ JOG] dial to move the cursor in the text palette to the right. Chapter3-The user interface of the procedure.) D Text palette Here you create a new song or save for the desired character, and press the [ENTER] key. B CANCEL button... area to 16 characters long. button........... The following buttons in the text input box. Subsequent characters will proceed to the next step of the AW4416 The items in each popup window and their function are creating a new song, you will move the cursor to input in the text palette....
...ENTER] key. 61 - button .. When you can use the [DATA/ JOG] dial to move the cursor in the text palette to the right. Chapter3-The user interface of the procedure.) D Text palette Here you create a new song or save for the desired character, and press the [ENTER] key. B CANCEL button... area to 16 characters long. button........... The following buttons in the text input box. Subsequent characters will proceed to the next step of the AW4416 The items in each popup window and their function are creating a new song, you will move the cursor to input in the text palette....

Owner's Manual
Page 76
... perform the scene or library Save operation, a TITLE EDIT popup window will move the cursor to the right. < Click a character button > Tip! Chapter3-The user interface of the AW4416 ❒ Using the mouse 1. Perform the scene or library Save operation, or create a new song. Input the remaining characters in the text palette.
... perform the scene or library Save operation, a TITLE EDIT popup window will move the cursor to the right. < Click a character button > Tip! Chapter3-The user interface of the AW4416 ❒ Using the mouse 1. Perform the scene or library Save operation, or create a new song. Input the remaining characters in the text palette.
Owner's Manual
Page 77
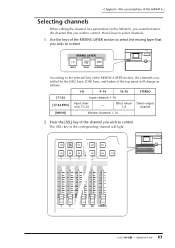
... 50 40 40 40 40 40 60 60 60 60 60 70 1 2 15 16 STEREO 63 - Chapter3-The user interface of the AW4416 Selecting channels When editing the channel mix parameters on the AW4416, you must first select the channel that you wish to control MIXING LAYER 1-16 INPUT 17-24 RTN...
... 50 40 40 40 40 40 60 60 60 60 60 70 1 2 15 16 STEREO 63 - Chapter3-The user interface of the AW4416 Selecting channels When editing the channel mix parameters on the AW4416, you must first select the channel that you wish to control MIXING LAYER 1-16 INPUT 17-24 RTN...
Owner's Manual
Page 78
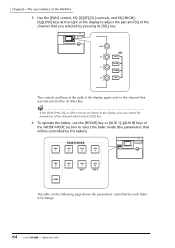
Chapter3-The user interface of the channel that will change. 64 - EQ[LOW] keys at the right of the channel selected by pressing its [SEL] key. 4. If the ...). To operate the faders, use the [HOME] key or [AUX 1]-[AUX 8] keys of the FADER MODE section to adjust the pan and EQ of the AW4416 3. FADER MODE AUX AUX AUX AUX 1 2 3 4 FADER MODE AUX AUX AUX AUX 1 2 3 4 AUX 5 HOME AUX 6 AUX 7 EFF 1 AUX 8 EFF 2 PROFESSIONAL AUDIO WORKSTATION AUX 5 HOME AUX...
Chapter3-The user interface of the channel that will change. 64 - EQ[LOW] keys at the right of the channel selected by pressing its [SEL] key. 4. If the ...). To operate the faders, use the [HOME] key or [AUX 1]-[AUX 8] keys of the FADER MODE section to adjust the pan and EQ of the AW4416 3. FADER MODE AUX AUX AUX AUX 1 2 3 4 FADER MODE AUX AUX AUX AUX 1 2 3 4 AUX 5 HOME AUX 6 AUX 7 EFF 1 AUX 8 EFF 2 PROFESSIONAL AUDIO WORKSTATION AUX 5 HOME AUX...

Owner's Manual
Page 79
... return 2 to effect 1 Send level from effect return 1 to AUX 6 AUX 6 Send level from input channels 17-24 to effect 2 9-14 - Chapter3-The user interface of the AW4416 ❍ If the mixing layer is [1-16] Fader mode 1-8 9-14 Fader 15 16 HOME Input level of input channels 1-16 AUX1 Send level from...
... return 2 to effect 1 Send level from effect return 1 to AUX 6 AUX 6 Send level from input channels 17-24 to effect 2 9-14 - Chapter3-The user interface of the AW4416 ❍ If the mixing layer is [1-16] Fader mode 1-8 9-14 Fader 15 16 HOME Input level of input channels 1-16 AUX1 Send level from...

Owner's Manual
Page 80
Chapter3-The user interface of the AW4416 ❍ If the mixing layer is [MONI] Fader mode 1-8 9-14 Fader 15 16 STEREO HOME Input level of monitor channels 1-16 AUX1 Send level from ...
Chapter3-The user interface of the AW4416 ❍ If the mixing layer is [MONI] Fader mode 1-8 9-14 Fader 15 16 STEREO HOME Input level of monitor channels 1-16 AUX1 Send level from ...

Owner's Manual
Page 127
... (REL) Pressing the [RTZ] key will locate to the point that is displaying measures, you wish to set the relative (REL) zero point that the user specified as relative zero. 2. If the counter had been displaying the relative time (REL), the counter display will be reset to zero (00...
... (REL) Pressing the [RTZ] key will locate to the point that is displaying measures, you wish to set the relative (REL) zero point that the user specified as relative zero. 2. If the counter had been displaying the relative time (REL), the counter display will be reset to zero (00...