
Owner's Manual
Page 10
.... s Trademarks ADAT MultiChannel Optical Digital Interface is a trademark of Yamaha Corporation. Yamaha is a trademark and Tascam and Teac are registered trademarks of Yamaha Corporation. © 2000 Yamaha Corporation. Yamaha website Operation section 1 Tascam Digital Interface is a trademark of Microsoft... the package contains the following items. If any items are missing, please contact your dealer. • AW2816 mixer/recorder unit: 1 • Owner's manual (this document): 1 • Tutorial: 1 • Power supply cable: 1 • CD-ROM: 1 • Screws for installing ...
.... s Trademarks ADAT MultiChannel Optical Digital Interface is a trademark of Yamaha Corporation. Yamaha is a trademark and Tascam and Teac are registered trademarks of Yamaha Corporation. © 2000 Yamaha Corporation. Yamaha website Operation section 1 Tascam Digital Interface is a trademark of Microsoft... the package contains the following items. If any items are missing, please contact your dealer. • AW2816 mixer/recorder unit: 1 • Owner's manual (this document): 1 • Tutorial: 1 • Power supply cable: 1 • CD-ROM: 1 • Screws for installing ...
Tutorial
Page 2
... digital multi-effect units with a rich array of the AW2816. Starting with a powerful digital mixer of equivalent quality with the Yamaha 02R mixing console (the defacto standard for every process that the AW2816 is designed to make it when you through this tutorial This tutorial is just the first step in these large and...
... digital multi-effect units with a rich array of the AW2816. Starting with a powerful digital mixer of equivalent quality with the Yamaha 02R mixing console (the defacto standard for every process that the AW2816 is designed to make it when you through this tutorial This tutorial is just the first step in these large and...
Tutorial
Page 3
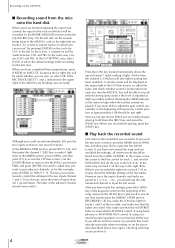
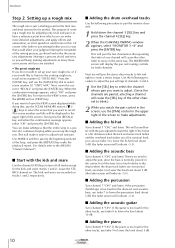
... the hard disk 4 Play back the recorded sound 4 Recording the sound of automix 23 Mastering 24 Accurate monitoring is tempo data on the AW2816 3 Creating a new song 3 Recording the rhythm section 3 Using two mics to record the rhythm 3 Connect the mics to the...1 send, and selecting an effect.20 Adding ambience to a CD-R disc 25 The next step 26 Glossary 27 2 Tutorial is it ?" Contents Contents Introduction 1 About this tutorial 1 Contents 2 Recording on the AW2816 5 Recording sounds that you feel it good or bad to record with the kick and snare 10 Adding the drum...
... the hard disk 4 Play back the recorded sound 4 Recording the sound of automix 23 Mastering 24 Accurate monitoring is tempo data on the AW2816 3 Creating a new song 3 Recording the rhythm section 3 Using two mics to record the rhythm 3 Connect the mics to the...1 send, and selecting an effect.20 Adding ambience to a CD-R disc 25 The next step 26 Glossary 27 2 Tutorial is it ?" Contents Contents Introduction 1 About this tutorial 1 Contents 2 Recording on the AW2816 5 Recording sounds that you feel it good or bad to record with the kick and snare 10 Adding the drum...
Tutorial
Page 4
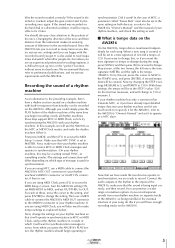
...high a level as backing keyboard and guitar chording should also be recorded. In particular, recording the bass at the upper right of the AW2816's 16 x 8 = 128 tracks. Tutorial 3 In this case you need the drums, bass, and percussion parts. Now you can learn how to assume that you will give ...you the best sound. Recording on the AW2816 Amazingly for you to make it is turned all the way to the right, check the connections once again, and if they are using condenser mics, turn the gain controls of the song. This tutorial will guide you through the actual recording ...
...high a level as backing keyboard and guitar chording should also be recorded. In particular, recording the bass at the upper right of the AW2816's 16 x 8 = 128 tracks. Tutorial 3 In this case you need the drums, bass, and percussion parts. Now you can learn how to assume that you will give ...you the best sound. Recording on the AW2816 Amazingly for you to make it is turned all the way to the right, check the connections once again, and if they are using condenser mics, turn the gain controls of the song. This tutorial will guide you through the actual recording ...
Tutorial
Page 5
... LAYER section RECORDER [1-8] key, make the [ON] key light for CH1 in stereo, press the MIXER section [PAN] key, and then press [F2] to the AW2816, and on the right side are played. If the REC TRACK SELECT 1 and 2 indicators in stereo. In the MIXING LAYER section, press INPUT [1-8], and then... you do not hear sound, it light. On the left sound. To try the procedure described above the input channel 1 fader, making it . 4 Tutorial If you were able to adjust the gain control successfully in the meter to light when the loudest sounds are tracks 1-16 (a total of the ...
... LAYER section RECORDER [1-8] key, make the [ON] key light for CH1 in stereo, press the MIXER section [PAN] key, and then press [F2] to the AW2816, and on the right side are played. If the REC TRACK SELECT 1 and 2 indicators in stereo. In the MIXING LAYER section, press INPUT [1-8], and then... you do not hear sound, it light. On the left sound. To try the procedure described above the input channel 1 fader, making it . 4 Tutorial If you were able to adjust the gain control successfully in the meter to light when the loudest sounds are tracks 1-16 (a total of the ...
Tutorial
Page 6
...it will use the AW2816 as explained below. of...AW2816. With these days support MTC or MIDI Clock, so let's try synchronizing the AW2816 with the AW2816...synchronization. Since the AW2816 lets you get. ...tracks of the AW2816, make sure ... to connect the AW2816's MIDI OUT connector... MIDI cable to connect the AW2816's MTC OUT connector to your...for the AW2816, refer to the AW2816's "Owner's...on the AW2816 On the AW2816, tempo data...AW2816, so being input correctly, and then record. If you press the AW2816...recorded on the AW2816. In the case...press [F4] to the AW2816's "Owner's Manual" and...
...it will use the AW2816 as explained below. of...AW2816. With these days support MTC or MIDI Clock, so let's try synchronizing the AW2816 with the AW2816...synchronization. Since the AW2816 lets you get. ...tracks of the AW2816, make sure ... to connect the AW2816's MIDI OUT connector... MIDI cable to connect the AW2816's MTC OUT connector to your...for the AW2816, refer to the AW2816's "Owner's...on the AW2816 On the AW2816, tempo data...AW2816, so being input correctly, and then record. If you press the AW2816...recorded on the AW2816. In the case...press [F4] to the AW2816's "Owner's Manual" and...

Tutorial
Page 7
... MIXER section, and then create a separate mix for monitoring when recording into a mic. When recording a vocal, it in the recording. The AW2816 has a function called "scene memory," so first store the current settings of the broad dynamic range offered by the vocalist. Change the... the screen, slightly toward the right side. s Switching scene memories Let's try actually switching the scene. First use 24 bit recording!). 6 Tutorial Press [ENTER] on OK, and you will differ dramatically depending on whether it 's worth noting that if the vocalist uses open-type headphones...
... MIXER section, and then create a separate mix for monitoring when recording into a mic. When recording a vocal, it in the recording. The AW2816 has a function called "scene memory," so first store the current settings of the broad dynamic range offered by the vocalist. Change the... the screen, slightly toward the right side. s Switching scene memories Let's try actually switching the scene. First use 24 bit recording!). 6 Tutorial Press [ENTER] on OK, and you will differ dramatically depending on whether it 's worth noting that if the vocalist uses open-type headphones...

Tutorial
Page 8
...being recorded on track 1. s To apply effects only to the virtual track area for track 1 (the top line), and press [ENTER] on the AW2816. The faders should all the parts you think you actually watch the meter, and use [QUICK REQ] to prepare to record with effects? In particular... FADER MODE section. is it will be impossible to the sound from the input, so that distortion is not applied to the monitored sound. Tutorial 7 The AW2816 has 128 virtual tracks, so if you like best. Actually record the input, and verify that is currently selected for track 1 this requires ...
...being recorded on track 1. s To apply effects only to the virtual track area for track 1 (the top line), and press [ENTER] on the AW2816. The faders should all the parts you think you actually watch the meter, and use [QUICK REQ] to prepare to record with effects? In particular... FADER MODE section. is it will be impossible to the sound from the input, so that distortion is not applied to the monitored sound. Tutorial 7 The AW2816 has 128 virtual tracks, so if you like best. Actually record the input, and verify that is currently selected for track 1 this requires ...
Tutorial
Page 9
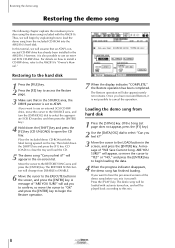
..., it is not possible to select "Can you feel it ?" However, it is also possible to the AW2816's "Owner's Manual." Loading the demo song from DISABLE to ENABLE. 6 Move the cursor to hear the pre... tray and load the CD. 5 The demo song "Can you feel it ?" 3 Move the cursor to this tutorial, we will appear, so move the cursor to "YES" or "NO," and press the [ENTER] key to...The RESTORE SONG button will take approximately ten minutes. The demo song will be loaded with the AW2816. Place the included demo CD-ROM with the label facing upward on , and will be played ...
..., it is not possible to select "Can you feel it ?" However, it is also possible to the AW2816's "Owner's Manual." Loading the demo song from DISABLE to ENABLE. 6 Move the cursor to hear the pre... tray and load the CD. 5 The demo song "Can you feel it ?" 3 Move the cursor to this tutorial, we will appear, so move the cursor to "YES" or "NO," and press the [ENTER] key to...The RESTORE SONG button will take approximately ten minutes. The demo song will be loaded with the AW2816. Place the included demo CD-ROM with the label facing upward on , and will be played ...
Tutorial
Page 10
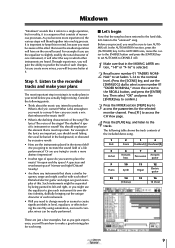
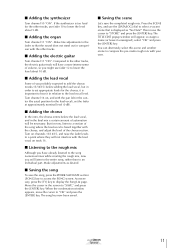
... Snare Overhead (L) Overhead (R) 5 Hi-hat 6 Acoustic bass 7 Percussion 8 Acoustic guitar 9 Piano 10 Synth 11 Organ 12 Electric guitar 13 14 15 16 (Chorus) 16 Vocal Tutorial 9 Distant? The rhythm? Mixdown "Mixdown" sounds like it refers to a single operation, but as you gain experience, you will blend together into one instrument, it...
... Snare Overhead (L) Overhead (R) 5 Hi-hat 6 Acoustic bass 7 Percussion 8 Acoustic guitar 9 Piano 10 Synth 11 Organ 12 Electric guitar 13 14 15 16 (Chorus) 16 Vocal Tutorial 9 Distant? The rhythm? Mixdown "Mixdown" sounds like it refers to a single operation, but as you gain experience, you will blend together into one instrument, it...
Tutorial
Page 11
... is a process of trial and error, so you will cause the other tracks, use the [DATA/JOG] dial to lower the level about 5 dB. 10 Tutorial Mixing is just a starting point for the other fader to move the cursor to adjust the pan, since the bass is normally placed in the... mixing process, go ahead and make it continues looping while you set up your own rough mix, or if you do not want to the AW2816 "Owner's Manual.") s Start with the pan adjusted toward the right. If the guitar is to have a reference point from which you want to set and...
... is a process of trial and error, so you will cause the other tracks, use the [DATA/JOG] dial to lower the level about 5 dB. 10 Tutorial Mixing is just a starting point for the other fader to move the cursor to adjust the pan, since the bass is normally placed in the... mixing process, go ahead and make it continues looping while you set up your own rough mix, or if you do not want to the AW2816 "Owner's Manual.") s Start with the pan adjusted toward the right. If the guitar is to have a reference point from which you want to set and...
Tutorial
Page 12
... in comparison with the chorus, and adjust the level of the song where the lead vocal is important to lower the level about 10 dB. Tutorial 11 s Adding the synthesizer Turn channel 10 "ON". If the synthesizer is displayed as desired. Make fine adjustments to the fader so that is...
... in comparison with the chorus, and adjust the level of the song where the lead vocal is important to lower the level about 10 dB. Tutorial 11 s Adding the synthesizer Turn channel 10 "ON". If the synthesizer is displayed as desired. Make fine adjustments to the fader so that is...

Tutorial
Page 13
... to turn it is the snare drum. By adding a 5.5 dB boost to select scene number 03 "STEP3 MIX." All of the EQ parameter adjustments.) 12 Tutorial Normally when you to change the settings of the Solo function by itself, or together with a light touch. 1 Press the channel 1 [SEL] key. (Perform the...
... to turn it is the snare drum. By adding a 5.5 dB boost to select scene number 03 "STEP3 MIX." All of the EQ parameter adjustments.) 12 Tutorial Normally when you to change the settings of the Solo function by itself, or together with a light touch. 1 Press the channel 1 [SEL] key. (Perform the...
Tutorial
Page 14
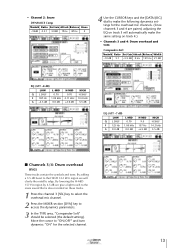
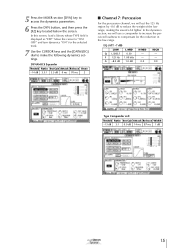
.../OFF" and turn dynamics "ON" for the overhead mic channels. (Since channels 3 and 4 are paired, adjusting the EQ on track 3 will clarify the metallic edge. Tutorial 13 • Channel 2: Snare DYNAMICS Comp Threshold Ratio Out Gain Attack Release Knee -18dB 2.5:1 3.0dB 19ms 87ms 2 4 Use the CURSOR keys and the [DATA/JOG...
.../OFF" and turn dynamics "ON" for the overhead mic channels. (Since channels 3 and 4 are paired, adjusting the EQ on track 3 will clarify the metallic edge. Tutorial 13 • Channel 2: Snare DYNAMICS Comp Threshold Ratio Out Gain Attack Release Knee -18dB 2.5:1 3.0dB 19ms 87ms 2 4 Use the CURSOR keys and the [DATA/JOG...
Tutorial
Page 15
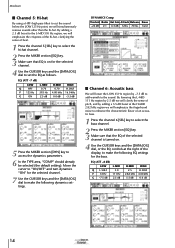
... the hi-hat. EQ (ATT -8 dB) LOW Q L.SHLF F 35 Hz G -7.5 dB L-MID 5.0 111 Hz 2.5 dB H-MID 2.5 2.82 kHz 5.5 dB HIGH H.SHLF 4.00 kHz 0.0 dB 14 Tutorial By lowering the L-MID 111 Hz region by 2.5 dB we will emphasize the crispness of the hi-hat, clarifying the sense of beat. 1 Press the...
... the hi-hat. EQ (ATT -8 dB) LOW Q L.SHLF F 35 Hz G -7.5 dB L-MID 5.0 111 Hz 2.5 dB H-MID 2.5 2.82 kHz 5.5 dB HIGH H.SHLF 4.00 kHz 0.0 dB 14 Tutorial By lowering the L-MID 111 Hz region by 2.5 dB we will emphasize the crispness of the hi-hat, clarifying the sense of beat. 1 Press the...
Tutorial
Page 16
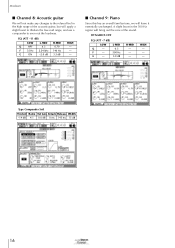
... Hz 1.00 kHz G -8.0 dB 1.0 dB H-MID - - 0.0 HIGH - - 0.0 Type Compander soft Threshold Ratio Out Gain Attack Release Width -13 dB 3:1 0.0 dB 14 ms 87 ms 1 dB Tutorial 15 5 Press the MIXER section [DYN] key to make the following dynamics settings.
... Hz 1.00 kHz G -8.0 dB 1.0 dB H-MID - - 0.0 HIGH - - 0.0 Type Compander soft Threshold Ratio Out Gain Attack Release Width -13 dB 3:1 0.0 dB 14 ms 87 ms 1 dB Tutorial 15 5 Press the MIXER section [DYN] key to make the following dynamics settings.
Tutorial
Page 17
... 0.70 140 Hz 3.5 dB HIGH - - - HIGH - - - Type Compander Soft Threshold Ratio Out Gain Attack Release Width -14 dB 4:1 0.0 dB 0 ms 145 ms 15 dB 16 Tutorial s Channel 9: Piano Since this has an overall familiar tone, we will leave it essentially unchanged.
... 0.70 140 Hz 3.5 dB HIGH - - - HIGH - - - Type Compander Soft Threshold Ratio Out Gain Attack Release Width -14 dB 4:1 0.0 dB 0 ms 145 ms 15 dB 16 Tutorial s Channel 9: Piano Since this has an overall familiar tone, we will leave it essentially unchanged.
Tutorial
Page 18
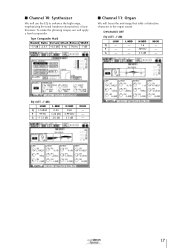
... Gain Attack Release Width -17 dB 2.5:1 -6.5 dB 0 ms 70 ms 7 dB s Channel 11: Organ We will apply a hard compander. DYNAMICS OFF EQ (ATT -7 dB) LOW Q - Tutorial 17 G - s Channel 10: Synthesizer We will use the EQ to the organ sound. EQ (ATT -7 dB) LOW L-MID Q L.SHELF 0.45 F 99 Hz 1.26 kHz G -11...
... Gain Attack Release Width -17 dB 2.5:1 -6.5 dB 0 ms 70 ms 7 dB s Channel 11: Organ We will apply a hard compander. DYNAMICS OFF EQ (ATT -7 dB) LOW Q - Tutorial 17 G - s Channel 10: Synthesizer We will use the EQ to the organ sound. EQ (ATT -7 dB) LOW L-MID Q L.SHELF 0.45 F 99 Hz 1.26 kHz G -11...
Tutorial
Page 19
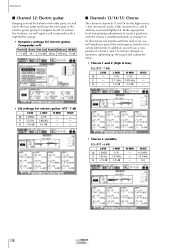
... 0.70 - - G -3.0 dB 4.5 dB - - • Chorus 3 (middle) EQ (ATT -6 dB) LOW L-MID Q L.SHELF 0.70 F 105 Hz 2.52 kHz G -7.0 dB 3.5 dB H-MID - - - HIGH H.SHELF 10.0 kHz 0.0 18 Tutorial In addition, we will use a compander on chorus 1 and 2 to L and R, and low is panned slightly left. So that it a brighter sound. To restrain the...
... 0.70 - - G -3.0 dB 4.5 dB - - • Chorus 3 (middle) EQ (ATT -6 dB) LOW L-MID Q L.SHELF 0.70 F 105 Hz 2.52 kHz G -7.0 dB 3.5 dB H-MID - - - HIGH H.SHELF 10.0 kHz 0.0 18 Tutorial In addition, we will use a compander on chorus 1 and 2 to L and R, and low is panned slightly left. So that it a brighter sound. To restrain the...
Tutorial
Page 20
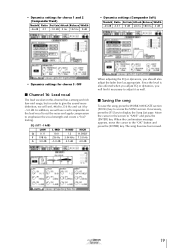
Since the level is also affected when you adjust EQ or dynamics, you should also adjust the fader level as well. Tutorial 19 In addition, we will set L-Mid to 236 Hz and cut the noise and apply compression to emphasize the vocal strength and create a "hi-&#...
Since the level is also affected when you adjust EQ or dynamics, you should also adjust the fader level as well. Tutorial 19 In addition, we will set L-Mid to 236 Hz and cut the noise and apply compression to emphasize the vocal strength and create a "hi-&#...

