
Owner's Manual
Page 1
PROFESSIONAL AUDIO WORKSTATION Owner's Manual Keep This Manual For Future Reference. E
PROFESSIONAL AUDIO WORKSTATION Owner's Manual Keep This Manual For Future Reference. E
Owner's Manual
Page 2
...is being affected by using one of the following measures: Relocate either this product in the users manual, may void your authority, granted by Yamaha Corporation of America or its subsidiaries. Kassera använt batteri enligt fabrikantens instruktion. NO USER-... af samme fabrikat og type. Hävitä käytetty paristo valmistajan ohjeiden mukaisesti. Modifications not expressly approved by Yamaha may cause interference harmful to use of important operating and maintenance (servicing) instructions in all installation instructions. Compliance with these ...
...is being affected by using one of the following measures: Relocate either this product in the users manual, may void your authority, granted by Yamaha Corporation of America or its subsidiaries. Kassera använt batteri enligt fabrikantens instruktion. NO USER-... af samme fabrikat og type. Hävitä käytetty paristo valmistajan ohjeiden mukaisesti. Modifications not expressly approved by Yamaha may cause interference harmful to use of important operating and maintenance (servicing) instructions in all installation instructions. Compliance with these ...
Owner's Manual
Page 4
...to securely ground the device. The rate of the unit as soon as marked on the unit. Important Important Read the following before operating the AW2816 s Warnings • Do not place a container with moving contacts, such switches, rotary controls, faders, and connectors, deteriorates over time. ... If noise occurs, relocate the affected equipment. • Using a mobile telephone near this unit may result. • Connect this Owner's Manual or as possible, and unplug the power cable plug from the AC outlet. Fire or electrical shock may induce a slight noise into nearby ...
...to securely ground the device. The rate of the unit as soon as marked on the unit. Important Important Read the following before operating the AW2816 s Warnings • Do not place a container with moving contacts, such switches, rotary controls, faders, and connectors, deteriorates over time. ... If noise occurs, relocate the affected equipment. • Using a mobile telephone near this unit may result. • Connect this Owner's Manual or as possible, and unplug the power cable plug from the AC outlet. Fire or electrical shock may induce a slight noise into nearby ...
Owner's Manual
Page 6
...2 Installing a CD-RW drive 4 About the CD-RW drives 4 CD-RW drive settings 4 Installation procedure 5 Removing the transport protection pad...7 Manual eject (emergency disc removal) .......7 Attaching an external SCSI device...........8 About external SCSI devices 8 Connection procedure 8 Installing I/O card 10 About I/O cards... internal effects 59 Recording on the stereo track 60 Saving your song 62 Advanced techniques on the AW2816 ..63 Manually re-recording only a specific area (Manual Punch-in/out 63 Automatically re-recording only a specific area (Auto Punch-in/out 64 Switching...
...2 Installing a CD-RW drive 4 About the CD-RW drives 4 CD-RW drive settings 4 Installation procedure 5 Removing the transport protection pad...7 Manual eject (emergency disc removal) .......7 Attaching an external SCSI device...........8 About external SCSI devices 8 Connection procedure 8 Installing I/O card 10 About I/O cards... internal effects 59 Recording on the stereo track 60 Saving your song 62 Advanced techniques on the AW2816 ..63 Manually re-recording only a specific area (Manual Punch-in/out 63 Automatically re-recording only a specific area (Auto Punch-in/out 64 Switching...
Owner's Manual
Page 10
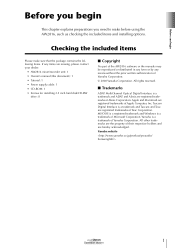
...; Screws for installing 2.5 inch hard disk/CD-RW drive: 8 s Copyright No part of the AW2816 software or the manuals may be reproduced or distributed in any form or by any items are registered trademarks of Yamaha Corporation. © 2000 Yamaha Corporation. MS-DOS is a registered trademark and Windows is a trademark and ADAT and Alesis...
...; Screws for installing 2.5 inch hard disk/CD-RW drive: 8 s Copyright No part of the AW2816 software or the manuals may be reproduced or distributed in any form or by any items are registered trademarks of Yamaha Corporation. © 2000 Yamaha Corporation. MS-DOS is a registered trademark and Windows is a trademark and ADAT and Alesis...
Owner's Manual
Page 11
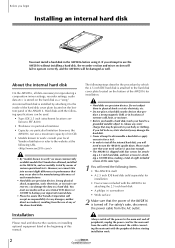
...attaching a CD-RW drive, making a total of eight included screws of the same type. 1 You will need to the website at the beginning of this manual. Please make sure that your body or clothing. For safety's sake, disconnect the power cable from the use a maximum capacity of 64 GB) • ...Models known to do so, static electricity may be aware that Yamaha Corporation will accept no particular limitation (however, the AW2816 can damage the data on the hard disk as an external SCSI device or CD-RW to SFF-8201) • Thickness...
...attaching a CD-RW drive, making a total of eight included screws of the same type. 1 You will need to the website at the beginning of this manual. Please make sure that your body or clothing. For safety's sake, disconnect the power cable from the use a maximum capacity of 64 GB) • ...Models known to do so, static electricity may be aware that Yamaha Corporation will accept no particular limitation (however, the AW2816 can damage the data on the hard disk as an external SCSI device or CD-RW to SFF-8201) • Thickness...
Owner's Manual
Page 13
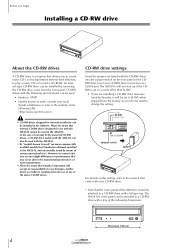
...no responsibility for any of the above CD-RW drives. However, we mean commercially available models that Yamaha has obtained, installed in performance that may occur due to change the setting. The AW2816 will not start up if the CDRW is an option that allows you to create music CD's, to... successfully tested by removing the CD-RW drive cover from the use with the AW2816. • By "models known to work : consult your CD-RW drive to the manual that came with a tray of the following URL. • CD-RW drives designed for use of any damages, neither direct nor ...
...no responsibility for any of the above CD-RW drives. However, we mean commercially available models that Yamaha has obtained, installed in performance that may occur due to change the setting. The AW2816 will not start up if the CDRW is an option that allows you to create music CD's, to... successfully tested by removing the CD-RW drive cover from the use with the AW2816. • By "models known to work : consult your CD-RW drive to the manual that came with a tray of the following URL. • CD-RW drives designed for use of any damages, neither direct nor ...
Owner's Manual
Page 14
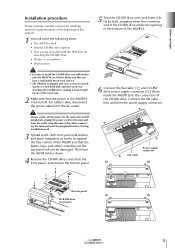
...the power cable from the AC outlet. 6 Connect the flat cable (1) and CD-RW drive power supply connector (2) (from inside the AW2816) to turn the AW2816 face down. 4 Remove the CD-RW drive cover from the outlet, then disconnect the cables connecting the main unit with four screws for attaching...Power supply connector Bottom panel CD-R/RW drive cover panel Operation section 5 Connect the flat the beginning of this manual. 1 You will need to the connectors of the AW2816 is turned off. Make sure that the power of the CD-RW drive. Always switch off the power for the ...
...the power cable from the AC outlet. 6 Connect the flat cable (1) and CD-RW drive power supply connector (2) (from inside the AW2816) to turn the AW2816 face down. 4 Remove the CD-RW drive cover from the outlet, then disconnect the cables connecting the main unit with four screws for attaching...Power supply connector Bottom panel CD-R/RW drive cover panel Operation section 5 Connect the flat the beginning of this manual. 1 You will need to the connectors of the AW2816 is turned off. Make sure that the power of the CD-RW drive. Always switch off the power for the ...
Owner's Manual
Page 16
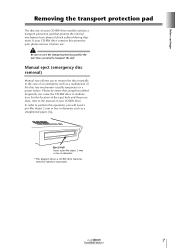
...such as a malfunction of an emergency such as a straightened paper clip. Operation section 7 Manual eject (emergency disc removal) Manual eject allows you will need to the manual of your CD-RW drive contains this method frequently can cause the CD-RW drive to ...remove the disc manually in the case of the disc tray mechanism (usually temporary) or a power failure. Please be...pin-like object 2 mm or less in diameter. * This diagram shows a CD-RW drive manufactured by Yamaha Corporation. If your CD-RW drive.
...such as a malfunction of an emergency such as a straightened paper clip. Operation section 7 Manual eject (emergency disc removal) Manual eject allows you will need to the manual of your CD-RW drive contains this method frequently can cause the CD-RW drive to ...remove the disc manually in the case of the disc tray mechanism (usually temporary) or a power failure. Please be...pin-like object 2 mm or less in diameter. * This diagram shows a CD-RW drive manufactured by Yamaha Corporation. If your CD-RW drive.
Owner's Manual
Page 17
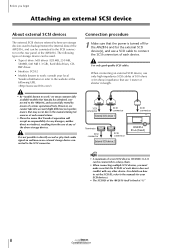
...in performance that may occur due to the manufacturing tolerances of each manufacturer. • Please be used to backup/restore the internal data of the AW2816, and can be connected in a daisy-chain. • When connecting multiple SCSI devices, you begin Attaching an external SCSI device About external ... external SCSI devices referred to here are 1 meter or shorter in realtime on how to set the SCSI ID, refer to the manuals for your local Yamaha distributor or refer to the website at "6." 8 Operation section Before you must make sure that the power is turned off for the...
...in performance that may occur due to the manufacturing tolerances of each manufacturer. • Please be used to backup/restore the internal data of the AW2816, and can be connected in a daisy-chain. • When connecting multiple SCSI devices, you begin Attaching an external SCSI device About external ... external SCSI devices referred to here are 1 meter or shorter in realtime on how to set the SCSI ID, refer to the manuals for your local Yamaha distributor or refer to the website at "6." 8 Operation section Before you must make sure that the power is turned off for the...
Owner's Manual
Page 18
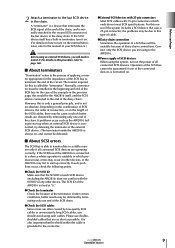
...problems occur, check the following points. Operation section 9 q External SCSI devices with 25-pin connectors Most SCSI cables with the SCSI ID of the AW2816 is connected to the last SCSI device in terminator, turn it . Connect only the SCSI device you begin 2 Attach a terminator to a device... an external SCSI device, you should avoid using to transfer data in other device. For details on the internal terminator, refer to the manual of a SCSI bus will need to format it on. (For details on how to start up correctly. The resistor required for the ...
...problems occur, check the following points. Operation section 9 q External SCSI devices with 25-pin connectors Most SCSI cables with the SCSI ID of the AW2816 is connected to the last SCSI device in terminator, turn it . Connect only the SCSI device you begin 2 Attach a terminator to a device... an external SCSI device, you should avoid using to transfer data in other device. For details on the internal terminator, refer to the manual of a SCSI bus will need to format it on. (For details on how to start up correctly. The resistor required for the ...
Owner's Manual
Page 19
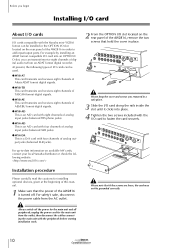
... turned off the power for the main unit and all peripherals, unplug the power cord for installing optional devices, given at the beginning of this manual. 1 Make sure that the power of AES/EBU format digital signals. q MY8-AD This is an A/D card with four channels of analog input...sake, disconnect the power cable from the AC outlet. 2 From the OPTION I/O slot located on available MY cards, contact your local Yamaha distributor or check the following types of the AW2816 in a safe place. 3 Slide the I/O card along the rails inside the slot until it clicks into an OPTION I /O card ...
... turned off the power for the main unit and all peripherals, unplug the power cord for installing optional devices, given at the beginning of this manual. 1 Make sure that the power of AES/EBU format digital signals. q MY8-AD This is an A/D card with four channels of analog input...sake, disconnect the power cable from the AC outlet. 2 From the OPTION I/O slot located on available MY cards, contact your local Yamaha distributor or check the following types of the AW2816 in a safe place. 3 Slide the I/O card along the rails inside the slot until it clicks into an OPTION I /O card ...
Owner's Manual
Page 32
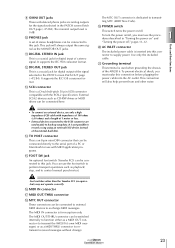
...OUT jacks. This connection will always output the same signal as playback/ stop, and to control manual punch-in "Turning the power on /off ," pages 11-12. The MIDI IN connector is ... I OMNI OUT jacks These unbalanced phone jacks are used when grounding the chassis of the AW2816. Parts and their functions T AC INLET connector The included power cable is for digital output... a high impedance SCSI cable with MIDI application programs. O FOOT SW jack An optional foot switch (Yamaha FC5) can be connected to this connector to record a song using an external SCSI device instead of...
...OUT jacks. This connection will always output the same signal as playback/ stop, and to control manual punch-in "Turning the power on /off ," pages 11-12. The MIDI IN connector is ... I OMNI OUT jacks These unbalanced phone jacks are used when grounding the chassis of the AW2816. Parts and their functions T AC INLET connector The included power cable is for digital output... a high impedance SCSI cable with MIDI application programs. O FOOT SW jack An optional foot switch (Yamaha FC5) can be connected to this connector to record a song using an external SCSI device instead of...
Owner's Manual
Page 45
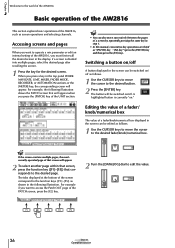
...the screen can be switched on /off as follows. 1 Use the CURSOR keys to move the cursor to the world of the AW2816 2 Basic operation of the AW2816 This section explains basic operations of a fader/knob/numerical box displayed in the following illustration shows the PATCH screen that corresponds to ... the CURSOR keys to move the cursor to the desired page. When you must first recall the desired screen in step 1. • In this manual, consecutive key operations are listed as "[PATCH] key ¡ [F2] key" (press the [PATCH] key and then press the [F2] key). Chapter Welcome...
...the screen can be switched on /off as follows. 1 Use the CURSOR keys to move the cursor to the world of the AW2816 2 Basic operation of the AW2816 This section explains basic operations of a fader/knob/numerical box displayed in the following illustration shows the PATCH screen that corresponds to ... the CURSOR keys to move the cursor to the desired page. When you must first recall the desired screen in step 1. • In this manual, consecutive key operations are listed as "[PATCH] key ¡ [F2] key" (press the [PATCH] key and then press the [F2] key). Chapter Welcome...

Owner's Manual
Page 46
... LOCK button This switches the type of character that will appear, allowing you to assign a name to the song. 1 3 4 2 5 2 Welcome to the world of the AW2816 1 3 4 2 5 The popup window contains the following characters/symbols/numerals can be displayed here. A B C D E F G H I J K L M N O P Q R ST UV W XY Z a b c d e f g h i j k l m n o p q r s t u v w x y z spc (space) 1...appear, allowing you to assign a name to the scene or library. The / buttons are displayed in this manual, key operations such as the above where one key is held , new function buttons will be input. The ...
... LOCK button This switches the type of character that will appear, allowing you to assign a name to the song. 1 3 4 2 5 2 Welcome to the world of the AW2816 1 3 4 2 5 The popup window contains the following characters/symbols/numerals can be displayed here. A B C D E F G H I J K L M N O P Q R ST UV W XY Z a b c d e f g h i j k l m n o p q r s t u v w x y z spc (space) 1...appear, allowing you to assign a name to the scene or library. The / buttons are displayed in this manual, key operations such as the above where one key is held , new function buttons will be input. The ...
Owner's Manual
Page 71
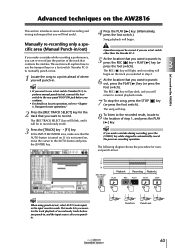
...and you will punch-in /out. 1 Locate the song to a point ahead of where you want to use a foot switch (Yamaha FC-5) to perform manual punch-in Punch-out 63 The following diagram shows the procedure for the track that you will return to normal playback mode. 7 To ... before you use the transport keys or a foot switch (Yamaha FC-5) to manually punch-in . Advanced techniques on the AW2816 This section introduces more advanced recording and mixing techniques that contains the mistake. Manually re-recording only a specific area (Manual Punch-in/out) If you make sure that you want...
...and you will punch-in /out. 1 Locate the song to a point ahead of where you want to use a foot switch (Yamaha FC-5) to perform manual punch-in Punch-out 63 The following diagram shows the procedure for the track that you will return to normal playback mode. 7 To ... before you use the transport keys or a foot switch (Yamaha FC-5) to manually punch-in . Advanced techniques on the AW2816 This section introduces more advanced recording and mixing techniques that contains the mistake. Manually re-recording only a specific area (Manual Punch-in/out) If you make sure that you want...
Owner's Manual
Page 92
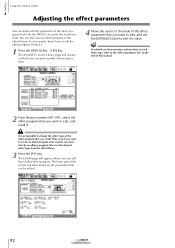
... to recall. If you are using the effect via AUX send/return, you want to the CANCEL button and press the [ENTER] key. For this manual. A popup window will appear, asking you to confirm the effect program recall operation. 6 In the lower right of the display, make sure that...
... to recall. If you are using the effect via AUX send/return, you want to the CANCEL button and press the [ENTER] key. For this manual. A popup window will appear, asking you to confirm the effect program recall operation. 6 In the lower right of the display, make sure that...
Owner's Manual
Page 99
... section Tip! For details on the parameters and functions of each effect type, refer to the "Effect parameter list" at the end of this manual. 2 From library numbers 001-041, select the effect program that you want. You can also save an edited program in which you can perform...161; [F2] key. Chapter Using the internal effects 5 Adjusting the effect parameters You can freely edit the parameters of the effect programs built into the AW2816 to edit, and recall it. As an example, here's how to create an effect program from scratch, you must start by recalling a program that ...
... section Tip! For details on the parameters and functions of each effect type, refer to the "Effect parameter list" at the end of this manual. 2 From library numbers 001-041, select the effect program that you want. You can also save an edited program in which you can perform...161; [F2] key. Chapter Using the internal effects 5 Adjusting the effect parameters You can freely edit the parameters of the effect programs built into the AW2816 to edit, and recall it. As an example, here's how to create an effect program from scratch, you must start by recalling a program that ...
Owner's Manual
Page 167
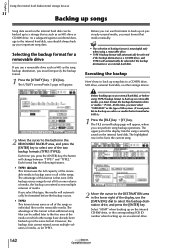
.../Backup page will automatically be formatted before using a removable drive. • TYPE1 backup format will automatically be selected if the backup destination is that media manually. Executing the backup Here's how to back up on removable media, you can perform song backup operations. Chapter Using the internal hard disk/external storage...
.../Backup page will automatically be formatted before using a removable drive. • TYPE1 backup format will automatically be selected if the backup destination is that media manually. Executing the backup Here's how to back up on removable media, you can perform song backup operations. Chapter Using the internal hard disk/external storage...
Owner's Manual
Page 195
... your computer, we recommend that you separately obtain a MIDI interface, and connect the AW2816's MTC OUT connector to the MIDI IN of your application to 1 MHz. • If you want to transmit MTC from the TO HOST connector, this ... for your software. • If you are connecting a Macintosh, you must set the MIDI interface setting of your MIDI interface. For details refer to the manual for your system. • If you are using .
... your computer, we recommend that you separately obtain a MIDI interface, and connect the AW2816's MTC OUT connector to the MIDI IN of your application to 1 MHz. • If you want to transmit MTC from the TO HOST connector, this ... for your software. • If you are connecting a Macintosh, you must set the MIDI interface setting of your MIDI interface. For details refer to the manual for your system. • If you are using .


