
Owner's Manual
Page 4
...replacing the battery. • The performance of the power cord. Consult your dealer for this unit. Important Important Read the following before operating the AW2816 s Warnings • Do not place a container with liquid or small metal objects on top of this unit. Failure to touch the leads (metal...'s Manual or as smoke, odor, or noise, or if a foreign object or liquid gets inside this unit are wired as follows: sleeve: ground, tip: send, and ring: return. • If the message "LOW BATTERY" appears when you notice any static electric charge on your dealer for a replacement...
...replacing the battery. • The performance of the power cord. Consult your dealer for this unit. Important Important Read the following before operating the AW2816 s Warnings • Do not place a container with liquid or small metal objects on top of this unit. Failure to touch the leads (metal...'s Manual or as smoke, odor, or noise, or if a foreign object or liquid gets inside this unit are wired as follows: sleeve: ground, tip: send, and ring: return. • If the message "LOW BATTERY" appears when you notice any static electric charge on your dealer for a replacement...
Owner's Manual
Page 20
When you save a song you created on and off ) while the AW2816 is in progress. The clock field will take effect. Tip! Before you begin blinking. 3 In the same way, input the M (month), D (date), h (hour), m (minute), and s (second) fields. Use the following order. 1 Any storage devices ...
When you save a song you created on and off ) while the AW2816 is in progress. The clock field will take effect. Tip! Before you begin blinking. 3 In the same way, input the M (month), D (date), h (hour), m (minute), and s (second) fields. Use the following order. 1 Any storage devices ...
Owner's Manual
Page 31
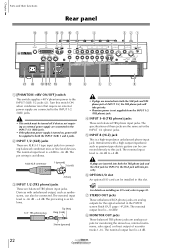
... is as follows. If plugs are inserted into both the XLR jack and TRS phone jack of INPUT 1/2, the TRS phone jack will take priority. Tip! The nominal input level is -10 dBV. The pin wiring is -46 dB to the INPUT (XLR) 1/2 jacks (2). F OPTION I/O slot An optional I /O card, refer to.... E INPUT 8 (Hi-Z) jack This is +4 dB. 22 Operation section For details on , power will take priority. • Phantom power is as follows. 1/4" TRS phone plug Tip (hot) Ring (cold) Sleeve (ground) • If plugs are the same as synthesizers, can be supplied to this jack.
... is as follows. If plugs are inserted into both the XLR jack and TRS phone jack of INPUT 1/2, the TRS phone jack will take priority. Tip! The nominal input level is -10 dBV. The pin wiring is -46 dB to the INPUT (XLR) 1/2 jacks (2). F OPTION I/O slot An optional I /O card, refer to.... E INPUT 8 (Hi-Z) jack This is +4 dB. 22 Operation section For details on , power will take priority. • Phantom power is as follows. 1/4" TRS phone plug Tip (hot) Ring (cold) Sleeve (ground) • If plugs are the same as synthesizers, can be supplied to this jack.

Owner's Manual
Page 33
Chapter Parts and their functions 1 Front panel 1 A CD-RW drive cover This covers the installation bay for the optional CD-RW drive. Tip! For details on installing a CD-RW drive, refer to page 4. 24 Operation section
Chapter Parts and their functions 1 Front panel 1 A CD-RW drive cover This covers the installation bay for the optional CD-RW drive. Tip! For details on installing a CD-RW drive, refer to page 4. 24 Operation section
Owner's Manual
Page 38
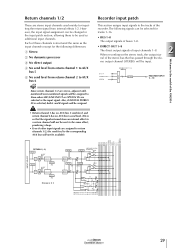
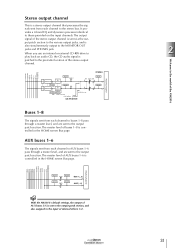
... the world of the recorder. BUS 1~8 8 CH DIRECT OUT1~8 8 STEREO 2 SELECT RECORER INPUT 1~16 16 DITHER RECORDER INPUT 1(...16) Welcome to the tracks of the AW2816 • Return channel 1 has no AUX bus 5 send level, and return channel 2 has no AUX bus 6 send level. BUS 1 BUS 2 BUS 3 BUS 4 BUS 5 ... can be changed in X 2 PRE/POST ON AUX RETURN1 can not be assigned to AUX5(EFF1) RETURN2 can not be assigned to AUX bus 6 Tip! This is so that has passed through the ste- nal of input channels 1-8. 2 When recording on the stereo track, the output sig- RETURN 1(...2)...
... the world of the recorder. BUS 1~8 8 CH DIRECT OUT1~8 8 STEREO 2 SELECT RECORER INPUT 1~16 16 DITHER RECORDER INPUT 1(...16) Welcome to the tracks of the AW2816 • Return channel 1 has no AUX bus 5 send level, and return channel 2 has no AUX bus 6 send level. BUS 1 BUS 2 BUS 3 BUS 4 BUS 5 ... can be changed in X 2 PRE/POST ON AUX RETURN1 can not be assigned to AUX5(EFF1) RETURN2 can not be assigned to AUX bus 6 Tip! This is so that has passed through the ste- nal of input channels 1-8. 2 When recording on the stereo track, the output sig- RETURN 1(...2)...
Owner's Manual
Page 40
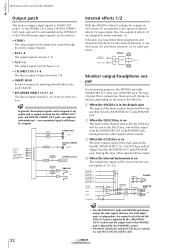
... the input of AUX buses 5/6 is sent to the output patch section, and also assigned to the MONITOR OUT jacks and PHONES jack. With the AW2816's default settings, the output of internal effects 1/2. STEREO L STEREO R SOLO L SOLO R AUX 1 AUX 4 AUX 5(EFF1) AUX 6(EFF2) OUTPUT PATCH Stereo... 4 AUX 5(EFF1) AUX 6(EFF2) OUTPUT PATCH ... Operation section 2 31 Welcome to the pre-fader location of the AW2816 STEREO ... METER METER LEVEL BUS 1(...8) METER METER LEVEL AUX1(...6) Tip! When you use an internal or external CD-RW drive to play back an audio CD, the CD audio signal is...
... the input of AUX buses 5/6 is sent to the output patch section, and also assigned to the MONITOR OUT jacks and PHONES jack. With the AW2816's default settings, the output of internal effects 1/2. STEREO L STEREO R SOLO L SOLO R AUX 1 AUX 4 AUX 5(EFF1) AUX 6(EFF2) OUTPUT PATCH Stereo... 4 AUX 5(EFF1) AUX 6(EFF2) OUTPUT PATCH ... Operation section 2 31 Welcome to the pre-fader location of the AW2816 STEREO ... METER METER LEVEL BUS 1(...8) METER METER LEVEL AUX1(...6) Tip! When you use an internal or external CD-RW drive to play back an audio CD, the CD audio signal is...
Owner's Manual
Page 41
... R DIGITAL STEREO OUT 2 COAXIAL METER DITHER OPTION I / O slot. Chapter OUTPUT PATCH SELECT Welcome to the world of the AW2816 2 Output patch This section assigns output signals to return channels 1/2. Tip! If desired, you may defeat these jack will change as follows, depending on the state of the... AW2816. 1 When the AW2816 is in the OPTION I /O SLOT 8 SLOT OUT METER DA METER DA OMNI OUT X 4 0dB Internal effects 1/2 With the AW2816's default settings, the ...
... R DIGITAL STEREO OUT 2 COAXIAL METER DITHER OPTION I / O slot. Chapter OUTPUT PATCH SELECT Welcome to the world of the AW2816 2 Output patch This section assigns output signals to return channels 1/2. Tip! If desired, you may defeat these jack will change as follows, depending on the state of the... AW2816. 1 When the AW2816 is in the OPTION I /O SLOT 8 SLOT OUT METER DA METER DA OMNI OUT X 4 0dB Internal effects 1/2 With the AW2816's default settings, the ...
Owner's Manual
Page 43
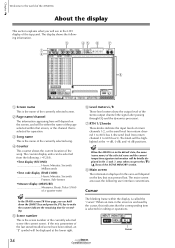
...location of a quarter note) Tip! Sub-frames •Measure display (MEASURE Measures. The knob will be briefly displayed in the 6 and 7 areas when you press the [ ]/ [ ] keys of the SCENE MEMORY section. Chapter Welcome to the world of the AW2816 2 About the display This section... an item in this indicates that was pressed last. Milliseconds •Time code display (TIME CODE Hours: Minutes: Seconds: Frames. When the AW2816 is the scene number of the currently selected scene (the current scene). Cursor 34 Operation section Ticks (1/960 of the song. E Scene number...
...location of a quarter note) Tip! Sub-frames •Measure display (MEASURE Measures. The knob will be briefly displayed in the 6 and 7 areas when you press the [ ]/ [ ] keys of the SCENE MEMORY section. Chapter Welcome to the world of the AW2816 2 About the display This section... an item in this indicates that was pressed last. Milliseconds •Time code display (TIME CODE Hours: Minutes: Seconds: Frames. When the AW2816 is the scene number of the currently selected scene (the current scene). Cursor 34 Operation section Ticks (1/960 of the song. E Scene number...
Owner's Manual
Page 45
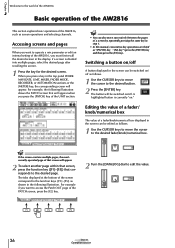
... operation of the AW2816 This section explains basic operations of the PATCH screen, press the [F2] key. 2 Turn the [DATA/JOG] dial to the desired page. Tip! A highlighted button is divided into multiple pages, select the desired page after recalling the screen. 1 Press the key for the ...desired screen. Accessing screens and pages When you want to operate a mix parameter or edit an internal setting of the AW2816, you want to ...
... operation of the AW2816 This section explains basic operations of the PATCH screen, press the [F2] key. 2 Turn the [DATA/JOG] dial to the desired page. Tip! A highlighted button is divided into multiple pages, select the desired page after recalling the screen. 1 Press the key for the ...desired screen. Accessing screens and pages When you want to operate a mix parameter or edit an internal setting of the AW2816, you want to ...

Owner's Manual
Page 46
...popup window that allows more than 16 characters to be executed. E Character palette Here you can select the character that will be input. Tip! The highlighted area indicates the character that can now be input into the text input box (1). When you save a scene memory or... library, a popup window will appear, allowing you to assign a name to the song. 1 3 4 2 5 2 Welcome to the world of the AW2816 1 3 4 2 5 The popup window contains the following characters/symbols/numerals can be input in a popup window as "[SHIFT] key + [F3] key" (hold the [...
...popup window that allows more than 16 characters to be executed. E Character palette Here you can select the character that will be input. Tip! The highlighted area indicates the character that can now be input into the text input box (1). When you save a scene memory or... library, a popup window will appear, allowing you to assign a name to the song. 1 3 4 2 5 2 Welcome to the world of the AW2816 1 3 4 2 5 The popup window contains the following characters/symbols/numerals can be input in a popup window as "[SHIFT] key + [F3] key" (hold the [...
Owner's Manual
Page 47
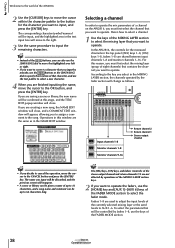
...select in this window are the same as follows. Input channels 1-8 Monitor channels 1-8 Monitor channels 9-16 Return channel 2 Return channel 1 Stereo output channel Tip! • If you want to operate the faders, use the keys of the FADER MODE section. 38 Operation section Here's how to select a channel...character/symbol/numeral will be controlled by mistake, use the text palette to select a new character. 4 When you want to operate. In the AW2816, the controls for the character you are finished inputting the name, move the cursor to the OK button, and press the [ENTER] ...
...select in this window are the same as follows. Input channels 1-8 Monitor channels 1-8 Monitor channels 9-16 Return channel 2 Return channel 1 Stereo output channel Tip! • If you want to operate the faders, use the keys of the FADER MODE section. 38 Operation section Here's how to select a channel...character/symbol/numeral will be controlled by mistake, use the text palette to select a new character. 4 When you want to operate. In the AW2816, the controls for the character you are finished inputting the name, move the cursor to the OK button, and press the [ENTER] ...
Owner's Manual
Page 50
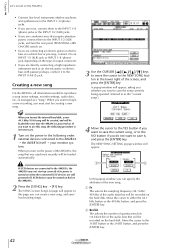
... and save it to the INPUT 8 (HI-Z) jack. In this song, the following order: external devices connected to the AW2816 ¡ the AW2816 itself ¡ your monitor system. Move the cursor to the 16 BIT button or the 24 BIT button, and press the ... and will be recorded on when the connected SCSI devices are still powered-off. If SCSI devices are connected to the AW2816, the AW2816 may not start by creating a new song. B Recbit This selects the number of quantization bits (16 bit/24 bit... necessary. 1 Turn on the power in the lower right of the screen, and press the [ENTER] key. Tip!
... and save it to the INPUT 8 (HI-Z) jack. In this song, the following order: external devices connected to the AW2816 ¡ the AW2816 itself ¡ your monitor system. Move the cursor to the 16 BIT button or the 24 BIT button, and press the ... and will be recorded on when the connected SCSI devices are still powered-off. If SCSI devices are connected to the AW2816, the AW2816 may not start by creating a new song. B Recbit This selects the number of quantization bits (16 bit/24 bit... necessary. 1 Turn on the power in the lower right of the screen, and press the [ENTER] key. Tip!
Owner's Manual
Page 51
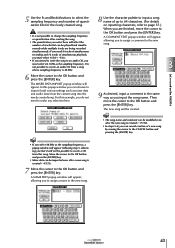
Tip! • The song name and comment can be modified even after the new song is ...new song. 8 Use the character palette to input a song name of up to 64 characters. (For details on the AW2816 Operation section 43 The new song will appear. The MIXER DATA IMPORT popup window will be created. In this popup window you...8 tracks of simultaneous recording and 16 tracks of simultaneous playback, you must select 44.1 kHz as you input the song name. Tip! • If you select 48 kHz as the sampling frequency, a popup window will appear following step 5, informing you that ...
Tip! • The song name and comment can be modified even after the new song is ...new song. 8 Use the character palette to input a song name of up to 64 characters. (For details on the AW2816 Operation section 43 The new song will appear. The MIXER DATA IMPORT popup window will be created. In this popup window you...8 tracks of simultaneous recording and 16 tracks of simultaneous playback, you must select 44.1 kHz as you input the song name. Tip! • If you select 48 kHz as the sampling frequency, a popup window will appear following step 5, informing you that ...
Owner's Manual
Page 54
... channels that is in the default state. This page displays meters that [ON] keys 1/2 are remembered, and the faders and keys will assume that the AW2816 is being controlled by the panel controls ([SEL] keys 1-8, [ON] keys 1-8, and faders 1-8) (¡P.38). • Even when you can use [...SEL] keys 1-8, [ON] keys 1-8, and faders 1- 8 to the default state (¡P.129). Tip! Chapter Let's record on , move the cursor to the POST FADER button and press the [ENTER] key. As an example, we will return to their...
... channels that is in the default state. This page displays meters that [ON] keys 1/2 are remembered, and the faders and keys will assume that the AW2816 is being controlled by the panel controls ([SEL] keys 1-8, [ON] keys 1-8, and faders 1-8) (¡P.38). • Even when you can use [...SEL] keys 1-8, [ON] keys 1-8, and faders 1- 8 to the default state (¡P.129). Tip! Chapter Let's record on , move the cursor to the POST FADER button and press the [ENTER] key. As an example, we will return to their...
Owner's Manual
Page 55
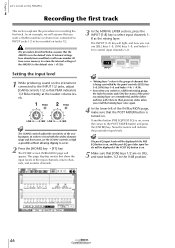
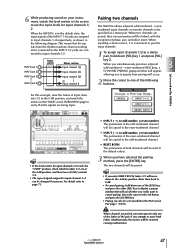
... "OVER" position, check whether faders 1/2 are paired, their mix parameters will be reset to the default values. 3 When you really want to cancel pairing. Tip! • If the level meters for input channels 1/ 2. Raise them back to 0 dB. • To cancel pairing, hold down one of the pair...in the default state, the input signals of the following diagram. The two channels will be changed if necessary. 6 While producing sound on the AW2816 For this example, raise the faders of input channels 1/2 to the 0 dB position, and watch the level meters in the PAN screen Pair ...
... "OVER" position, check whether faders 1/2 are paired, their mix parameters will be reset to the default values. 3 When you really want to cancel pairing. Tip! • If the level meters for input channels 1/ 2. Raise them back to 0 dB. • To cancel pairing, hold down one of the pair...in the default state, the input signals of the following diagram. The two channels will be changed if necessary. 6 While producing sound on the AW2816 For this example, raise the faders of input channels 1/2 to the 0 dB position, and watch the level meters in the PAN screen Pair ...
Owner's Manual
Page 56
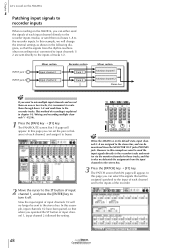
... example we want to mix multiple input channels and record them to the recorder tracks. When the AW2816 is convenient to route them through buses 1-8 and send them on the AW2816, you operated the ST button of input channel 1, input channel 2 followed the setting. However in... Mixer section Input channel 1 Input channel 2 Recorder section Track 1 Track 2 Mixer section Monitor channel 1 Monitor channel 2 Stereo bus Tip! Chapter Let's record on the AW2816 3 Patching input signals to recorder inputs When recording on one or two tracks, it off. This method of recording is why we ...
... example we want to mix multiple input channels and record them to the recorder tracks. When the AW2816 is convenient to route them through buses 1-8 and send them on the AW2816, you operated the ST button of input channel 1, input channel 2 followed the setting. However in... Mixer section Input channel 1 Input channel 2 Recorder section Track 1 Track 2 Mixer section Monitor channel 1 Monitor channel 2 Stereo bus Tip! Chapter Let's record on the AW2816 3 Patching input signals to recorder inputs When recording on one or two tracks, it off. This method of recording is why we ...
Owner's Manual
Page 57
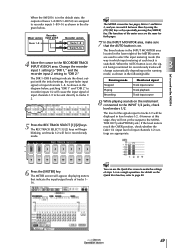
... both pages. 7 In the INPUT MONITOR area, make the settings of steps 1-6 in a single operation. Let's record on the AW2816 Running mode Stopped Playing Recording Monitored signal Track input source Track playback Track input source 8 While playing sounds on the Quick Rec function,...;8 ×8 Recorder section Tracks 1-8 Tracks 9-16 4 Move the cursor to make sure that indicate the input/output levels of input channels 1-8. Tip! Operation section 49 The DIR 1-DIR 8 settings indicate the direct output (with the initial settings, the post-fader input signal) of tracks 1-...
... both pages. 7 In the INPUT MONITOR area, make the settings of steps 1-6 in a single operation. Let's record on the AW2816 Running mode Stopped Playing Recording Monitored signal Track input source Track playback Track input source 8 While playing sounds on the Quick Rec function,...;8 ×8 Recorder section Tracks 1-8 Tracks 9-16 4 Move the cursor to make sure that indicate the input/output levels of input channels 1-8. Tip! Operation section 49 The DIR 1-DIR 8 settings indicate the direct output (with the initial settings, the post-fader input signal) of tracks 1-...
Owner's Manual
Page 58
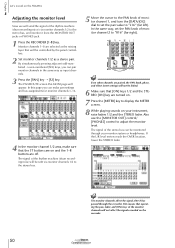
... monitor channels affect the signal after it from the MONITOR OUT jacks or PHONES jack. 1 Press the RECORDER [1-8] key. Chapter Let's record on the AW2816 3 Adjusting the monitor level Now we will send the signal of the rhythm machine (drum recording mics) via monitor channels 1/2 to the stereo bus. ... [ON] keys 1/2 and the STEREO [ON] key are paired, the PAN knob, phase, and effect insert settings will be monitored through the recorder. Tip! The signal of monitor channel 2 to "R16" (far right). Even when channels are turned on your monitor system or headphones. In the same way,...
... monitor channels affect the signal after it from the MONITOR OUT jacks or PHONES jack. 1 Press the RECORDER [1-8] key. Chapter Let's record on the AW2816 3 Adjusting the monitor level Now we will send the signal of the rhythm machine (drum recording mics) via monitor channels 1/2 to the stereo bus. ... [ON] keys 1/2 and the STEREO [ON] key are paired, the PAN knob, phase, and effect insert settings will be monitored through the recorder. Tip! The signal of monitor channel 2 to "R16" (far right). Even when channels are turned on your monitor system or headphones. In the same way,...
Owner's Manual
Page 59
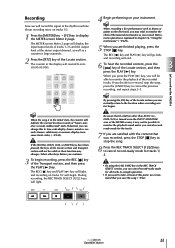
...press the PLAY [ ] key. Let's record on your instrument. By pressing the [IN] key of the Locate section you continue. 3 To begin . Tip! The REC [ ] key and PLAY [ ] key will go dark, and recording will indicate the current location in the REC TRACK SELECT section, you...you are finished playing, press the STOP [ ] key. millisecond" units. The METER screen Meter 2 page will light. 4 Begin performing on the AW2816 Tip! subframes) or measure display (measures: beats. If desired, you can cancel record-ready mode for the tracks. 7 If you are satisfied with the...
...press the PLAY [ ] key. Let's record on your instrument. By pressing the [IN] key of the Locate section you continue. 3 To begin . Tip! The REC [ ] key and PLAY [ ] key will go dark, and recording will indicate the current location in the REC TRACK SELECT section, you...you are finished playing, press the STOP [ ] key. millisecond" units. The METER screen Meter 2 page will light. 4 Begin performing on the AW2816 Tip! subframes) or measure display (measures: beats. If desired, you can cancel record-ready mode for the tracks. 7 If you are satisfied with the...
Owner's Manual
Page 60
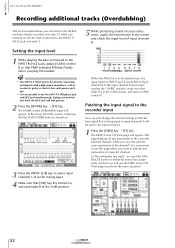
...perform the same operation. 52 Operation section The VIEW screen CH View page will take priority. 2 Press the [HOME] key ¡ [F1] key. Tip! • The INPUT 8 (HI-Z) jack is for directly connecting instruments with a high output impedance, such as the mixing layer. 4 Make sure that... on tracks 1/2 while you overdub an electric bass connected to the INPUT 8 (HI-Z) jack onto track 3. Chapter Let's record on the AW2816 3 Recording additional tracks (Overdubbing) This section explains how you can also edit the main parameters of the channel.) It is convenient to use this...
...perform the same operation. 52 Operation section The VIEW screen CH View page will take priority. 2 Press the [HOME] key ¡ [F1] key. Tip! • The INPUT 8 (HI-Z) jack is for directly connecting instruments with a high output impedance, such as the mixing layer. 4 Make sure that... on tracks 1/2 while you overdub an electric bass connected to the INPUT 8 (HI-Z) jack onto track 3. Chapter Let's record on the AW2816 3 Recording additional tracks (Overdubbing) This section explains how you can also edit the main parameters of the channel.) It is convenient to use this...