
Owner's Manual
Page 2
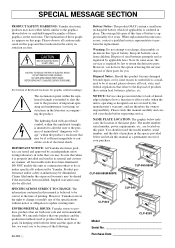
... required by law to the presence of these graphics appears on the enclosure. DO NOT modify this type of knowledge relating to lack of battery. NOTICE: Service charges incurred due to how a function or effect works (when the unit is approximately five years. You should record the model number, serial number, and the date of the specifications without notice or obligation to perform the replacement.
... required by law to the presence of these graphics appears on the enclosure. DO NOT modify this type of knowledge relating to lack of battery. NOTICE: Service charges incurred due to how a function or effect works (when the unit is approximately five years. You should record the model number, serial number, and the date of the specifications without notice or obligation to perform the replacement.
Owner's Manual
Page 3
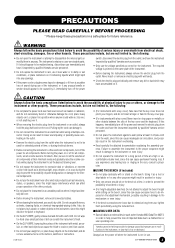
... by qualified Yamaha service personnel. • Only use . (1)B-6vari. sUSING THE BENCH (if included) • Do not play carelessly with metal, porcelain, or other electrical products such as correct for future reference. CLP-880/860/840/820/820S 3 Doing so can damage it , immediately turn the power off the power and remove the electric plug from the outlet and have the instrument inspected...
... by qualified Yamaha service personnel. • Only use . (1)B-6vari. sUSING THE BENCH (if included) • Do not play carelessly with metal, porcelain, or other electrical products such as correct for future reference. CLP-880/860/840/820/820S 3 Doing so can damage it , immediately turn the power off the power and remove the electric plug from the outlet and have the instrument inspected...
Owner's Manual
Page 5
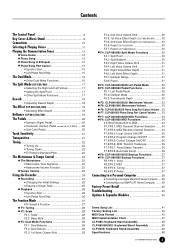
...: CLP-880/860 Backup Functions 37 F8.1/F9.1: Voice 37 F8.2/F9.2: MIDI 37 F8.3/F9.3: Tuning 37 F8.4/F9.4: Pedal 37 Connecting to a Personal Computer 38 q Connecting to an Apple Macintosh Series Computer .... 38 q Connecting to an IBM-PC/AT Series Computer ........ 39 Factory Preset Recall 40 Troubleshooting 40 Options & Expander Modules 40 Demo Song List 41 Factory Setting List 42 MIDI Data Format 43 MIDI Implementation Chart 47 CLP-880: Keyboard Stand Assembly 48 CLP-860/840/820: Keyboard Stand Assembly 56 CLP-820S: Keyboard Stand Assembly 62 Specifications...
...: CLP-880/860 Backup Functions 37 F8.1/F9.1: Voice 37 F8.2/F9.2: MIDI 37 F8.3/F9.3: Tuning 37 F8.4/F9.4: Pedal 37 Connecting to a Personal Computer 38 q Connecting to an Apple Macintosh Series Computer .... 38 q Connecting to an IBM-PC/AT Series Computer ........ 39 Factory Preset Recall 40 Troubleshooting 40 Options & Expander Modules 40 Demo Song List 41 Factory Setting List 42 MIDI Data Format 43 MIDI Implementation Chart 47 CLP-880: Keyboard Stand Assembly 48 CLP-860/840/820: Keyboard Stand Assembly 56 CLP-820S: Keyboard Stand Assembly 62 Specifications...
Owner's Manual
Page 7
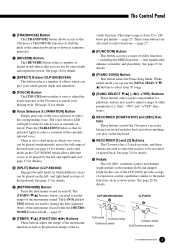
...). 6 [REVERB] Button The [REVERB] button selects a number of the keyboard. and right-hand sections of digital reverb effects that you can use the [SONG SELECT w/ v] buttons to select from 32 to select functions - These same buttons are also used to set the tempo of the keyboard (see page 16 for details), and a split mode on the CLP-880/860 which allows different voices to change the time signature (beat) of utility functions - page 27. # [FUNCTION] Button This button accesses a range of the metronome if used...
...). 6 [REVERB] Button The [REVERB] button selects a number of the keyboard. and right-hand sections of digital reverb effects that you can use the [SONG SELECT w/ v] buttons to select from 32 to select functions - These same buttons are also used to set the tempo of the keyboard (see page 16 for details), and a split mode on the CLP-880/860 which allows different voices to change the time signature (beat) of utility functions - page 27. # [FUNCTION] Button This button accesses a range of the metronome if used...
Owner's Manual
Page 10
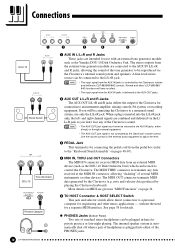
... connecting the pedal cord from an external MIDI device (such as the Yamaha DOU-10 Disk Orchestra Unit. and right-channel signals are combined and delivered via the Clavinova's internal sound system and speakers. Use the volume control on the external audio equipment to adjust the level. 3 PEDAL Jack This terminal is delivered to the AUX OUT jacks. 2 AUX OUT L/L+R and R Jacks The AUX OUT L/L+R and R jacks deliver the output of the PHONES jacks. 10 CLP-880/860...
... connecting the pedal cord from an external MIDI device (such as the Yamaha DOU-10 Disk Orchestra Unit. and right-channel signals are combined and delivered via the Clavinova's internal sound system and speakers. Use the volume control on the external audio equipment to adjust the level. 3 PEDAL Jack This terminal is delivered to the AUX OUT jacks. 2 AUX OUT L/L+R and R Jacks The AUX OUT L/L+R and R jacks deliver the output of the PHONES jacks. 10 CLP-880/860...
Owner's Manual
Page 11
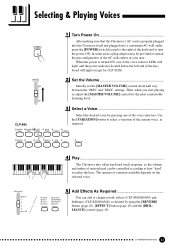
... play the keys. PIANO 2 HARPSICHORD STRINGS PIPE ORGAN CHURCH ORGAN JAZZ ORGAN BASS VARIATION BRILLIANCE BRIGHT MELLOW Play ...The Clavinova also offers keyboard touch response, so the volume and timbre of notes played can add or change reverb, effects (CLP-880/860/840) and brilliance (CLP-880/860/840) as required. Selecting & Playing Voices Turn Power On After making sure that the Clavinova's AC cord is turned ON, one of the voice selectors. Use the [VARIATION] button to turn the power ON. When the power is properly plugged...
... play the keys. PIANO 2 HARPSICHORD STRINGS PIPE ORGAN CHURCH ORGAN JAZZ ORGAN BASS VARIATION BRILLIANCE BRIGHT MELLOW Play ...The Clavinova also offers keyboard touch response, so the volume and timbre of notes played can add or change reverb, effects (CLP-880/860/840) and brilliance (CLP-880/860/840) as required. Selecting & Playing Voices Turn Power On After making sure that the Clavinova's AC cord is turned ON, one of the voice selectors. Use the [VARIATION] button to turn the power ON. When the power is properly plugged...

Owner's Manual
Page 15
... Pedal Mode" function described on the keyboard. The default setting is "5". • Both parts are arrangements for four-hands, tracks [1] and [2] correspond to primo and secondo parts of the selected piano song will go out (these buttons alternately toggle the corresponding part on the keyboard. CLP-880/860/840/820/820S 15 NOTE • If you hold a track button which is ON. The right-hand part is played by recorder's [2] track. (Some of the songs...
... Pedal Mode" function described on the keyboard. The default setting is "5". • Both parts are arrangements for four-hands, tracks [1] and [2] correspond to primo and secondo parts of the selected piano song will go out (these buttons alternately toggle the corresponding part on the keyboard. CLP-880/860/840/820/820S 15 NOTE • If you hold a track button which is ON. The right-hand part is played by recorder's [2] track. (Some of the songs...
Owner's Manual
Page 16
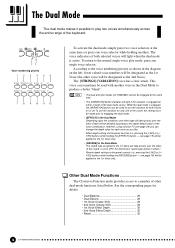
... the [EFFECT] button - NOTE • The dual and split modes (CLP-880/860) cannot be applied to the 1st Voice only. However, using function F3 (see page 29) you like. Other Dual Mode Functions The Clavinova Function mode provides access to a number of the voice combination. The Dual Mode The dual mode makes it possible to play mode, press any single voice selector. PIAN Voice numbering priority 123456 GRAND PIANO CLASSICAL JAZZ PIANO PIANO ROCK PIANO E. PIANO 1 E. The [STRINGS] [VARIATION] voice has...
... the [EFFECT] button - NOTE • The dual and split modes (CLP-880/860) cannot be applied to the 1st Voice only. However, using function F3 (see page 29) you like. Other Dual Mode Functions The Clavinova Function mode provides access to a number of the voice combination. The Dual Mode The dual mode makes it possible to play mode, press any single voice selector. PIAN Voice numbering priority 123456 GRAND PIANO CLASSICAL JAZZ PIANO PIANO ROCK PIANO E. PIANO 1 E. The [STRINGS] [VARIATION] voice has...
Owner's Manual
Page 17
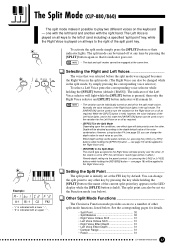
... setting via the Function mode (see page 19) will take priority over the other key by default. see below . Setting the Split Point The split point is initially set via the panel controls (i.e. The split point can change the depth value for the Right Voice on and off as you can be applied to the Right Voice only. • [REVERB] in the split mode. one effect type will be used to turn...
... setting via the Function mode (see page 19) will take priority over the other key by default. see below . Setting the Split Point The split point is initially set via the panel controls (i.e. The split point can change the depth value for the Right Voice on and off as you can be applied to the Right Voice only. • [REVERB] in the split mode. one effect type will be used to turn...
Owner's Manual
Page 18
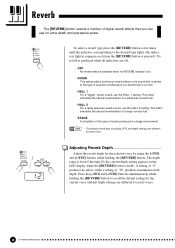
... different for the selected voice by using the [-/NO] and [+/YES] buttons while holding the [REVERB] button to recall the default setting for the current voice (default depth settings are different for extra depth and expressive power. HALL 1 For a "bigger" reverb sound, use the HALL 2 setting. STAGE A simulation of the type of a small-size concert hall. ROOM HALL 1 HALL 2 STAGE REVERB To select a reverb type press the [REVERB] button a few times until the indicator corresponding...
... different for the selected voice by using the [-/NO] and [+/YES] buttons while holding the [REVERB] button to recall the default setting for the current voice (default depth settings are different for extra depth and expressive power. HALL 1 For a "bigger" reverb sound, use the HALL 2 setting. STAGE A simulation of the type of a small-size concert hall. ROOM HALL 1 HALL 2 STAGE REVERB To select a reverb type press the [REVERB] button a few times until the indicator corresponding...
Owner's Manual
Page 19
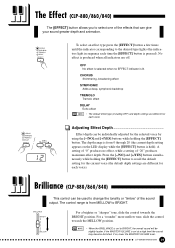
... EFFECT SONG SELECT -/NO +/YES To select an effect type press the [EFFECT] button a few times until the indicator corresponding to BRIGHT. OFF No effect is pressed). Press the [-/NO] and [+/YES] buttons simultaneously while holding the [EFFECT] button. Adjusting Effect Depth Effect depth can give your sound greater depth and animation. If the MASTER VOLUME is held). The Effect (CLP-880/860/840) The [EFFECT] button allows you to recall the default setting for the current voice...
... EFFECT SONG SELECT -/NO +/YES To select an effect type press the [EFFECT] button a few times until the indicator corresponding to BRIGHT. OFF No effect is pressed). Press the [-/NO] and [+/YES] buttons simultaneously while holding the [EFFECT] button. Adjusting Effect Depth Effect depth can give your sound greater depth and animation. If the MASTER VOLUME is held). The Effect (CLP-880/860/840) The [EFFECT] button allows you to recall the default setting for the current voice...
Owner's Manual
Page 24
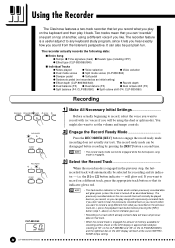
... part on top of another, using the dual or split mode). The previously-recorded data on the non-record track will normally be shown on the previous track etc.,), press the playback track button before recording by pressing the [REC] button a second time. • The record ready mode cannot be just plain fun. The recorder actually records the following data: s Entire Song q Tempo q Time signature (beat) q Reverb type (including OFF) q Effect type (CLP-880/860/840) s Individual Tracks q Notes played q Voice selection q Voice variation...
... part on top of another, using the dual or split mode). The previously-recorded data on the non-record track will normally be shown on the previous track etc.,), press the playback track button before recording by pressing the [REC] button a second time. • The record ready mode cannot be just plain fun. The recorder actually records the following data: s Entire Song q Tempo q Time signature (beat) q Reverb type (including OFF) q Effect type (CLP-880/860/840) s Individual Tracks q Notes played q Voice selection q Voice variation...
Owner's Manual
Page 26
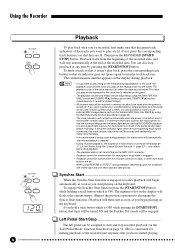
... time by using the [MASTER VOLUME] control and [TEMPO w/v] buttons (press both track buttons are lit. It is OFF while pressing the [START/STOP] button, that track will be turned ON and the Synchro Start mode will begin playing on the display will stop recorder playback via the MIDI OUT connector. • Playback cannot be started when the demo/piano song mode is engaged, recorder playback will be started playing. 26 CLP-880/860...
... time by using the [MASTER VOLUME] control and [TEMPO w/v] buttons (press both track buttons are lit. It is OFF while pressing the [START/STOP] button, that track will be turned ON and the Synchro Start mode will begin playing on the display will stop recorder playback via the MIDI OUT connector. • Playback cannot be started when the demo/piano song mode is engaged, recorder playback will be started playing. 26 CLP-880/860...

Owner's Manual
Page 33
... recall the default setting "5". Set to "0" if you don't want to play along with. Use the [-/NO] and [+/ YES] buttons to the metronome functions by pressing the [FUNCTION] button while holding the [METRONOME] button. Adjust the part volume to a comfortable level to use the [-/NO] and [+/YES] buttons to set the volume as a guide to hear the part. The volume range is from 0 through 20. A setting of "0" produces no sound, while a setting of "20" produces maximum volume. CLP...
... recall the default setting "5". Set to "0" if you don't want to play along with. Use the [-/NO] and [+/ YES] buttons to the metronome functions by pressing the [FUNCTION] button while holding the [METRONOME] button. Adjust the part volume to a comfortable level to use the [-/NO] and [+/YES] buttons to set the volume as a guide to hear the part. The volume range is from 0 through 20. A setting of "0" produces no sound, while a setting of "20" produces maximum volume. CLP...
Owner's Manual
Page 34
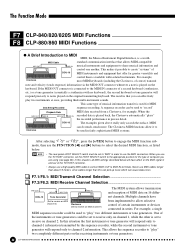
... to use the MIDI connectors. The Function Mode F7 CLP-840/820/820S MIDI Functions F8 CLP-880/860 MIDI Functions q A Brief Introduction to MIDI MIDI, the Musical Instrument Digital Interface, is played back, the Clavinova automatically "plays" the recorded performance in precise detail. NOTE • The rear-panel HOST SELECT switch must be set to receive only on channel 1, while the other is played on the receiving instruments or tone generators. 34 CLP-880/860/840/820/820S The Clavinova MIDI functions allow selective control of MIDI data on...
... to use the MIDI connectors. The Function Mode F7 CLP-840/820/820S MIDI Functions F8 CLP-880/860 MIDI Functions q A Brief Introduction to MIDI MIDI, the Musical Instrument Digital Interface, is played back, the Clavinova automatically "plays" the recorded performance in precise detail. NOTE • The rear-panel HOST SELECT switch must be set to receive only on channel 1, while the other is played on the receiving instruments or tone generators. 34 CLP-880/860/840/820/820S The Clavinova MIDI functions allow selective control of MIDI data on...
Owner's Manual
Page 35
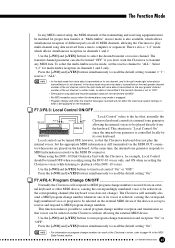
... "Local Control On" since the internal tone generator is set the receive channel to be turned OFF, however, so that the Clavinova keyboard does not play multi-channel song data received from a music computer or sequencer. NOTE • For information on program change number reception and transmission so that , normally, the MIDI OUT AUX IN OUT PUT MIDI L R R L IN Clavinova keyboard controls its own keyboard. receive = "ALL". This function makes it possible to "OFF". • Demo/piano song data and recorder playback data are played...
... "Local Control On" since the internal tone generator is set the receive channel to be turned OFF, however, so that the Clavinova keyboard does not play multi-channel song data received from a music computer or sequencer. NOTE • For information on program change number reception and transmission so that , normally, the MIDI OUT AUX IN OUT PUT MIDI L R R L IN Clavinova keyboard controls its own keyboard. receive = "ALL". This function makes it possible to "OFF". • Demo/piano song data and recorder playback data are played...

Owner's Manual
Page 37
... Backup Functions F9 CLP-880/860 Backup Functions After selecting "F8Y. Use the [-/NO] and [+/YES] buttons to turn backup "On" or "OFF". Use the [-/NO] and [+/YES] buttons to turn backup "On" or "OFF". The default backup mode is found on or off . The factory setting list is "OFF". • Channel (Transmit, Receive) • Program Change ON/OFF • MIDI Transmit Transpose • Local ON/OFF • Control Change ON/OFF F8.3/F9.3: Tuning ...Turns...
... Backup Functions F9 CLP-880/860 Backup Functions After selecting "F8Y. Use the [-/NO] and [+/YES] buttons to turn backup "On" or "OFF". Use the [-/NO] and [+/YES] buttons to turn backup "On" or "OFF". The default backup mode is found on or off . The factory setting list is "OFF". • Channel (Transmit, Receive) • Program Change ON/OFF • MIDI Transmit Transpose • Local ON/OFF • Control Change ON/OFF F8.3/F9.3: Tuning ...Turns...

Owner's Manual
Page 40
... MASTER VOLUME control turned up to a level at which the distortion ceases. Distorted Sound When the Clavinova is Connected to An External Amplifier/Speaker System If the Clavinova is connected to a stereo system or instrument amplifier and the sound is properly plugged into the PHONES jack, and that a pair of MIDI recording and playback functions, plus Yamaha DOC software, Disklavier PianoSoft™, and General MIDI/Standard MIDI File disk playback capability. 40 CLP-880/860/840/820/820S Troubleshooting...
... MASTER VOLUME control turned up to a level at which the distortion ceases. Distorted Sound When the Clavinova is Connected to An External Amplifier/Speaker System If the Clavinova is connected to a stereo system or instrument amplifier and the sound is properly plugged into the PHONES jack, and that a pair of MIDI recording and playback functions, plus Yamaha DOC software, Disklavier PianoSoft™, and General MIDI/Standard MIDI File disk playback capability. 40 CLP-880/860/840/820/820S Troubleshooting...
Owner's Manual
Page 42
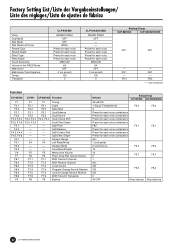
....2 F7.3 F7.4 F7.5 F7.6 F8 F1 F2.1 F2.2 F3.1 F3.2 F3.3, F3.4 F4 - - Factory Setting List/Liste der Vorgabeeinstellungen/ Liste des réglages/Lista de ajustes de fábrica Voice Dual Mode Split Mode Split Mode Left Voice Reverb Type Reverb Depth Effect Type Effect Depth Touch Sensitivity Volume in the FIXED Mode Metronome Metronome Time Signature Tempo Transpose CLP-880/860 GRAND PIANO OFF OFF BASS Preset for each voice Preset for each voice Preset for each voice Preset for each voice MEDIUM 64 OFF 0 (no accent) 120...
....2 F7.3 F7.4 F7.5 F7.6 F8 F1 F2.1 F2.2 F3.1 F3.2 F3.3, F3.4 F4 - - Factory Setting List/Liste der Vorgabeeinstellungen/ Liste des réglages/Lista de ajustes de fábrica Voice Dual Mode Split Mode Split Mode Left Voice Reverb Type Reverb Depth Effect Type Effect Depth Touch Sensitivity Volume in the FIXED Mode Metronome Metronome Time Signature Tempo Transpose CLP-880/860 GRAND PIANO OFF OFF BASS Preset for each voice Preset for each voice Preset for each voice Preset for each voice MEDIUM 64 OFF 0 (no accent) 120...

Owner's Manual
Page 69
... product or as ; Electrical/electronic products should be used near a swimming pool, spa, tub, sink, or wet basement. 9. This product, either supplied as a part of producing sound levels that are to insert the plug into the outlet, turn the plug over power or connecting cords of this product close to service this manual. 3. IMPORTANT: The louder the sound, the shorter the time period before damage occurs...
... product or as ; Electrical/electronic products should be used near a swimming pool, spa, tub, sink, or wet basement. 9. This product, either supplied as a part of producing sound levels that are to insert the plug into the outlet, turn the plug over power or connecting cords of this product close to service this manual. 3. IMPORTANT: The louder the sound, the shorter the time period before damage occurs...


