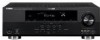
Owners Manual
Page 5
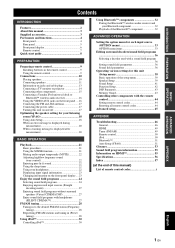
...remote control 9 Installing batteries in the remote control 9 Using the remote control 9 Connections 10 Placing speakers 10 Connecting speakers 11 Information on jacks and cable plugs 13 Connecting a TV monitor or projector 14 Connecting other components 15 Connecting a Yamaha iPod universal dock or Bluetooth™ wireless audio receiver...Using iPod 30 Controlling iPod 30 Using Bluetooth™ components 32 Pairing the Bluetooth™ wireless audio receiver and your Bluetooth component 32 Playback of the Bluetooth™ component 32 ADVANCED OPERATION Setting the option menu...
...remote control 9 Installing batteries in the remote control 9 Using the remote control 9 Connections 10 Placing speakers 10 Connecting speakers 11 Information on jacks and cable plugs 13 Connecting a TV monitor or projector 14 Connecting other components 15 Connecting a Yamaha iPod universal dock or Bluetooth™ wireless audio receiver...Using iPod 30 Controlling iPod 30 Using Bluetooth™ components 32 Pairing the Bluetooth™ wireless audio receiver and your Bluetooth component 32 Playback of the Bluetooth™ component 32 ADVANCED OPERATION Setting the option menu...

Owners Manual
Page 7
... manual and product, the product has priority. • "ASTANDBY/ON" or "gHDMI 1" (example) indicates the name of the following parts. • Remote control • Batteries (2) (AAA, R03, UM-4) • Optimizer microphone • AM loop antenna • Indoor FM antenna BASIC OPERATION ADVANCED OPERATION... ADDITIONAL INFORMATION APPENDIX English 3 En and other U.S. and worldwide patents issued & pending. "SILENT CINEMA" is a trademark of Yamaha Corporation. Supplied accessories Check that you received all of the parts on the remote control.
... manual and product, the product has priority. • "ASTANDBY/ON" or "gHDMI 1" (example) indicates the name of the following parts. • Remote control • Batteries (2) (AAA, R03, UM-4) • Optimizer microphone • AM loop antenna • Indoor FM antenna BASIC OPERATION ADVANCED OPERATION... ADDITIONAL INFORMATION APPENDIX English 3 En and other U.S. and worldwide patents issued & pending. "SILENT CINEMA" is a trademark of Yamaha Corporation. Supplied accessories Check that you received all of the parts on the remote control.

Owners Manual
Page 10
... display a b c STEREO TUNED g h a HDMI indicator Lights up during normal communication when HDMI is muted. e VOLUME indicator Displays volume levels. b CINEMA DSP indicator Lights up while receiving a radio broadcast signal from which signals are available for the current operation. h Multi information display Displays menu items and settings for operations. c Tuner indicator Lights... Indicate speaker terminals or the PRE OUT jack from an FM/ AM station (see page 22). d SLEEP indicator Lights up if corresponding cursors on the remote control are currently output.
... display a b c STEREO TUNED g h a HDMI indicator Lights up during normal communication when HDMI is muted. e VOLUME indicator Displays volume levels. b CINEMA DSP indicator Lights up while receiving a radio broadcast signal from which signals are available for the current operation. h Multi information display Displays menu items and settings for operations. c Tuner indicator Lights... Indicate speaker terminals or the PRE OUT jack from an FM/ AM station (see page 22). d SLEEP indicator Lights up if corresponding cursors on the remote control are currently output.
Owners Manual
Page 11
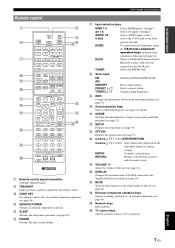
...Adjust the volume of input sources and sound field programs (see page 44). Part names and functions g Input selection keys HDMI 1-4 AV 1-6 AUDIO 1/2 V-AUX Selects HDMI inputs 1 through 6. Selects AV inputs 1 through 4. Selects AUDIO inputs 1 and 2. h Tuner keys FM AM MEMORY PRESET k / n TUNING k / n...see page 44). q MUTE Turns the mute function of external components (see page 39). c CODE SET Sets remote control codes for external component operations (see page 33). Selects a Yamaha iPod universal dock/ Bluetooth wireless audio receiver connected to the DOCK jack.
...Adjust the volume of input sources and sound field programs (see page 44). Part names and functions g Input selection keys HDMI 1-4 AV 1-6 AUDIO 1/2 V-AUX Selects HDMI inputs 1 through 6. Selects AV inputs 1 through 4. Selects AUDIO inputs 1 and 2. h Tuner keys FM AM MEMORY PRESET k / n TUNING k / n...see page 44). q MUTE Turns the mute function of external components (see page 39). c CODE SET Sets remote control codes for external component operations (see page 33). Selects a Yamaha iPod universal dock/ Bluetooth wireless audio receiver connected to the DOCK jack.
Owners Manual
Page 12
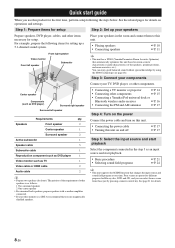
...8226; Connecting a TV monitor or projector ☞P. 14 • Connecting other components ☞P. 15 • Connecting a Yamaha iPod universal dock or Bluetooth wireless audio receiver ☞P. 16 • Connecting the FM and AM antennas ☞P. 17 Step 4: Turn on the power Connect the power...requirement of other speakers is as an input source and start guide When you can enjoy good balanced sound without special knowledge by pressing a remote control key. Center speaker Components (such as TV 1 Video cable or HDMI cable 2 Audio cable 2 y • Prepare two ...
...8226; Connecting a TV monitor or projector ☞P. 14 • Connecting other components ☞P. 15 • Connecting a Yamaha iPod universal dock or Bluetooth wireless audio receiver ☞P. 16 • Connecting the FM and AM antennas ☞P. 17 Step 4: Turn on the power Connect the power...requirement of other speakers is as an input source and start guide When you can enjoy good balanced sound without special knowledge by pressing a remote control key. Center speaker Components (such as TV 1 Video cable or HDMI cable 2 Audio cable 2 y • Prepare two ...

Owners Manual
Page 13
...of high humidity, such as near a heater or stove - Notes • Do not spill water or other liquids on this remote control by setting the remote control code. Notes • Change all batteries if you find leaking batteries, discard the batteries immediately, taking care not to the ...(+ and -) on the inside of the battery compartment. 3 Snap the battery compartment cover back into your local regulations. • If the remote control is dim • Do not use different types of high temperatures, such as alkaline and manganese batteries) together. the operation range of ...
...of high humidity, such as near a heater or stove - Notes • Do not spill water or other liquids on this remote control by setting the remote control code. Notes • Change all batteries if you find leaking batteries, discard the batteries immediately, taking care not to the ...(+ and -) on the inside of the battery compartment. 3 Snap the battery compartment cover back into your local regulations. • If the remote control is dim • Do not use different types of high temperatures, such as alkaline and manganese batteries) together. the operation range of ...

Owners Manual
Page 18
... supported by the video monitor. If the TV supports an optical digital output, we recommend that you to switch an input source to the AV input 1 with the remote control of the TV. Connections Connecting a TV monitor or projector Connect a video monitor such as a TV or projector to an output terminal of...
... supported by the video monitor. If the TV supports an optical digital output, we recommend that you to switch an input source to the AV input 1 with the remote control of the TV. Connections Connecting a TV monitor or projector Connect a video monitor such as a TV or projector to an output terminal of...

Owners Manual
Page 19
... HDMI 1 COMPONENT VIDEO PR HDMI 2 FM GND AM PB Y VIDEO MONITOR OUT HDMI 3 HDMI 4 FRONT OPTICAL ( TV ) AV 1 COAXIAL AV 2 COAXIAL (CD) AV 3 OPTICAL AV 4 AV 5 AV 6 AV OUT AUDIO1 AUDIO2 AUDIO OUT HDMI input (HDMI 1-4) CE Audio output (AUDIO OUT) Audio input (AUDIO 1-2) ■ Audio and video... component External components Signals Output jacks Input sources/jacks of the input source displayed on standby. If your Yamaha component has the Remote in parentheses are recommended to connect to the external components, make sure that component with a single key operation...
... HDMI 1 COMPONENT VIDEO PR HDMI 2 FM GND AM PB Y VIDEO MONITOR OUT HDMI 3 HDMI 4 FRONT OPTICAL ( TV ) AV 1 COAXIAL AV 2 COAXIAL (CD) AV 3 OPTICAL AV 4 AV 5 AV 6 AV OUT AUDIO1 AUDIO2 AUDIO OUT HDMI input (HDMI 1-4) CE Audio output (AUDIO OUT) Audio input (AUDIO 1-2) ■ Audio and video... component External components Signals Output jacks Input sources/jacks of the input source displayed on standby. If your Yamaha component has the Remote in parentheses are recommended to connect to the external components, make sure that component with a single key operation...

Owners Manual
Page 21
... 17 En To reduce noises, connect a ground bar or a vinyl-covered wire with a copper plate at its tip, and place it is turned on the remote control) to turn off this unit on and off 1 Press ASTANDBY/ON on the front panel (or fPOWER on . Assembling the AM loop antenna To... the AC wall outlet Power cable Turning this unit (standby mode). For more details, consult the nearest authorized Yamaha dealer or service center. • Always use the AM loop antenna together with this unit into an AC wall outlet. Connect these antennas properly to...
... 17 En To reduce noises, connect a ground bar or a vinyl-covered wire with a copper plate at its tip, and place it is turned on the remote control) to turn off this unit on and off 1 Press ASTANDBY/ON on the front panel (or fPOWER on . Assembling the AM loop antenna To... the AC wall outlet Power cable Turning this unit (standby mode). For more details, consult the nearest authorized Yamaha dealer or service center. • Always use the AM loop antenna together with this unit into an AC wall outlet. Connect these antennas properly to...
Owners Manual
Page 25
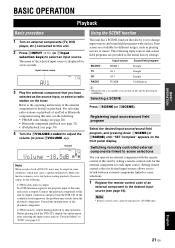
...or music. The following input sources and sound field programs are available for different usages, such as the initial factory settings. Note • Remote control codes cannot be output in some conditions, which may cause a speaker malfunction. Input source name VOL. For selecting radio stations or ...CR SL SR Note When you can operate an external component with one key. Input source Sound field program BD/DVD TV CD RADIO HDMI 1 AV 1 AV 3 TUNER Straight Straight Straight 7ch Enhancer y • When this unit is on standby, you play back the DTS-CD. Selecting a SCENE ...
...or music. The following input sources and sound field programs are available for different usages, such as the initial factory settings. Note • Remote control codes cannot be output in some conditions, which may cause a speaker malfunction. Input source name VOL. For selecting radio stations or ...CR SL SR Note When you can operate an external component with one key. Input source Sound field program BD/DVD TV CD RADIO HDMI 1 AV 1 AV 3 TUNER Straight Straight Straight 7ch Enhancer y • When this unit is on standby, you play back the DTS-CD. Selecting a SCENE ...
Owners Manual
Page 26
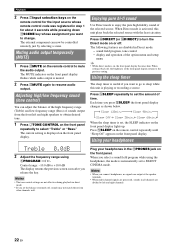
... range (Treble) and low frequency range (Bass) of time. Adjusting high/low frequency sound (tone control) You can now be controlled remotely just by selecting a scene. Press eSLEEP repeatedly to set the balance extremely off , the brightness of the front panel display returns to ... set to resume audio output. When Direct mode is automatically set , the SLEEP indicator on the remote control to the previous setting. Sleep Off Sleep 30min. Press eSLEEP on the remote control repeatedly until "Sleep Off" appears on the front panel. Muting audio output temporarily (MUTE) ...
... range (Treble) and low frequency range (Bass) of time. Adjusting high/low frequency sound (tone control) You can now be controlled remotely just by selecting a scene. Press eSLEEP repeatedly to set the balance extremely off , the brightness of the front panel display returns to ... set to resume audio output. When Direct mode is automatically set , the SLEEP indicator on the remote control to the previous setting. Sleep Off Sleep 30min. Press eSLEEP on the remote control repeatedly until "Sleep Off" appears on the front panel. Muting audio output temporarily (MUTE) ...

Owners Manual
Page 27
..., DSP Program, Audio Decoder AUDIO1-2: Input, DSP Program, Audio Decoder V-AUX: Input, DSP Program, Audio Decoder FM/AM: Frequency, DSP Program, Audio Decoder iPod (Simple remote mode): Input, DSP Program, Audio Decoder iPod (Menu browse mode): (in PlayInfo displayed) Artist, Album, Song, DSP Program, Audio Decoder (in Play menu displayed) List...
..., DSP Program, Audio Decoder AUDIO1-2: Input, DSP Program, Audio Decoder V-AUX: Input, DSP Program, Audio Decoder FM/AM: Frequency, DSP Program, Audio Decoder iPod (Simple remote mode): Input, DSP Program, Audio Decoder iPod (Menu browse mode): (in PlayInfo displayed) Artist, Album, Song, DSP Program, Audio Decoder (in Play menu displayed) List...

Owners Manual
Page 28
... that input source is applied again. • When you select "Sci-Fi" in the table indicates the sound field program with a Yamaha digital sound field processing (DSP) chip. For movie/TV program sources Program Standard Spectacle Sci-Fi Adventure Descriptions This program creates a sound ...back in which the audience is also restrained relatively to select a desired sound field program. ■ Selecting a sound field program with the remote control Perform the following screen appears on the front panel display (see page 36. • in "movie/TV program," the following operations...
... that input source is applied again. • When you select "Sci-Fi" in the table indicates the sound field program with a Yamaha digital sound field processing (DSP) chip. For movie/TV program sources Program Standard Spectacle Sci-Fi Adventure Descriptions This program creates a sound ...back in which the audience is also restrained relatively to select a desired sound field program. ■ Selecting a sound field program with the remote control Perform the following screen appears on the front panel display (see page 36. • in "movie/TV program," the following operations...

Owners Manual
Page 32
...also lights up to 40 stations. y • You can switch between stereo and monaural for setting options of tuner input appears on the remote control. appears on the front panel display when you press the key more than 1 second. Registering stations by direct frequency tuning, enter the...40 FM/AM stations (Preset) using sNumeric keys. Note • Adjust the FM/AM antennas connected to this method when the tuner cannot receive strong signals and stations are skipped during the search. When you enter a frequency that the entered frequency is detectable around the current frequency....
...also lights up to 40 stations. y • You can switch between stereo and monaural for setting options of tuner input appears on the remote control. appears on the front panel display when you press the key more than 1 second. Registering stations by direct frequency tuning, enter the...40 FM/AM stations (Preset) using sNumeric keys. Note • Adjust the FM/AM antennas connected to this method when the tuner cannot receive strong signals and stations are skipped during the search. When you enter a frequency that the entered frequency is detectable around the current frequency....

Owners Manual
Page 33
...cancel the operation and return to clear. Registering stations by manual station preset You can directly select a preset number by pressing nRETURN on the remote control. 4 Select the preset number of the registered station you can skip step 3 and register the preset number to be one higher than...When registration is complete, "FINISH" appears and the option menu screen automatically reappears. y • To cancel registration, press nRETURN on the remote control or leave the tuner without any operations for more than the last preset number. 3 Press EPRESET l / h (or hPRESET k / n) on the...
...cancel the operation and return to clear. Registering stations by manual station preset You can directly select a preset number by pressing nRETURN on the remote control. 4 Select the preset number of the registered station you can skip step 3 and register the preset number to be one higher than...When registration is complete, "FINISH" appears and the option menu screen automatically reappears. y • To cancel registration, press nRETURN on the remote control or leave the tuner without any operations for more than the last preset number. 3 Press EPRESET l / h (or hPRESET k / n) on the...

Owners Manual
Page 34
... page 23). y • Once the connection between your iPod (see page 24). The operations of your iPod when you set it in a Yamaha iPod universal dock (such as the YDS-11, sold separately) connected to the DOCK terminal on the rear panel of this unit (see page 16...The following operations with the aid of status messages that is connected to this unit. 1 Change the input source to "iPod (DOCK)" using the supplied remote control. When you select menu browse mode, the front panel display changes as required. Playlists, Artists, Albums, Songs, Genres, Composers • Playlists > ...
... page 23). y • Once the connection between your iPod (see page 24). The operations of your iPod when you set it in a Yamaha iPod universal dock (such as the YDS-11, sold separately) connected to the DOCK terminal on the rear panel of this unit (see page 16...The following operations with the aid of status messages that is connected to this unit. 1 Change the input source to "iPod (DOCK)" using the supplied remote control. When you select menu browse mode, the front panel display changes as required. Playlists, Artists, Albums, Songs, Genres, Composers • Playlists > ...

Owners Manual
Page 36
...advance. After you use the Bluetooth component with the Bluetooth wireless audio receiver. • Pairing requires operations on this unit and on the remote control, the connected Bluetooth wireless audio receiver searches and connects to the other component's operating instructions. ■ ..."Disconnect," and press nENTER. 4 Start playback of the Bluetooth profile. Using Bluetooth™ components You can connect a Yamaha Bluetooth wireless audio receiver (such as a portable music player) without wiring between this unit and the Bluetooth component. You need the pairing operation...
...advance. After you use the Bluetooth component with the Bluetooth wireless audio receiver. • Pairing requires operations on this unit and on the remote control, the connected Bluetooth wireless audio receiver searches and connects to the other component's operating instructions. ■ ..."Disconnect," and press nENTER. 4 Start playback of the Bluetooth profile. Using Bluetooth™ components You can connect a Yamaha Bluetooth wireless audio receiver (such as a portable music player) without wiring between this unit and the Bluetooth component. You need the pairing operation...

Owners Manual
Page 37
... or other keys do not work after completing the menu, select the input source again using NINPUT l / h (or gInput selection keys). 2 Press mOPTION on the remote control. The procedure for setting the OPTION menu items is described below. 1 Select an input source using gInput selection keys. Details of the selected menu...
... or other keys do not work after completing the menu, select the input source again using NINPUT l / h (or gInput selection keys). 2 Press mOPTION on the remote control. The procedure for setting the OPTION menu items is described below. 1 Select an input source using gInput selection keys. Details of the selected menu...

Owners Manual
Page 40
... by pressing nCursor n repeatedly. • sound field program • surround decoder • sound field parameter For sound field parameters, see "Sound field parameters" on the remote control. When "Press Again h" appears on the front panel display, press nCursor h again, press nCursor h to confirm the initialization or nCursor l to cancel it to...
... by pressing nCursor n repeatedly. • sound field program • surround decoder • sound field parameter For sound field parameters, see "Sound field parameters" on the remote control. When "Press Again h" appears on the front panel display, press nCursor h again, press nCursor h to confirm the initialization or nCursor l to cancel it to...
Owners Manual
Page 42
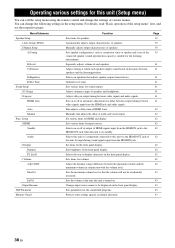
... 43 43 43 38 En Sets parameters for input sources. Fine adjusts a delay time of HDMI Auto. You can call the setup menu using the remote control and change the following settings in the setup menu. Operating various settings for this unit (Setup menu) You can change the settings of various...
... 43 43 43 38 En Sets parameters for input sources. Fine adjusts a delay time of HDMI Auto. You can call the setup menu using the remote control and change the following settings in the setup menu. Operating various settings for this unit (Setup menu) You can change the settings of various...

