

Owner's Manual
Page 1
U HTR-6160 AV Receiver OWNER'S MANUAL
U HTR-6160 AV Receiver OWNER'S MANUAL
Owner's Manual
Page 3
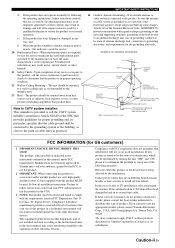
... to comply with other hazards. 21 Safety Check - If the antenna lead-in is 300 ohm ribbon lead, change in the users manual, may void your FCC authorization to use the product. 2 IMPORTANT: When connecting this product to provide some protection against voltage surges and...controls that are covered by the operating instructions as practical. Adjust only those products distributed by Yamaha Corporation of any way, and f) When the product exhibits a distinct change the lead-in this manual, meets FCC requirements. Upon completion of America or its normal operation, e) If the ...
... to comply with other hazards. 21 Safety Check - If the antenna lead-in is 300 ohm ribbon lead, change in the users manual, may void your FCC authorization to use the product. 2 IMPORTANT: When connecting this product to provide some protection against voltage surges and...controls that are covered by the operating instructions as practical. Adjust only those products distributed by Yamaha Corporation of any way, and f) When the product exhibits a distinct change the lead-in this manual, meets FCC requirements. Upon completion of America or its normal operation, e) If the ...
Owner's Manual
Page 4
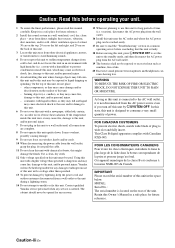
.... vacation), disconnect the AC power plug from use of time (i.e. Retain this Owner's Manual in an environment with a higher voltage than specified. 13 To prevent damage by LSYSTEM OFF. do not place: - Yamaha will not be used. away from a wall outlet or the unit during a lightning ... this unit is connected to read this unit away from other than specified is located on the back of this unit. 3 Locate this manual carefully. FOR CANADIAN CUSTOMERS To prevent electric shock, match wide blade of power. POUR LES CONSOMMATEURS CANADIENS Pour éviter les chocs ...
.... vacation), disconnect the AC power plug from use of time (i.e. Retain this Owner's Manual in an environment with a higher voltage than specified. 13 To prevent damage by LSYSTEM OFF. do not place: - Yamaha will not be used. away from a wall outlet or the unit during a lightning ... this unit is connected to read this unit away from other than specified is located on the back of this unit. 3 Locate this manual carefully. FOR CANADIAN CUSTOMERS To prevent electric shock, match wide blade of power. POUR LES CONSOMMATEURS CANADIENS Pour éviter les chocs ...
Owner's Manual
Page 5
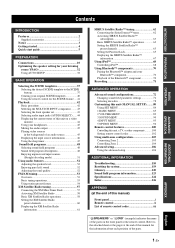
...™ component 70 Recording 71 ADVANCED OPERATION Advanced sound configurations 72 Changing sound field parameter settings 72 Selecting decoders 78 Customizing this unit (MANUAL SETUP).........80 Using SET MENU 84 1 BASIC MENU 85 2 VOLUME MENU 89 3 SOUND MENU 90 4 INPUT MENU 93 5 OPTION ... Troubleshooting 110 Resetting the system 119 Glossary 120 Sound field program information 123 Specifications 124 Index 126 APPENDIX (at the end of this manual) Front panel i Remote control ii List of remote control codes iii "ASPEAKERS" or "4DVD" (example) indicates the name of the...
...™ component 70 Recording 71 ADVANCED OPERATION Advanced sound configurations 72 Changing sound field parameter settings 72 Selecting decoders 78 Customizing this unit (MANUAL SETUP).........80 Using SET MENU 84 1 BASIC MENU 85 2 VOLUME MENU 89 3 SOUND MENU 90 4 INPUT MENU 93 5 OPTION ... Troubleshooting 110 Resetting the system 119 Glossary 120 Sound field program information 123 Specifications 124 Index 126 APPENDIX (at the end of this manual) Front panel i Remote control ii List of remote control codes iii "ASPEAKERS" or "4DVD" (example) indicates the name of the...
Owner's Manual
Page 7
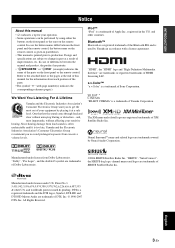
... panel and the remote control, the button name on the remote control is given in parentheses. • This manual is too late, Yamaha and the Electronic Industries Association's Consumer Electronics Group recommend you to avoid prolonged exposure from loud sounds is often undetectable... until it at the end of this manual • y indicates a tip for the information about each position of the parts. • The symbol...
... panel and the remote control, the button name on the remote control is given in parentheses. • This manual is too late, Yamaha and the Electronic Industries Association's Consumer Electronics Group recommend you to avoid prolonged exposure from loud sounds is often undetectable... until it at the end of this manual • y indicates a tip for the information about each position of the parts. • The symbol...
Owner's Manual
Page 12
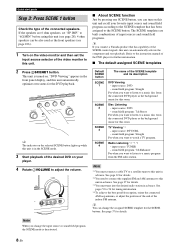
... the SCENE buttons. Radio Listening *2, *3, *4 - See page 27 for details. *3 You must connect a cable TV or a satellite tuner to the instruction manual of the connected speakers. Quick start playback. Default SCENE button SCENE 1 SCENE 2 SCENE 3 SCENE 4 The name of the indoor FM antenna. Disc Listening -... display, and this room. See pages 53 to this unit. ■ About SCENE function Just by pressing one SCENE button, you connect a Yamaha product that has been assigned to adjust the volume. to "6Ω MIN" before using this unit (see page 28). 4 ohm speakers can...
... the SCENE buttons. Radio Listening *2, *3, *4 - See page 27 for details. *3 You must connect a cable TV or a satellite tuner to the instruction manual of the connected speakers. Quick start playback. Default SCENE button SCENE 1 SCENE 2 SCENE 3 SCENE 4 The name of the indoor FM antenna. Disc Listening -... display, and this room. See pages 53 to this unit. ■ About SCENE function Just by pressing one SCENE button, you connect a Yamaha product that has been assigned to adjust the volume. to "6Ω MIN" before using this unit (see page 28). 4 ohm speakers can...

Owner's Manual
Page 13
...to the standby mode. Press KMAIN ZONE ON/OFF to set to the standby mode and consumes a small amount of power in order to receive infrared signals from the standby mode, press the desired SSCENE buttons (or 6SCENE) or KMAIN ZONE ON/OFF (or HPOWER). See page ...9632; Customizing the SCENE templates • Using various SCENE templates ☞ P. 37 • Creating your listening room (AUTO SETUP) ☞ P. 32 • Manually adjusting various parameters of this unit... Quick start guide What do you want to do with this unit ☞ P. 68 • Using the Bluetooth components...
...to the standby mode. Press KMAIN ZONE ON/OFF to set to the standby mode and consumes a small amount of power in order to receive infrared signals from the standby mode, press the desired SSCENE buttons (or 6SCENE) or KMAIN ZONE ON/OFF (or HPOWER). See page ...9632; Customizing the SCENE templates • Using various SCENE templates ☞ P. 37 • Creating your listening room (AUTO SETUP) ☞ P. 32 • Manually adjusting various parameters of this unit... Quick start guide What do you want to do with this unit ☞ P. 68 • Using the Bluetooth components...

Owner's Manual
Page 16
... for the effect sounds of the CINEMA DSP sound field program. For other speaker combinations You can enjoy multi-channel sources with the placement in "MANUAL SETUP" (see page 11). See page 13 for connection information. Surround back speaker Connect a single surround speakers to "NONE" (see page 11). Surround left and...
... for the effect sounds of the CINEMA DSP sound field program. For other speaker combinations You can enjoy multi-channel sources with the placement in "MANUAL SETUP" (see page 11). See page 13 for connection information. Surround back speaker Connect a single surround speakers to "NONE" (see page 11). Surround left and...

Owner's Manual
Page 20
... bi-amplification connections, use the FRONT and SURROUND BACK/BI-AMP terminals as shown below. Front speakers Right Left 4 Tighten the knob to the instruction manuals of the corresponding terminal. 10 mm (0.4 in) 2 Loosen the knob. and Canada models only) Tighten the knob and then insert the banana plug connector into...
... bi-amplification connections, use the FRONT and SURROUND BACK/BI-AMP terminals as shown below. Front speakers Right Left 4 Tighten the knob to the instruction manuals of the corresponding terminal. 10 mm (0.4 in) 2 Loosen the knob. and Canada models only) Tighten the knob and then insert the banana plug connector into...
Owner's Manual
Page 22
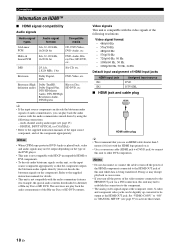
...audio signals directly (does not decode the bitstream signals on the component). DIGITAL INPUT OPTICAL (or COAXIAL) • Refer to the supplied instruction manuals of the Blu-ray Disc or HD DVD contents. y • If the input source component can decode the bitstream audio signals of audio ... the HDMI OUT jack. multi-channel analog audio input (see page 97) to activate this feature. 18 En Refer to the supplied instruction manuals for details. • This unit is not compatible with the HDMI logo printed on HDMI™ ■ HDMI signal compatibility Audio signals ...
...audio signals directly (does not decode the bitstream signals on the component). DIGITAL INPUT OPTICAL (or COAXIAL) • Refer to the supplied instruction manuals of the Blu-ray Disc or HD DVD contents. y • If the input source component can decode the bitstream audio signals of audio ... the HDMI OUT jack. multi-channel analog audio input (see page 97) to activate this feature. 18 En Refer to the supplied instruction manuals for details. • This unit is not compatible with the HDMI logo printed on HDMI™ ■ HDMI signal compatibility Audio signals ...
Owner's Manual
Page 30
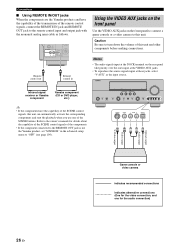
... the remote control input and output jack with the monaural analog mini cable as the input source. Refer to the owner's manuals for details about the capability of the SCENE control signals of the components. • If the component connected to the REMOTE...Video output Game console or video camera indicates recommended connections indicates alternative connections (One for the audio connection) 26 En Infrared signal receiver or Yamaha component Yamaha component (CD or DVD player, etc.) VOLUME SPEAKERS EDIT SEARCH MODE BAND CATEGORY A/B/C/D/E PRESET/TUNING/CH MEMORY INFO ZONE 2 ...
... the remote control input and output jack with the monaural analog mini cable as the input source. Refer to the owner's manuals for details about the capability of the SCENE control signals of the components. • If the component connected to the REMOTE...Video output Game console or video camera indicates recommended connections indicates alternative connections (One for the audio connection) 26 En Infrared signal receiver or Yamaha component Yamaha component (CD or DVD player, etc.) VOLUME SPEAKERS EDIT SEARCH MODE BAND CATEGORY A/B/C/D/E PRESET/TUNING/CH MEMORY INFO ZONE 2 ...

Owner's Manual
Page 35
... on the remote control. • Do not drop the remote control. • Do not leave or store the remote control in "MANUAL SETUP" (see page 48). VIRTUAL indicator Lights up when headphones are connected and a sound field program is in the automatic setup procedure ... of conditions: - y You can make settings for the presence and surround back speakers automatically by running "AUTO SETUP" (see page 32) or manually by adjusting settings for other information when adjusting or changing settings. SP A: The FRONT A speakers are selected (see page 85). F DSP indicators The...
... on the remote control. • Do not drop the remote control. • Do not leave or store the remote control in "MANUAL SETUP" (see page 48). VIRTUAL indicator Lights up when headphones are connected and a sound field program is in the automatic setup procedure ... of conditions: - y You can make settings for the presence and surround back speakers automatically by running "AUTO SETUP" (see page 32) or manually by adjusting settings for other information when adjusting or changing settings. SP A: The FRONT A speakers are selected (see page 85). F DSP indicators The...

Owner's Manual
Page 36
... position on and the volume level is set to affix the optimizer microphone at your listening room (YPAO) This unit employs the YPAO (Yamaha Parametric Room Acoustic Optimizer) technology which lets you use the attached screw of a subwoofer (example) ❏ The room is too much ambient... noise, the results may not be satisfactory. This manual uses the OSD illustrations to explain the "AUTO SETUP" procedure. • Before performing operations, press 5AMP. • This unit uses the speakers...
... position on and the volume level is set to affix the optimizer microphone at your listening room (YPAO) This unit employs the YPAO (Yamaha Parametric Room Acoustic Optimizer) technology which lets you use the attached screw of a subwoofer (example) ❏ The room is too much ambient... noise, the results may not be satisfactory. This manual uses the OSD illustrations to explain the "AUTO SETUP" procedure. • Before performing operations, press 5AMP. • This unit uses the speakers...

Owner's Manual
Page 39
... and do not place it away from this unit. English 35 En RESULT WIRING FRONT L;;;;;;;OK [ [ ]/[[]:Select [ENTER]:Return 11 Press 8l / h repeatedly to manually adjust each speaker (EQ) AUTO SETUP RESULT SP : 3/4/0.1 DIST: 14.0/17.0ft LVL : -9.0/+6.5dB . >SET CANCEL [ ]/[ ]:Up/Down [ENTER]:Enter 13...cancel the "AUTO SETUP" results. 14 Press 8ENTER to toggle between the setup result displays. Keep it on the characteristics of each parameter, use "MANUAL SETUP" (see page 80). Press 8k / n to confirm your listening room (YPAO) 10 Press 8k and then 8ENTER to display the setup ...
... and do not place it away from this unit. English 35 En RESULT WIRING FRONT L;;;;;;;OK [ [ ]/[[]:Select [ENTER]:Return 11 Press 8l / h repeatedly to manually adjust each speaker (EQ) AUTO SETUP RESULT SP : 3/4/0.1 DIST: 14.0/17.0ft LVL : -9.0/+6.5dB . >SET CANCEL [ ]/[ ]:Up/Down [ENTER]:Enter 13...cancel the "AUTO SETUP" results. 14 Press 8ENTER to toggle between the setup result displays. Keep it on the characteristics of each parameter, use "MANUAL SETUP" (see page 80). Press 8k / n to confirm your listening room (YPAO) 10 Press 8k and then 8ENTER to display the setup ...

Owner's Manual
Page 40
... OF PHASE Reverse Channel FL -- WARNING(3) RESULT SP : 3/4/0.1 DIST: 14.0/17.0ft LVL : -9.0/+6.5dB >SET CANCEL [ ]/[ ]:Up/Down [ENTER]:Detail [ [ ERROR . SET MENU . ;AUTO SETUP ;MANUAL SETUP .A;SIGNAL INFO [ ]/[ ]:Up/Down [ENTER]:Enter 16 Press MMENU to a speaker, "--" is an example when "E-9:USER CANCEL" appears in the top result display. y If...
... OF PHASE Reverse Channel FL -- WARNING(3) RESULT SP : 3/4/0.1 DIST: 14.0/17.0ft LVL : -9.0/+6.5dB >SET CANCEL [ ]/[ ]:Up/Down [ENTER]:Detail [ [ ERROR . SET MENU . ;AUTO SETUP ;MANUAL SETUP .A;SIGNAL INFO [ ]/[ ]:Up/Down [ENTER]:Enter 16 Press MMENU to a speaker, "--" is an example when "E-9:USER CANCEL" appears in the top result display. y If...

Owner's Manual
Page 50
... Displaying the input source information You can display the audio and video information of source channels in the OSD. ANALOG RES. SET MENU . ;AUTO SETUP ;MANUAL SETUP .A;SIGNAL INFO [ ]/[ ]:Up/Down [ENTER]:Enter p p 2 Press 8n repeatedly to select "SIGNAL INFO" and then press 8ENTER. Resolution of the analog video signals output...
... Displaying the input source information You can display the audio and video information of source channels in the OSD. ANALOG RES. SET MENU . ;AUTO SETUP ;MANUAL SETUP .A;SIGNAL INFO [ ]/[ ]:Up/Down [ENTER]:Enter p p 2 Press 8n repeatedly to select "SIGNAL INFO" and then press 8ENTER. Resolution of the analog video signals output...

Owner's Manual
Page 57
... "TUNER" as the input source. 2 Press CBAND (or 7BAND) to tune into the desired FM/AM station: Frequency tuning mode (AUTO TUNING/MANUAL TUNING) You can preset the desired FM/AM station in advance, and then recall the station by using the automatic tuning. Note Orient the connected...• Press Eh (or 8k) to tune into a lower frequency. See page 54 for a moment. English 53 En A FM 88.9MHz No colon (:) y Manually tuning into an FM station automatically switches the tuner to monaural reception to increase the signal quality. 3 Press BSEARCH MODE (or MSRCH MODE) to tune...
... "TUNER" as the input source. 2 Press CBAND (or 7BAND) to tune into the desired FM/AM station: Frequency tuning mode (AUTO TUNING/MANUAL TUNING) You can preset the desired FM/AM station in advance, and then recall the station by using the automatic tuning. Note Orient the connected...• Press Eh (or 8k) to tune into a lower frequency. See page 54 for a moment. English 53 En A FM 88.9MHz No colon (:) y Manually tuning into an FM station automatically switches the tuner to monaural reception to increase the signal quality. 3 Press BSEARCH MODE (or MSRCH MODE) to tune...

Owner's Manual
Page 58
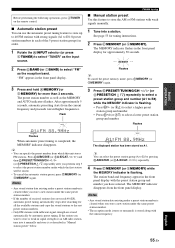
...the station band and frequency. appears in the front panel display. 2 Press BSEARCH MODE (or MSRCH MODE) repeatedly to select "AUTO TUNING" or "MANUAL TUNING". Press BSEARCH MODE (or MSRCH MODE) to turn the colon (:) off. 3 Enter the frequency of the desired station by using the automatic or... Using station preset feature Use this feature to store up . • Hold down the button to continue searching when this unit is in the manual tuning mode. • Press GINFO (or AINFO) repeatedly to toggle the frequency information and sound field program information in the front panel. FM/AM...
...the station band and frequency. appears in the front panel display. 2 Press BSEARCH MODE (or MSRCH MODE) repeatedly to select "AUTO TUNING" or "MANUAL TUNING". Press BSEARCH MODE (or MSRCH MODE) to turn the colon (:) off. 3 Enter the frequency of the desired station by using the automatic or... Using station preset feature Use this feature to store up . • Hold down the button to continue searching when this unit is in the manual tuning mode. • Press GINFO (or AINFO) repeatedly to toggle the frequency information and sound field program information in the front panel. FM/AM...
Owner's Manual
Page 59
... station, tune into a station. If the station you want to store is completed, the MEMORY indicator disappears. FM/AM tuning ■ Manual station preset Use this unit stores FM stations. The station band and frequency appear in the front panel display. 3 Press and hold FMEMORY ...automatic preset tuning feature to store up to 40 FM stations with strong signals (A1 to E8: 8 preset station numbers in each of received stations does not reach 40 (E8), automatic preset tuning automatically stops after you have selected. After approximately 5 seconds, automatic presetting starts from...
... station, tune into a station. If the station you want to store is completed, the MEMORY indicator disappears. FM/AM tuning ■ Manual station preset Use this unit stores FM stations. The station band and frequency appear in the front panel display. 3 Press and hold FMEMORY ...automatic preset tuning feature to store up to 40 FM stations with strong signals (A1 to E8: 8 preset station numbers in each of received stations does not reach 40 (E8), automatic preset tuning automatically stops after you have selected. After approximately 5 seconds, automatic presetting starts from...

Owner's Manual
Page 66
... or "SIRIUS Information" screen in the front panel display, the connection of the SiriusConnect tuner or antenna is available in the path to the instruction manuals supplied with a Canadian address. Refer to the sky. The orientation of exclusive entertainment and 100% commercial-free music. Notes • If "CHECK SR TUNER" or...
... or "SIRIUS Information" screen in the front panel display, the connection of the SiriusConnect tuner or antenna is available in the path to the instruction manuals supplied with a Canadian address. Refer to the sky. The orientation of exclusive entertainment and 100% commercial-free music. Notes • If "CHECK SR TUNER" or...


