
Owners Manual
Page 5
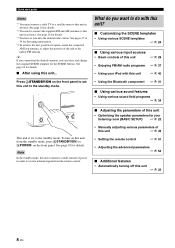
...Information on jacks and cable plugs 13 Information on HDMI 14 Connecting video components 15 Connecting audio components 17 Connecting a Yamaha iPod™ universal dock and Bluetooth™ adapter 18 Connecting to do with page number(s) indicates the corresponding reference ...Glossary 60 Specifications 62 Index 63 APPENDIX (at the end of this unit 8 PREPARATION Connections 9 Rear panel 9 Placing speakers 10 Connecting speakers 11 Setting the speaker impedance (U.S.A. In case the button names differ between the manual and product, the product has priority. • "ASTANDBY...
...Information on jacks and cable plugs 13 Information on HDMI 14 Connecting video components 15 Connecting audio components 17 Connecting a Yamaha iPod™ universal dock and Bluetooth™ adapter 18 Connecting to do with page number(s) indicates the corresponding reference ...Glossary 60 Specifications 62 Index 63 APPENDIX (at the end of this unit 8 PREPARATION Connections 9 Rear panel 9 Placing speakers 10 Connecting speakers 11 Setting the speaker impedance (U.S.A. In case the button names differ between the manual and product, the product has priority. • "ASTANDBY...

Owners Manual
Page 8
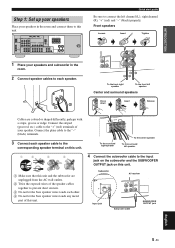
Video monitor Front left speaker Front right speaker Subwoofer Surround right speaker Center speaker DVD player Surround left speaker Step 1: Set up your speakers ☞ P. 5 Step 2: Connect your home theater. Quick start guide Quick ...and other components Preparation: Check the items Prepare the following items. ❏ Speakers ❏ Front speaker x 2 ❏ Center speaker x 1 ❏ Surround speaker x 2 Select magnetically shielded speakers. The minimum required speakers are two front speakers. ❏ Active subwoofer x 1 Select an active subwoofer equipped with an...
Video monitor Front left speaker Front right speaker Subwoofer Surround right speaker Center speaker DVD player Surround left speaker Step 1: Set up your speakers ☞ P. 5 Step 2: Connect your home theater. Quick start guide Quick ...and other components Preparation: Check the items Prepare the following items. ❏ Speakers ❏ Front speaker x 2 ❏ Center speaker x 1 ❏ Surround speaker x 2 Select magnetically shielded speakers. The minimum required speakers are two front speakers. ❏ Active subwoofer x 1 Select an active subwoofer equipped with an...
Owners Manual
Page 9
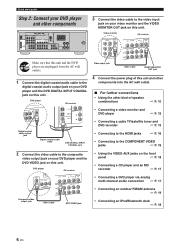
... Step 1: Set up your speakers Place your speakers and subwoofer in the room and connect them to this unit. Front speakers Loosen Insert Tighten To the front right speaker To the front left speaker 1 2 3 4 1 Make sure that this unit. Subwoofer AV receiver Input jack Subwoofer cable SUBWOOFER OUTPUT... DTV/CBL AUDIO DVR CD IN OUT L R R SUBWOOFER ANTENNA SPEAKERS SURROUND CENTER FRONT B R L R L AM GND FM 75 UNBAL. Quick start guide Be sure to the corresponding speaker terminal on this unit and the subwoofer are colored or shaped differently,...
... Step 1: Set up your speakers Place your speakers and subwoofer in the room and connect them to this unit. Front speakers Loosen Insert Tighten To the front right speaker To the front left speaker 1 2 3 4 1 Make sure that this unit. Subwoofer AV receiver Input jack Subwoofer cable SUBWOOFER OUTPUT... DTV/CBL AUDIO DVR CD IN OUT L R R SUBWOOFER ANTENNA SPEAKERS SURROUND CENTER FRONT B R L R L AM GND FM 75 UNBAL. Quick start guide Be sure to the corresponding speaker terminal on this unit and the subwoofer are colored or shaped differently,...
Owners Manual
Page 10
DVD player AV receiver Video input jack Video cable VIDEO MONITOR OUT jack 4 Connect the power plug of speaker combinations ☞ P. 10 • Connecting a video monitor and DVD player ☞ P. 15 Digital coaxial audio output jack Digital coaxial audio ...R SUBWOOFER ANTENNA SPEAKERS SURROUND CENTER FRONT B R L R L AM GND FM 75 UNBAL. IN MD/ OUT (PLAY) CD-R (REC) OUTPUT SUB WOOFER R FRONT A L 3 Connect the video cable to the digital coaxial audio output jack on your video monitor and the VIDEO MONITOR OUT jack on this unit. DVD player AV receiver • Using...
DVD player AV receiver Video input jack Video cable VIDEO MONITOR OUT jack 4 Connect the power plug of speaker combinations ☞ P. 10 • Connecting a video monitor and DVD player ☞ P. 15 Digital coaxial audio output jack Digital coaxial audio ...R SUBWOOFER ANTENNA SPEAKERS SURROUND CENTER FRONT B R L R L AM GND FM 75 UNBAL. IN MD/ OUT (PLAY) CD-R (REC) OUTPUT SUB WOOFER R FRONT A L 3 Connect the video cable to the digital coaxial audio output jack on your video monitor and the VIDEO MONITOR OUT jack on this unit. DVD player AV receiver • Using...
Owners Manual
Page 11
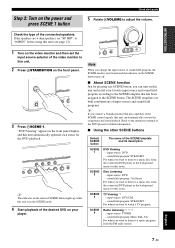
... (see page 12). 1 Turn on the video monitor and then set "SP IMP." The SCENE templates are 6 ohm speakers, set the input source selector of the connected speakers. Disc Listening - sound field program: 5ch Stereo For when you want to listen to a music disc from the connected ... SCENE button turns off. ■ About SCENE function Just by pressing one SCENE button, you connect a Yamaha product that has been assigned to adjust the volume. If the speakers are built combinations of input sources and sound field programs. y If you can automatically activate the component and...
... (see page 12). 1 Turn on the video monitor and then set "SP IMP." The SCENE templates are 6 ohm speakers, set the input source selector of the connected speakers. Disc Listening - sound field program: 5ch Stereo For when you want to listen to a music disc from the connected ... SCENE button turns off. ■ About SCENE function Just by pressing one SCENE button, you connect a Yamaha product that has been assigned to adjust the volume. If the speakers are built combinations of input sources and sound field programs. y If you can automatically activate the component and...
Owners Manual
Page 12
... • Basic controls of the indoor FM antenna. See page 19 for the SCENE buttons. y If you cannot find the desired situation, you want to receive infrared signals from the standby mode, press ASTANDBY/ON (or DPOWER) on the front panel. To turn on the front panel to set to tune... unit is set this unit... Press ASTANDBY/ON on this unit from the remote control. ■ Adjusting the parameters of this unit • Optimizing the speaker parameters for details.
... • Basic controls of the indoor FM antenna. See page 19 for the SCENE buttons. y If you cannot find the desired situation, you want to receive infrared signals from the standby mode, press ASTANDBY/ON (or DPOWER) on the front panel. To turn on the front panel to set to tune... unit is set this unit... Press ASTANDBY/ON on this unit from the remote control. ■ Adjusting the parameters of this unit • Optimizing the speaker parameters for details.

Owners Manual
Page 13
IN MD/ OUT (PLAY) CD-R (REC) OUTPUT SUB WOOFER R FRONT A L Connections 7 8 9 0 Name 1 DOCK terminal 2 COMPONENT VIDEO jacks 3 HDMI jacks 4 VIDEO jacks 5 ANTENNA terminals 6 SPEAKERS terminals 7 DIGITAL INPUT jacks 8 MULTI CH INPUT jacks 9 AUDIO jacks 0 SUBWOOFER OUTPUT jack See page 18 16 16 15 19 11 15, 17 17 15, ... 1 DVD VIDEO DTV/CBL DVR IN OUT MONITOR OUT MULTI CH INPUT FRONT SURROUND CENTER L DVD DTV/CBL AUDIO DVR CD IN OUT L R R SUBWOOFER ANTENNA SPEAKERS SURROUND CENTER FRONT B R L R L AM GND FM 75 UNBAL.
IN MD/ OUT (PLAY) CD-R (REC) OUTPUT SUB WOOFER R FRONT A L Connections 7 8 9 0 Name 1 DOCK terminal 2 COMPONENT VIDEO jacks 3 HDMI jacks 4 VIDEO jacks 5 ANTENNA terminals 6 SPEAKERS terminals 7 DIGITAL INPUT jacks 8 MULTI CH INPUT jacks 9 AUDIO jacks 0 SUBWOOFER OUTPUT jack See page 18 16 16 15 19 11 15, 17 17 15, ... 1 DVD VIDEO DTV/CBL DVR IN OUT MONITOR OUT MULTI CH INPUT FRONT SURROUND CENTER L DVD DTV/CBL AUDIO DVR CD IN OUT L R R SUBWOOFER ANTENNA SPEAKERS SURROUND CENTER FRONT B R L R L AM GND FM 75 UNBAL.

Owners Manual
Page 14
...system. Subwoofer (SW) The use a center speaker, you can do without it is for the main source sound plus effect sounds. The position of the LFE (low-frequency effect) channel included in amplifier, such as the Yamaha Active Servo Processing Subwoofer System, is effective ..., however, are not highly directional. Surround left and right speakers (FL and FR) The front speakers are used for the center channel sounds (dialog, vocals, etc.). Connections Placing speakers The speaker layout below shows the speaker setting we recommend. If for effect and surround sounds. You...
...system. Subwoofer (SW) The use a center speaker, you can do without it is for the main source sound plus effect sounds. The position of the LFE (low-frequency effect) channel included in amplifier, such as the Yamaha Active Servo Processing Subwoofer System, is effective ..., however, are not highly directional. Surround left and right speakers (FL and FR) The front speakers are used for the center channel sounds (dialog, vocals, etc.). Connections Placing speakers The speaker layout below shows the speaker setting we recommend. If for effect and surround sounds. You...

Owners Manual
Page 15
... to "6ΩMIN" before using this unit (see page 12). • Before connecting the speakers, make sure that this unit. to set "SP IMP." Surround speakers Right Left Center speaker Front speakers (B) Right Left DOCK COMPONENT VIDEO DVD DTV/CBL DVR MONITOR OUT PR OUT DVD DTV/CBL...any metal part of this the AC power plug is actually a pair of this unit cannot reproduce the input sources accurately. PREPARATION Connections Connecting speakers Be sure to the "-" (black) terminals. If the connections are faulty, this unit. • If you are colored or shaped differently,...
... to "6ΩMIN" before using this unit (see page 12). • Before connecting the speakers, make sure that this unit. to set "SP IMP." Surround speakers Right Left Center speaker Front speakers (B) Right Left DOCK COMPONENT VIDEO DVD DTV/CBL DVR MONITOR OUT PR OUT DVD DTV/CBL...any metal part of this the AC power plug is actually a pair of this unit cannot reproduce the input sources accurately. PREPARATION Connections Connecting speakers Be sure to the "-" (black) terminals. If the connections are faulty, this unit. • If you are colored or shaped differently,...

Owners Manual
Page 16
... connector into the hole on the terminal. 3 Tighten the knob to the FRONT A terminals 2 1 Red: positive (+) Black: negative (-) 3 Setting the speaker impedance (U.S.A. The following display appears in the front panel display. and Canada models only) Caution If you turn on this unit. to "6ΩMIN" as... follows BEFORE using this unit is reflected next time you are to terminate speaker cables. Connections ■ Connecting to secure the wire. See page 19 for details about turning on , an the advanced setup menu appears...
... connector into the hole on the terminal. 3 Tighten the knob to the FRONT A terminals 2 1 Red: positive (+) Black: negative (-) 3 Setting the speaker impedance (U.S.A. The following display appears in the front panel display. and Canada models only) Caution If you turn on this unit. to "6ΩMIN" as... follows BEFORE using this unit is reflected next time you are to terminate speaker cables. Connections ■ Connecting to secure the wire. See page 19 for details about turning on , an the advanced setup menu appears...
Owners Manual
Page 18
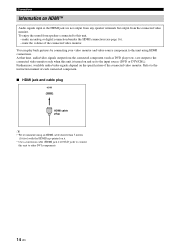
At that time, audio/video signals output from speakers connected to this unit, - Furthermore, available audio/video signals depend on the specification of each connected component. ■ HDMI jack and cable plug HDMI HDMI ... besides the HDMI connection (see page 16). - To enjoy the sound from the connected component (such as DVD player etc.) are not output from any speaker terminals but output from the connected video monitor. mute the volume of the connected video monitor. Connections Information on HDMI™ Audio signals input at...
At that time, audio/video signals output from speakers connected to this unit, - Furthermore, available audio/video signals depend on the specification of each connected component. ■ HDMI jack and cable plug HDMI HDMI ... besides the HDMI connection (see page 16). - To enjoy the sound from the connected component (such as DVD player etc.) are not output from any speaker terminals but output from the connected video monitor. mute the volume of the connected video monitor. Connections Information on HDMI™ Audio signals input at...
Owners Manual
Page 20
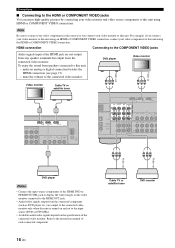
... the specification of the connected video monitor. To enjoy the sound from the connected component (such as DVD player etc.) are not output from any speaker terminals but output from the connected video monitor. HDMI connection Connecting to the instruction manual of each connected component. 16 En Cable TV or satellite... or DTV/CBL). • Available audio/video signals depend on the video monitor connected to the HDMI OUT jack. • Audio/video signals output from speakers connected to this unit.
... the specification of the connected video monitor. To enjoy the sound from the connected component (such as DVD player etc.) are not output from any speaker terminals but output from the connected video monitor. HDMI connection Connecting to the instruction manual of each connected component. 16 En Cable TV or satellite... or DTV/CBL). • Available audio/video signals depend on the video monitor connected to the HDMI OUT jack. • Audio/video signals output from speakers connected to this unit.

Owners Manual
Page 21
... PB OPTICAL Y CD 3 DTV/ CBL 2 COAXIAL DVD 1 MULTI CH INPUT FRONT SURROUND CENTER L L R R SUBWOOFER Make sure that you connect a 5.1-channel speaker system before using this unit and other components are unplugged from a multi-format player, external decoder or sound processor. DVD VIDEO DTV/CBL DVR IN...; Connecting a CD player and a CD recorder/MD recorder Note When you connect your multi-format player or external decoder to accommodate for missing speakers. IN MD/ OUT (PLAY) CD-R (REC) OUTPUT SUB WOOFER O Audio out LR Audio out LR Audio out LR Audio in CD ...
... PB OPTICAL Y CD 3 DTV/ CBL 2 COAXIAL DVD 1 MULTI CH INPUT FRONT SURROUND CENTER L L R R SUBWOOFER Make sure that you connect a 5.1-channel speaker system before using this unit and other components are unplugged from a multi-format player, external decoder or sound processor. DVD VIDEO DTV/CBL DVR IN...; Connecting a CD player and a CD recorder/MD recorder Note When you connect your multi-format player or external decoder to accommodate for missing speakers. IN MD/ OUT (PLAY) CD-R (REC) OUTPUT SUB WOOFER O Audio out LR Audio out LR Audio out LR Audio in CD ...
Owners Manual
Page 22
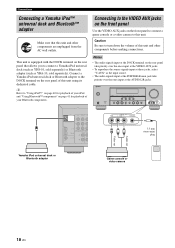
... • The audio signals input at the DOCK terminal on the rear panel of your Bluetooth components. VOLUME STANDBY /ON PHONES SILENT CINEMA SPEAKERS A/B/OFF EDIT PRESET/TUNING BAND A/B/C/D/E TONE CONTROL 1 PROGRAM PRESET/TUNING SCENE 2 3 4 MEMORY TUNING AUTO/MAN'L STRAIGHT NIGHT INPUT AUDIO ... DVD 1 MULTI CH INPU FRONT SURROU L R VIDEO VIDEO AUX L AUDIO R PORTABLE V L R 3.5 mm stereo mini plug Audio out Video out Yamaha iPod universal dock or Bluetooth adapter Game console or video camera 18 En This unit is equipped with the DOCK terminal on the rear panel...
... • The audio signals input at the DOCK terminal on the rear panel of your Bluetooth components. VOLUME STANDBY /ON PHONES SILENT CINEMA SPEAKERS A/B/OFF EDIT PRESET/TUNING BAND A/B/C/D/E TONE CONTROL 1 PROGRAM PRESET/TUNING SCENE 2 3 4 MEMORY TUNING AUTO/MAN'L STRAIGHT NIGHT INPUT AUDIO ... DVD 1 MULTI CH INPU FRONT SURROU L R VIDEO VIDEO AUX L AUDIO R PORTABLE V L R 3.5 mm stereo mini plug Audio out Video out Yamaha iPod universal dock or Bluetooth adapter Game console or video camera 18 En This unit is equipped with the DOCK terminal on the rear panel...
Owners Manual
Page 24
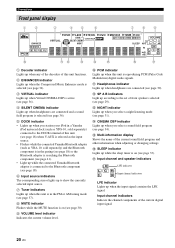
...to the DOCK terminal of this unit (see page 18) when V-AUX is selected as the input source. • Flashes while the connected Yamaha Bluetooth adaptor (such as YBA-10, sold separately) and the Bluetooth component is in the paring (see page 18) or the Bluetooth adaptor is... signal. 20 En C NIGHT indicator Lights up when this unit is reproducing PCM (Pulse Code Modulation) digital audio signals. G Input channel and speaker indicators LFE L CR SL SR LFE indicator Input channel indicators LFE indicator Lights up according to show the currently selected input source. 7 Tuner indicators...
...to the DOCK terminal of this unit (see page 18) when V-AUX is selected as the input source. • Flashes while the connected Yamaha Bluetooth adaptor (such as YBA-10, sold separately) and the Bluetooth component is in the paring (see page 18) or the Bluetooth adaptor is... signal. 20 En C NIGHT indicator Lights up when this unit is reproducing PCM (Pulse Code Modulation) digital audio signals. G Input channel and speaker indicators LFE L CR SL SR LFE indicator Input channel indicators LFE indicator Lights up according to show the currently selected input source. 7 Tuner indicators...
Owners Manual
Page 26
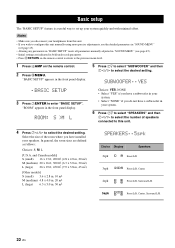
...ft2 (7.9 x 5.8 m, 45 m2) [Other models] S (small) 3.6 x 2.8 m, 10 m2 M (medium) 4.8 x 4.0 m, 20 m2 L (large) 6.3 x 5.0 m, 30 m2 SPEAKERS ..5spk Choice Display Speakers 2spk L R Front L/R 3spk L C R Front L/R, Center 4spk L R Front L/R, Surround L/R SL SR 5spk L CR SL SR Front L/R, Center, Surround L/R 22 En SUBWOOFER .. Select the ...size of speakers connected to this unit. 4 Press 7l / h to configure this unit. • If you do not have installed your speakers. Notes • Make sure you disconnect your headphones ...
...ft2 (7.9 x 5.8 m, 45 m2) [Other models] S (small) 3.6 x 2.8 m, 10 m2 M (medium) 4.8 x 4.0 m, 20 m2 L (large) 6.3 x 5.0 m, 30 m2 SPEAKERS ..5spk Choice Display Speakers 2spk L R Front L/R 3spk L C R Front L/R, Center 4spk L R Front L/R, Surround L/R SL SR 5spk L CR SL SR Front L/R, Center, Surround L/R 22 En SUBWOOFER .. Select the ...size of speakers connected to this unit. 4 Press 7l / h to configure this unit. • If you do not have installed your speakers. Notes • Make sure you disconnect your headphones ...

Owners Manual
Page 27
...7l / h to apply the settings you selected "NO" in step 9, the front speaker level adjustment display appears in turn . Note The available speaker channels differ depending on the setting of the speaker currently outputting the test tone flashes in turn . • Press 7h to increase the... value. • Press 7l to confirm your selection. CHECK:TestTone y • Check the speaker connections (see page 5) and adjust the "SPEAKERS" settings back in step 7, each speaker. 10 Press 7ENTER to decrease the value. y You can also press HMENU to cancel the setup procedure....
...7l / h to apply the settings you selected "NO" in step 9, the front speaker level adjustment display appears in turn . Note The available speaker channels differ depending on the setting of the speaker currently outputting the test tone flashes in turn . • Press 7h to increase the... value. • Press 7l to confirm your selection. CHECK:TestTone y • Check the speaker connections (see page 5) and adjust the "SPEAKERS" settings back in step 7, each speaker. 10 Press 7ENTER to decrease the value. y You can also press HMENU to cancel the setup procedure....

Owners Manual
Page 33
... the volume to the desired output level. 6 Press KPROGRAM l / h (or press 4AMP and then press 0PROG l / h) repeatedly to ... The respective speaker indicators lights up in DTS. Movie Dramatic Currently selected surround field program Notes • Choose a sound field program based on your CD player supports CDs...Turn on the name of the currently selected input source appears in the front panel display. Adjust the tonal quality of the front speakers Edit parameters of the selected sound field program appears in the front panel display for details. ■ Guide to contents When you...
... the volume to the desired output level. 6 Press KPROGRAM l / h (or press 4AMP and then press 0PROG l / h) repeatedly to ... The respective speaker indicators lights up in DTS. Movie Dramatic Currently selected surround field program Notes • Choose a sound field program based on your CD player supports CDs...Turn on the name of the currently selected input source appears in the front panel display. Adjust the tonal quality of the front speakers Edit parameters of the selected sound field program appears in the front panel display for details. ■ Guide to contents When you...
Owners Manual
Page 34
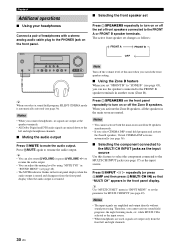
...headphones Connect a pair of headphones with a stereo analog audio cable plug to the PHONES jack on the front panel. ■ Selecting the front speaker set the parameter for MULTI CH INPUT (see page 48). • The MUTE indicator flashes in the front panel display when the audio output...off the set of this feature to select the component connected to mute the audio output. Notes • When you activate the Zone B speakers, all the speakers in the main room are amplified and output directly without sound processing. Press NINPUT l / h repeatedly (or press 4AMP and then press ...
...headphones Connect a pair of headphones with a stereo analog audio cable plug to the PHONES jack on the front panel. ■ Selecting the front speaker set the parameter for MULTI CH INPUT (see page 48). • The MUTE indicator flashes in the front panel display when the audio output...off the set of this feature to select the component connected to mute the audio output. Notes • When you activate the Zone B speakers, all the speakers in the main room are amplified and output directly without sound processing. Press NINPUT l / h repeatedly (or press 4AMP and then press ...
Owners Manual
Page 35
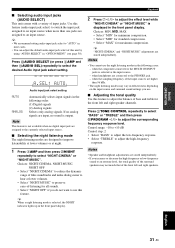
...an input source when more than 96 kHz. • The night listening modes may not match that of the front left and right speaker channels. y • We recommend setting audio input jack select to "AUTO" in the following order: (1) Digital signals (2) Analog ... "NIGHT:MUSIC" is selected as the input source. - Playback 2 Press 7l / h to adjust the corresponding frequency response level. Notes • Speaker and headphone adjustments are stored independently. BASIC OPERATION ■ Selecting audio input jacks (AUDIO SELECT) This unit comes with a variety of -listening for...
...an input source when more than 96 kHz. • The night listening modes may not match that of the front left and right speaker channels. y • We recommend setting audio input jack select to "AUTO" in the following order: (1) Digital signals (2) Analog ... "NIGHT:MUSIC" is selected as the input source. - Playback 2 Press 7l / h to adjust the corresponding frequency response level. Notes • Speaker and headphone adjustments are stored independently. BASIC OPERATION ■ Selecting audio input jacks (AUDIO SELECT) This unit comes with a variety of -listening for...


