
Owner's Manual
Page 2
...33 EQ'ing the Input Signals 35 Using the EQ Library 36 Compressing the Input Signals 37 Using the Internal Effects 38 Recording to DAW Software via the USB Port 39 Adjusting the Monitor Levels from the DAW 41 Using Scene Memories 42 Changing the Channel Names 43 Creating a Custom... Spec 61 Analog Output Specs 61 Digital Input Spec 62 Digital Output Spec 62 I/O SLOT Spec 63 MIDI/USB/WORD CLOCK I/O Spec .... 64 Dimensions 64 Options 65 Rack Mounting the 01V96i Using RK1 Rack Mount Kit 65 Index 66 01V96i Block Diagram.......End of Manual 01V96i Level Diagram .......End of Manual...
...33 EQ'ing the Input Signals 35 Using the EQ Library 36 Compressing the Input Signals 37 Using the Internal Effects 38 Recording to DAW Software via the USB Port 39 Adjusting the Monitor Levels from the DAW 41 Using Scene Memories 42 Changing the Channel Names 43 Creating a Custom... Spec 61 Analog Output Specs 61 Digital Input Spec 62 Digital Output Spec 62 I/O SLOT Spec 63 MIDI/USB/WORD CLOCK I/O Spec .... 64 Dimensions 64 Options 65 Rack Mounting the 01V96i Using RK1 Rack Mount Kit 65 Index 66 01V96i Block Diagram.......End of Manual 01V96i Level Diagram .......End of Manual...
Owner's Manual
Page 7
...computer. ■ Yamaha Steinberg USB Driver This is forbidden. • The manufacturer accepts no support for connecting the 01V96i to your computer. http://www.steinberg.net/ 01V96i-Owner's Manual About the included DAW software Yamaha Corporation provides no ...Yamaha 01V96i Digital Mixing Console. The 01V96i covers a broad range of the latest updates, and a FAQ. The Steinberg website provides product-related support information, downloads of needs and applications including multi-track recording, 2-channel mixdown, and surround sound production. The compact 01V96i...
...computer. ■ Yamaha Steinberg USB Driver This is forbidden. • The manufacturer accepts no support for connecting the 01V96i to your computer. http://www.steinberg.net/ 01V96i-Owner's Manual About the included DAW software Yamaha Corporation provides no ...Yamaha 01V96i Digital Mixing Console. The 01V96i covers a broad range of the latest updates, and a FAQ. The Steinberg website provides product-related support information, downloads of needs and applications including multi-track recording, 2-channel mixdown, and surround sound production. The compact 01V96i...
Owner's Manual
Page 17
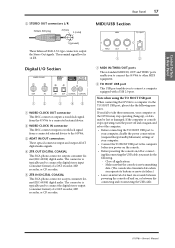
... format) of at least six seconds between disconnecting and reconnecting the USB cable. 01V96i-Owner's Manual The nominal signal level is typically used to connect the digital stereo output (consumer format) of a DAT recorder, MD recorder, or CD recorder. 1 2 1 MIDI IN/THRU/OUT ports These standard MIDI ...IN, OUT and THRU ports enable you to connect the 01V96i to other MIDI equipment. 2 TO HOST USB port This USB port enables you power-on the console. ...
... format) of at least six seconds between disconnecting and reconnecting the USB cable. 01V96i-Owner's Manual The nominal signal level is typically used to connect the digital stereo output (consumer format) of a DAT recorder, MD recorder, or CD recorder. 1 2 1 MIDI IN/THRU/OUT ports These standard MIDI ...IN, OUT and THRU ports enable you to connect the 01V96i to other MIDI equipment. 2 TO HOST USB port This USB port enables you power-on the console. ...

Owner's Manual
Page 26
26 Connections and Setup ■ Configuring a recording system that uses a DAW (Digital Audio Workstation) Computer TO HOST USB port Effects processor Synthesizer REC SONG SCENE INPUT connector OMNI OUT connector CH1-4 CH5-8 CH9-12 1 2 3 4 5 6 7 8 9 10 11 12 13 15 PHANTOM +48V A A A A A A A A A A A...7 16 32 BUS 8 STEREO PHONES jack VOL VOL Monitoring system In this system, the 01V96i is connected to edit its parameters. 01V96i-Owner's Manual The 01V96i's remote functionality can also be used to perform locate and transport operations on the DAW,...
26 Connections and Setup ■ Configuring a recording system that uses a DAW (Digital Audio Workstation) Computer TO HOST USB port Effects processor Synthesizer REC SONG SCENE INPUT connector OMNI OUT connector CH1-4 CH5-8 CH9-12 1 2 3 4 5 6 7 8 9 10 11 12 13 15 PHANTOM +48V A A A A A A A A A A A...7 16 32 BUS 8 STEREO PHONES jack VOL VOL Monitoring system In this system, the 01V96i is connected to edit its parameters. 01V96i-Owner's Manual The 01V96i's remote functionality can also be used to perform locate and transport operations on the DAW,...
Owner's Manual
Page 39
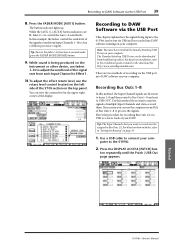
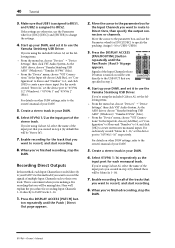
... the [AUX 1]-[AUX 8] button indicators are two methods of Bus Outs 1-8 to process the signals. Tip: To reset the fader 1-16 function to the 01V96i. 2. Use a USB cable to connect your DAW. puter to normal mode, press the FADER MODE [HOME] button. 9. For details on the top panel. Note: You must... use faders 1-16 to adjust the send level of the ST IN section on how to do this method if you want to record must have installed the Yamaha Steinberg USB Driver on your computer. Tip: The Input Channels that you want to mix the signals of your com- ton repeatedly until the...
... the [AUX 1]-[AUX 8] button indicators are two methods of Bus Outs 1-8 to process the signals. Tip: To reset the fader 1-16 function to the 01V96i. 2. Use a USB cable to connect your DAW. puter to normal mode, press the FADER MODE [HOME] button. 9. For details on the top panel. Note: You must... use faders 1-16 to adjust the send level of the ST IN section on how to do this method if you want to record must have installed the Yamaha Steinberg USB Driver on your computer. Tip: The Input Channels that you want to mix the signals of your com- ton repeatedly until the...
Owner's Manual
Page 40
... use the Parameter wheel (or [INC]/[DEC]) and [ENTER] to "01V96i 1/2" (Windows) / "01V96i 1" and "01V96i 2" (Mac). As the ASIO driver, choose "Yamaha Steinberg USB ASIO" (Windows) / "Yamaha 01V96i" (Mac). • From the "Device" menu, choose "VST Connections." If the settings are otherwise, use the Yamaha Steinberg USB Driver. Enable recording for each Input Channel is convenient when you're making...
... use the Parameter wheel (or [INC]/[DEC]) and [ENTER] to "01V96i 1/2" (Windows) / "01V96i 1" and "01V96i 2" (Mac). As the ASIO driver, choose "Yamaha Steinberg USB ASIO" (Windows) / "Yamaha 01V96i" (Mac). • From the "Device" menu, choose "VST Connections." If the settings are otherwise, use the Yamaha Steinberg USB Driver. Enable recording for each Input Channel is convenient when you're making...
Owner's Manual
Page 41
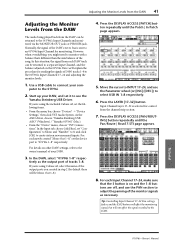
...from the channel strip section. 7. As the ASIO driver, choose "Yamaha Steinberg USB ASIO" (Windows) / "Yamaha 01V96i" (Mac). • From the "Device" menu, choose "VST Connections." If you're using the included Cubase AI, set the device port to "01V96i 1-8" respectively. Input Channel Layer 17-32 is sent to an...17-24 and adjusting the monitor levels. 1. However when overdubbing, you created in step 2 (by default these will not affect the signal recorded to the DAW. ton repeatedly until the Pan/Route | Rout17-STI page appears. 8. Press the DISPLAY ACCESS [PATCH] but will be...
...from the channel strip section. 7. As the ASIO driver, choose "Yamaha Steinberg USB ASIO" (Windows) / "Yamaha 01V96i" (Mac). • From the "Device" menu, choose "VST Connections." If you're using the included Cubase AI, set the device port to "01V96i 1-8" respectively. Input Channel Layer 17-32 is sent to an...17-24 and adjusting the monitor levels. 1. However when overdubbing, you created in step 2 (by default these will not affect the signal recorded to the DAW. ton repeatedly until the Pan/Route | Rout17-STI page appears. 8. Press the DISPLAY ACCESS [PATCH] but will be...
Owner's Manual
Page 50
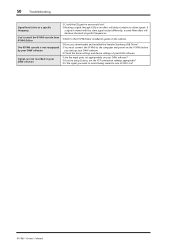
50 Troubleshooting Signal level is not recognized by your DAW software Signals are not recorded on your DAW software? ❍ If you're using Cubase, are the VST connection settings appropriate? ❍ Is the signal you start up your DAW ... installation guide on the website. ❍ Have you downloaded and installed the Yamaha Steinberg USB Driver? ❍ You must connect the 01V96i to the computer and power-on the 01V96i before you want to record being routed to other signals. If a signal is mixed with the same signal routed differently, a comb filter effect will delay...
50 Troubleshooting Signal level is not recognized by your DAW software Signals are not recorded on your DAW software? ❍ If you're using Cubase, are the VST connection settings appropriate? ❍ Is the signal you start up your DAW ... installation guide on the website. ❍ Have you downloaded and installed the Yamaha Steinberg USB Driver? ❍ You must connect the 01V96i to the computer and power-on the 01V96i before you want to record being routed to other signals. If a signal is mixed with the same signal routed differently, a comb filter effect will delay...
Owner's Manual
Page 67
Q Q (slope 35 Q control 14 R RECALL button 14 Recording system 26 Recording to DAW Software 39 REMOTE button 13 Rotary controls 20 Routing 33 S S button (Routing... 19 Synchronization status 28 Synchronize 27 T Tab Scroll 13 TITLE 46 Title Edit Window 21 TO HOST USB port 17 U USB 2.0 port 17 USB OUT 30 User Assignable Layer 44 User Define Select window 46 User Defined Keys 46 USER DEFINED KEYS Section...CLOCK OUT connector .......17 Wordclock 27 Wordclock master 27 Wordclock slave 27 Wordclock Source 28 Y Yamaha Steinberg USB Driver 7 Index 67 Index 01V96i-Owner's Manual
Q Q (slope 35 Q control 14 R RECALL button 14 Recording system 26 Recording to DAW Software 39 REMOTE button 13 Rotary controls 20 Routing 33 S S button (Routing... 19 Synchronization status 28 Synchronize 27 T Tab Scroll 13 TITLE 46 Title Edit Window 21 TO HOST USB port 17 U USB 2.0 port 17 USB OUT 30 User Assignable Layer 44 User Define Select window 46 User Defined Keys 46 USER DEFINED KEYS Section...CLOCK OUT connector .......17 Wordclock 27 Wordclock master 27 Wordclock slave 27 Wordclock Source 28 Y Yamaha Steinberg USB Driver 7 Index 67 Index 01V96i-Owner's Manual
Reference Manual
Page 3
... Setting the Routing EQ'ing the Input Signals Using the EQ Library Compressing the Input Signals Using the Internal Effects Recording to DAW Software via the USB Port Adjusting the Monitor Levels from the DAW Using Scene Memories Changing the Channel Names Creating a Custom Layer by Combining...Manual Specifications General Spec Libraries Analog Input Spec Analog Output Specs Digital Input Spec Digital Output Spec I/O SLOT Spec MIDI/USB/WORD CLOCK I/O Spec Dimensions Options Rack Mounting the 01V96i Using RK1 Rack Mount Kit Index 01V96i Block Diagram 01V96i Level Diagram 01V96i-Reference Manual
... Setting the Routing EQ'ing the Input Signals Using the EQ Library Compressing the Input Signals Using the Internal Effects Recording to DAW Software via the USB Port Adjusting the Monitor Levels from the DAW Using Scene Memories Changing the Channel Names Creating a Custom Layer by Combining...Manual Specifications General Spec Libraries Analog Input Spec Analog Output Specs Digital Input Spec Digital Output Spec I/O SLOT Spec MIDI/USB/WORD CLOCK I/O Spec Dimensions Options Rack Mounting the 01V96i Using RK1 Rack Mount Kit Index 01V96i Block Diagram 01V96i Level Diagram 01V96i-Reference Manual

Reference Manual
Page 54
... a playback device or MTR to the output connectors. ■ Surround Pan Recording To record surround pan movement to a DAW, patch the corresponding bus outs to the TO HOST USB port's output channels, sending them to the outputs, ADAT OUT channels, or...and right front signals of recording each channel's signal into a DAW when using 5.1 Surround mode. 01V96i BUS1 (L) BUS2 (R) BUS3 (Ls) BUS4 (Rs) BUS5 (C) BUS6 (LFE) Input Channel 1 SURROUND PAN LFE LEVEL Input Channel 2 SURROUND PAN LFE LEVEL Input Channel 3 SURROUND PAN LFE LEVEL USB USB 1 USB 2 USB 3 USB 4 USB 5 USB 6 Track 1 Track ...
... a playback device or MTR to the output connectors. ■ Surround Pan Recording To record surround pan movement to a DAW, patch the corresponding bus outs to the TO HOST USB port's output channels, sending them to the outputs, ADAT OUT channels, or...and right front signals of recording each channel's signal into a DAW when using 5.1 Surround mode. 01V96i BUS1 (L) BUS2 (R) BUS3 (Ls) BUS4 (Rs) BUS5 (C) BUS6 (LFE) Input Channel 1 SURROUND PAN LFE LEVEL Input Channel 2 SURROUND PAN LFE LEVEL Input Channel 3 SURROUND PAN LFE LEVEL USB USB 1 USB 2 USB 3 USB 4 USB 5 USB 6 Track 1 Track ...

Reference Manual
Page 83
...Control By using MIDI Machine Control commands and the DIO/Setup | Machine page, you can control an external recording machine that you to control external equipment directly from the 01V96i top panel. Install the driver in the downloaded file. 3. Refer to control the external device. (You .... The following URL. Download the Yamaha Steinberg USB Driver from the following targets are two types of Remote functions (Remote and Machine Control): ■ REMOTE (Remote Layer) To use the User Defined buttons. Tip: To control external devices from the 01V96i, you to "Other Functions" on...
...Control By using MIDI Machine Control commands and the DIO/Setup | Machine page, you can control an external recording machine that you to control external equipment directly from the 01V96i top panel. Install the driver in the downloaded file. 3. Refer to control the external device. (You .... The following URL. Download the Yamaha Steinberg USB Driver from the following targets are two types of Remote functions (Remote and Machine Control): ■ REMOTE (Remote Layer) To use the User Defined buttons. Tip: To control external devices from the 01V96i, you to "Other Functions" on...
Reference Manual
Page 93
...become available for Automation punch in and out recording. http://www.yamahaproaudio.com/ 2. Download the Yamaha Steinberg USB Driver from the following URL, and install the driver as described in the Owner's Manual (separate booklet). Make sure that the 01V96i is transmitted. Also, whenever the transport ...functions to the user defined keys, refer to be transmitted to Pro Tools. Use a USB cable to configure the DIO/Setup | MIDI/HOST page. 2. Refer to page 84 to connect the 01V96i. 3. You can now remotely control Nuendo/Cubase using the Remote Layer. ■ Configuring...
...become available for Automation punch in and out recording. http://www.yamahaproaudio.com/ 2. Download the Yamaha Steinberg USB Driver from the following URL, and install the driver as described in the Owner's Manual (separate booklet). Make sure that the 01V96i is transmitted. Also, whenever the transport ...functions to the user defined keys, refer to be transmitted to Pro Tools. Use a USB cable to configure the DIO/Setup | MIDI/HOST page. 2. Refer to page 84 to connect the 01V96i. 3. You can now remotely control Nuendo/Cubase using the Remote Layer. ■ Configuring...

Reference Manual
Page 98
... 32 BUS 8 STEREO MIDI OUT MIDI IN MMC-supported machine • MIDI MIDI port • USB USB port • SLOT Slot with an MY16-mLAN (mLAN card) installed If USB is selected, move the cursor to the User's Manual for the external device for information on the ...box, then rotate the Parameter wheel to set or cancel their Record Ready mode. • ALL CLEAR............Turning on this button switches all buttons (1-24) simultaneously. 01V96i-Reference Manual Note: Controllable parameters vary depending on connecting the 01V96i to the same ID number as the MMC destination. 4 ...
... 32 BUS 8 STEREO MIDI OUT MIDI IN MMC-supported machine • MIDI MIDI port • USB USB port • SLOT Slot with an MY16-mLAN (mLAN card) installed If USB is selected, move the cursor to the User's Manual for the external device for information on the ...box, then rotate the Parameter wheel to set or cancel their Record Ready mode. • ALL CLEAR............Turning on this button switches all buttons (1-24) simultaneously. 01V96i-Reference Manual Note: Controllable parameters vary depending on connecting the 01V96i to the same ID number as the MMC destination. 4 ...
Reference Manual
Page 117
...+48V 10 Rear panel 10 AD output section 10 Digital I/O section 10 MIDI/USB Section 10 Power section 11 SLOT section 11 RECALL button 9 Recall Confirmation preference .......109 Recall safe function 72 RECORDING 49 Remote 83 FRAMES 99 Insert display mode 85 LOCATE/TIME section 98 Machine control... 83, 98 MACHINE CONTROL section 98 MIDI messages 96 MIDI remote 94 Nuendo 83 ProTools 83 REMOTE 83 Target parameter 85 TRACK ARMING section 98 TRANSPORT section 99 01V96i-...
...+48V 10 Rear panel 10 AD output section 10 Digital I/O section 10 MIDI/USB Section 10 Power section 11 SLOT section 11 RECALL button 9 Recall Confirmation preference .......109 Recall safe function 72 RECORDING 49 Remote 83 FRAMES 99 Insert display mode 85 LOCATE/TIME section 98 Machine control... 83, 98 MACHINE CONTROL section 98 MIDI messages 96 MIDI remote 94 Nuendo 83 ProTools 83 REMOTE 83 Target parameter 85 TRACK ARMING section 98 TRANSPORT section 99 01V96i-...
Reference Manual
Page 118
... 16 SLOT 11, 13, 100 SLOT section 11 Solo 49 LAST SOLO 50 LISTEN 50 MIX SOLO 50 MIXDOWN 49 RECORDING 49 SOLO 49 Solo function 51 SOLO SAFE CHANNEL 50 Solo safe function 50 SOLO TRIM 50 SOLO buttons 7, 8 ...messages 100 System version 113 T Tab scroll buttons 9 Target parameter 85 TO HOST USB port 10 Trajectory patterns 57 TREMOLO 135 U UNLATCH 97 USB 10 USB port 100 USB OUT page 45 User assignable layer 110 USER DEFINED KEYS 9 Initial assignments 121 Utility...27 Copy operation 42 WORD CLOCK IN connector 10 WORD CLOCK OUT connector .......10 01V96i-Reference Manual
... 16 SLOT 11, 13, 100 SLOT section 11 Solo 49 LAST SOLO 50 LISTEN 50 MIX SOLO 50 MIXDOWN 49 RECORDING 49 SOLO 49 Solo function 51 SOLO SAFE CHANNEL 50 Solo safe function 50 SOLO TRIM 50 SOLO buttons 7, 8 ...messages 100 System version 113 T Tab scroll buttons 9 Target parameter 85 TO HOST USB port 10 Trajectory patterns 57 TREMOLO 135 U UNLATCH 97 USB 10 USB port 100 USB OUT page 45 User assignable layer 110 USER DEFINED KEYS 9 Initial assignments 121 Utility...27 Copy operation 42 WORD CLOCK IN connector 10 WORD CLOCK OUT connector .......10 01V96i-Reference Manual


