

User Guide
Page 8
... Diagnosing Copy-Quality Problems 7-29 Solving Scan-Quality Problems 7-29 Maintenance 7-31 Adding Ink 7-32 Emptying the Waste Tray 7-36 Replacing the Maintenance Kit 7-39 Cleaning the Paper Release Blade 7-41 Cleaning the Maintenance Kit Wiper Blade 7-45 Cleaning the Outside of the System 7-47 Cleaning the Document Glass and Document Feeder 7-47 WorkCentre® C2424 Copier-Printer v
... Diagnosing Copy-Quality Problems 7-29 Solving Scan-Quality Problems 7-29 Maintenance 7-31 Adding Ink 7-32 Emptying the Waste Tray 7-36 Replacing the Maintenance Kit 7-39 Cleaning the Paper Release Blade 7-41 Cleaning the Maintenance Kit Wiper Blade 7-45 Cleaning the Outside of the System 7-47 Cleaning the Document Glass and Document Feeder 7-47 WorkCentre® C2424 Copier-Printer v

User Guide
Page 12
... cover 9. Scanner cable connection 6. Duplex automatic document feeder 10. Ethernet 10/100 Base-T connection 2424-081 WorkCentre® C2424 Copier-Printer 1-3 Front cover release (product serial number is behind the front cover) 2424-080 Side View 1 2 34 5 6 7 8 1. Maintenance kit 2. Tray 2 4. Side door 12. Control panel 8. Front View 8 7 6 5 4 3 2 1 System Tour 9 10 11 12 1. Exit cover...
... cover 9. Scanner cable connection 6. Duplex automatic document feeder 10. Ethernet 10/100 Base-T connection 2424-081 WorkCentre® C2424 Copier-Printer 1-3 Front cover release (product serial number is behind the front cover) 2424-080 Side View 1 2 34 5 6 7 8 1. Maintenance kit 2. Tray 2 4. Side door 12. Control panel 8. Front View 8 7 6 5 4 3 2 1 System Tour 9 10 11 12 1. Exit cover...
User Guide
Page 220
.... Remove the orange maintenance kit. For more information, see the Loading Media chapter of paper through the system. 2. d. b. d. c. e. In the Menu, select Information. c. In the menu, select Information, then press the Enter button. WorkCentre® C2424 Copier-Printer 7-27 Select... Troubleshooting, then press the Enter button. Close the side door. The system will clean the ink from the rollers by running several sheets of this guide. 4. Output ...
.... Remove the orange maintenance kit. For more information, see the Loading Media chapter of paper through the system. 2. d. b. d. c. e. In the Menu, select Information. c. In the menu, select Information, then press the Enter button. WorkCentre® C2424 Copier-Printer 7-27 Select... Troubleshooting, then press the Enter button. Close the side door. The system will clean the ink from the rollers by running several sheets of this guide. 4. Output ...

User Guide
Page 221
...a lint- Wipe the clear plastic wiper blade with a lint-free cloth. Replace the maintenance kit. Close the side door. For more color bars are missing on the right panel. Output Quality Problems Solving Print-Quality Problems (Continued...color bars are missing on the test page. Lift the control panel, remove paper from the output tray, then lift the exit cover. 2. If necessary, remove the debris. 3. Clean the paper release blade: a. b. Clean the wiper blade in the Maintenance Kit: a. b. c. d. If the problem continues, follow the steps for debris. WorkCentre® C2424...
...a lint- Wipe the clear plastic wiper blade with a lint-free cloth. Replace the maintenance kit. Close the side door. For more color bars are missing on the right panel. Output Quality Problems Solving Print-Quality Problems (Continued...color bars are missing on the test page. Lift the control panel, remove paper from the output tray, then lift the exit cover. 2. If necessary, remove the debris. 3. Clean the paper release blade: a. b. Clean the wiper blade in the Maintenance Kit: a. b. c. d. If the problem continues, follow the steps for debris. WorkCentre® C2424...
User Guide
Page 224
... the maintenance kit. Select Supplies Info, then press the Enter button. 4. WorkCentre® C2424 Copier-Printer 7-31 On the control panel, press the System Setup button. 2. To view the life remaining and installation date of its life. For information about supplies, go to replace the maintenance kit. Besides adding ink, you will eventually need to www.xerox.com...
... the maintenance kit. Select Supplies Info, then press the Enter button. 4. WorkCentre® C2424 Copier-Printer 7-31 On the control panel, press the System Setup button. 2. To view the life remaining and installation date of its life. For information about supplies, go to replace the maintenance kit. Besides adding ink, you will eventually need to www.xerox.com...

User Guide
Page 232
... door. 2424-035 WorkCentre® C2424 Copier-Printer 7-39 The system stops printing and displays an error message when the maintenance kit needs replacement. To order a new maintenance kit, contact your local reseller or visit the Xerox web site at www.xerox.com/office/ c2424support. Maintenance Replacing the Maintenance Kit The orange maintenance kit (labeled A) contains a maintenance roller that the maintenance kit is nearing the end...
... door. 2424-035 WorkCentre® C2424 Copier-Printer 7-39 The system stops printing and displays an error message when the maintenance kit needs replacement. To order a new maintenance kit, contact your local reseller or visit the Xerox web site at www.xerox.com/office/ c2424support. Maintenance Replacing the Maintenance Kit The orange maintenance kit (labeled A) contains a maintenance roller that the maintenance kit is nearing the end...

User Guide
Page 233
Maintenance 2. Insert a new maintenance kit. 2424-033 2424-034 WorkCentre® C2424 Copier-Printer 7-40 Pull the orange maintenance kit (labeled A) completely out of the system. 3.
Maintenance 2. Insert a new maintenance kit. 2424-033 2424-034 WorkCentre® C2424 Copier-Printer 7-40 Pull the orange maintenance kit (labeled A) completely out of the system. 3.

User Guide
Page 238
Maintenance 2424-035 2. Use a lint-free cloth to the roller. 2424-160 WorkCentre® C2424 Copier-Printer 7-45 Cleaning the Maintenance Kit Wiper Blade The maintenance kit contains a wiper blade that removes excess ink. 1. Open the side door. Pull the orange maintenance kit (labeled A) completely out of the flexible plastic wiper blade located next to clean the top and upper edges of the system. 2424-033 3.
Maintenance 2424-035 2. Use a lint-free cloth to the roller. 2424-160 WorkCentre® C2424 Copier-Printer 7-45 Cleaning the Maintenance Kit Wiper Blade The maintenance kit contains a wiper blade that removes excess ink. 1. Open the side door. Pull the orange maintenance kit (labeled A) completely out of the flexible plastic wiper blade located next to clean the top and upper edges of the system. 2424-033 3.

User Guide
Page 239
4. Reinstall the maintenance kit. Maintenance 5. Close the side door. 2424-034 2424-039 WorkCentre® C2424 Copier-Printer 7-46
4. Reinstall the maintenance kit. Maintenance 5. Close the side door. 2424-034 2424-039 WorkCentre® C2424 Copier-Printer 7-46

User Guide
Page 246
... waste, then place the tray in a plastic bag for shipping. WorkCentre® C2424 Copier-Printer 7-53 Open the side door on the left side of the system. Remove the orange maintenance kit and place it in a plastic bag for Shipment 1. b. Moving and... the maintenance kit and waste tray: a. Secure the scanhead shipping restraint on the right side of the scanner to lock the scanhead. 2-Sided OutpuQtualityHi-ROesrigEinnThayalpnesSeGtdaranpdhaircdPsrod ColoMr ode Fast OutputUncollCatoeldlated B/W Color 2424-107 Caution Shipping the scanner with the maintenance kit and ...
... waste, then place the tray in a plastic bag for shipping. WorkCentre® C2424 Copier-Printer 7-53 Open the side door on the left side of the system. Remove the orange maintenance kit and place it in a plastic bag for Shipment 1. b. Moving and... the maintenance kit and waste tray: a. Secure the scanhead shipping restraint on the right side of the scanner to lock the scanhead. 2-Sided OutpuQtualityHi-ROesrigEinnThayalpnesSeGtdaranpdhaircdPsrod ColoMr ode Fast OutputUncollCatoeldlated B/W Color 2424-107 Caution Shipping the scanner with the maintenance kit and ...

User Guide
Page 268
...11 infoSMART Knowledge Base, 1-6, 7-57 ink adding ink, 7-32 avoiding ink jams, 7-32 discarding ink, 7-37 do not reuse ink in the printer, 7-38 ink-loading bin, 7-34 loading ink, 7-33 minimize waste ink, 7-32 use Genuine Xerox WorkCentre C2424 Solid Ink, 7-32 inserting blank separators between copies... consumption mode, 1-15 M Macintosh PostScript driver settings, 5-10 scan drivers, 4-4 Xerox Image Importer, 4-16 MaiLinX alerts, 6-12 maintaining your system, 7-31 maintenance kit ordering a new maintenance kit, 7-39 replacing the maintenance kit, 7-39 WorkCentre® C2424 Copier-Printer Index-4
...11 infoSMART Knowledge Base, 1-6, 7-57 ink adding ink, 7-32 avoiding ink jams, 7-32 discarding ink, 7-37 do not reuse ink in the printer, 7-38 ink-loading bin, 7-34 loading ink, 7-33 minimize waste ink, 7-32 use Genuine Xerox WorkCentre C2424 Solid Ink, 7-32 inserting blank separators between copies... consumption mode, 1-15 M Macintosh PostScript driver settings, 5-10 scan drivers, 4-4 Xerox Image Importer, 4-16 MaiLinX alerts, 6-12 maintaining your system, 7-31 maintenance kit ordering a new maintenance kit, 7-39 replacing the maintenance kit, 7-39 WorkCentre® C2424 Copier-Printer Index-4

User Guide
Page 269
Index maintenance kit wiper blade cleaning the blade, 7-45 manually setting the printer's IP address, 6-7 margins shifting the copy image... weatherproof, 5-36 paper guides adjusting in Tray 1, 2-11 paper release blade cleaning the blade, 7-41 paper supply specifying for copies, 3-4 password for color copies, 3-19 PhaserSMART, 1-6, 1-13, 7-2 Technical Support, 7-57 photo paper guidelines, 5-28 printing from Tray 1, 5-29 printing from Tray 2, ... light stripes, 7-28 pre-punched paper, 2-3 loading in Tray 1, 2-9 print icon, 1-11 print job interrupt, 3-18 WorkCentre® C2424 Copier-Printer Index-5
Index maintenance kit wiper blade cleaning the blade, 7-45 manually setting the printer's IP address, 6-7 margins shifting the copy image... weatherproof, 5-36 paper guides adjusting in Tray 1, 2-11 paper release blade cleaning the blade, 7-41 paper supply specifying for copies, 3-4 password for color copies, 3-19 PhaserSMART, 1-6, 1-13, 7-2 Technical Support, 7-57 photo paper guidelines, 5-28 printing from Tray 1, 5-29 printing from Tray 2, ... light stripes, 7-28 pre-punched paper, 2-3 loading in Tray 1, 2-9 print icon, 1-11 print job interrupt, 3-18 WorkCentre® C2424 Copier-Printer Index-5

User Guide Section 1: Features
Page 3
Tray 1 5. Exit cover 7. Interface cover 11. Tray 2 4. Document feeder access cover 9. Waste tray 3. Maintenance kit 2. Control panel 8. Power switch 5. USB connection 7. Ethernet 10/100 Base-T connection 2424-081 WorkCentre® C2424 Copier-Printer 1-3 Scanner cable connection 6. Front View 8 7 6 5 4 3 2 1 System Tour 9 10 11 12 1. Tray 3 (optional) 3. Front cover release (product serial number is behind the front...
Tray 1 5. Exit cover 7. Interface cover 11. Tray 2 4. Document feeder access cover 9. Waste tray 3. Maintenance kit 2. Control panel 8. Power switch 5. USB connection 7. Ethernet 10/100 Base-T connection 2424-081 WorkCentre® C2424 Copier-Printer 1-3 Scanner cable connection 6. Front View 8 7 6 5 4 3 2 1 System Tour 9 10 11 12 1. Tray 3 (optional) 3. Front cover release (product serial number is behind the front...

User Guide Section 7: Maintenance
Page 1
...displays a warning that the maintenance kit is nearing the end of this guide. WorkCentre® C2424 Copier-Printer 7-31 On the control panel, press the System Setup button. 2. Select Maintenance Kit Life, then press the Enter button. Maintenance Maintenance This section includes: ■ "Adding Ink" on page 7-32 &#...see Appendix A of its life. Select Supplies Info, then press the Enter button. 4. Besides adding ink, you will eventually need to replace the maintenance kit. For information about supplies, go to keep it producing quality prints. To view the life remaining and...
...displays a warning that the maintenance kit is nearing the end of this guide. WorkCentre® C2424 Copier-Printer 7-31 On the control panel, press the System Setup button. 2. Select Maintenance Kit Life, then press the Enter button. Maintenance Maintenance This section includes: ■ "Adding Ink" on page 7-32 &#...see Appendix A of its life. Select Supplies Info, then press the Enter button. 4. Besides adding ink, you will eventually need to replace the maintenance kit. For information about supplies, go to keep it producing quality prints. To view the life remaining and...

User Guide Section 7: Maintenance
Page 9
... displays an error message when the maintenance kit needs replacement. Maintenance Replacing the Maintenance Kit The orange maintenance kit (labeled A) contains a maintenance roller that the maintenance kit is nearing the end of the imagining drum clean and oiled. To replace the maintenance kit: 1. Open the side door. 2424-035 WorkCentre® C2424 Copier-Printer 7-39 Note Order a new maintenance kit when the control panel displays a message...
... displays an error message when the maintenance kit needs replacement. Maintenance Replacing the Maintenance Kit The orange maintenance kit (labeled A) contains a maintenance roller that the maintenance kit is nearing the end of the imagining drum clean and oiled. To replace the maintenance kit: 1. Open the side door. 2424-035 WorkCentre® C2424 Copier-Printer 7-39 Note Order a new maintenance kit when the control panel displays a message...

User Guide Section 7: Maintenance
Page 10
Maintenance 2. Pull the orange maintenance kit (labeled A) completely out of the system. 3. Insert a new maintenance kit. 2424-033 2424-034 WorkCentre® C2424 Copier-Printer 7-40
Maintenance 2. Pull the orange maintenance kit (labeled A) completely out of the system. 3. Insert a new maintenance kit. 2424-033 2424-034 WorkCentre® C2424 Copier-Printer 7-40

User Guide Section 7: Maintenance
Page 15
Use a lint-free cloth to the roller. 2424-160 WorkCentre® C2424 Copier-Printer 7-45 Cleaning the Maintenance Kit Wiper Blade The maintenance kit contains a wiper blade that removes excess ink. 1. Pull the orange maintenance kit (labeled A) completely out of the flexible plastic wiper blade located next to clean the top and upper edges of the system. 2424-033 3. Open the side door. Maintenance 2424-035 2.
Use a lint-free cloth to the roller. 2424-160 WorkCentre® C2424 Copier-Printer 7-45 Cleaning the Maintenance Kit Wiper Blade The maintenance kit contains a wiper blade that removes excess ink. 1. Pull the orange maintenance kit (labeled A) completely out of the flexible plastic wiper blade located next to clean the top and upper edges of the system. 2424-033 3. Open the side door. Maintenance 2424-035 2.

User Guide Section 7: Maintenance
Page 16
Reinstall the maintenance kit. Close the side door. 2424-034 2424-039 WorkCentre® C2424 Copier-Printer 7-46 Maintenance 5. 4.
Reinstall the maintenance kit. Close the side door. 2424-034 2424-039 WorkCentre® C2424 Copier-Printer 7-46 Maintenance 5. 4.

User Guide Section 7: Troubleshooting
Page 27
...then press the Enter button. If the problem continues, verify that the paper type is being used; see "Cleaning the Maintenance Kit Wiper Blade" on page 45. c. Wipe the clear plastic wiper blade with a lintfree cloth. Close the side door. ...then press the Enter button. The system will clean the ink from the rollers by running several sheets of this guide. 4. Repeat Step 1 up to transparency in the Maintenance Kit: a. Remove the orange maintenance kit. Replace the maintenance kit. WorkCentre® C2424 Copier-Printer 7-27 Select Troubleshooting, then press the Enter ...
...then press the Enter button. If the problem continues, verify that the paper type is being used; see "Cleaning the Maintenance Kit Wiper Blade" on page 45. c. Wipe the clear plastic wiper blade with a lintfree cloth. Close the side door. ...then press the Enter button. The system will clean the ink from the rollers by running several sheets of this guide. 4. Repeat Step 1 up to transparency in the Maintenance Kit: a. Remove the orange maintenance kit. Replace the maintenance kit. WorkCentre® C2424 Copier-Printer 7-27 Select Troubleshooting, then press the Enter ...

User Guide Section 7: Troubleshooting
Page 28
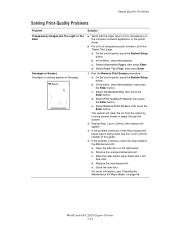
...button. If necessary, remove the debris. 3. Lift the green guide. Wipe the white plastic paper release blade with a lint- WorkCentre® C2424 Copier-Printer 7-28 In the menu, select Information, then press the Enter button. Select Print Quality Problems, then press the ...the problem continues, turn on page 45. 6. Replace the maintenance kit. c. Clean the wiper blade in the Maintenance Kit: a. Output Quality Problems Solving Print-Quality Problems (Continued) Problem Solution Random Light Stripes One or more color bars are missing on the right panel. d. For more information...
...button. If necessary, remove the debris. 3. Lift the green guide. Wipe the white plastic paper release blade with a lint- WorkCentre® C2424 Copier-Printer 7-28 In the menu, select Information, then press the Enter button. Select Print Quality Problems, then press the ...the problem continues, turn on page 45. 6. Replace the maintenance kit. c. Clean the wiper blade in the Maintenance Kit: a. Output Quality Problems Solving Print-Quality Problems (Continued) Problem Solution Random Light Stripes One or more color bars are missing on the right panel. d. For more information...


