
User Guide
Page 13
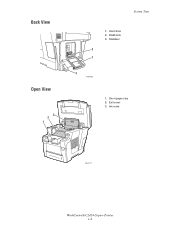
Hard drive 2. Short paper stop 2. RAM slots 3. Ink cover 2424-171 WorkCentre® C2424 Copier-Printer 1-4 Stabilizer 2 1 3 2424-082 1. Exit cover 3. Back View Open View 3 2 1 System Tour 1.
Hard drive 2. Short paper stop 2. RAM slots 3. Ink cover 2424-171 WorkCentre® C2424 Copier-Printer 1-4 Stabilizer 2 1 3 2424-082 1. Exit cover 3. Back View Open View 3 2 1 System Tour 1.

User Guide
Page 66
... and "Selecting Color or Black and White Images" on the system's hard drive, in either the Public Folder or in color will have a larger file size than directly to a computer, the user scans a document or image at www.xerox.com/office/c2424support.... Basic Scanning Basic Scanning This section includes: ■ "Overview" on page 4-2 ■ "Scanning the Originals at the System" on page 4-3 ■ "Retrieving the Scanned Images" on page 4-19. Users can print while you are available with the WorkCentre C2424 Copier-Printer differs from the system hard drive...
... and "Selecting Color or Black and White Images" on the system's hard drive, in either the Public Folder or in color will have a larger file size than directly to a computer, the user scans a document or image at www.xerox.com/office/c2424support.... Basic Scanning Basic Scanning This section includes: ■ "Overview" on page 4-2 ■ "Scanning the Originals at the System" on page 4-3 ■ "Retrieving the Scanned Images" on page 4-19. Users can print while you are available with the WorkCentre C2424 Copier-Printer differs from the system hard drive...

User Guide
Page 67
... the next person that location. For information, see "Setting the Scan Destination" on the system's hard drive. Scanning continues until the document feeder is scanned to a password protected location, press the Clear/Clear All button twice. WorkCentre® C2424 Copier-Printer 4-3 Adjust the paper guides so they fit against the originals. 2424-065 Document...
... the next person that location. For information, see "Setting the Scan Destination" on the system's hard drive. Scanning continues until the document feeder is scanned to a password protected location, press the Clear/Clear All button twice. WorkCentre® C2424 Copier-Printer 4-3 Adjust the paper guides so they fit against the originals. 2424-065 Document...

User Guide
Page 68
..., you can copy the image files from the Public Folder or a private folder on the system's hard drive to your computer's hard drive using CentreWare IS, or using the Xerox Scan Utility (Windows only). ■ If the system has either import the scanned images directly into...the system's hard drive into an application (such as Photoshop or Word) or scan directly to your computer. 2. For more information, see "Retrieving Images" on your computer. WorkCentre® C2424 Copier-Printer 4-4 Insert the WorkCentre C2424 Software CD-ROM in your computer, you must install the Xerox scan driver....
..., you can copy the image files from the Public Folder or a private folder on the system's hard drive to your computer's hard drive using CentreWare IS, or using the Xerox Scan Utility (Windows only). ■ If the system has either import the scanned images directly into...the system's hard drive into an application (such as Photoshop or Word) or scan directly to your computer. 2. For more information, see "Retrieving Images" on your computer. WorkCentre® C2424 Copier-Printer 4-4 Insert the WorkCentre C2424 Software CD-ROM in your computer, you must install the Xerox scan driver....

User Guide
Page 69
...can find the IP address on the system's hard drive into which you can scan images. Under Private Folders on the control panel; The name can have a maximum of the screen, click Create Folder. 4. WorkCentre® C2424 Copier-Printer 4-5 Enter your web browser. c....Scan Destination" on page 4-6 ■ "Setting the Scan Resolution" on page 4-7 ■ "Automatically Suppressing Background Variations" on page 4-7 ■ "Selecting Color or Black and White Images" on page 4-8 ■ "Specifying 1-Sided or 2-Sided Originals" on page 4-8 ■ "Specifying the Original Type" on page...
...can find the IP address on the system's hard drive into which you can scan images. Under Private Folders on the control panel; The name can have a maximum of the screen, click Create Folder. 4. WorkCentre® C2424 Copier-Printer 4-5 Enter your web browser. c....Scan Destination" on page 4-6 ■ "Setting the Scan Resolution" on page 4-7 ■ "Automatically Suppressing Background Variations" on page 4-7 ■ "Selecting Color or Black and White Images" on page 4-8 ■ "Specifying 1-Sided or 2-Sided Originals" on page 4-8 ■ "Specifying the Original Type" on page...

User Guide
Page 70
...user's computer hard drive. (Windows only.) For information about creating private folders, see "Setting Up a Private Folder for your scanned image: ■ Public Folder - On the control panel, press the Scan button. 2. If users have the Xerox Scan Utility open on page 4-5. WorkCentre® C2424 Copier-Printer ...then press the Enter button. Note When you selected a password protected private folder or user name in a private folder on the system's hard drive, where it can select one of available destinations. In the menu, select Scan To, then press the Enter button. If there are...
...user's computer hard drive. (Windows only.) For information about creating private folders, see "Setting Up a Private Folder for your scanned image: ■ Public Folder - On the control panel, press the Scan button. 2. If users have the Xerox Scan Utility open on page 4-5. WorkCentre® C2424 Copier-Printer ...then press the Enter button. Note When you selected a password protected private folder or user name in a private folder on the system's hard drive, where it can select one of available destinations. In the menu, select Scan To, then press the Enter button. If there are...

User Guide
Page 76
... IP address. 2. On the left side of the screen under Private Folders, click the name of the images in a private folder: a. WorkCentre® C2424 Copier-Printer 4-12 If you can use CentreWare IS to retrieve, select the desired file format. 5. If the private folder has a numeric password... in which it opened (Macintosh). Access CentreWare IS: a. b. Follow the prompts to save the image from a private folder on the system's hard drive. 1. Note If you want to delete that you see thumbnails of the private folder in the Public Folder on the "Configuration Page" or the...
... IP address. 2. On the left side of the screen under Private Folders, click the name of the images in a private folder: a. WorkCentre® C2424 Copier-Printer 4-12 If you can use CentreWare IS to retrieve, select the desired file format. 5. If the private folder has a numeric password... in which it opened (Macintosh). Access CentreWare IS: a. b. Follow the prompts to save the image from a private folder on the system's hard drive. 1. Note If you want to delete that you see thumbnails of the private folder in the Public Folder on the "Configuration Page" or the...

User Guide
Page 79
... the icon is a checkbox on the system's hard drive. Select the menu item to select the image. For example, if you are imported at a resolution of the imported image. 1. Click to acquire the image. If you want to change the color and resolution of 100x100. Using the WIA Image ...and exit the dialog box. In the Get Pictures from the hard drive of an image file: a. WorkCentre® C2424 Copier-Printer 4-15 Click the OK button to import the image. 4. Note To import images using the WIA image manager, the Xerox Scan Utility must be imported in a document, select Insert, ...
... the icon is a checkbox on the system's hard drive. Select the menu item to select the image. For example, if you are imported at a resolution of the imported image. 1. Click to acquire the image. If you want to change the color and resolution of 100x100. Using the WIA Image ...and exit the dialog box. In the Get Pictures from the hard drive of an image file: a. WorkCentre® C2424 Copier-Printer 4-15 Click the OK button to import the image. 4. Note To import images using the WIA image manager, the Xerox Scan Utility must be imported in a document, select Insert, ...

User Guide
Page 81
..., click the Delete button instead. Click to change the color and resolution used when images are imported: 1. Note If...the Image Import Options dialog box. 2. WorkCentre® C2424 Copier-Printer 4-17 Changing the Xerox Image Importer Settings on your keyboard as...WorkCentre C2424 system after it displayed, click the Refresh button. 6. Click the Import button. If you select an image. Click the OK button to that you recently scanned an image and don't see it is transferred to save your application. To have the system automatically delete the image from the hard drive...
..., click the Delete button instead. Click to change the color and resolution used when images are imported: 1. Note If...the Image Import Options dialog box. 2. WorkCentre® C2424 Copier-Printer 4-17 Changing the Xerox Image Importer Settings on your keyboard as...WorkCentre C2424 system after it displayed, click the Refresh button. 6. Click the Import button. If you select an image. Click the OK button to that you recently scanned an image and don't see it is transferred to save your application. To have the system automatically delete the image from the hard drive...

User Guide
Page 82
To see the content of the image files: ■ View thumbnails of the images using another application (page 4-14). WorkCentre® C2424 Copier-Printer 4-18 However, these file names do not describe the image. Managing Files and Controlling Scanning Options Managing Files and Controlling Scanning ...Scanning Policies" on page 4-21 Viewing Images The image files are stored on the system's hard drive with unique file names that indicate the date and time of the images using CentreWare IS (page 4-12) or the Xerox Scan Control (page 4-13). ■ View thumbnails of the scan: yyyy-mm-dd@hh...
To see the content of the image files: ■ View thumbnails of the images using another application (page 4-14). WorkCentre® C2424 Copier-Printer 4-18 However, these file names do not describe the image. Managing Files and Controlling Scanning Options Managing Files and Controlling Scanning ...Scanning Policies" on page 4-21 Viewing Images The image files are stored on the system's hard drive with unique file names that indicate the date and time of the images using CentreWare IS (page 4-12) or the Xerox Scan Control (page 4-13). ■ View thumbnails of the scan: yyyy-mm-dd@hh...

User Guide
Page 83
...WorkCentre® C2424 Copier-Printer 4-19 Managing Files and Controlling Scanning Options Deleting Image Files When you press the Scan button on page 4-16. To save space on the scan resolution and color options selected. In the menu, select the folder; Note The size of scanned image files varies based on the hard drive...on page 4-14 and "Using the Xerox Image Importer on Macintosh OS X" on the control panel, the display shows the Full indicating how much hard drive space has been used to remove all scan files from the WorkCentre system's hard drive after it is full; scanning cannot...
...WorkCentre® C2424 Copier-Printer 4-19 Managing Files and Controlling Scanning Options Deleting Image Files When you press the Scan button on page 4-16. To save space on the scan resolution and color options selected. In the menu, select the folder; Note The size of scanned image files varies based on the hard drive...on page 4-14 and "Using the Xerox Image Importer on Macintosh OS X" on the control panel, the display shows the Full indicating how much hard drive space has been used to remove all scan files from the WorkCentre system's hard drive after it is full; scanning cannot...

User Guide
Page 90
..., verify that helps manage fonts, macros and forms on the system's hard drive. Downloading Fonts from your print job, a different font will be sent...application that the fonts specified in your document are installed in the system's memory or on a printer's hard drive. To download the Font Management Utility, go to any point size; The system accepts the following downloadable fonts...available for printing: ■ PCL ■ Type 1 ■ Type 3 ■ TrueType (scalable to www.xerox.com/office/drivers and use the Key word search FMU. Note If you turn the system off, the fonts ...
..., verify that helps manage fonts, macros and forms on the system's hard drive. Downloading Fonts from your print job, a different font will be sent...application that the fonts specified in your document are installed in the system's memory or on a printer's hard drive. To download the Font Management Utility, go to any point size; The system accepts the following downloadable fonts...available for printing: ■ PCL ■ Type 1 ■ Type 3 ■ TrueType (scalable to www.xerox.com/office/drivers and use the Key word search FMU. Note If you turn the system off, the fonts ...

User Guide
Page 148
...Saved Print Jobs Note These jobs are entered on the hard drive and remain in order to print the remaining copies, delete the job at the control panel. Image smoothing is not recommended for smoother color transitions. Your four-digit numeric password-protected jobs are ...automatically deleted from the World Wide Web. To print additional copies, select the job name on the system's hard drive. The job is selected. WorkCentre® C2424 Copier-Printer 5-63 To select...
...Saved Print Jobs Note These jobs are entered on the hard drive and remain in order to print the remaining copies, delete the job at the control panel. Image smoothing is not recommended for smoother color transitions. Your four-digit numeric password-protected jobs are ...automatically deleted from the World Wide Web. To print additional copies, select the job name on the system's hard drive. The job is selected. WorkCentre® C2424 Copier-Printer 5-63 To select...

User Guide
Page 149
...-down list. Enter a four-digit number, ranging from the control panel. WorkCentre® C2424 Copier-Printer 5-64 In the menu, select Secure Print Jobs, then press the Enter button. 3. Advanced Options ■ Saved Print: Stores the job on the system's hard drive so you can print it on demand from 0000 through 9999, in...
...-down list. Enter a four-digit number, ranging from the control panel. WorkCentre® C2424 Copier-Printer 5-64 In the menu, select Secure Print Jobs, then press the Enter button. 3. Advanced Options ■ Saved Print: Stores the job on the system's hard drive so you can print it on demand from 0000 through 9999, in...

User Guide
Page 150
...the job name, then press the Enter button. 4. When a new print job would exceed the space on the hard drive. Select Delete, then press the Enter button to print the job. When prompted at the control panel whether you ... print jobs that are no longer needed ■ Delete secure print and proof print jobs that can be stored on the hard drive for saved prints), then press the Enter button. 5. If more than one secure print job is a limit per type ...the control panel, press the Print button. 2. Select Delete, then press the Enter button. 5. WorkCentre® C2424 Copier-Printer 5-65
...the job name, then press the Enter button. 4. When a new print job would exceed the space on the hard drive. Select Delete, then press the Enter button to print the job. When prompted at the control panel whether you ... print jobs that are no longer needed ■ Delete secure print and proof print jobs that can be stored on the hard drive for saved prints), then press the Enter button. 5. If more than one secure print job is a limit per type ...the control panel, press the Print button. 2. Select Delete, then press the Enter button. 5. WorkCentre® C2424 Copier-Printer 5-65

User Guide
Page 154
...hard drive, open the Applications folder, then open the Utilities folder. 3. Select the system in the Chooser. 1. The system is called Printer Setup. Windows 98 or Later and Windows 2000 or Later 1. For more information, go to install the driver from the WorkCentre C2424 Software CD-ROM. 2. Install the driver from the WorkCentre C2424... is not included with your system and must be purchased separately. Click the Add button. 4. Select USB from the WorkCentre C2424 Software CD-ROM. 2. Connections and Internet Protocol (TCP/IP) Connecting via USB A USB connection requires a standard ...
...hard drive, open the Applications folder, then open the Utilities folder. 3. Select the system in the Chooser. 1. The system is called Printer Setup. Windows 98 or Later and Windows 2000 or Later 1. For more information, go to install the driver from the WorkCentre C2424 Software CD-ROM. 2. Install the driver from the WorkCentre C2424... is not included with your system and must be purchased separately. Click the Add button. 4. Select USB from the WorkCentre C2424 Software CD-ROM. 2. Connections and Internet Protocol (TCP/IP) Connecting via USB A USB connection requires a standard ...
User Guide
Page 159
... to access the pages in Printer Neighborhood. JavaScript is required to support these functions. WorkCentre® C2424 Copier-Printer 6-9 Device Management Software Device Management Software This section includes: ■ "...'s support page. ■ Access online manuals and technical support information located on the Xerox web site. TCP/IP and HTTP must be saved as printing saved jobs. With...saving a trip to system status and special printing functions such as a group with a hard drive is disabled, a warning message appears and the pages do not function properly. It ...
... to access the pages in Printer Neighborhood. JavaScript is required to support these functions. WorkCentre® C2424 Copier-Printer 6-9 Device Management Software Device Management Software This section includes: ■ "...'s support page. ■ Access online manuals and technical support information located on the Xerox web site. TCP/IP and HTTP must be saved as printing saved jobs. With...saving a trip to system status and special printing functions such as a group with a hard drive is disabled, a warning message appears and the pages do not function properly. It ...

User Guide
Page 163
...Profile Properties link. The tool supports large networks with at least 32 MB of RAM. Go to www.xerox.com/office/uat for complete information about Usage Profile reporting, including descriptions of hard drive space recommended for the server ■ Supported operating systems: Windows 98 or later and Windows 2000 or ... (for viewing, analysis, and billing. Enter the system's IP address in CentreWare IS to go to a spreadsheet for graphing, billing, and data analysis) WorkCentre® C2424 Copier-Printer 6-13 The data can be properly set up using "MaiLinX Alerts" on page 6-12. 1.
...Profile Properties link. The tool supports large networks with at least 32 MB of RAM. Go to www.xerox.com/office/uat for complete information about Usage Profile reporting, including descriptions of hard drive space recommended for the server ■ Supported operating systems: Windows 98 or later and Windows 2000 or ... (for viewing, analysis, and billing. Enter the system's IP address in CentreWare IS to go to a spreadsheet for graphing, billing, and data analysis) WorkCentre® C2424 Copier-Printer 6-13 The data can be properly set up using "MaiLinX Alerts" on page 6-12. 1.

User Guide
Page 258
...; Up to 20 pages per minute (ppm) scan ■ Up to 18 pages per minute (ppm) document feeder Controller Specifications 500 MHz processor Hard Drive 40 GB Internal IDE hard disk Memory ■ 256 MB PC133 DRAM standard ■ Upgradable to a maximum of 1 GB Resolution ■ 2400 FinePoint print ■ Standard 300 x 300...) ■ PCL5c ■ Adobe PostScript 3 Residential Fonts ■ 137 PostScript Type 1 ■ 81 PCL5c Interfaces ■ Ethernet 10BaseT and 100BaseTx ■ Universal Serial Bus (USB 2.0) WorkCentre® C2424 Copier-Printer B-2
...; Up to 20 pages per minute (ppm) scan ■ Up to 18 pages per minute (ppm) document feeder Controller Specifications 500 MHz processor Hard Drive 40 GB Internal IDE hard disk Memory ■ 256 MB PC133 DRAM standard ■ Upgradable to a maximum of 1 GB Resolution ■ 2400 FinePoint print ■ Standard 300 x 300...) ■ PCL5c ■ Adobe PostScript 3 Residential Fonts ■ 137 PostScript Type 1 ■ 81 PCL5c Interfaces ■ Ethernet 10BaseT and 100BaseTx ■ Universal Serial Bus (USB 2.0) WorkCentre® C2424 Copier-Printer B-2

User Guide Section 1: Features
Page 4
Short paper stop 2. Stabilizer 2 1 3 2424-082 1. Ink cover 2424-171 WorkCentre® C2424 Copier-Printer 1-4 Exit cover 3. Hard drive 2. RAM slots 3. Back View Open View 3 2 1 System Tour 1.
Short paper stop 2. Stabilizer 2 1 3 2424-082 1. Ink cover 2424-171 WorkCentre® C2424 Copier-Printer 1-4 Exit cover 3. Hard drive 2. RAM slots 3. Back View Open View 3 2 1 System Tour 1.


