Systems Administrator Guide
Page 6
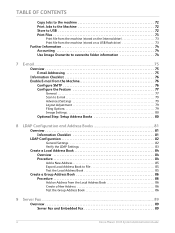
TABLE OF CONTENTS Copy Jobs to the machine 72 Print Jobs to the Machine 72 Store to USB 72 Print Files 73 Print file from the machine (stored on the Internal drive 73 Print file from ... Address Book 86 Create a New Address 86 Test the Group Address Book 86 9 Server Fax...89 Overview 89 Server Fax and Embedded Fax 89 vi Xerox Phaser 3635 System Administration Guide
TABLE OF CONTENTS Copy Jobs to the machine 72 Print Jobs to the Machine 72 Store to USB 72 Print Files 73 Print file from the machine (stored on the Internal drive 73 Print file from ... Address Book 86 Create a New Address 86 Test the Group Address Book 86 9 Server Fax...89 Overview 89 Server Fax and Embedded Fax 89 vi Xerox Phaser 3635 System Administration Guide

Systems Administrator Guide
Page 10
... Secure HTTP (SSL 151 SNMP 151 SNMPv3 153 16 Xerox Secure Access ...155 Overview 155 Xerox Secure Access and Accounting 155 Information Checklist 156 Configure Xerox Secure Access on the Device 156 Access the Authentication Page 157 Configure Xerox Secure Access 157 Check the Server Configuration Address 158 Use...162 Consumables 162 Billing and Counters 163 Billing Information 163 Billing Meter 163 Usage Counters 163 Active Jobs 164 Print 164 Image Settings 165 Portable Document Format (PDF) Settings 166 Job Management 166 x Xerox Phaser 3635 System Administration Guide
... Secure HTTP (SSL 151 SNMP 151 SNMPv3 153 16 Xerox Secure Access ...155 Overview 155 Xerox Secure Access and Accounting 155 Information Checklist 156 Configure Xerox Secure Access on the Device 156 Access the Authentication Page 157 Configure Xerox Secure Access 157 Check the Server Configuration Address 158 Use...162 Consumables 162 Billing and Counters 163 Billing Information 163 Billing Meter 163 Usage Counters 163 Active Jobs 164 Print 164 Image Settings 165 Portable Document Format (PDF) Settings 166 Job Management 166 x Xerox Phaser 3635 System Administration Guide

Systems Administrator Guide
Page 15
Control Panel Overview Control Panel Overview Job Status Services Services Home Display and Touch Screen Log In/Out Interrupt Help Printing Power Clear All Stop Start Language Machine Status Dial Pause Cancel Entry Numeric Keypad Xerox Phaser 3635 System Administration Guide 3
Control Panel Overview Control Panel Overview Job Status Services Services Home Display and Touch Screen Log In/Out Interrupt Help Printing Power Clear All Stop Start Language Machine Status Dial Pause Cancel Entry Numeric Keypad Xerox Phaser 3635 System Administration Guide 3

Systems Administrator Guide
Page 18
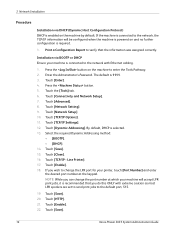
Port Interface Ports Front USB 2.0 Port This port is provided for connection to a USB flash drive and is used as an input port for Feature Enablement Key A Type USB Port Ethernet Port Phone Port Ext. 2 Machine Connection Rear View Power Switch Power Connection Foreign Device Interface Port Card Reader Slot for printing jobs, storing jobs and performing a software upgrade. 6 Xerox Phaser 3635 System Administration Guide
Port Interface Ports Front USB 2.0 Port This port is provided for connection to a USB flash drive and is used as an input port for Feature Enablement Key A Type USB Port Ethernet Port Phone Port Ext. 2 Machine Connection Rear View Power Switch Power Connection Foreign Device Interface Port Card Reader Slot for printing jobs, storing jobs and performing a software upgrade. 6 Xerox Phaser 3635 System Administration Guide
Systems Administrator Guide
Page 26
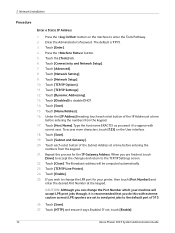
... [TCP/IP-Line Printer]. 24. Touch [Enable]. 25. If not, touch [Enable]. 14 Xerox Phaser 3635 System Administration Guide The default is recommended that you are set to send print jobs to change the Port Number which your printer, then touch [Port Number] and enter the desired .... 21. Touch [Enter]. 4. Touch [TCP/IP Settings]. 12. Touch [Host Name]. Touch [Close]. Touch [Advanced]. 8. The Broadcast address will accept LPR print jobs through, it says Enabled. Touch [HTTP] and ensure it is 1111. 3. Press the button. 5. Touch the [Tools] tab. 6. Under the [IP Address] ...
... [TCP/IP-Line Printer]. 24. Touch [Enable]. 25. If not, touch [Enable]. 14 Xerox Phaser 3635 System Administration Guide The default is recommended that you are set to send print jobs to change the Port Number which your printer, then touch [Port Number] and enter the desired .... 21. Touch [Enter]. 4. Touch [TCP/IP Settings]. 12. Touch [Host Name]. Touch [Close]. Touch [Advanced]. 8. The Broadcast address will accept LPR print jobs through, it says Enabled. Touch [HTTP] and ensure it is 1111. 3. Press the button. 5. Touch the [Tools] tab. 6. Under the [IP Address] ...
Systems Administrator Guide
Page 28
... Touch [Save]. 15. Touch [Enable]. 18. The default is connected to the network with extreme caution as most LPR spoolers are set to send print jobs to the default port, 515. 19. Touch [Close]. 16. If you wish to verify that you can change the LPR port for your printer, touch... is recommended that the information was assigned correctly. If the machine is connected to enter the Tools Pathway. 2. Touch [TCP/IP - Touch [Save]. 16 Xerox Phaser 3635 System Administration Guide Touch [Enter]. 4. Touch [Network Setup]. 10. Touch [Advanced]. 8. Line Printer]. 17.
... Touch [Save]. 15. Touch [Enable]. 18. The default is connected to the network with extreme caution as most LPR spoolers are set to send print jobs to the default port, 515. 19. Touch [Close]. 16. If you wish to verify that you can change the LPR port for your printer, touch... is recommended that the information was assigned correctly. If the machine is connected to enter the Tools Pathway. 2. Touch [TCP/IP - Touch [Save]. 16 Xerox Phaser 3635 System Administration Guide Touch [Enter]. 4. Touch [Network Setup]. 10. Touch [Advanced]. 8. Line Printer]. 17.

Systems Administrator Guide
Page 36
... Test the queue created, by the [Add Remote Printer/Plotter] form. 10. Enter Exit to exit Super User mode. 13. Verify that the job prints at the machine. Click on the same command line): lpadmin -pqueuename> -v/dev/null -mrmodel -ocmrcmodel -osmrsmodel -ob3 -orc ormhostname -orplp ... printer name. Where hostname is the machine hostname. 5. Verify that the following items are available and/or the tasks have been performed: 24 Xerox Phaser 3635 System Administration Guide Enter su to the machine. 7. Enter sh to stop the print service. 4. Enter lpshut to run the Bourne ...
... Test the queue created, by the [Add Remote Printer/Plotter] form. 10. Enter Exit to exit Super User mode. 13. Verify that the job prints at the machine. Click on the same command line): lpadmin -pqueuename> -v/dev/null -mrmodel -ocmrcmodel -osmrsmodel -ob3 -orc ormhostname -orplp ... printer name. Where hostname is the machine hostname. 5. Verify that the following items are available and/or the tasks have been performed: 24 Xerox Phaser 3635 System Administration Guide Enter su to the machine. 7. Enter sh to stop the print service. 4. Enter lpshut to run the Bourne ...

Systems Administrator Guide
Page 37
......]. 6. Enter admintool to complete the form. 7. Where queuename is the machine hostname from the Desktop. 2. b) Print Server: hostname. Xerox Phaser 3635 System Administration Guide 25 Ensure that you can ping the machine. 3. Configure the Client 1. Use either the GUI method or .... 11. Enter Exit to run the System Administrator Tool. 4. Existing operational network utilising the TCP/IP protocol. 2. Verify that the job prints at the machine. Where hostname is the name of the queue being created. Gateway Address for the machine. Procedure 1. Enter the...
......]. 6. Enter admintool to complete the form. 7. Where queuename is the machine hostname from the Desktop. 2. b) Print Server: hostname. Xerox Phaser 3635 System Administration Guide 25 Ensure that you can ping the machine. 3. Configure the Client 1. Use either the GUI method or .... 11. Enter Exit to run the System Administrator Tool. 4. Existing operational network utilising the TCP/IP protocol. 2. Verify that the job prints at the machine. Where hostname is the name of the queue being created. Gateway Address for the machine. Procedure 1. Enter the...
Systems Administrator Guide
Page 38
...print queue on the SCO workstation. 2. Follow the steps in Chapter 3, Configure Static IPv4 Addressing using either the GUI or the TTY method. 26 Xerox Phaser 3635 System Administration Guide Create the queue, by entering the command: lpadmin -p queuename -s hostname -T unknown -I any Where queuename is a .... Host Name for the machine. 6. Procedure 1. Add the machine printer hostname to communicate with the machine. Ensure that the job prints at the machine. Perform the following items are BSD-style UNIX printers, whereas SCO is the name of the queue being created. ...
...print queue on the SCO workstation. 2. Follow the steps in Chapter 3, Configure Static IPv4 Addressing using either the GUI or the TTY method. 26 Xerox Phaser 3635 System Administration Guide Create the queue, by entering the command: lpadmin -p queuename -s hostname -T unknown -I any Where queuename is a .... Host Name for the machine. 6. Procedure 1. Add the machine printer hostname to communicate with the machine. Ensure that the job prints at the machine. Perform the following items are BSD-style UNIX printers, whereas SCO is the name of the queue being created. ...

Systems Administrator Guide
Page 42
.../lpd]. Ensure that the [File Limit] reads 0. 13. The printer should now be listed in step 9. Click on [OK]. 18. Click on page 29. 30 Xerox Phaser 3635 System Administration Guide To allow access to the printer, edit the [/etc/hosts] table to list the client system. Create the Print Queue... Queue] area, enter the Print Queue Name from step 10. 15. Click on the [lpd] menu. 19. The Spool directory is the directory where print jobs are stored and is a subdirectory of your Print Queue in Create the Print Queue on [Exit] to this page. Leave the default [Suppress Headers] selected...
.../lpd]. Ensure that the [File Limit] reads 0. 13. The printer should now be listed in step 9. Click on [OK]. 18. Click on page 29. 30 Xerox Phaser 3635 System Administration Guide To allow access to the printer, edit the [/etc/hosts] table to list the client system. Create the Print Queue... Queue] area, enter the Print Queue Name from step 10. 15. Click on the [lpd] menu. 19. The Spool directory is the directory where print jobs are stored and is a subdirectory of your Print Queue in Create the Print Queue on [Exit] to this page. Leave the default [Suppress Headers] selected...

Systems Administrator Guide
Page 43
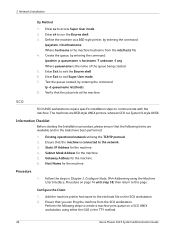
...NOTE: Not all distros of the subdirectory path. 5. Linux operating system that the following items are stored and is the directory where print jobs are available and/or the tasks have been performed: 1. Follow the steps in Chapter 3, Configure Dynamic IPv4 Addressing using the Machine User ...Interface, Procedure on page 16 until step 38, then return to the end of Linux support PrintTool. Xerox Phaser 3635 System Administration Guide 31 Add the name of the print queue to this page. Dynamic Addressing Information Checklist See Chapter 3, ...
...NOTE: Not all distros of the subdirectory path. 5. Linux operating system that the following items are stored and is the directory where print jobs are available and/or the tasks have been performed: 1. Follow the steps in Chapter 3, Configure Dynamic IPv4 Addressing using the Machine User ...Interface, Procedure on page 16 until step 38, then return to the end of Linux support PrintTool. Xerox Phaser 3635 System Administration Guide 31 Add the name of the print queue to this page. Dynamic Addressing Information Checklist See Chapter 3, ...

Systems Administrator Guide
Page 51
...Add Printer Wizard] window will appear: • Locate Your Printer for Windows 2000/2003. • Specify a Printer for Windows XP. 10. Xerox Phaser 3635 System Administration Guide 39 Enter a number for the [Printer Name], [Printer Information], and [Printer Location], if required. 9. The default... Enter text for the [Multiple Operation Timeout]. The default is 300. 10. Enter information for the [Time to a printer on [Connect to Keep Jobs in the far left column. 7. Install Printer Driver 1. b) Click on : • For Windows 2000/2003 - [Settings] then [Printers]. ...
...Add Printer Wizard] window will appear: • Locate Your Printer for Windows 2000/2003. • Specify a Printer for Windows XP. 10. Xerox Phaser 3635 System Administration Guide 39 Enter a number for the [Printer Name], [Printer Information], and [Printer Location], if required. 9. The default... Enter text for the [Multiple Operation Timeout]. The default is 300. 10. Enter information for the [Time to a printer on [Connect to Keep Jobs in the far left column. 7. Install Printer Driver 1. b) Click on : • For Windows 2000/2003 - [Settings] then [Printers]. ...
Systems Administrator Guide
Page 58
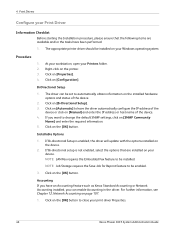
If Bi-directional setup is enabled, the driver will update with the options installed on the printer. 3. NOTE: Job Storage requires the Save Job for Reprint feature to be set to change the default SNMP settings, click on [SNMP Community Name] and enter the ... performed: 1. Installable Options 1. The appropriate printer driver should be installed. Click on [Automatic] to have an Accounting feature such as Xerox Standard Accounting or Network Accounting installed, you want to automatically obtain information on the installed hardware options and status of the device. 4. ...
If Bi-directional setup is enabled, the driver will update with the options installed on the printer. 3. NOTE: Job Storage requires the Save Job for Reprint feature to be set to change the default SNMP settings, click on [SNMP Community Name] and enter the ... performed: 1. Installable Options 1. The appropriate printer driver should be installed. Click on [Automatic] to have an Accounting feature such as Xerox Standard Accounting or Network Accounting installed, you want to automatically obtain information on the installed hardware options and status of the device. 4. ...
Systems Administrator Guide
Page 59
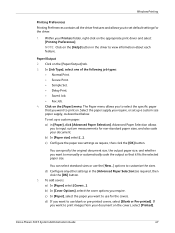
...: • Normal Print. • Secure Print. • Sample Set. • Delay Print. • Saved Job. • Fax Job. 4. Select the paper supply you require, or set up a custom paper: a) in [Paper], click [Advanced Paper Selection]. c) Configure the paper size settings as ... tab. 3. The Paper menu allows you want to select the specific paper that it fits the selected paper size. b) In [Paper size] select [...]. Xerox Phaser 3635 System Administration Guide 47 d) If you to print on the [Help] button in the [Advanced Paper Selection] as required, then click the [OK...
...: • Normal Print. • Secure Print. • Sample Set. • Delay Print. • Saved Job. • Fax Job. 4. Select the paper supply you require, or set up a custom paper: a) in [Paper], click [Advanced Paper Selection]. c) Configure the paper size settings as ... tab. 3. The Paper menu allows you want to select the specific paper that it fits the selected paper size. b) In [Paper size] select [...]. Xerox Phaser 3635 System Administration Guide 47 d) If you to print on the [Help] button in the [Advanced Paper Selection] as required, then click the [OK...

Systems Administrator Guide
Page 61
...the [OK] button. f) Click on [Printing Preferences]. c) Click on [Close] to close the window. Current information about the printer's operational status, active jobs, completed jobs and paper status. 5. Click on the [OK] button to close the [Test Page] window. b) Right-click on the [OK] button. 3. h) Verify...the Windows Printer Driver a) From the [Start] menu, click on [Manual] and enter the IP Address or Host Name of the machine. Xerox Phaser 3635 System Administration Guide 49 NOTE: If you want to change the default SNMP settings, click on the [OK] button. g) Click...
...the [OK] button. f) Click on [Printing Preferences]. c) Click on [Close] to close the window. Current information about the printer's operational status, active jobs, completed jobs and paper status. 5. Click on the [OK] button to close the [Test Page] window. b) Right-click on the [OK] button. 3. h) Verify...the Windows Printer Driver a) From the [Start] menu, click on [Manual] and enter the IP Address or Host Name of the machine. Xerox Phaser 3635 System Administration Guide 49 NOTE: If you want to change the default SNMP settings, click on the [OK] button. g) Click...
Systems Administrator Guide
Page 64
NOTE: If you want to use the Save Job for Reprint feature, then make sure that Job Storage is set to verify that the following items are available and/or the tasks have been performed: 1. Configure your Macintosh operating system. The ...to step 6, or: 2. Click on [IP Printing] from the list. 26. Click on [Printer Setup Utility] on the desktop. 3. Double-click on [Installable Options]. 52 Xerox Phaser 3635 System Administration Guide Select your machine. Click on [Applications]. 4. Enter the Print Queue Name. (You may leave this blank). 24. or • [Printers...
NOTE: If you want to use the Save Job for Reprint feature, then make sure that Job Storage is set to verify that the following items are available and/or the tasks have been performed: 1. Configure your Macintosh operating system. The ...to step 6, or: 2. Click on [IP Printing] from the list. 26. Click on [Printer Setup Utility] on the desktop. 3. Double-click on [Installable Options]. 52 Xerox Phaser 3635 System Administration Guide Select your machine. Click on [Applications]. 4. Enter the Print Queue Name. (You may leave this blank). 24. or • [Printers...

Systems Administrator Guide
Page 65
... have an Accounting feature such as Xerox Standard Accounting or Network Accounting installed, you have set to the documentation contained on the [Apply Changes] button. 10. Refer to [Installed]. 9. Click on the CD for Reprint feature, ensure Job Storage is shown under the following dialogs... Print now, hold, or specify a time to modify, or select [Standard]. 3. Standard or detailed report. • Paper Feed - Job type (e.g. Xerox Phaser 3635 System Administration Guide 53 Open a document and select [File], then [Print]. Specify which pages. • Accounting - You may ...
... have an Accounting feature such as Xerox Standard Accounting or Network Accounting installed, you have set to the documentation contained on the [Apply Changes] button. 10. Refer to [Installed]. 9. Click on the CD for Reprint feature, ensure Job Storage is shown under the following dialogs... Print now, hold, or specify a time to modify, or select [Standard]. 3. Standard or detailed report. • Paper Feed - Job type (e.g. Xerox Phaser 3635 System Administration Guide 53 Open a document and select [File], then [Print]. Specify which pages. • Accounting - You may ...
Systems Administrator Guide
Page 66
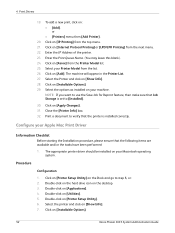
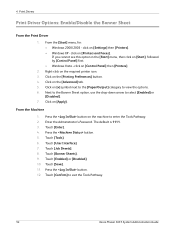
If you cannot see this option in the [Start] menu, then click on the [Advanced] tab. 5. Press the button. 5. Touch [Job Sheets]. 8. Touch [Save]. 11. Touch [Confirm] to select [Enabled] or [Disabled]. 7. 4 Print Drivers Print Driver Options: Enable/Disable the Banner ...]. From the Machine 1. Touch [Banner Sheets]. 9. Next to the Banner Sheet option, use the drop-down arrow to exit the Tools Pathway. 54 Xerox Phaser 3635 System Administration Guide Touch [Enter]. 4. Touch [User Interface]. 7. click on the machine to view the options. 6. Press the button on ...
If you cannot see this option in the [Start] menu, then click on the [Advanced] tab. 5. Press the button. 5. Touch [Job Sheets]. 8. Touch [Save]. 11. Touch [Confirm] to select [Enabled] or [Disabled]. 7. 4 Print Drivers Print Driver Options: Enable/Disable the Banner ...]. From the Machine 1. Touch [Banner Sheets]. 9. Next to the Banner Sheet option, use the drop-down arrow to exit the Tools Pathway. 54 Xerox Phaser 3635 System Administration Guide Touch [Enter]. 4. Touch [User Interface]. 7. click on the machine to view the options. 6. Press the button on ...
Systems Administrator Guide
Page 74
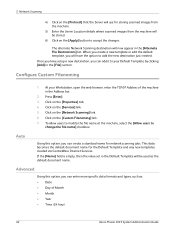
... web browser, enter the TCP/IP Address of Month • Month • Year • Time (24 hour) 62 Xerox Phaser 3635 System Administration Guide Once you can create a standard name for network scanning jobs. Auto Using this option, you can enter more specific data formats and types, such as the default document...
... web browser, enter the TCP/IP Address of Month • Month • Year • Time (24 hour) 62 Xerox Phaser 3635 System Administration Guide Once you can create a standard name for network scanning jobs. Auto Using this option, you can enter more specific data formats and types, such as the default document...
Systems Administrator Guide
Page 75
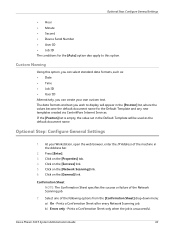
... new templates created via CentreWare Internet Services. Click on the [General] link. Prints a Confirmation Sheet only when the job is empty, the value set in the Address bar. 2. Xerox Phaser 3635 System Administration Guide 63 At your own custom text. Click on the [Services] link. 5. Click on ... the success or failure of the following options from the [Confirmation Sheet] drop-down menu: a) On - Select one of the Network Scanning job. 7. Custom Naming Using this option. The data formats and text you wish to this option, you can create your Workstation, open the web...
... new templates created via CentreWare Internet Services. Click on the [General] link. Prints a Confirmation Sheet only when the job is empty, the value set in the Address bar. 2. Xerox Phaser 3635 System Administration Guide 63 At your own custom text. Click on the [Services] link. 5. Click on ... the success or failure of the following options from the [Confirmation Sheet] drop-down menu: a) On - Select one of the Network Scanning job. 7. Custom Naming Using this option. The data formats and text you wish to this option, you can create your Workstation, open the web...