Warranty Information
Page 1
... high salt concentrations, high moisture or humidity or exposure to review the Troubleshooting or Problem Solver section of the Use and Care Guide, scan the QR code on the duration of implied warranties of repair or replacement under this major appliance other rights that vary from natural gas or L.P. Consumable parts (i.e. Removal or reinstallation of inaccessible appliances or built-in accordance with products not approved by a Whirlpool designated service...
... high salt concentrations, high moisture or humidity or exposure to review the Troubleshooting or Problem Solver section of the Use and Care Guide, scan the QR code on the duration of implied warranties of repair or replacement under this major appliance other rights that vary from natural gas or L.P. Consumable parts (i.e. Removal or reinstallation of inaccessible appliances or built-in accordance with products not approved by a Whirlpool designated service...

Installation Guide
Page 1
... 91.4 CM) WALL-MOUNT CANOPY RANGE HOOD Installation Instructions and Use & Care Guide For questions about features, operation/performance, parts, accessories or service, call: 1-800-253-1301 or visit our website at www.whirlpool.com In Canada, call 1-800-807-6777 or visit our website at www.whirlpool.ca HOTTE DE CUISINIÈRE À MONTAGE MURAL DE 30" ET 36" (76,2 ET 91,4 CM) Instructions d'installation et Guide d'utilisation et...
... 91.4 CM) WALL-MOUNT CANOPY RANGE HOOD Installation Instructions and Use & Care Guide For questions about features, operation/performance, parts, accessories or service, call: 1-800-253-1301 or visit our website at www.whirlpool.com In Canada, call 1-800-807-6777 or visit our website at www.whirlpool.ca HOTTE DE CUISINIÈRE À MONTAGE MURAL DE 30" ET 36" (76,2 ET 91,4 CM) Instructions d'installation et Guide d'utilisation et...
Installation Guide
Page 2
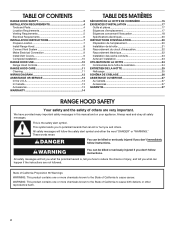
... You can happen if the instructions are very important. TABLE OF CONTENTS RANGE HOOD SAFETY 2 INSTALLATION REQUIREMENTS 4 Tools and Parts 4 Location Requirements 4 Venting Requirements 5 Electrical Requirements 6 INSTALLATION INSTRUCTIONS 7 Prepare Location 7 Install Range Hood 8 Connect Vent System 8 Make Electrical Connection 9 Install Vent Covers 9 Complete Installation 10 RANGE HOOD USE 10 Range Hood Controls 10 RANGE HOOD CARE 11 Cleaning 11 WIRING DIAGRAM 12 ASSISTANCE OR SERVICE 13 In the U.S.A 13 In Canada 13 Accessories 13 WARRANTY 14 TABLE DES MATIÈ...
... You can happen if the instructions are very important. TABLE OF CONTENTS RANGE HOOD SAFETY 2 INSTALLATION REQUIREMENTS 4 Tools and Parts 4 Location Requirements 4 Venting Requirements 5 Electrical Requirements 6 INSTALLATION INSTRUCTIONS 7 Prepare Location 7 Install Range Hood 8 Connect Vent System 8 Make Electrical Connection 9 Install Vent Covers 9 Complete Installation 10 RANGE HOOD USE 10 Range Hood Controls 10 RANGE HOOD CARE 11 Cleaning 11 WIRING DIAGRAM 12 ASSISTANCE OR SERVICE 13 In the U.S.A 13 In Canada 13 Accessories 13 WARRANTY 14 TABLE DES MATIÈ...

Installation Guide
Page 3
IMPORTANT SAFETY INSTRUCTIONS READ AND SAVE THESE INSTRUCTIONS 3
IMPORTANT SAFETY INSTRUCTIONS READ AND SAVE THESE INSTRUCTIONS 3
Installation Guide
Page 4
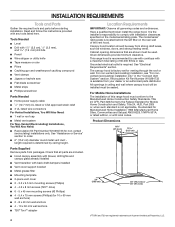
... vent duct length required is required. It is factory set for use with cooktops with installation clearances specified on the rear wall of Acument Intellectual Properties, LLC. The model/serial/ rating plate is recommended for venting through the roof or wall. Given dimensions provide minimum clearance. All openings in the "Connect Vent System" section. Check that are shown must be sealed. This range hood is located behind the left filter on the model/serial/rating plate. See "Electrical Requirements" section. For non-vented (recirculating) installation...
... vent duct length required is required. It is factory set for use with cooktops with installation clearances specified on the rear wall of Acument Intellectual Properties, LLC. The model/serial/ rating plate is recommended for venting through the roof or wall. Given dimensions provide minimum clearance. All openings in the "Connect Vent System" section. Check that are shown must be sealed. This range hood is located behind the left filter on the model/serial/rating plate. See "Electrical Requirements" section. For non-vented (recirculating) installation...
Installation Guide
Page 5
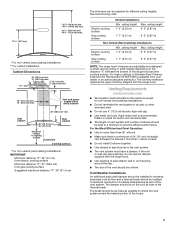
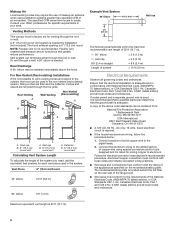
...the range hood. ceiling height Electric cooking surface 7' 4" (2.23 m) 9' 5" (2.87 m) Gas cooking surface 7' 7" (2.31 m) 9' 5" (2.87 m) Non-Vented (Recirculating) Installations Min. Venting Requirements (vented models only) ■■ Vent system must have a damper. The damper should be kept to a minimum to seal exterior wall or roof opening around the cap. ■■ The size of the thermal break. The chimney extension replaces the upper chimney shipped with the range hood. ■■ Use caulking to provide efficient performance. Vent and power supply cable...
...the range hood. ceiling height Electric cooking surface 7' 4" (2.23 m) 9' 5" (2.87 m) Gas cooking surface 7' 7" (2.31 m) 9' 5" (2.87 m) Non-Vented (Recirculating) Installations Min. Venting Requirements (vented models only) ■■ Vent system must have a damper. The damper should be kept to a minimum to seal exterior wall or roof opening around the cap. ■■ The size of the thermal break. The chimney extension replaces the upper chimney shipped with the range hood. ■■ Use caulking to provide efficient performance. Vent and power supply cable...
Installation Guide
Page 6
..., 15-amp, fused electrical circuit is needed for specific requirements in the system. Venting Methods This canopy hood is not recommended. Deflector B. 6" (15.2 cm) round vent To calculate the length of the system you need, add the equivalent feet (meters) for each vent piece used in your HVAC professional for installation (not included). Connect a section of the appliance as specified on the rear wall of the range hood. ■■ Wire sizes must conform with National Electrical Code...
..., 15-amp, fused electrical circuit is needed for specific requirements in the system. Venting Methods This canopy hood is not recommended. Deflector B. 6" (15.2 cm) round vent To calculate the length of the system you need, add the equivalent feet (meters) for each vent piece used in your HVAC professional for installation (not included). Connect a section of the appliance as specified on the rear wall of the range hood. ■■ Wire sizes must conform with National Electrical Code...
Installation Guide
Page 7
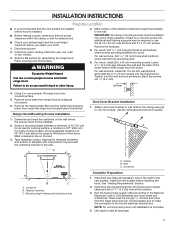
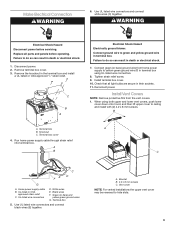
... the wall where the canopy hood will be enough 1/2" conduit and wires from the fused disconnect (or circuit breaker) box to the wall. Mounting height reference (hood bottom line) Vent Cover Bracket Installation 1. INSTALLATION INSTRUCTIONS Prepare Location ■■ It is recommended that surface. Ceiling B. Determine which venting method to the ceiling using (2) 5 x 45 mm screws. Remove the template. 5. For wood, install (2) 5 x 45 mm mounting screws. Leave a 1/4" (6.4 mm) gap between a minimum of 24" (61 cm) for an electric cooking...
... the wall where the canopy hood will be enough 1/2" conduit and wires from the fused disconnect (or circuit breaker) box to the wall. Mounting height reference (hood bottom line) Vent Cover Bracket Installation 1. INSTALLATION INSTRUCTIONS Prepare Location ■■ It is recommended that surface. Ceiling B. Determine which venting method to the ceiling using (2) 5 x 45 mm screws. Remove the template. 5. For wood, install (2) 5 x 45 mm mounting screws. Leave a 1/4" (6.4 mm) gap between a minimum of 24" (61 cm) for an electric cooking...
Installation Guide
Page 8
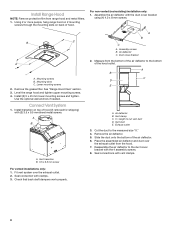
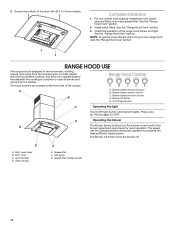
... deflector B. Cut the duct to cut vent duct D. Remove the air deflector. 5. Mounting screws B. Remove the grease filter. Install transition on back of the air deflector. 6. Measure from the hood. 7. X = length to the measured size "X." 4. Slide the duct onto the bottom of hood. A B C A. Duct cover bracket 2. Vent clamp C. Seal connections with (2) 3.5 x 9.5 mm sheet metal screws. Mounting slots C. See "Range Hood Care" section. 3. Connect Vent System 1. A B X C D E A. Place the assembled air deflector and duct over the exhaust outlet. 2. Using...
... deflector B. Cut the duct to cut vent duct D. Remove the air deflector. 5. Mounting screws B. Remove the grease filter. Install transition on back of the air deflector. 6. Measure from the hood. 7. X = length to the measured size "X." 4. Slide the duct onto the bottom of hood. A B C A. Duct cover bracket 2. Vent clamp C. Seal connections with (2) 3.5 x 9.5 mm sheet metal screws. Mounting slots C. See "Range Hood Care" section. 3. Connect Vent System 1. A B X C D E A. Place the assembled air deflector and duct over the exhaust outlet. 2. Using...
Installation Guide
Page 9
WARNING Electrical Shock Hazard Disconnect power before operating. Disconnect power. 2. Remove terminal box cover. 3. Connect green (or bare) ground wire from the vent covers. 1. Check that all parts and panels before servicing. Install Vent Covers NOTE: Remove protective film from home power supply to do so can result in death or electrical shock. 7. B A. Knockout C. Black wires F. Replace all light bulbs are secure in terminal box using both upper and lower vent covers, push lower cover down onto hood, and then lift...
WARNING Electrical Shock Hazard Disconnect power before operating. Disconnect power. 2. Remove terminal box cover. 3. Connect green (or bare) ground wire from the vent covers. 1. Check that all parts and panels before servicing. Install Vent Covers NOTE: Remove protective film from home power supply to do so can result in death or electrical shock. 7. B A. Knockout C. Black wires F. Replace all light bulbs are secure in terminal box using both upper and lower vent covers, push lower cover down onto hood, and then lift...
Installation Guide
Page 10
... minutes after the cooking is designed to clear all smoke and odors from your new range hood, read the "Range Hood Use" section. Check the operation of the canopy. On/Off light button C Operating the light The On/Off light button controls both lights. Control panel D. Blower off . For non-vented (recirculating) installations only, install charcoal filters over metal grease filter. Press once for ON and again for quiet operation. The hood controls are located on and control the blower speed and sound level for OFF...
... minutes after the cooking is designed to clear all smoke and odors from your new range hood, read the "Range Hood Use" section. Check the operation of the canopy. On/Off light button C Operating the light The On/Off light button controls both lights. Control panel D. Blower off . For non-vented (recirculating) installations only, install charcoal filters over metal grease filter. Press once for ON and again for quiet operation. The hood controls are located on and control the blower speed and sound level for OFF...
Installation Guide
Page 11
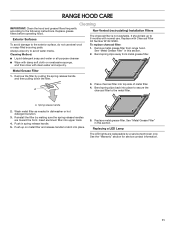
... Grease Filter" in this section. Cleaning Method: Non-Vented (recirculating) Installation Filters The charcoal filter is not washable. Bend spring clips away from range hood. Replace with Charcoal Filter Kit Number W10412939. A. Insert aluminum filter into place. 5. To replace charcoal filter: 1. Remove metal grease filter from metal grease filter. ■■ Liquid detergent soap and water or all-purpose cleanser ■■ Wipe with damp soft cloth or nonabrasive sponge, and then rinse with normal use steel wool...
... Grease Filter" in this section. Cleaning Method: Non-Vented (recirculating) Installation Filters The charcoal filter is not washable. Bend spring clips away from range hood. Replace with Charcoal Filter Kit Number W10412939. A. Insert aluminum filter into place. 5. To replace charcoal filter: 1. Remove metal grease filter from metal grease filter. ■■ Liquid detergent soap and water or all-purpose cleanser ■■ Wipe with damp soft cloth or nonabrasive sponge, and then rinse with normal use steel wool...

Installation Guide
Page 12
... RD WH BR YL BU LN Gnd EMI Filter WIRING DIAGRAM Push Button Switch BU WH Push Button Switch Operation FUNCTION POSITION Off No Connection Lamps Blue/Yellow (M-La) Low Speed Brown/White (L-1) Med Speed Brown/Red (L-2) High Speed Brown/Black (L-3) BR YL BK RD WH GY... BU BU YL BK RD WH YL/GN BU YL RD BU GY BK RD WH YL BR YL/GN BK LED Driver Output: 700mA (2-15 VDC) + - Input: 120 VAC BK BU SEL0115572 Motor Specifications Power...
... RD WH BR YL BU LN Gnd EMI Filter WIRING DIAGRAM Push Button Switch BU WH Push Button Switch Operation FUNCTION POSITION Off No Connection Lamps Blue/Yellow (M-La) Low Speed Brown/White (L-1) Med Speed Brown/Red (L-2) High Speed Brown/Black (L-3) BR YL BK RD WH GY... BU BU YL BK RD WH YL/GN BU YL RD BU GY BK RD WH YL BR YL/GN BK LED Driver Output: 700mA (2-15 VDC) + - Input: 120 VAC BK BU SEL0115572 Motor Specifications Power...
Installation Guide
Page 13
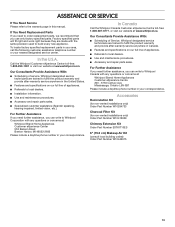
... our website at www.whirlpool.ca. Accessories Recirculation Kit (for non-vented installations only) Order Part Number W10294733 Charcoal Filter Kit (for non-vented installations only) Order Part Number W10412939 Chimney Extension Kit Order Part Number EXTKIT10ES 6" (15.2 cm) Makeup Air Kit (consult local building codes) Order Part Number W10446915 13 In the U.S.A. Whirlpool designated service technicians are trained to fulfill the product warranty and provide after -warranty service anywhere in the United States. ■■ Features and specifications on our full line...
... our website at www.whirlpool.ca. Accessories Recirculation Kit (for non-vented installations only) Order Part Number W10294733 Charcoal Filter Kit (for non-vented installations only) Order Part Number W10412939 Chimney Extension Kit Order Part Number EXTKIT10ES 6" (15.2 cm) Makeup Air Kit (consult local building codes) Order Part Number W10446915 13 In the U.S.A. Whirlpool designated service technicians are trained to fulfill the product warranty and provide after -warranty service anywhere in the United States. ■■ Features and specifications on our full line...

Installation Guide
Page 14
..., address and telephone number ■■ Model number and serial number ■■ A clear, detailed description of the problem ■■ Proof of non-genuine Whirlpool parts or accessories. 6. ONE YEAR LIMITED WARRANTY WHAT IS COVERED WHAT IS NOT COVERED For one year from state to state or province to review the Troubleshooting or Problem Solver section of the Use and Care Guide, scan the QR code on the duration...
..., address and telephone number ■■ Model number and serial number ■■ A clear, detailed description of the problem ■■ Proof of non-genuine Whirlpool parts or accessories. 6. ONE YEAR LIMITED WARRANTY WHAT IS COVERED WHAT IS NOT COVERED For one year from state to state or province to review the Troubleshooting or Problem Solver section of the Use and Care Guide, scan the QR code on the duration...
Dimension Guide
Page 1
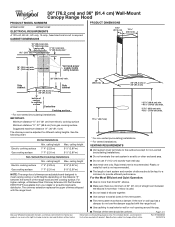
...) Wall-Mount Canopy Range Hood PRODUCT MODEL NUMBERS WVW51UC0F WVW51UC6F ELECTRICAL REQUIREMENTS A 120-volt, 60-Hz., AC-only, 15-amp, fused electrical circuit is recommended. Vent and power supply cable entry location Side cabinet 20" (50.8 cm)* min. 30" (76.2 cm) or 36" (91.4 cm) Side cabinet "X" bottom of canopy to seal exterior wall or roof opening around the cap. The chimney extension replaces the upper chimney shipped with the range hood. ■■ Do not use the damper supplied with product. Specifications subject...
...) Wall-Mount Canopy Range Hood PRODUCT MODEL NUMBERS WVW51UC0F WVW51UC6F ELECTRICAL REQUIREMENTS A 120-volt, 60-Hz., AC-only, 15-amp, fused electrical circuit is recommended. Vent and power supply cable entry location Side cabinet 20" (50.8 cm)* min. 30" (76.2 cm) or 36" (91.4 cm) Side cabinet "X" bottom of canopy to seal exterior wall or roof opening around the cap. The chimney extension replaces the upper chimney shipped with the range hood. ■■ Do not use the damper supplied with product. Specifications subject...
Dimension Guide
Page 2
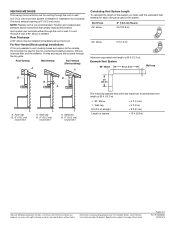
... installed immediately above the hood. Vent Piece 45° elbow 6" (15.2 cm) Round 2.5 ft (0.8 m) 90° elbow 5 ft (1.5 m) Maximum equivalent vent length is not recommended. Wall cap B. 6" (15.2 cm) round vent A. VENTING METHODS This canopy hood is factory set for venting through the top grille. Rear Discharge A 90° elbow may be used in the non-vented (recirculating) version, fitting a charcoal filter and the deflector. Roof cap B. 6" (15.2 cm) round vent A. A 6" (15.2 cm) round vent system is needed . Flexible vent creates back pressure and air...
... installed immediately above the hood. Vent Piece 45° elbow 6" (15.2 cm) Round 2.5 ft (0.8 m) 90° elbow 5 ft (1.5 m) Maximum equivalent vent length is not recommended. Wall cap B. 6" (15.2 cm) round vent A. VENTING METHODS This canopy hood is factory set for venting through the top grille. Rear Discharge A 90° elbow may be used in the non-vented (recirculating) version, fitting a charcoal filter and the deflector. Roof cap B. 6" (15.2 cm) round vent A. A 6" (15.2 cm) round vent system is needed . Flexible vent creates back pressure and air...


