
Use & Care Guide
Page 3
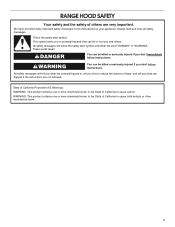
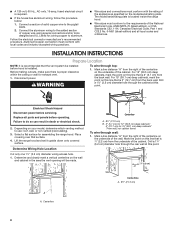
...You can be killed or seriously injured if you don't immediately follow instructions. All safety messages will follow instructions. RANGE HOOD SAFETY Your safety and the safety of injury, and tell you what can happen if the instructions are very important. WARNING: This product contains one or more chemicals ... chemicals known to the State of California to reduce the chance of others . We have provided many important safety messages in this manual and on your appliance. This is , tell you and others are not followed. These words mean: DANGER You can kill or...
...You can be killed or seriously injured if you don't immediately follow instructions. All safety messages will follow instructions. RANGE HOOD SAFETY Your safety and the safety of injury, and tell you what can happen if the instructions are very important. WARNING: This product contains one or more chemicals ... chemicals known to the State of California to reduce the chance of others . We have provided many important safety messages in this manual and on your appliance. This is , tell you and others are not followed. These words mean: DANGER You can kill or...
Use & Care Guide
Page 4
IMPORTANT SAFETY INSTRUCTIONS READ AND SAVE THESE INSTRUCTIONS 4
IMPORTANT SAFETY INSTRUCTIONS READ AND SAVE THESE INSTRUCTIONS 4

Use & Care Guide
Page 5
... screwdriver ■■ Saber or keyhole saw ■■ Metal snips Parts supplied Remove parts from package. UL Listed wire connectors ■■ Vent clamps/duct tape as non-vented (recirculating) require charcoal filters. Given dimensions provide minimum clearance. Read and follow the instructions provided with any cutouts. ■■ This range hood is recommended for use with cooktops with a maximum total rating of 55,000 BTUs or less. ■■ Grounded...
... screwdriver ■■ Saber or keyhole saw ■■ Metal snips Parts supplied Remove parts from package. UL Listed wire connectors ■■ Vent clamps/duct tape as non-vented (recirculating) require charcoal filters. Given dimensions provide minimum clearance. Read and follow the instructions provided with any cutouts. ■■ This range hood is recommended for use with cooktops with a maximum total rating of 55,000 BTUs or less. ■■ Grounded...
Use & Care Guide
Page 6
... length of vent system and number of elbows should be as close as part of outside through the wall or the roof. Consult your HVAC professional for ordering information. ■■ Vent system must have a damper. above the cooking surface D. bottom of air movement. See the "Accessories" section for specific requirements in your installation requirements. If roof or wall cap has a damper, do not use damper supplied with the range hood. ■■ Use caulking to cooking surface...
... length of vent system and number of elbows should be as close as part of outside through the wall or the roof. Consult your HVAC professional for ordering information. ■■ Vent system must have a damper. above the cooking surface D. bottom of air movement. See the "Accessories" section for specific requirements in your installation requirements. If roof or wall cap has a damper, do not use damper supplied with the range hood. ■■ Use caulking to cooking surface...
Use & Care Guide
Page 7
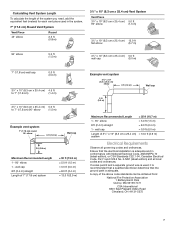
... x 25.4 cm) 5.0 ft to 7" (17.8 cm) 90° elbow (1.5 m) Example vent system 7" (17.8 cm) round 90˚ elbow 6 ft (1.8 m) Wall cap 2 ft (0.6 m) Maximum Recommended Length 1 - 90° elbow 1 - If codes permit and a separate ground wire is used in conformance with National Electrical Code, ANSI/NFPA 70 (latest edition), or CSA Standards C22.1-94, Canadian Electrical Code, Part 1 and C22.2 No. 0-M91 (latest edition) and all governing...
... x 25.4 cm) 5.0 ft to 7" (17.8 cm) 90° elbow (1.5 m) Example vent system 7" (17.8 cm) round 90˚ elbow 6 ft (1.8 m) Wall cap 2 ft (0.6 m) Maximum Recommended Length 1 - 90° elbow 1 - If codes permit and a separate ground wire is used in conformance with National Electrical Code, ANSI/NFPA 70 (latest edition), or CSA Standards C22.1-94, Canadian Electrical Code, Part 1 and C22.2 No. 0-M91 (latest edition) and all governing...
Use & Care Guide
Page 8
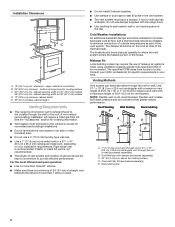
... all parts and panels before servicing. A B Centerline A. 8³⁄8" (21.3 cm) B. 2" (5.1 cm) for 12" (30.5 cm) deep cabinets* 5" (12.7 cm) for exhaust vent. 1. ■■ A 120-volt, 60 Hz., AC-only, 15-amp, fused electrical circuit is 7⁄8" (2.2 cm) from the back wall. The model/serial/rating plate is located inside the range hood. ■■ Wire sizes must conform with local codes and industry accepted wiring practices. ■■ Wire sizes and connections must...
... all parts and panels before servicing. A B Centerline A. 8³⁄8" (21.3 cm) B. 2" (5.1 cm) for 12" (30.5 cm) deep cabinets* 5" (12.7 cm) for exhaust vent. 1. ■■ A 120-volt, 60 Hz., AC-only, 15-amp, fused electrical circuit is 7⁄8" (2.2 cm) from the back wall. The model/serial/rating plate is located inside the range hood. ■■ Wire sizes must conform with local codes and industry accepted wiring practices. ■■ Wire sizes and connections must...

Use & Care Guide
Page 9
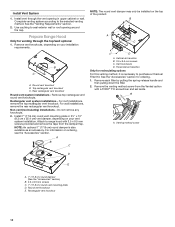
... draw a circle with a diameter that is ¼" (0.64 cm) larger than the vent. 4. Use a compass or a circle template to Round Vent Transition Roof Venting To make a 4¹⁄4" x 10½" (10.8 cm x 26.7 cm) rectangular cutout on the underside of the top of cabinet top and bottom: 1. Cut Openings for vent. 4. Mark lines 5¼" (13.3 cm) to draw a circle with a diameter that is...
... draw a circle with a diameter that is ¼" (0.64 cm) larger than the vent. 4. Use a compass or a circle template to Round Vent Transition Roof Venting To make a 4¹⁄4" x 10½" (10.8 cm x 26.7 cm) rectangular cutout on the underside of the top of cabinet top and bottom: 1. Cut Openings for vent. 4. Mark lines 5¼" (13.3 cm) to draw a circle with a diameter that is...
Use & Care Guide
Page 10
... 7" (17.8 cm) round damper is neccesary to seal exterior wall or roof opening in upper cabinet or wall. Horizontal air transition Only for recirculating options For this venting method, it is also available as an accessory. Remove each filter by pulling the spring-release handle and then pulling down the filter. 2. Venting method screw D E A. 7" (17.8 cm) round damper (See the "Accessories" section) B. 3.5 x 9.5 mm screws C. 7" (17.8 cm) round vent mounting plate D. Remove top rectangular and round vent knockouts. For...
... 7" (17.8 cm) round damper is neccesary to seal exterior wall or roof opening in upper cabinet or wall. Horizontal air transition Only for recirculating options For this venting method, it is also available as an accessory. Remove each filter by pulling the spring-release handle and then pulling down the filter. 2. Venting method screw D E A. 7" (17.8 cm) round damper (See the "Accessories" section) B. 3.5 x 9.5 mm screws C. 7" (17.8 cm) round vent mounting plate D. Remove top rectangular and round vent knockouts. For...

Use & Care Guide
Page 11
3. A 6. Lever on the No Vented (recirculating) option. Replace the venting method screw on No Vented option 4. Non-vented (recirculating) vent cover 11 Place charcoal filter into place to secure the charcoal filter to the metal filter. Slide the venting lever down as shown in the following image. Bend spring clips away from metal grease filter. 7. A. No Vented method screw 5. A 9. A 8. Remove the non-vented (recirculating) vent cover. Replace metal grease filter. A. A. Bend spring clips back into top side of metal filter.
3. A 6. Lever on the No Vented (recirculating) option. Replace the venting method screw on No Vented option 4. Non-vented (recirculating) vent cover 11 Place charcoal filter into place to secure the charcoal filter to the metal filter. Slide the venting lever down as shown in the following image. Bend spring clips away from metal grease filter. 7. A. No Vented method screw 5. A 9. A 8. Remove the non-vented (recirculating) vent cover. Replace metal grease filter. A. A. Bend spring clips back into top side of metal filter.
Use & Care Guide
Page 12
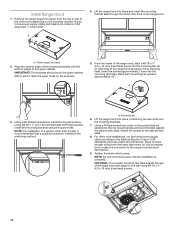
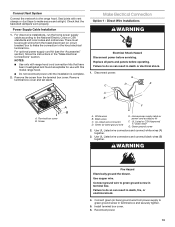
... inside of the vent hood (depending on the brackets. 5. There must be enough wiring from the top or rear of the range hood, start a #8-18 x 5⁄8" (4.2 x 16 mm) truss-head screw into place and insert the mounting bracket tabs through the slots in the range hood electrical terminal box. 9. Using a #2 Phillips screwdriver, install the drywall anchors. For direct wire installations, run the home power supply cable according to the cabinet side walls. 8. NOTE: Do...
... inside of the vent hood (depending on the brackets. 5. There must be enough wiring from the top or rear of the range hood, start a #8-18 x 5⁄8" (4.2 x 16 mm) truss-head screw into place and insert the mounting bracket tabs through the slots in the range hood electrical terminal box. 9. Using a #2 Phillips screwdriver, install the drywall anchors. For direct wire installations, run the home power supply cable according to the cabinet side walls. 8. NOTE: Do...
Use & Care Guide
Page 13
... instructions in terminal box. Make Electrical Connection Option 1 - Disconnect power. Green ground screw 2. Use UL Listed wire connectors and connect white wires (A) together. 3. Reconnect power. 13 Seal joints with this model range hood. ■■ Do not reconnect power until the installation is complete. 2. Remove the screw from power supply to do so can result in death, fire, or electrical shock. 4. Black wires C. Replace all parts and panels before servicing. Screw F A. UL Listed wire connector D. Home power supply cable or power cord accessory...
... instructions in terminal box. Make Electrical Connection Option 1 - Disconnect power. Green ground screw 2. Use UL Listed wire connectors and connect white wires (A) together. 3. Reconnect power. 13 Seal joints with this model range hood. ■■ Do not reconnect power until the installation is complete. 2. Remove the screw from power supply to do so can result in death, fire, or electrical shock. 4. Black wires C. Replace all parts and panels before servicing. Screw F A. UL Listed wire connector D. Home power supply cable or power cord accessory...
Use & Care Guide
Page 14
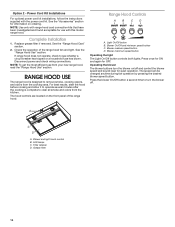
...after the cooking is designed to turn the blower on the front panel of the range hood fan and light. The hood controls are located on /off . Blower medium speed button D. LED lamps C. Power Cord Kit Installations For optional power cord kit installations, follow the instructions supplied with this model range hood. Operating the blower The blower buttons turn the blower off and control the blower speed and sound level for use from the kitchen. Filter retainer D. See the "Range Hood Care" section. 2. Replace grease filter if removed. If range hood does not operate, check to...
...after the cooking is designed to turn the blower on the front panel of the range hood fan and light. The hood controls are located on /off . Blower medium speed button D. LED lamps C. Power Cord Kit Installations For optional power cord kit installations, follow the instructions supplied with this model range hood. Operating the blower The blower buttons turn the blower off and control the blower speed and sound level for use from the kitchen. Filter retainer D. See the "Range Hood Care" section. 2. Replace grease filter if removed. If range hood does not operate, check to...
Use & Care Guide
Page 15
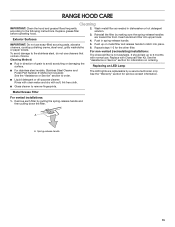
... or damaging the surface. 2. A A. RANGE HOOD CARE Cleaning IMPORTANT: Clean the hood and grease filters frequently according to order. Reinstall the filter by a service technician only. For non-vented (recirculating) installations: The charcoal filter is not washable. The LED lights are replaceable by making sure the spring-release handles are toward the front. Repeat steps 1-5 for information on metal filter and release handle to remove fingerprints. See the "Assistance or...
... or damaging the surface. 2. A A. RANGE HOOD CARE Cleaning IMPORTANT: Clean the hood and grease filters frequently according to order. Reinstall the filter by a service technician only. For non-vented (recirculating) installations: The charcoal filter is not washable. The LED lights are replaceable by making sure the spring-release handles are toward the front. Repeat steps 1-5 for information on metal filter and release handle to remove fingerprints. See the "Assistance or...
Use & Care Guide
Page 16
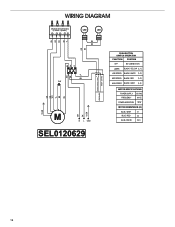
WIRING DIAGRAM GN RD WH BK YL RD BK Mechanical Push Buttons (4 button 3 Speeds) LED LED BU BK YL BK BU BK W H YL BU 10uF LED DRIVER BU YL B R GN RD W H YL/GN W H BK YL/GN M N L GND SEL0120629 OUTPUT:700mA (2-15 VDC) +INPUT: 120 VAC PUSH BUTTON SWITCH OPERATION FUNCTION POSITION OFF NO CONNECTION LAMPS BLACK / YELLOW (L-1) LOW SPEED BLACK / WHITE (L-2) MED SPEED BLACK / RED (L-3) HIGH SPEED BLACK / GREY (L-4) MOTOR SPECIFICATIONS POWER SUPPLY 120 VAC FREQUENCY 60 HZ POWER ABSORTION 180W BLUE / GREY 31 BLUE / RED 44 BLUE / WHITE 54.5 16
WIRING DIAGRAM GN RD WH BK YL RD BK Mechanical Push Buttons (4 button 3 Speeds) LED LED BU BK YL BK BU BK W H YL BU 10uF LED DRIVER BU YL B R GN RD W H YL/GN W H BK YL/GN M N L GND SEL0120629 OUTPUT:700mA (2-15 VDC) +INPUT: 120 VAC PUSH BUTTON SWITCH OPERATION FUNCTION POSITION OFF NO CONNECTION LAMPS BLACK / YELLOW (L-1) LOW SPEED BLACK / WHITE (L-2) MED SPEED BLACK / RED (L-3) HIGH SPEED BLACK / GREY (L-4) MOTOR SPECIFICATIONS POWER SUPPLY 120 VAC FREQUENCY 60 HZ POWER ABSORTION 180W BLUE / GREY 31 BLUE / RED 44 BLUE / WHITE 54.5 16
Use & Care Guide
Page 17
... Charcoal Filter Kit For 30" (76.2 cm) models, order Part Number W10905734 For 36" (91.4 cm) models, order Part Number W10905735 Power Cord Kit Order Part Number W10613691 7" (17.8 cm) Round Damper Order Part Number W10355451 7" Round Damper Vent Mounting Plate Order Part Number W10388168 17 In Canada If you need replacement parts If you need to order replacement parts, we recommend that you need further assistance, you can write to the warranty page in your nearest designated service center. For further assistance Whirlpool Brand Home Appliances Customer...
... Charcoal Filter Kit For 30" (76.2 cm) models, order Part Number W10905734 For 36" (91.4 cm) models, order Part Number W10905735 Power Cord Kit Order Part Number W10613691 7" (17.8 cm) Round Damper Order Part Number W10355451 7" Round Damper Vent Mounting Plate Order Part Number W10388168 17 In Canada If you need replacement parts If you need to order replacement parts, we recommend that you need further assistance, you can write to the warranty page in your nearest designated service center. For further assistance Whirlpool Brand Home Appliances Customer...
Use & Care Guide
Page 18
... appliances with published user, operator or when this warranty. In-home instruction on the right to correct product damage or defects caused by Whirlpool. Specified Replacement Parts and repair 4. Consumable parts (i.e. Conversion of purchase, 1. warranty period. 9. Proof of merchantability or fitness, so this limited warranty. 14. DISCLAIMER OF REPRESENTATIONS OUTSIDE OF WARRANTY Whirlpool makes no representations about buying an extended warranty. All warranty service is required to use inconsistent with original model/serial numbers removed, altered or...
... appliances with published user, operator or when this warranty. In-home instruction on the right to correct product damage or defects caused by Whirlpool. Specified Replacement Parts and repair 4. Consumable parts (i.e. Conversion of purchase, 1. warranty period. 9. Proof of merchantability or fitness, so this limited warranty. 14. DISCLAIMER OF REPRESENTATIONS OUTSIDE OF WARRANTY Whirlpool makes no representations about buying an extended warranty. All warranty service is required to use inconsistent with original model/serial numbers removed, altered or...

Use & Care Guide
Page 36
W10907132A Utilisé sous licence au Canada. Tous droits réservés. 9/16 ®/™ ©2016 Whirlpool. Used under license in Canada. All rights reserved.
W10907132A Utilisé sous licence au Canada. Tous droits réservés. 9/16 ®/™ ©2016 Whirlpool. Used under license in Canada. All rights reserved.


