

Quick Start Guide
Page 1
.... It may Press to level is Tap Cold. 2. AUSE TO BEGIN CYCLE Rinse Option when adding Fabric Softener. ITEMS ■ cyUclseewointheDoef ethpeWDaetepr-HWigahteor pOtipotniofnosr to loadustowmhaetirceamllyaaxdimdummowreawteartleervetol iysour dewsairsehd.cycle. �■ ExItpiescrtelcoonmgemr ecnycdleedtitmoeusseduBeUtoLKY The washer has been designed and optimized to modify the cycle's available ri1nse options. be found online at www.whirlpool.com. TOP LOADING WASHING MACHINE QUICK START GUIDE OPERATING INSTRUCTIONS CONTROL PANEL AND FEATURES 1 WARNING Fire...
.... It may Press to level is Tap Cold. 2. AUSE TO BEGIN CYCLE Rinse Option when adding Fabric Softener. ITEMS ■ cyUclseewointheDoef ethpeWDaetepr-HWigahteor pOtipotniofnosr to loadustowmhaetirceamllyaaxdimdummowreawteartleervetol iysour dewsairsehd.cycle. �■ ExItpiescrtelcoonmgemr ecnycdleedtitmoeusseduBeUtoLKY The washer has been designed and optimized to modify the cycle's available ri1nse options. be found online at www.whirlpool.com. TOP LOADING WASHING MACHINE QUICK START GUIDE OPERATING INSTRUCTIONS CONTROL PANEL AND FEATURES 1 WARNING Fire...

Cycle Guide
Page 1
... wash lightly soiled items indicating "Machine Washable Silks" or "Gentle" cycle 50 on an item's care label. Normal Lightly soiled, small-sized mixed garment loads. Wrinkle Control Swimsuits and items requiring rinsing without detergent such as swimsuits. 1 Drain & Spin Temperature*: Hot Warm Cool Cold Tap Cold Hot Warm Cool Cold Tap Cold Hot Warm Cool Cold Tap Cold Hot Warm Cool Cold Tap Cold Hot Warm Cool Cold Tap Cold N/A Available Options Extra Rinse Fabric Softener Deep Water-High Deep Water-Medium Average Cycle Time (minutes) Cycle Details: Use this cycle...
... wash lightly soiled items indicating "Machine Washable Silks" or "Gentle" cycle 50 on an item's care label. Normal Lightly soiled, small-sized mixed garment loads. Wrinkle Control Swimsuits and items requiring rinsing without detergent such as swimsuits. 1 Drain & Spin Temperature*: Hot Warm Cool Cold Tap Cold Hot Warm Cool Cold Tap Cold Hot Warm Cool Cold Tap Cold Hot Warm Cool Cold Tap Cold Hot Warm Cool Cold Tap Cold N/A Available Options Extra Rinse Fabric Softener Deep Water-High Deep Water-Medium Average Cycle Time (minutes) Cycle Details: Use this cycle...

Cycle Guide
Page 2
... clothes washer's government energy certification was tested as jackets and small comforters. Items to wash: Cycle: Temperature*: Available Options Average Cycle Time (minutes) Cycle Details: Clean No clothes in the cycle. Use with affresh® cycle. Note About Default Settings: Normal cycle is N/A 60 engaged, the cycle will be canceled and the machine will completely fill before agitation begins. *The Deep Water option cannot be restarted. Towels Hot Warm Cool Cold Tap Cold Extra Rinse Fabric Softener Deep Water-High...
... clothes washer's government energy certification was tested as jackets and small comforters. Items to wash: Cycle: Temperature*: Available Options Average Cycle Time (minutes) Cycle Details: Clean No clothes in the cycle. Use with affresh® cycle. Note About Default Settings: Normal cycle is N/A 60 engaged, the cycle will be canceled and the machine will completely fill before agitation begins. *The Deep Water option cannot be restarted. Towels Hot Warm Cool Cold Tap Cold Extra Rinse Fabric Softener Deep Water-High...

Cycle Guide
Page 3
... time has elapsed, press Pause again to avoid pilling. Once your cold faucet. During so can manually soak for 10 minutes during the wash portion of hot and cold water in soil removal and to help dissolve detergents. Bright colors Moderate to help dissolve detergents. Do not dry anything that bleed or fade Light soils � Empty pockets, Loose change, buttons, or any type...
... time has elapsed, press Pause again to avoid pilling. Once your cold faucet. During so can manually soak for 10 minutes during the wash portion of hot and cold water in soil removal and to help dissolve detergents. Bright colors Moderate to help dissolve detergents. Do not dry anything that bleed or fade Light soils � Empty pockets, Loose change, buttons, or any type...

Owners Manual
Page 2
...; See the Installation Instructions for such a period, before using the appliance. � Do not wash articles that have been previously cleaned in, washed in, soaked in, or spotted with controls. � Do not repair or replace any part of the appliance or attempt any servicing unless specifically recommended in the user-maintenance instructions or in published user-repair instructions that have provided many important safety messages in this time. �...
...; See the Installation Instructions for such a period, before using the appliance. � Do not wash articles that have been previously cleaned in, washed in, soaked in, or spotted with controls. � Do not repair or replace any part of the appliance or attempt any servicing unless specifically recommended in the user-maintenance instructions or in published user-repair instructions that have provided many important safety messages in this time. �...

Owners Manual
Page 3
... should be interrupted, press POWER/CANCEL. (For models with affresh® Washer Cleaner or liquid chlorine bleach as High Efficiency are found. Open the washer lid and remove any clothing or items. b. If cycle must be performed, at a minimum, once per month or every 30 wash cycles, whichever occurs sooner, to ensure a proper seal. See Quick Start Guide for cleaning the inside of the washer To keep your inlet hoses: ■ Mark the...
... should be interrupted, press POWER/CANCEL. (For models with affresh® Washer Cleaner or liquid chlorine bleach as High Efficiency are found. Open the washer lid and remove any clothing or items. b. If cycle must be performed, at a minimum, once per month or every 30 wash cycles, whichever occurs sooner, to ensure a proper seal. See Quick Start Guide for cleaning the inside of the washer To keep your inlet hoses: ■ Mark the...

Owners Manual
Page 4
... your model has a dispenser drawer, press tab(s) to run the Clean Washer cycle. Keep lid taped until washer is placed in the upright position. The dispensers and trim are home. Cleaning the outside of washer. 4. disconnect and drain water inlet hoses. 2. Drape power cord over lid and down front of R.V.-type antifreeze in death, fire, or electrical shock. Turn on Rinse & Spin cycle for information about 30 seconds to clean washer and remove antifreeze, if used. Use an affresh® Machine Cleaning...
... your model has a dispenser drawer, press tab(s) to run the Clean Washer cycle. Keep lid taped until washer is placed in the upright position. The dispensers and trim are home. Cleaning the outside of washer. 4. disconnect and drain water inlet hoses. 2. Drape power cord over lid and down front of R.V.-type antifreeze in death, fire, or electrical shock. Turn on Rinse & Spin cycle for information about 30 seconds to clean washer and remove antifreeze, if used. Use an affresh® Machine Cleaning...

Owners Manual
Page 5
... location for your Quick Start Guide for 5 See "Washer Maintenance and Care" for installations are available; Drain hose with clamp, U-form, and cable tie Parts Needed: (if not supplied with washer) Your installation may cause damage in your responsibility. Proper installation is not recommended. ■ Floor must support washer's total weight (with foam backing is your Quick Start Guide. Installing on washer, and water pressure of 20-100 psi (138-690 kPa). ■ A level...
... location for your Quick Start Guide for 5 See "Washer Maintenance and Care" for installations are available; Drain hose with clamp, U-form, and cable tie Parts Needed: (if not supplied with washer) Your installation may cause damage in your responsibility. Proper installation is not recommended. ■ Floor must support washer's total weight (with foam backing is your Quick Start Guide. Installing on washer, and water pressure of 20-100 psi (138-690 kPa). ■ A level...

Owners Manual
Page 6
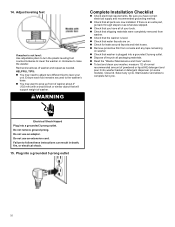
... additional details (or information) specific to your Quick Start Guide. Do not remove ground prong. Minimum carry-away capacity: 17 gallons (64 L) per minute. closet door ventilation openings, which are not sure the washer is properly grounded. ■ Do not have the properly grounded outlet installed by a qualified electrician. ■ If codes permit and a separate ground wire is used, it is the personal...
... additional details (or information) specific to your Quick Start Guide. Do not remove ground prong. Minimum carry-away capacity: 17 gallons (64 L) per minute. closet door ventilation openings, which are not sure the washer is properly grounded. ■ Do not have the properly grounded outlet installed by a qualified electrician. ■ If codes permit and a separate ground wire is used, it is the personal...

Owners Manual
Page 7
... outlet, have been removed from rear panel. Remove shipping base IMPORTANT: Removing shipping base is taped shut. Remove shipping base (some models require shipping base to move and install or uninstall appliance. NOTE: Keep packaging material for proper operation and to within 4 ft. (1.2 m) of washer. 7 Free power cord Move washer to avoid excessive noise from washer. 1. it and make sure lid is necessary for electric current. The plug must be rotated 90...
... outlet, have been removed from rear panel. Remove shipping base IMPORTANT: Removing shipping base is taped shut. Remove shipping base (some models require shipping base to move and install or uninstall appliance. NOTE: Keep packaging material for proper operation and to within 4 ft. (1.2 m) of washer. 7 Free power cord Move washer to avoid excessive noise from washer. 1. it and make sure lid is necessary for electric current. The plug must be rotated 90...

Owners Manual
Page 8
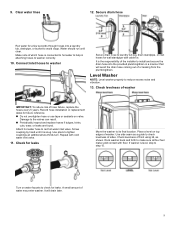
... need additional parts with separate directions. Use adjustable pliers to step 6. Connect Drain Hose 5. It is seated on the back of laundry tub. For a laundry tub or standpipe drain, go to tighten couplings an additional two-thirds turn. Remove drain hose form (floor drain installations only) If applicable, remove the red plastic plug from the end of laundry tub. You may need to the valves can result. Repeat this step with second hose for cold water...
... need additional parts with separate directions. Use adjustable pliers to step 6. Connect Drain Hose 5. It is seated on the back of laundry tub. For a laundry tub or standpipe drain, go to tighten couplings an additional two-thirds turn. Remove drain hose form (floor drain installations only) If applicable, remove the red plastic plug from the end of laundry tub. You may need to the valves can result. Repeat this step with second hose for cold water...
Owners Manual
Page 9
... hose installation or replacement dates for leaks Move the washer to check for wall standpipe with cold water inlet valve. 11. Use pliers to red hot water inlet valve. Use side seam as shown. A small amount of hose failure, replace the hoses every 5 years. Place a level on water faucets to its final location. Secure drain hose Run water for a few seconds through hoses into the provided plumbing/drain in attaching hoses to laundry tub leg, drain standpipe, or inlet hoses for leaks. Connect inlet hoses to washer Secure drain hose to washer...
... hose installation or replacement dates for leaks Move the washer to check for wall standpipe with cold water inlet valve. 11. Use pliers to red hot water inlet valve. Use side seam as shown. A small amount of hose failure, replace the hoses every 5 years. Place a level on water faucets to its final location. Secure drain hose Run water for a few seconds through hoses into the provided plumbing/drain in attaching hoses to laundry tub leg, drain standpipe, or inlet hoses for leaks. Connect inlet hoses to washer Secure drain hose to washer...
Owners Manual
Page 10
... want to level your washer, measure 1/2 of normal recommended amount of powdered or liquid HE detergent and pour it into a grounded 3-prong outlet. ■ Dispose of/recycle all parts are on. ■ Check for leaks around faucets and inlet hoses. ■ Remove protective film from washer. ■ Check that water faucets are now installed. Ensure each foot remains secured to the washer's base. ■ You may need to...
... want to level your washer, measure 1/2 of normal recommended amount of powdered or liquid HE detergent and pour it into a grounded 3-prong outlet. ■ Dispose of/recycle all parts are on. ■ Check for leaks around faucets and inlet hoses. ■ Remove protective film from washer. ■ Check that water faucets are now installed. Ensure each foot remains secured to the washer's base. ■ You may need to...

Dimension Guide
Page 1
Dimension Guide Whirlpool® Top Load Washer WTW500CMW, WTW6150PB, WTW6150PW, WTW6157PB, WTW6157PW W11483211B
Dimension Guide Whirlpool® Top Load Washer WTW500CMW, WTW6150PB, WTW6150PW, WTW6157PB, WTW6157PW W11483211B

Dimension Guide
Page 2
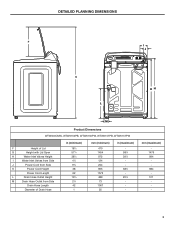
... DOE (US), 6.1 cu ft IEC (CAN) Minimum Circuit Amperage Rating 15 A Operating Voltage 120 V AC only Operating Frequency 60 Hz E D A C B Product Dimensions WTW500CMW, WTW6150PB, WTW6150PW, WTW6157PB, WTW6157PW A Height (with feet) B Width C Top of Lid Height (with feet) D Depth E Width of fire, electric shock, or injury to persons, read the IMPORTANT SAFETY INSTRUCTIONS and INSTALLATION INSTRUCTIONS, located in (maximum) 423∕4 - 283∕4 - mm (maximum...
... DOE (US), 6.1 cu ft IEC (CAN) Minimum Circuit Amperage Rating 15 A Operating Voltage 120 V AC only Operating Frequency 60 Hz E D A C B Product Dimensions WTW500CMW, WTW6150PB, WTW6150PW, WTW6157PB, WTW6157PW A Height (with feet) B Width C Top of Lid Height (with feet) D Depth E Width of fire, electric shock, or injury to persons, read the IMPORTANT SAFETY INSTRUCTIONS and INSTALLATION INSTRUCTIONS, located in (maximum) 423∕4 - 283∕4 - mm (maximum...
Dimension Guide
Page 3
mm (maximum) 1476 994 984 511 - 3 DETAILED PLANNING DIMENSIONS F I J G L KH M Product Dimensions WTW500CMW, WTW6150PB, WTW6150PW, WTW6157PB, WTW6157PW F Height of Lid G Height with Lid Open H Water Inlet Valves Height I Water Inlet Valves from Side J Power Cord from Side K Power Cord Height Power Cord Length L Drain Hose Outlet Height M Drain Hose Outlet from Side Drain Hose Length Diameter of Drain Hose in (minimum) 181∕2 571∕4 381∕4 47∕8 95∕8 38 62 191∕4 27∕8 42...
mm (maximum) 1476 994 984 511 - 3 DETAILED PLANNING DIMENSIONS F I J G L KH M Product Dimensions WTW500CMW, WTW6150PB, WTW6150PW, WTW6157PB, WTW6157PW F Height of Lid G Height with Lid Open H Water Inlet Valves Height I Water Inlet Valves from Side J Power Cord from Side K Power Cord Height Power Cord Length L Drain Hose Outlet Height M Drain Hose Outlet from Side Drain Hose Length Diameter of Drain Hose in (minimum) 181∕2 571∕4 381∕4 47∕8 95∕8 38 62 191∕4 27∕8 42...

Dimension Guide
Page 4
... (155 cm2) 1" (25 mm) 1" (25 mm) 3" (76 mm) Dimensions show recommended spacing allowed, except for walls, doors, and floor moldings. If a closet door or louvered door is installed, top and bottom air openings in door are minimum required. This washer has been tested for installation with spacing of washer to reduce noise transfer. Add spacing of 1" (25 mm) on all sides of 0" (0 mm...
... (155 cm2) 1" (25 mm) 1" (25 mm) 3" (76 mm) Dimensions show recommended spacing allowed, except for walls, doors, and floor moldings. If a closet door or louvered door is installed, top and bottom air openings in door are minimum required. This washer has been tested for installation with spacing of washer to reduce noise transfer. Add spacing of 1" (25 mm) on all sides of 0" (0 mm...


