Whirlpool WTW4715E Support and Manuals
Get Help and Manuals for this Whirlpool item

View All Support Options Below
Free Whirlpool WTW4715E manuals!
Problems with Whirlpool WTW4715E?
Ask a Question
Free Whirlpool WTW4715E manuals!
Problems with Whirlpool WTW4715E?
Ask a Question
Popular Whirlpool WTW4715E Manual Pages
Dimension Guide - Page 1

... for walls, doors, and floor moldings.
Consider allowing more space for ease of installation and servicing, and spacing for companion appliances and clearances for installation with spacing of washer to reduce noise transfer. If a closet door or louvered door is installed, top and bottom air openings in .2 (155 cm2)
1" (25 mm)
1" (25 mm)
3" (76...
Dimension Guide - Page 2
...Kit (Part Number 285834), 2 Connector Kits (Part Number 285835), and an Extension Drain Hose (Part Number ... phone numbers in your Use and Care Guide. install no higher than 96" (2.44 m) from...Installation Instructions packed with cable tie. Because Whirlpool Corporation policy includes a continuous commitment to improve our products, we reserve the right to change materials and specifications...
Installation Instructions - Page 2
...phone numbers on back page of the washer.
Install your Use and Care Guide.
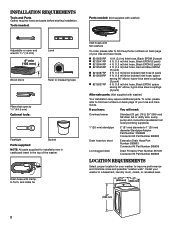
Tools needed:
Parts needed: (Not supplied with flat washers
To ...
2" (51 mm) diameter to 13⁄4" (44.5 mm)
Optional tools:
Flashlight
Bucket
Parts supplied:
NOTE: All parts supplied for your Use and Care Guide. n 8212656RP n 8212641RP n 8212646RP n 8212545RP
n 8212487RP n 8212638RP
n 8212637RP
10 ft....
Installation Instructions - Page 3
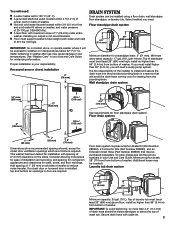
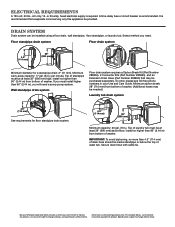
..." (2.44 m), you must support washer's total weight (with ...installation with water and load) of installation and servicing...Guide for floor standpipe drain system. Minimum siphon break: 28" (710 mm) from the plumbing/drain.
DRAIN SYSTEM
Drain system can be at least 39" (990 mm) above floor; Floor drain system requires a Siphon Break Kit (Part Number 285834), 2 Connector Kits (Part...
Installation Instructions - Page 4

... Hz., AC only, 15-
Remove shipping base
To avoid damaging floor, place cardboard supports from washer.
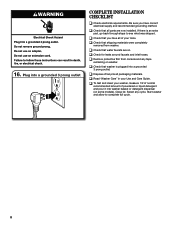
1. it is the personal responsibility and obligation of its final location; Tip washer back and place on floor behind washer. ELECTRICAL REQUIREMENTS
INSTALLATION INSTRUCTIONS
Before you are not sure the washer is required. If a mating outlet is...
Installation Instructions - Page 5
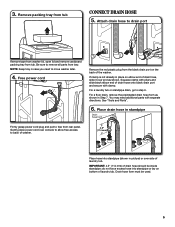
... lay on bottom of drain hose should be used.
5 Remove packing tray from tray.
See "Tools and Parts".
6. For a floor drain, remove the preinstalled drain hose form as shown. You may need to step ...6. Gently place power cord over console to allow free access to remove all parts from tub
CONNECT DRAIN HOSE
5. Drain hose form must be inside standpipe;
Be sure to...
Installation Instructions - Page 6
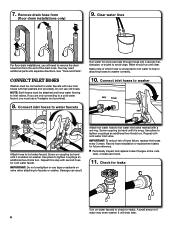
...Record hose installation or replacement dates for...Parts". 7. Clear water lines
For floor drain installations, you are found.
11. Check for leaks. Damage can result. Repeat this step with flat washers (not provided). NOTE: Both hoses must be attached and have water flowing to check for leaks
Turn on coupling by hand until it is snug. n Periodically inspect and replace...
Installation Instructions - Page 7

... on leveling feet tightly against washer cabinet. Check levelness of front using lid, as a guide to raise the washer. Then turn the plastic leveling foot counterclockwise to lower the washer or...with cable tie. Rock washer back and forth to step 15, (on models with a wood block or similar object that will support weight of washer about 1/2" (13 mm) from the washer cabinet.
12...
Installation Instructions - Page 8
... of your Use and Care Guide.
q Read "Washer Care...installed. q Check that all packaging materials.
q Check that washer is an extra part..., go back through steps to complete full cycle.
8 Be sure you have correct electrical supply and recommended grounding method. q To test and clean your washer, measure 1/2 of normal
recommended amount of /recycle all parts are on some models...
W10682801B v01.indd - Page 1
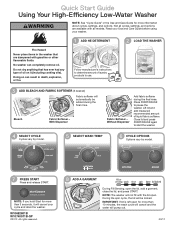
...settings, and options are dampened with gasoline or other flammable fluids.
Follow manufacturer's instructions... CYCLE Cycles vary by model.
5 SELECT WASH TEMP
6 CYCLE OPTIONS Options vary by model.
7 PRESS START Press...Guide before using your cycle and drain the washer.
Quick Start Guide Using Your High-E ciency Low-Water Washer
NOTE: See "Cycle Guide" in the Use and Care Guide...
Whirlpool WTW4715E Reviews
We have not received any reviews for Whirlpool yet.