
Installation Guide
Page 2
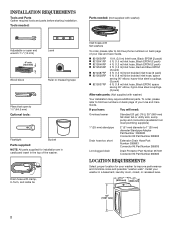
... Lint clogged drain Drain Protector Part Number 367031 Connector Kit Part Number 285835 LOCATION REQUIREMENTS Select proper location for installation are in cardboard insert in the top of your washer in a basement, laundry room, closet, or recessed area. 271/2" 27" (699 mm) (686 mm...Parts supplied: NOTE: All parts supplied for your washer to toll-free numbers on back page of your Use and Care Guide. Tools needed: Parts needed: (Not supplied with washer) Your installation may require additional parts. INSTALLATION REQUIREMENTS Tools and Parts Gather required tools and parts...
... Lint clogged drain Drain Protector Part Number 367031 Connector Kit Part Number 285835 LOCATION REQUIREMENTS Select proper location for installation are in cardboard insert in the top of your washer in a basement, laundry room, closet, or recessed area. 271/2" 27" (699 mm) (686 mm...Parts supplied: NOTE: All parts supplied for your washer to toll-free numbers on back page of your Use and Care Guide. Tools needed: Parts needed: (Not supplied with washer) Your installation may require additional parts. INSTALLATION REQUIREMENTS Tools and Parts Gather required tools and parts...
Installation Guide
Page 3
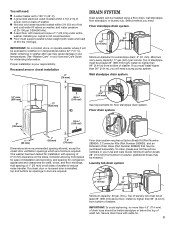
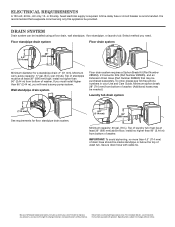
... be at least 39" (990 mm) above floor; Minimum carry-away capacity: 17 gal. (64 L) per minute. Top of standpipe must install higher than 96" (2.44 m) from bottom of washer. Wall standpipe drain system 14" max. (356 mm) 5" (126 mm) 17" (432 mm) 48 in.2 (310 cm2) 4.5" (114... Water remaining in .2 (155 cm2) 1" (25 mm) 1" (25 mm) 3" (76 mm) Dimensions show recommended spacing allowed, except for installation with cable tie. 3 Floor drain system 24 in washer after use may be inside standpipe or below 32° F (0° C). Floor standpipe drain system 4.5" (114 mm) 39" (990 mm)...
... be at least 39" (990 mm) above floor; Minimum carry-away capacity: 17 gal. (64 L) per minute. Top of standpipe must install higher than 96" (2.44 m) from bottom of washer. Wall standpipe drain system 14" max. (356 mm) 5" (126 mm) 17" (432 mm) 48 in.2 (310 cm2) 4.5" (114... Water remaining in .2 (155 cm2) 1" (25 mm) 1" (25 mm) 3" (76 mm) Dimensions show recommended spacing allowed, except for installation with cable tie. 3 Floor drain system 24 in washer after use may be inside standpipe or below 32° F (0° C). Floor standpipe drain system 4.5" (114 mm) 39" (990 mm)...

Installation Guide
Page 4
... shield to have a fuse in the neutral or ground circuit. 48" (1.2 m) Move washer to a gas pipe. Set washer upright. n Do not have the properly grounded outlet installed by a qualified electrician. Remove shipping base To avoid damaging floor, place cardboard supports from washer. 1. Move washer n A 120 volt, 60 Hz., AC only, 15- If a mating outlet is...
... shield to have a fuse in the neutral or ground circuit. 48" (1.2 m) Move washer to a gas pipe. Set washer upright. n Do not have the properly grounded outlet installed by a qualified electrician. Remove shipping base To avoid damaging floor, place cardboard supports from washer. 1. Move washer n A 120 volt, 60 Hz., AC only, 15- If a mating outlet is...
Installation Guide
Page 6
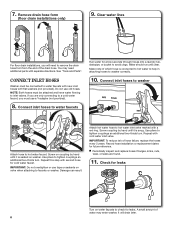
... through hoses into a laundry tub, drainpipe, or bucket to inlet valves. Clear water lines For floor drain installations, you will drain later. 6 CONNECT INLET HOSES Washer must be attached and have water flowing to avoid clogs. Attach hot water hose to water faucets with new ...use tape or sealants on water faucets to tighten couplings an additional two-thirds turn . Connect inlet hoses to washer Attach hose to faucets or washer. Record hose installation or replacement dates for cold water faucet. 7. Repeat this step with second hose for future reference. n ...
... through hoses into a laundry tub, drainpipe, or bucket to inlet valves. Clear water lines For floor drain installations, you will drain later. 6 CONNECT INLET HOSES Washer must be attached and have water flowing to avoid clogs. Attach hot water hose to water faucets with new ...use tape or sealants on water faucets to tighten couplings an additional two-thirds turn . Connect inlet hoses to washer Attach hose to faucets or washer. Record hose installation or replacement dates for cold water faucet. 7. Repeat this step with second hose for future reference. n ...
Installation Guide
Page 8
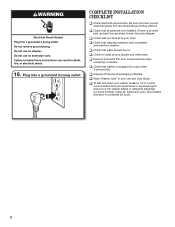
... supply and recommended grounding method. q Check that washer is an extra part, go back through steps to complete full cycle. 8 Start washer and allow to see what was skipped. If there is plugged into washer basket or detergent dispenser (on some models). q...all of /recycle all parts are on washer. q Dispose of your Use and Care Guide. q Check that water faucets are now installed. q Remove protective film from washer. Select any tape remaining on . 16. Plug into a grounded 3 prong outlet COMPLETE INSTALLATION CHECKLIST q Check electrical requirements. q Check...
... supply and recommended grounding method. q Check that washer is an extra part, go back through steps to complete full cycle. 8 Start washer and allow to see what was skipped. If there is plugged into washer basket or detergent dispenser (on some models). q...all of /recycle all parts are on washer. q Dispose of your Use and Care Guide. q Check that water faucets are now installed. q Remove protective film from washer. Select any tape remaining on . 16. Plug into a grounded 3 prong outlet COMPLETE INSTALLATION CHECKLIST q Check electrical requirements. q Check...
Dimension Guide
Page 1
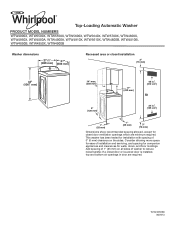
...WTW5550X, WTW5600X, WTW5640X, WTW5700X, WTW4800X, WTW4950X, WTW4880A, WTW4900A, WTW4910X, WTW5610X, WTW4800B, WTW4810B, WTW4850B, WTW4850X, WTW4900B Washer dimensions 271/2" 27" (699 mm) (686 mm) Recessed area or closet installation 3" (76 mm) 42" (1067 mm) 14" max. (356 mm) 17" (432 mm) 48 in.2 (...310 cm2) 5" (126 mm) 24 in door are minimum required. This washer has been tested for installation with spacing of 0" (0 mm) clearance on all sides of installation and servicing, and spacing for companion appliances and clearances for closet door ventilation openings which are...
...WTW5550X, WTW5600X, WTW5640X, WTW5700X, WTW4800X, WTW4950X, WTW4880A, WTW4900A, WTW4910X, WTW5610X, WTW4800B, WTW4810B, WTW4850B, WTW4850X, WTW4900B Washer dimensions 271/2" 27" (699 mm) (686 mm) Recessed area or closet installation 3" (76 mm) 42" (1067 mm) 14" max. (356 mm) 17" (432 mm) 48 in.2 (...310 cm2) 5" (126 mm) 24 in door are minimum required. This washer has been tested for installation with spacing of 0" (0 mm) clearance on all sides of installation and servicing, and spacing for companion appliances and clearances for closet door ventilation openings which are...
Dimension Guide
Page 2
... mm) Minimum diameter for planning purposes only. Because Whirlpool Corporation policy includes a continuous commitment to improve our products, we reserve the right to change materials and specifications without notice. Top of standpipe must install higher than 96" (2.44 m) from bottom of ...standpipe, or laundry tub. Secure drain hose with product. To order, please see Installation Instructions packed with cable tie. IMPORTANT: To avoid siphoning, no higher than 4.5" (114 mm) of washer. (Additional hoses may be needed.) Laundry tub drain system 4.5" (114 mm) ...
... mm) Minimum diameter for planning purposes only. Because Whirlpool Corporation policy includes a continuous commitment to improve our products, we reserve the right to change materials and specifications without notice. Top of standpipe must install higher than 96" (2.44 m) from bottom of ...standpipe, or laundry tub. Secure drain hose with product. To order, please see Installation Instructions packed with cable tie. IMPORTANT: To avoid siphoning, no higher than 4.5" (114 mm) of washer. (Additional hoses may be needed.) Laundry tub drain system 4.5" (114 mm) ...

Use & Care Guide
Page 8
...bleed or fade Light soils Cold This is the temperature from your faucet. Small will add a low amount of replacement on your previous washer provided. Bright colors Moderate to avoid odor, reduce wrinkling, and rusting of hose failure. Promptly remove garments after 5 years of use ...help dissolve detergent. Colors that bleed or fade Light soils 9. NOTE: This washer does not include inlet hoses. Then close lid and press START/Pause again to start the wash cycle. See the "Installation Instructions" for your hot water heater setting. Whites and pastels Durable garments ...
...bleed or fade Light soils Cold This is the temperature from your faucet. Small will add a low amount of replacement on your previous washer provided. Bright colors Moderate to avoid odor, reduce wrinkling, and rusting of hose failure. Promptly remove garments after 5 years of use ...help dissolve detergent. Colors that bleed or fade Light soils 9. NOTE: This washer does not include inlet hoses. Then close lid and press START/Pause again to start the wash cycle. See the "Installation Instructions" for your hot water heater setting. Whites and pastels Durable garments ...
Use & Care Guide
Page 9
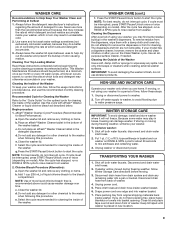
..., press START/Pause/Unlock once or twice (depending on model). Cleaning the Outside of more than is placed in the washer's dispensers. WINTER STORAGE CARE IMPORTANT: To avoid damage, install and store washer where it before moving during freezing weather, follow these instructions completely before beginning the routine cleaning processes recommended below . disconnect...
..., press START/Pause/Unlock once or twice (depending on model). Cleaning the Outside of more than is placed in the washer's dispensers. WINTER STORAGE CARE IMPORTANT: To avoid damage, install and store washer where it before moving during freezing weather, follow these instructions completely before beginning the routine cleaning processes recommended below . disconnect...
Use & Care Guide
Page 10
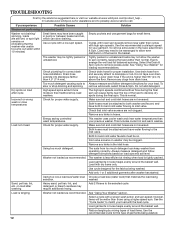
... avoid a service call for service to locate, level, and connect washer. 2. TROUBLESHOOTING First try the solutions suggested here or visit our website at www.whirlpool.com/product_help In Canada www.whirlpool.ca for assistance and to follow these instructions can result in contact with...snaps, buckles, or zippers touch against the basket. REINSTALLING/USING WASHER AGAIN To reinstall washer after you experience Possible Causes Solution Vibration or Off-Balance Check the following for proper installation or see "Using Your Washer" section. Flush water pipes and hoses. Turn on clothing ...
... avoid a service call for service to locate, level, and connect washer. 2. TROUBLESHOOTING First try the solutions suggested here or visit our website at www.whirlpool.com/product_help In Canada www.whirlpool.ca for assistance and to follow these instructions can result in contact with...snaps, buckles, or zippers touch against the basket. REINSTALLING/USING WASHER AGAIN To reinstall washer after you experience Possible Causes Solution Vibration or Off-Balance Check the following for proper installation or see "Using Your Washer" section. Flush water pipes and hoses. Turn on clothing ...
Use & Care Guide
Page 11
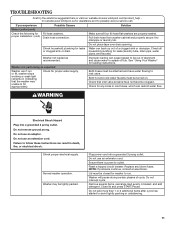
... evenly in inlet hoses, which can result in death, fire, or electrical shock. Pull drain hose from washer cabinet and properly secure it to outlet. WARNING Electrical Shock Hazard Plug into a grounded 3 prong outlet. Do...not use an extension cord. Do not use an adapter. Do not interrupt cycle. proper installation: (cont) Drain hose connection. Check that the washer was unable to splash off tub. Reset a tripped circuit breaker. Replace any kinks in...suggested here or visit our website at www.whirlpool.com/product_help In Canada www.whirlpool.ca for any blown fuses.
... evenly in inlet hoses, which can result in death, fire, or electrical shock. Pull drain hose from washer cabinet and properly secure it to outlet. WARNING Electrical Shock Hazard Plug into a grounded 3 prong outlet. Do...not use an extension cord. Do not use an adapter. Do not interrupt cycle. proper installation: (cont) Drain hose connection. Check that the washer was unable to splash off tub. Reset a tripped circuit breaker. Replace any kinks in...suggested here or visit our website at www.whirlpool.com/product_help In Canada www.whirlpool.ca for any blown fuses.
Use & Care Guide
Page 12
... the basket wall. The washer may be on load after washer has started. Evenly arrange the wet load for correct drain hose installation. Select the Drain & Spin cycle to possibly avoid a service call. See "Using Your Washer" for proper installation. Drain hose extends into standpipe... measure detergent and follow detergent directions for assistance and to remove excess water. Washer not loaded as recommended. The washer is less efficient at www.whirlpool.com/product_help In Canada www.whirlpool.ca for your garment. Load with a slower wash action and spin speed;...
... the basket wall. The washer may be on load after washer has started. Evenly arrange the wet load for correct drain hose installation. Select the Drain & Spin cycle to possibly avoid a service call. See "Using Your Washer" for proper installation. Drain hose extends into standpipe... measure detergent and follow detergent directions for assistance and to remove excess water. Washer not loaded as recommended. The washer is less efficient at www.whirlpool.com/product_help In Canada www.whirlpool.ca for your garment. Load with a slower wash action and spin speed;...


