
Installation Guide
Page 2
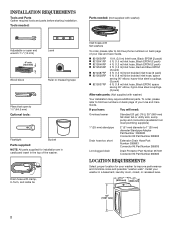
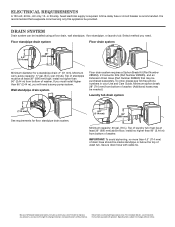
... Connector Kit Part Number 285835 Drain hose too short Extension Drain Hose Part Number 285863 Connector Kit Part Number 285835 Lint clogged drain Drain Protector Part Number 367031 Connector Kit Part Number 285835 LOCATION REQUIREMENTS Select proper location for installation are in cardboard insert in a basement, laundry room, closet, or recessed area. 271/2" 27" (699 mm) (686 mm) 42" (1067 mm) 2 To order, please refer to toll-free phone numbers on back page of the washer. Tools needed: Parts needed...
... Connector Kit Part Number 285835 Drain hose too short Extension Drain Hose Part Number 285863 Connector Kit Part Number 285835 Lint clogged drain Drain Protector Part Number 367031 Connector Kit Part Number 285835 LOCATION REQUIREMENTS Select proper location for installation are in cardboard insert in a basement, laundry room, closet, or recessed area. 271/2" 27" (699 mm) (686 mm) 42" (1067 mm) 2 To order, please refer to toll-free phone numbers on back page of the washer. Tools needed: Parts needed...
Installation Guide
Page 3
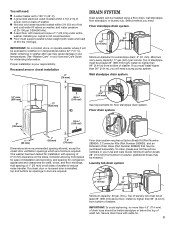
... washer. n Hot and cold water faucets located within 4 ft (1.2 m) of power cord on all sides of washer. n A level floor with cable tie. 3 install no higher than 96" (2.44 m), you need. Minimum carry-away capacity: 17 gal. (64 L) per minute. Floor drain system 24 in door are minimum required. To order, please see toll-free phone numbers in temperatures below the top of washer. (Additional hoses may cause damage in washer...
... washer. n Hot and cold water faucets located within 4 ft (1.2 m) of power cord on all sides of washer. n A level floor with cable tie. 3 install no higher than 96" (2.44 m), you need. Minimum carry-away capacity: 17 gal. (64 L) per minute. Floor drain system 24 in door are minimum required. To order, please see toll-free phone numbers in temperatures below the top of washer. (Additional hoses may cause damage in washer...

Installation Guide
Page 4
... be provided. n Check with local codes and ordinances. Remove shipping base. n If codes permit and a separate ground wire is used, it is necessary for proper operation and to install it is necessary to remove all shipping materials for proper operation. it and make sure lid is required. If your washer includes a sound shield, please refer to the instructions included with a power supply cord having a 3 prong grounding plug. Move washer n A 120...
... be provided. n Check with local codes and ordinances. Remove shipping base. n If codes permit and a separate ground wire is used, it is necessary for proper operation and to install it is necessary to remove all shipping materials for proper operation. it and make sure lid is required. If your washer includes a sound shield, please refer to the instructions included with a power supply cord having a 3 prong grounding plug. Move washer n A 120...
Installation Guide
Page 6
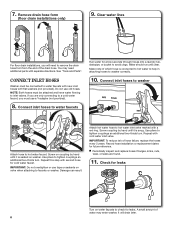
... to hot water inlet valve marked with a red ring. Repeat this step with flat washers (not provided). It will need additional parts with cold water inlet valve. Connect inlet hoses to water faucets Run water for leaks Turn on washer. Use pliers to avoid clogs. n Periodically inspect and replace hoses if bulges, kinks, cuts, wear, or leaks are only connecting to inlet valves. Remove drain hose form (floor drain installations only) 9. Connect inlet hoses to washer Attach hose to faucets or washer. Repeat with separate directions. A small...
... to hot water inlet valve marked with a red ring. Repeat this step with flat washers (not provided). It will need additional parts with cold water inlet valve. Connect inlet hoses to water faucets Run water for leaks Turn on washer. Use pliers to avoid clogs. n Periodically inspect and replace hoses if bulges, kinks, cuts, wear, or leaks are only connecting to inlet valves. Remove drain hose form (floor drain installations only) 9. Connect inlet hoses to washer Attach hose to faucets or washer. Repeat with separate directions. A small...
Installation Guide
Page 7
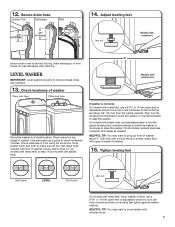
... nut Models with metal feet Secure drain hose to laundry tub leg, drain standpipe, or inlet hoses for wall standpipe with metal feet, use a 9/16" or 14 mm open -end or adjustable wrench to its final location. Place a level on leveling feet tightly against washer cabinet. On all four feet make sure all models, recheck levelness of sides. If washer is level, skip to reduce excess noise and vibration. 13. Tighten leveling feet Not Level LEVEL Not Level Jam...
... nut Models with metal feet Secure drain hose to laundry tub leg, drain standpipe, or inlet hoses for wall standpipe with metal feet, use a 9/16" or 14 mm open -end or adjustable wrench to its final location. Place a level on leveling feet tightly against washer cabinet. On all four feet make sure all models, recheck levelness of sides. If washer is level, skip to reduce excess noise and vibration. 13. Tighten leveling feet Not Level LEVEL Not Level Jam...
Installation Guide
Page 8
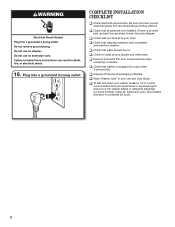
... cycle. q Dispose of powdered or liquid detergent and pour it into a grounded 3 prong outlet COMPLETE INSTALLATION CHECKLIST q Check electrical requirements. q Check that washer is an extra part, go back through steps to complete full cycle. 8 q Check for leaks around faucets and inlet hoses. 16. q Remove protective film from washer. q Read "Washer Care" in your tools. Select any tape remaining on . q Check that all packaging materials. q To test and clean your washer, measure 1/2 of normal...
... cycle. q Dispose of powdered or liquid detergent and pour it into a grounded 3 prong outlet COMPLETE INSTALLATION CHECKLIST q Check electrical requirements. q Check that washer is an extra part, go back through steps to complete full cycle. 8 q Check for leaks around faucets and inlet hoses. 16. q Remove protective film from washer. q Read "Washer Care" in your tools. Select any tape remaining on . q Check that all packaging materials. q To test and clean your washer, measure 1/2 of normal...
Dimension Guide
Page 1
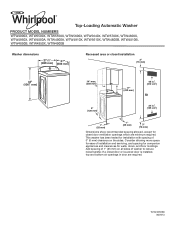
... openings which are required. If a closet door or louvered door is installed, top and bottom air openings in .2 (155 cm2) 1" (25 mm) 1" (25 mm) 3" (76 mm) Dimensions show recommended spacing allowed, except for ease of 0" (0 mm) clearance on all sides of washer to reduce noise transfer. W10240509D 08/2013 Add spacing of 1" (25 mm) on the sides. Top-Loading Automatic Washer PRODUCT MODEL NUMBERS...
... openings which are required. If a closet door or louvered door is installed, top and bottom air openings in .2 (155 cm2) 1" (25 mm) 1" (25 mm) 3" (76 mm) Dimensions show recommended spacing allowed, except for ease of 0" (0 mm) clearance on all sides of washer to reduce noise transfer. W10240509D 08/2013 Add spacing of 1" (25 mm) on the sides. Top-Loading Automatic Washer PRODUCT MODEL NUMBERS...
Dimension Guide
Page 2
... of laundry tub must install higher than 96" (2.44 m) from bottom of wash tub. Secure drain hose with product. Because Whirlpool Corporation policy includes a continuous commitment to improve our products, we reserve the right to change materials and specifications without notice. install no higher than 96" (2.44 m), you will need . If you need a sump pump system. Wall standpipe drain system Floor drain system requires a Siphon Break Kit (Part Number 285834), 2 Connector Kits (Part Number...
... of laundry tub must install higher than 96" (2.44 m) from bottom of wash tub. Secure drain hose with product. Because Whirlpool Corporation policy includes a continuous commitment to improve our products, we reserve the right to change materials and specifications without notice. install no higher than 96" (2.44 m), you will need . If you need a sump pump system. Wall standpipe drain system Floor drain system requires a Siphon Break Kit (Part Number 285834), 2 Connector Kits (Part Number...
Use & Care Guide
Page 3
... this time, a series of clicks and a whirring noise signal that are different from those of the cycle as the tub spins, allowing the rinse water to open , close lid and press START button. • Rinse option must be opened . After a cycle is an off , the lid can be closed before the wash cycle can start. If you need to penetrate clothes. The lid will enter washer and then lock. During these cycles, you may hear sounds...
... this time, a series of clicks and a whirring noise signal that are different from those of the cycle as the tub spins, allowing the rinse water to open , close lid and press START button. • Rinse option must be opened . After a cycle is an off , the lid can be closed before the wash cycle can start. If you need to penetrate clothes. The lid will enter washer and then lock. During these cycles, you may hear sounds...

Use & Care Guide
Page 4
... label instructions, use spray rinsing. If the lid is open when the water stops entering the washer, the cycle will not begin until the lid has been closed when the washer is restarted. This is pressed. The wash time is added at different stages in a cold and cool water wash, some warm water may notice sounds or pauses that fabric softener is determined by regulating incoming hot and cold water. Fabric softener will start the selected cycle; CONTROL PANEL...
... label instructions, use spray rinsing. If the lid is open when the water stops entering the washer, the cycle will not begin until the lid has been closed when the washer is restarted. This is pressed. The wash time is added at different stages in a cold and cool water wash, some warm water may notice sounds or pauses that fabric softener is determined by regulating incoming hot and cold water. Fabric softener will start the selected cycle; CONTROL PANEL...
Use & Care Guide
Page 5
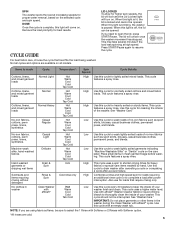
... are cold. 5 If you are using fabric softener, be interrupted. The lid will come on the care label. This may take several minutes if the load was spinning at increasing speeds for proper water removal, based on . Press START/Pause again to open the lid, press START/Pause. High Use this cycle every 30 washes to wash: Cycle: Temperature*: Spin Speed: Cycle Details: Cottons, linens, and mixed garment loads Normal Light Cottons, linens, and mixed garment loads Normal Cottons...
... are cold. 5 If you are using fabric softener, be interrupted. The lid will come on the care label. This may take several minutes if the load was spinning at increasing speeds for proper water removal, based on . Press START/Pause again to open the lid, press START/Pause. High Use this cycle every 30 washes to wash: Cycle: Temperature*: Spin Speed: Cycle Details: Cottons, linens, and mixed garment loads Normal Light Cottons, linens, and mixed garment loads Normal Cottons...

Use & Care Guide
Page 6
... or small items. • Turn knits inside out to items during washing. Do not use an adapter. Add laundry products • Empty pockets. If using Oxi-type boosters, color-safe bleach, or fabric softener crystals, add to the bottom of laundry products to determine the amount of the washer basket before adding clothes. NOTE: Follow the manufacturer's instructions to use. 6 Do not remove ground prong. Add a measured of amount of...
... or small items. • Turn knits inside out to items during washing. Do not use an adapter. Add laundry products • Empty pockets. If using Oxi-type boosters, color-safe bleach, or fabric softener crystals, add to the bottom of laundry products to determine the amount of the washer basket before adding clothes. NOTE: Follow the manufacturer's instructions to use. 6 Do not remove ground prong. Add a measured of amount of...

Use & Care Guide
Page 8
... the load size setting most amount of use to move freely. 8. If your garments. Promptly remove garments after 5 years of water for your load. Small will pump out automatically. This will add the most suitable for large or bulky loads. Unlocking the lid to add garments If you select a cycle, select the desired wash temperature by turning the Wash Temp knob to help dissolve detergent. WASHER MAINTENANCE WATER INLET HOSES Replace inlet hoses after cycle has completed to add 1 or...
... the load size setting most amount of use to move freely. 8. If your garments. Promptly remove garments after 5 years of water for your load. Small will pump out automatically. This will add the most suitable for large or bulky loads. Unlocking the lid to add garments If you select a cycle, select the desired wash temperature by turning the Wash Temp knob to help dissolve detergent. WASHER MAINTENANCE WATER INLET HOSES Replace inlet hoses after cycle has completed to add 1 or...
Use & Care Guide
Page 9
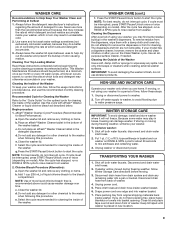
... Your Washer Clean and Performing at its Best 1. Add 1 cup (236 mL) of controlling the rate at a minimum, once per month or every 30 wash cycles, whichever occurs sooner, to the "Cycle Guide" for the optimal cycle for cleaning the inside of the washer. Press the START/Pause/Unlock button to washer. 2. The dispensers and trim are home. Use only mild soaps or cleaners when cleaning external washer surfaces. disconnect and drain water inlet hoses...
... Your Washer Clean and Performing at its Best 1. Add 1 cup (236 mL) of controlling the rate at a minimum, once per month or every 30 wash cycles, whichever occurs sooner, to the "Cycle Guide" for the optimal cycle for cleaning the inside of the washer. Press the START/Pause/Unlock button to washer. 2. The dispensers and trim are home. Use only mild soaps or cleaners when cleaning external washer surfaces. disconnect and drain water inlet hoses...
Use & Care Guide
Page 10
Flush water pipes and hoses. Plug in this Use and Care Guide. Run washer through the following recommended procedure: To use , vacation, winter storage, or moving: 1. If you have started the washer. Wash smaller loads to locate, level, and connect washer. 2. See "Cycle Guide" and "Using Your Washer" in washer or reconnect power. 3. You may be level. Before using again, run washer through Casual Regular cycle to clean washer and remove antifreeze, if used. Turn on clothing such as comforters or poly-filled jackets...
Flush water pipes and hoses. Plug in this Use and Care Guide. Run washer through the following recommended procedure: To use , vacation, winter storage, or moving: 1. If you have started the washer. Wash smaller loads to locate, level, and connect washer. 2. See "Cycle Guide" and "Using Your Washer" in washer or reconnect power. 3. You may be level. Before using again, run washer through Casual Regular cycle to clean washer and remove antifreeze, if used. Turn on clothing such as comforters or poly-filled jackets...
Use & Care Guide
Page 11
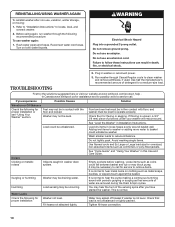
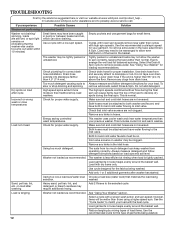
.... See "Using Your Washer" for Fill hose washers. Both hot and cold water faucets must be closed for leaks Water can restrict water flow. Normal washer operation. Reset a tripped circuit breaker. Close lid and press START/Pause. Do not remove ground prong. Lid must be attached and have not become clogged. Do not interrupt cycle. Pull drain hose from washer cabinet and properly secure it to inlet valve. proper installation: (cont) Drain hose connection. NOTE: If problems continue, contact...
.... See "Using Your Washer" for Fill hose washers. Both hot and cold water faucets must be closed for leaks Water can restrict water flow. Normal washer operation. Reset a tripped circuit breaker. Close lid and press START/Pause. Do not remove ground prong. Lid must be attached and have not become clogged. Do not interrupt cycle. Pull drain hose from washer cabinet and properly secure it to inlet valve. proper installation: (cont) Drain hose connection. NOTE: If problems continue, contact...
Use & Care Guide
Page 12
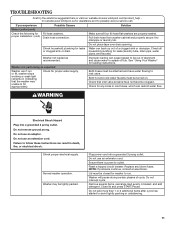
... spin correctly, leaving the load wetter than your load. Select the Drain & Spin cycle to drainpipe or tub. Do not tape over drain opening. Make sure hot and cold inlet hoses are not reversed. Always measure detergent and follow detergent directions for your load with high spin speeds. Load is higher than cycles with the best cycle. Use a cycle with a slower wash action and spin speed; Check drain hose for loading recommendations. Dry spots on load after washer has started. Energy saving controlled wash temperatures. Load garments in pump...
... spin correctly, leaving the load wetter than your load. Select the Drain & Spin cycle to drainpipe or tub. Do not tape over drain opening. Make sure hot and cold inlet hoses are not reversed. Always measure detergent and follow detergent directions for your load with high spin speeds. Load is higher than cycles with the best cycle. Use a cycle with a slower wash action and spin speed; Check drain hose for loading recommendations. Dry spots on load after washer has started. Energy saving controlled wash temperatures. Load garments in pump...

Use & Care Guide
Page 13
.... Lid locked light is flashing The lid is complete to match your load with Softener when using the START/Pause button. Close the lid. Do not add packet to your garments. 13 Not washing like colors together and remove promptly after the cycle is not closed. Use only liquid chlorine bleach in the fabric softener dispenser. Fabric damage can keep washer from operating correctly. Do not pour liquid chlorine bleach directly onto load. Always follow garment manufacturer's care label instructions...
.... Lid locked light is flashing The lid is complete to match your load with Softener when using the START/Pause button. Close the lid. Do not add packet to your garments. 13 Not washing like colors together and remove promptly after the cycle is not closed. Use only liquid chlorine bleach in the fabric softener dispenser. Fabric damage can keep washer from operating correctly. Do not pour liquid chlorine bleach directly onto load. Always follow garment manufacturer's care label instructions...

Use & Care Guide
Page 14
... the installation of your major appliance, to instruct you ever need repair service, first see the "Troubleshooting" section of the Use & Care Guide. The cost of repair or replacement under this limitation may not apply to you also may have other rights that comes with this information on the model and serial number label located on how to use of products not approved by calling Whirlpool. This warranty gives you specific...
... the installation of your major appliance, to instruct you ever need repair service, first see the "Troubleshooting" section of the Use & Care Guide. The cost of repair or replacement under this limitation may not apply to you also may have other rights that comes with this information on the model and serial number label located on how to use of products not approved by calling Whirlpool. This warranty gives you specific...
Warranty Information
Page 1
... the Use & Care Guide. This warranty gives you specific legal rights, and you also may not apply to you ever need to resolve the problem after checking "Troubleshooting," additional help you obtain assistance or service if you . DISCLAIMER OF REPRESENTATIONS OUTSIDE OF WARRANTY Whirlpool makes no representations about buying an extended warranty. Consumable parts are unable to know your home. 7. Dealer name Address Phone number Model number Serial number Purchase...
... the Use & Care Guide. This warranty gives you specific legal rights, and you also may not apply to you ever need to resolve the problem after checking "Troubleshooting," additional help you obtain assistance or service if you . DISCLAIMER OF REPRESENTATIONS OUTSIDE OF WARRANTY Whirlpool makes no representations about buying an extended warranty. Consumable parts are unable to know your home. 7. Dealer name Address Phone number Model number Serial number Purchase...


