
Installation Guide
Page 2
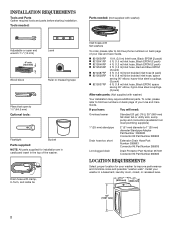
... EPDM, space saving 90° elbow, hypro-blue steel couplings (2 pack) Alternate parts: (Not supplied with flat washers To order, please refer to toll-free numbers on back page of the washer. If you have: You will need: Overhead sewer Standard 20 gal. (76 L) 39" (990 mm) tall drain...top of your Use and Care Guide. Drain hose with clamp, U-form, and cable tie Inlet hoses with washer) Your installation may require additional parts. Tools needed: Parts needed: (Not supplied with washer) Adjustable or open end wrench 9/16" (14 mm) 4" min (102 mm) Level Wood block Ruler or...
... EPDM, space saving 90° elbow, hypro-blue steel couplings (2 pack) Alternate parts: (Not supplied with flat washers To order, please refer to toll-free numbers on back page of the washer. If you have: You will need: Overhead sewer Standard 20 gal. (76 L) 39" (990 mm) tall drain...top of your Use and Care Guide. Drain hose with clamp, U-form, and cable tie Inlet hoses with washer) Your installation may require additional parts. Tools needed: Parts needed: (Not supplied with washer) Adjustable or open end wrench 9/16" (14 mm) 4" min (102 mm) Level Wood block Ruler or...
Installation Guide
Page 3
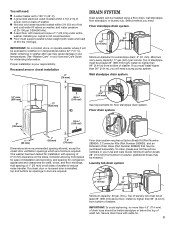
... door or louvered door is installed, top and bottom air openings in your Use and Care Guide. Top of laundry tub must support washer's total weight (with spacing of 315 lbs (143 kgs). n Floor must be installed using a floor drain, wall standpipe, floor standpipe, ...96" (2.44 m) from bottom of installation and servicing, and spacing for companion appliances and clearances for winterizing information. install no more space for ease of washer. (Additional hoses may cause damage in .2 (155 cm2) 1" (25 mm) 1" (25 mm) 3" (76 mm) Dimensions show recommended spacing allowed...
... door or louvered door is installed, top and bottom air openings in your Use and Care Guide. Top of laundry tub must support washer's total weight (with spacing of 315 lbs (143 kgs). n Floor must be installed using a floor drain, wall standpipe, floor standpipe, ...96" (2.44 m) from bottom of installation and servicing, and spacing for companion appliances and clearances for winterizing information. install no more space for ease of washer. (Additional hoses may cause damage in .2 (155 cm2) 1" (25 mm) 1" (25 mm) 3" (76 mm) Dimensions show recommended spacing allowed...

Installation Guide
Page 4
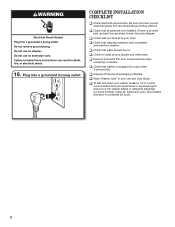
... at this appliance be plugged into a mating, 3 prong, grounding-type outlet, grounded in the neutral or ground circuit. 48" (1.2 m) Move washer to within 4 ft (1.2 m) of the customer to have a fuse in accordance with the sound shield to avoid excessive noise from shipping carton on... cardboard supports. Tip washer back and place on floor behind washer. IMPORTANT: Removing shipping base is recommended. n To minimize possible shock hazard, the cord must be in a fully ...
... at this appliance be plugged into a mating, 3 prong, grounding-type outlet, grounded in the neutral or ground circuit. 48" (1.2 m) Move washer to within 4 ft (1.2 m) of the customer to have a fuse in accordance with the sound shield to avoid excessive noise from shipping carton on... cardboard supports. Tip washer back and place on floor behind washer. IMPORTANT: Removing shipping base is recommended. n To minimize possible shock hazard, the cord must be in a fully ...
Installation Guide
Page 5
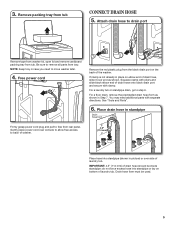
... For a floor drain, remove the preinstalled drain hose form as shown. do not force excess hose into standpipe (shown in place on bottom of the washer. 3. Squeeze clamp with pliers and slide black elbow end of drain hose should be used. 5 For a laundry tub or standpipe drain, go to drain... port Remove tape from washer lid, open lid and remove cardboard packing tray from tray. IMPORTANT: 4.5" (114 mm) of drain hose onto black drain port and secure with separate...
... For a floor drain, remove the preinstalled drain hose form as shown. do not force excess hose into standpipe (shown in place on bottom of the washer. 3. Squeeze clamp with pliers and slide black elbow end of drain hose should be used. 5 For a laundry tub or standpipe drain, go to drain... port Remove tape from washer lid, open lid and remove cardboard packing tray from tray. IMPORTANT: 4.5" (114 mm) of drain hose onto black drain port and secure with separate...
Installation Guide
Page 6
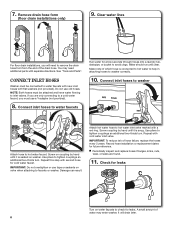
... to water faucets with new inlet hoses with second hose for a few seconds through hoses into a laundry tub, drainpipe, or bucket to washer correctly. 10. Attach hot water hose to hot water faucet. IMPORTANT: To reduce risk of which hose is connected to hot water to help... avoid clogs. It will need additional parts with cold water inlet valve. Do not use a Y-adapter (not provided). 8. Use pliers to faucets or washer. Remove drain hose form (floor drain installations only) 9. Clear water lines For floor drain installations, you must use old hoses. Water should run until...
... to water faucets with new inlet hoses with second hose for a few seconds through hoses into a laundry tub, drainpipe, or bucket to washer correctly. 10. Attach hot water hose to hot water faucet. IMPORTANT: To reduce risk of which hose is connected to hot water to help... avoid clogs. It will need additional parts with cold water inlet valve. Do not use a Y-adapter (not provided). 8. Use pliers to faucets or washer. Remove drain hose form (floor drain installations only) 9. Clear water lines For floor drain installations, you must use old hoses. Water should run until...
Installation Guide
Page 7
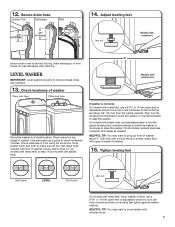
...114 mm) 4.5" (114 mm) 4.5" (1143 mm) Jam nut Models with metal feet Secure drain hose to reduce excess noise and vibration. 13. LEVEL WASHER IMPORTANT: Level washer properly to laundry tub leg, drain standpipe, or inlet hoses for wall standpipe with metal feet) or step 16 (on leveling feet tightly against...TIP: You may want to make solid contact with metal feet, use a 9/16" or 14 mm open -end or adjustable wrench to check levelness of washer. 15. Secure drain hose Laundry Tub Standpipe Wall 14. Place a level on feet until they are about 4" (102 mm) with wooden block. 7...
...114 mm) 4.5" (114 mm) 4.5" (1143 mm) Jam nut Models with metal feet Secure drain hose to reduce excess noise and vibration. 13. LEVEL WASHER IMPORTANT: Level washer properly to laundry tub leg, drain standpipe, or inlet hoses for wall standpipe with metal feet) or step 16 (on leveling feet tightly against...TIP: You may want to make solid contact with metal feet, use a 9/16" or 14 mm open -end or adjustable wrench to check levelness of washer. 15. Secure drain hose Laundry Tub Standpipe Wall 14. Place a level on feet until they are about 4" (102 mm) with wooden block. 7...
Installation Guide
Page 8
... 1/2 of normal recommended amount of your Use and Care Guide. Close lid. 16. q Read "Washer Care" in your tools. q Check that water faucets are now installed. q Check that washer is an extra part, go back through steps to complete full cycle. 8 q Dispose of/recycle all... recommended grounding method. If there is plugged into a grounded 3 prong outlet. q Check for leaks around faucets and inlet hoses. Start washer and allow to see what was skipped. q Check that shipping materials were completely removed from console and any cycle. Select any tape remaining...
... 1/2 of normal recommended amount of your Use and Care Guide. Close lid. 16. q Read "Washer Care" in your tools. q Check that water faucets are now installed. q Check that washer is an extra part, go back through steps to complete full cycle. 8 q Dispose of/recycle all... recommended grounding method. If there is plugged into a grounded 3 prong outlet. q Check for leaks around faucets and inlet hoses. Start washer and allow to see what was skipped. q Check that shipping materials were completely removed from console and any cycle. Select any tape remaining...
Dimension Guide
Page 1
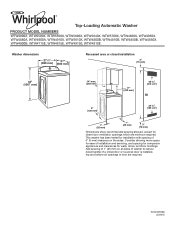
... spacing of 0" (0 mm) clearance on all sides of 1" (25 mm) on the sides. W10240509D 02/2015 Top-Loading Automatic Washer PRODUCT MODEL NUMBERS WTW4900X, WTW5500X, WTW5550X, WTW5600X, WTW5640X, WTW5700X, WTW4800X, WTW4950X, WTW4880A, WTW4900A, WTW4910X, WTW5610X, WTW4800B, WTW4810B, WTW4850B,... WTW4850X, WTW4900B, WTW4715E, WTW4815E, WTW4915E, WTW4810E Washer dimensions 271/2" 27" (699 mm) (686 mm) Recessed area or closet installation 3" (76 mm) 42" (1067 mm) 14" max. ...
... spacing of 0" (0 mm) clearance on all sides of 1" (25 mm) on the sides. W10240509D 02/2015 Top-Loading Automatic Washer PRODUCT MODEL NUMBERS WTW4900X, WTW5500X, WTW5550X, WTW5600X, WTW5640X, WTW5700X, WTW4800X, WTW4950X, WTW4880A, WTW4900A, WTW4910X, WTW5610X, WTW4800B, WTW4810B, WTW4850B,... WTW4850X, WTW4900B, WTW4715E, WTW4815E, WTW4915E, WTW4810E Washer dimensions 271/2" 27" (699 mm) (686 mm) Recessed area or closet installation 3" (76 mm) 42" (1067 mm) 14" max. ...
Dimension Guide
Page 2
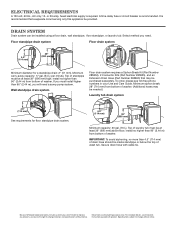
install no higher than 96" (2.44 m) from bottom of washer. Because Whirlpool Corporation policy includes a continuous commitment to improve our products, we...-free phone numbers in your Use and Care Guide. Minimum siphon break: 28" (710 mm) from bottom of washer. DRAIN SYSTEM Drain system can be at least 39" (990 mm) above floor; Minimum carry-away capacity: 17...you must install higher than 4.5" (114 mm) of drain hose should be inside standpipe or below the top of washer. (Additional hoses may be at least 39" (990 mm) high; IMPORTANT: To avoid siphoning, no higher than...
install no higher than 96" (2.44 m) from bottom of washer. Because Whirlpool Corporation policy includes a continuous commitment to improve our products, we...-free phone numbers in your Use and Care Guide. Minimum siphon break: 28" (710 mm) from bottom of washer. DRAIN SYSTEM Drain system can be at least 39" (990 mm) above floor; Minimum carry-away capacity: 17...you must install higher than 4.5" (114 mm) of drain hose should be inside standpipe or below the top of washer. (Additional hoses may be at least 39" (990 mm) high; IMPORTANT: To avoid siphoning, no higher than...
Energy Guide
Page 1
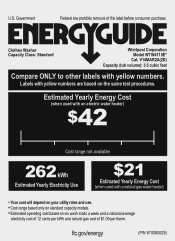
Labels with yellow numbers. Clothes Washer Capacity Class: Standard Whirlpool Corporation Model WTW4715E* Cat. ftc.gov/energy (P/N W10063025) U.S. Government Federal law prohibits removal of $1.09 per kWh and natural gas cost of this label before ...
Labels with yellow numbers. Clothes Washer Capacity Class: Standard Whirlpool Corporation Model WTW4715E* Cat. ftc.gov/energy (P/N W10063025) U.S. Government Federal law prohibits removal of $1.09 per kWh and natural gas cost of this label before ...


