
Installation Guide
Page 2
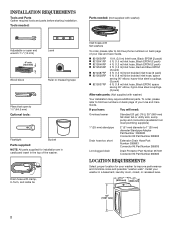
... your washer to toll-free numbers on back page of the washer. Drain hose with clamp, U-form, and cable tie Inlet hoses with flat washers To order, please refer to 1" (25 mm) diameter Standpipe Adapter Part Number 3363920 Connector Kit Part Number 285835 Drain hose too short Extension Drain Hose Part Number 285863 Connector Kit Part Number 285835 Lint clogged drain Drain Protector Part Number 367031 Connector Kit Part Number 285835 LOCATION REQUIREMENTS Select proper location for installation are in cardboard insert in a basement, laundry...
... your washer to toll-free numbers on back page of the washer. Drain hose with clamp, U-form, and cable tie Inlet hoses with flat washers To order, please refer to 1" (25 mm) diameter Standpipe Adapter Part Number 3363920 Connector Kit Part Number 285835 Drain hose too short Extension Drain Hose Part Number 285863 Connector Kit Part Number 285835 Lint clogged drain Drain Protector Part Number 367031 Connector Kit Part Number 285835 LOCATION REQUIREMENTS Select proper location for installation are in cardboard insert in a basement, laundry...
Installation Guide
Page 3
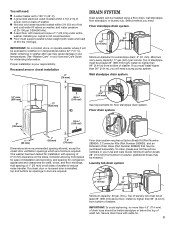
... of wash tub. Secure drain hose with spacing of 315 lbs (143 kgs). You will need a sump pump system. See "Washer Care" in temperatures below the top of installation and servicing, and spacing for companion appliances and clearances for a standpipe drain: 2" (51 mm). If you need. Consider allowing more than 96" (2.44 m), you will need : n A water heater set to 120° F (49° C). n A grounded electrical outlet located within...
... of wash tub. Secure drain hose with spacing of 315 lbs (143 kgs). You will need a sump pump system. See "Washer Care" in temperatures below the top of installation and servicing, and spacing for companion appliances and clearances for a standpipe drain: 2" (51 mm). If you need. Consider allowing more than 96" (2.44 m), you will need : n A water heater set to 120° F (49° C). n A grounded electrical outlet located within...

Installation Guide
Page 4
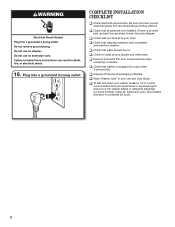
A time-delay fuse or circuit breaker is required. n This washer is equipped with the sound shield to install it at this appliance be plugged into a mating, 3 prong, grounding-type outlet, grounded in accordance with a qualified electrician if you start: remove shipping materials It is necessary to remove all shipping materials for proper operation. n If codes permit and a separate ground wire is used, it and make sure lid is...
A time-delay fuse or circuit breaker is required. n This washer is equipped with the sound shield to install it at this appliance be plugged into a mating, 3 prong, grounding-type outlet, grounded in accordance with a qualified electrician if you start: remove shipping materials It is necessary to remove all shipping materials for proper operation. n If codes permit and a separate ground wire is used, it and make sure lid is...
Installation Guide
Page 5
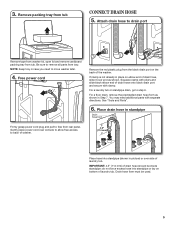
...) of drain hose onto black drain port and secure with separate directions. Attach drain hose to free from the black drain port on the back of drain hose, slide it over console to allow free access to remove all parts from tub CONNECT DRAIN HOSE 5. Free power cord Remove the red plastic plug from rear panel. Gently place power cord over end as shown in place on bottom of laundry tub. Be sure to back of washer...
...) of drain hose onto black drain port and secure with separate directions. Attach drain hose to free from the black drain port on the back of drain hose, slide it over console to allow free access to remove all parts from tub CONNECT DRAIN HOSE 5. Free power cord Remove the red plastic plug from rear panel. Gently place power cord over end as shown in place on bottom of laundry tub. Be sure to back of washer...
Installation Guide
Page 6
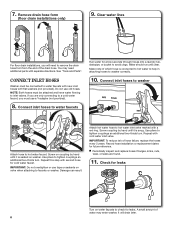
... water faucets Run water for a few seconds through hoses into a laundry tub, drainpipe, or bucket to water faucets with new inlet hoses with flat washers (not provided). Clear water lines For floor drain installations, you will drain later. 6 Connect inlet hoses to washer Attach hose to remove the drain hose form from the end of water may need to hot water faucet. Damage can result. A small amount of the drain hose. Make note of hose failure, replace the hoses every 5 years. Use...
... water faucets Run water for a few seconds through hoses into a laundry tub, drainpipe, or bucket to water faucets with new inlet hoses with flat washers (not provided). Clear water lines For floor drain installations, you will drain later. 6 Connect inlet hoses to washer Attach hose to remove the drain hose form from the end of water may need to hot water faucet. Damage can result. A small amount of the drain hose. Make note of hose failure, replace the hoses every 5 years. Use...
Installation Guide
Page 7
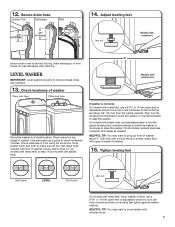
... support weight of washer about 1/2" (13 mm) from the washer cabinet. HELPFUL TIP: You may want to turn jam nuts clockwise on top edges of sides. HELPFUL TIP: You may want to make sure all models, recheck levelness of front using lid, as a guide to laundry tub leg, drain standpipe, or inlet hoses for wall standpipe with floor. Secure drain hose Laundry Tub Standpipe Wall 14. Place a level on feet...
... support weight of washer about 1/2" (13 mm) from the washer cabinet. HELPFUL TIP: You may want to turn jam nuts clockwise on top edges of sides. HELPFUL TIP: You may want to make sure all models, recheck levelness of front using lid, as a guide to laundry tub leg, drain standpipe, or inlet hoses for wall standpipe with floor. Secure drain hose Laundry Tub Standpipe Wall 14. Place a level on feet...
Installation Guide
Page 8
q Check that water faucets are now installed. q Check that all parts are on. q Check for leaks around faucets and inlet hoses. q Remove protective film from washer. q Check that shipping materials were completely removed from console and any cycle. Select any tape remaining on some models). If there is plugged into a grounded 3 prong outlet. q Read "Washer Care" in your tools. Plug into washer basket or detergent dispenser (on washer. Be sure you have correct electrical supply and...
q Check that water faucets are now installed. q Check that all parts are on. q Check for leaks around faucets and inlet hoses. q Remove protective film from washer. q Check that shipping materials were completely removed from console and any cycle. Select any tape remaining on some models). If there is plugged into a grounded 3 prong outlet. q Read "Washer Care" in your tools. Plug into washer basket or detergent dispenser (on washer. Be sure you have correct electrical supply and...
Dimension Guide
Page 1
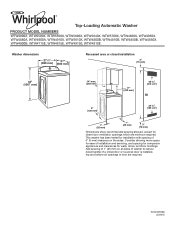
... for ease of installation and servicing, and spacing for companion appliances and clearances for closet door ventilation openings which are required. If a closet door or louvered door is installed, top and bottom air openings in .2 (155 cm2) 1" (25 mm) 1" (25 mm) 3" (76 mm) Dimensions show recommended spacing allowed, except for walls, doors, and floor moldings. Top-Loading Automatic Washer PRODUCT MODEL NUMBERS WTW4900X, WTW5500X, WTW5550X...
... for ease of installation and servicing, and spacing for companion appliances and clearances for closet door ventilation openings which are required. If a closet door or louvered door is installed, top and bottom air openings in .2 (155 cm2) 1" (25 mm) 1" (25 mm) 3" (76 mm) Dimensions show recommended spacing allowed, except for walls, doors, and floor moldings. Top-Loading Automatic Washer PRODUCT MODEL NUMBERS WTW4900X, WTW5500X, WTW5550X...
Dimension Guide
Page 2
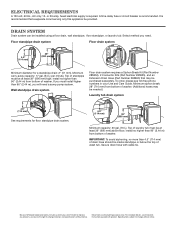
...; Because Whirlpool Corporation policy includes a continuous commitment to improve our products, we reserve the right to change materials and specifications without notice. Top of washer. Top of standpipe must install higher than 96" (2.44 m) from bottom of laundry tub must be installed using a floor drain, wall standpipe, floor standpipe, or laundry tub. Wall standpipe drain system Floor drain system requires a Siphon Break Kit (Part Number 285834), 2 Connector Kits (Part Number 285835...
...; Because Whirlpool Corporation policy includes a continuous commitment to improve our products, we reserve the right to change materials and specifications without notice. Top of washer. Top of standpipe must install higher than 96" (2.44 m) from bottom of laundry tub must be installed using a floor drain, wall standpipe, floor standpipe, or laundry tub. Wall standpipe drain system Floor drain system requires a Siphon Break Kit (Part Number 285834), 2 Connector Kits (Part Number 285835...

Energy Guide
Page 1
... available 262 kWh Estimated Yearly Electricity Use $21 Estimated Yearly Energy Cost (when used with a natural gas water heater) • Your cost will depend on your utility rates and use. • Cost range based only on standard capacity models. • Estimated operating cost based on the same test procedures. Clothes Washer Capacity Class: Standard Whirlpool Corporation Model WTW4715E* Cat. Labels with yellow numbers. V14MAR2A(2D) Capacity (tub volume): 3.5 cubic feet Compare ONLY to...
... available 262 kWh Estimated Yearly Electricity Use $21 Estimated Yearly Energy Cost (when used with a natural gas water heater) • Your cost will depend on your utility rates and use. • Cost range based only on standard capacity models. • Estimated operating cost based on the same test procedures. Clothes Washer Capacity Class: Standard Whirlpool Corporation Model WTW4715E* Cat. Labels with yellow numbers. V14MAR2A(2D) Capacity (tub volume): 3.5 cubic feet Compare ONLY to...


