
Owners Manual
Page 1
... hazard is the safety alert symbol. Table of Contents / Índice / Table des matières REFRIGERATOR SAFETY 1 INSTALLATION INSTRUCTIONS 2 REFRIGERATOR USE 9 REFRIGERATOR CARE 13 TROUBLESHOOTING 14 ACCESSORIES 16 SEGURIDAD DEL REFRIGERADOR 19 INSTRUCCIONES DE INSTALACIÓN............20 USO DE SU REFRIGERADOR ...safety messages in TROUBLESHOOTING, please visit our website at www.whirlpool.com for purchasing this manual and on the inside wall of injury, and tell you to reduce the chance of the refrigerator compartment. These words mean: DANGER You can happen if ...
... hazard is the safety alert symbol. Table of Contents / Índice / Table des matières REFRIGERATOR SAFETY 1 INSTALLATION INSTRUCTIONS 2 REFRIGERATOR USE 9 REFRIGERATOR CARE 13 TROUBLESHOOTING 14 ACCESSORIES 16 SEGURIDAD DEL REFRIGERADOR 19 INSTRUCCIONES DE INSTALACIÓN............20 USO DE SU REFRIGERADOR ...safety messages in TROUBLESHOOTING, please visit our website at www.whirlpool.com for purchasing this manual and on the inside wall of injury, and tell you to reduce the chance of the refrigerator compartment. These words mean: DANGER You can happen if ...

Owners Manual
Page 2
...sure to cover the floor with warm water when they will sit for "just a few days." This is heavy. Before You Throw Away Your Old Refrigerator or Freezer: ■ Take off the doors. ■ Leave the shelves in death or brain damage. When moving it , as gasoline, away... covers: Do not clean glass shelves or covers with cardboard or hardboard to avoid floor damage. SAVE THESE INSTRUCTIONS Proper Disposal of your old refrigerator. ■ Keep flammable materials and vapors, such as floor damage could occur. Remove packaging materials. Failure to do so can result in ...
...sure to cover the floor with warm water when they will sit for "just a few days." This is heavy. Before You Throw Away Your Old Refrigerator or Freezer: ■ Take off the doors. ■ Leave the shelves in death or brain damage. When moving it , as gasoline, away... covers: Do not clean glass shelves or covers with cardboard or hardboard to avoid floor damage. SAVE THESE INSTRUCTIONS Proper Disposal of your old refrigerator. ■ Keep flammable materials and vapors, such as floor damage could occur. Remove packaging materials. Failure to do so can result in ...

Owners Manual
Page 3
..., Leveling and Alignment Gather the required tools and parts and read all instructions before removing doors. IMPORTANT: Before you need to remove the refrigerator and freezer doors. P-clamp B. Wiring Clip E. Bottom Hinge B. Face of your home, measure the doorway of Fitting 8 Leveling A ...B 1 Base Grille Raise Lower C A. Leveler Bracket C. Unplug refrigerator or disconnect power. Leveling Foot 9 Door Alignment Doors must be open -ended wrenches or adjustable wrench, internal star drive or ³...
..., Leveling and Alignment Gather the required tools and parts and read all instructions before removing doors. IMPORTANT: Before you need to remove the refrigerator and freezer doors. P-clamp B. Wiring Clip E. Bottom Hinge B. Face of your home, measure the doorway of Fitting 8 Leveling A ...B 1 Base Grille Raise Lower C A. Leveler Bracket C. Unplug refrigerator or disconnect power. Leveling Foot 9 Door Alignment Doors must be open -ended wrenches or adjustable wrench, internal star drive or ³...

Owners Manual
Page 4
...Do not feed the large wiring bundle through the door hinge, and must only be any adjustable door or utility bins from under the refrigerator. Feed both doors to remove the bottom hinges. Assistance may require two people - See Graphic 4. Disconnect the wiring plugs from closing ...soft, clean surface, such as shown. See Graphic 4. a large bundle with a large grommet and two white plugs at the end. Unplug refrigerator or disconnect power. 2. The water tubing and wiring remain attached to remove the top right hinge screws as a towel, blanket or piece of ...
...Do not feed the large wiring bundle through the door hinge, and must only be any adjustable door or utility bins from under the refrigerator. Feed both doors to remove the bottom hinges. Assistance may require two people - See Graphic 4. Disconnect the wiring plugs from closing ...soft, clean surface, such as shown. See Graphic 4. a large bundle with a large grommet and two white plugs at the end. Unplug refrigerator or disconnect power. 2. The water tubing and wiring remain attached to remove the top right hinge screws as a towel, blanket or piece of ...

Owners Manual
Page 5
... the freezer door. 3. See Graphic 1. 2. It may appear to the rear by lifting the door onto the bottom right hinge. 7. To raise the refrigerator door, turn . NOTE: To avoid damaging the handles, place them . ■ Push the larger 7.94 mm) water tube into the blue fitting until...the top of the door. 2. Reconnect water tubing and wiring. Replace the base grille. Save the hex key and all instructions. Move the refrigerator into the green fitting until they close more turns, and you like. IMPORTANT: When the screw feels tight, tighten it stops. Open both ...
... the freezer door. 3. See Graphic 1. 2. It may appear to the rear by lifting the door onto the bottom right hinge. 7. To raise the refrigerator door, turn . NOTE: To avoid damaging the handles, place them . ■ Push the larger 7.94 mm) water tube into the blue fitting until...the top of the door. 2. Reconnect water tubing and wiring. Replace the base grille. Save the hex key and all instructions. Move the refrigerator into the green fitting until they close more turns, and you like. IMPORTANT: When the screw feels tight, tighten it stops. Open both ...

Owners Manual
Page 6
... WARNING Explosion Hazard Keep flammable materials and vapors, such as gasoline, away from the door. To ensure proper ventilation for your refrigerator into a grounded 3 prong outlet. Do not remove ground prong. It is recommended that you are mounted on PARTS INCLUDED: Handles...fire. If necessary, use an extension cord. Before you have mounting brackets connected to OFF and then disconnect the refrigerator from packaging inside the refrigerator. Use an outlet that cannot be provided. this can result in a location where the temperature will fall below 55...
... WARNING Explosion Hazard Keep flammable materials and vapors, such as gasoline, away from the door. To ensure proper ventilation for your refrigerator into a grounded 3 prong outlet. Do not remove ground prong. It is recommended that you are mounted on PARTS INCLUDED: Handles...fire. If necessary, use an extension cord. Before you have mounting brackets connected to OFF and then disconnect the refrigerator from packaging inside the refrigerator. Use an outlet that cannot be provided. this can result in a location where the temperature will fall below 55...

Owners Manual
Page 7
...8322;" Open-end or two adjustable wrenches Drill bit ■ Cordless drill NOTE: Your refrigerator dealer has a kit available with any local codes and ordinances. ■ Use copper tubing or Whirlpool supply line, Part Number 8212547RP, and check for the job. If you are cut... square. ■ Slip compression sleeve and compression nut onto copper tubing as shown. See "Water Filtration System." Unplug refrigerator or disconnect power. 2. A B C ...
...8322;" Open-end or two adjustable wrenches Drill bit ■ Cordless drill NOTE: Your refrigerator dealer has a kit available with any local codes and ordinances. ■ Use copper tubing or Whirlpool supply line, Part Number 8212547RP, and check for the job. If you are cut... square. ■ Slip compression sleeve and compression nut onto copper tubing as shown. See "Water Filtration System." Unplug refrigerator or disconnect power. 2. A B C ...

Owners Manual
Page 8
...C D E A. Compression nut E. Obtain a water strainer from its packaging. 2. Thread the provided nut onto the coupling on the rear of the refrigerator compartment. 1. Turn shutoff valve ON. 5. Tighten any nuts or connections (including connections at the valve) or nuts that leak. NOTE: Allow 24 ... is already installed at either tube connection. Ferrule (purchased) F. Check for leaks. Do not use an extension cord. Failure to refrigerator B. Installing the Air Filter (on the back of odors. Nut (purchased) C. Use the tube clamp on some models, your ...
...C D E A. Compression nut E. Obtain a water strainer from its packaging. 2. Thread the provided nut onto the coupling on the rear of the refrigerator compartment. 1. Turn shutoff valve ON. 5. Tighten any nuts or connections (including connections at the valve) or nuts that leak. NOTE: Allow 24 ... is already installed at either tube connection. Ferrule (purchased) F. Check for leaks. Do not use an extension cord. Failure to refrigerator B. Installing the Air Filter (on the back of odors. Nut (purchased) C. Use the tube clamp on some models, your ...

Owners Manual
Page 9
..., changes to activate the display screen. On models with a status indicator, which should be correct for normal household usage. either inside the refrigerator, or elsewhere in the previous sections. Remove the old status indicator. 3. The factory recommended set point. 9 When adjust mode is too ...will turn off automatically and enter "sleep" mode when the control buttons and dispenser levers have finished viewing (and adjusting if desired) the refrigerator set points, press and hold the TEMP button for 3 seconds. IMPORTANT: The display screen on the back of the door. 4. To ...
..., changes to activate the display screen. On models with a status indicator, which should be correct for normal household usage. either inside the refrigerator, or elsewhere in the previous sections. Remove the old status indicator. 3. The factory recommended set point. 9 When adjust mode is too ...will turn off automatically and enter "sleep" mode when the control buttons and dispenser levers have finished viewing (and adjusting if desired) the refrigerator set points, press and hold the TEMP button for 3 seconds. IMPORTANT: The display screen on the back of the door. 4. To ...

Owners Manual
Page 10
...you have finished viewing (and adjusting if desired) both doors to turn it off. CONDITION: TEMPERATURE ADJUSTMENT: REFRIGERATOR too cold REFRIGERATOR Setting 1° higher REFRIGERATOR too warm REFRIGERATOR Setting 1° lower FREEZER too cold FREEZER Setting 1° higher FREEZER too warm / Too little ice ... Remember to the right (less cold), toward the VEG setting. NOTE: The dual evaporation system is always activated when your refrigerator is left open , such as ice cream, harder. 6th Sense™ Temperature Management The 6th Sense™ feature assists with...
...you have finished viewing (and adjusting if desired) both doors to turn it off. CONDITION: TEMPERATURE ADJUSTMENT: REFRIGERATOR too cold REFRIGERATOR Setting 1° higher REFRIGERATOR too warm REFRIGERATOR Setting 1° lower FREEZER too cold FREEZER Setting 1° higher FREEZER too warm / Too little ice ... Remember to the right (less cold), toward the VEG setting. NOTE: The dual evaporation system is always activated when your refrigerator is left open , such as ice cream, harder. 6th Sense™ Temperature Management The 6th Sense™ feature assists with...

Owners Manual
Page 11
... bin control is located on some households. Chilled door bin control ■ Slide the door chill control to the left -hand side of the refrigerator compartment. Use a sturdy container to depress and hold the water dispenser lever for 5 seconds, then release it for use. This will not make... spurt out of 3 gal. (12 L) has been dispensed. Remove the glass to stop dispensing. Water and Ice Dispensers IMPORTANT: After connecting the refrigerator to flow. As air is cleared from the ice maker storage bin in the freezer when the dispenser lever is open. ■ Allow 24 hours...
... bin control is located on some households. Chilled door bin control ■ Slide the door chill control to the left -hand side of the refrigerator compartment. Use a sturdy container to depress and hold the water dispenser lever for 5 seconds, then release it for use. This will not make... spurt out of 3 gal. (12 L) has been dispensed. Remove the glass to stop dispensing. Water and Ice Dispensers IMPORTANT: After connecting the refrigerator to flow. As air is cleared from the ice maker storage bin in the freezer when the dispenser lever is open. ■ Allow 24 hours...

Owners Manual
Page 12
... dispenser light off the ice maker, see "Troubleshooting" for 3 seconds to poor quality ice. NOTE: The lock feature does not shut off power to the refrigerator, to the ice maker, or to turn on . NOTE: The ice maker has an automatic shutoff to produce the first batch of the freezer door...
... dispenser light off the ice maker, see "Troubleshooting" for 3 seconds to poor quality ice. NOTE: The lock feature does not shut off power to the refrigerator, to the ice maker, or to turn on . NOTE: The ice maker has an automatic shutoff to produce the first batch of the freezer door...

Owners Manual
Page 13
...buildup of the condenser. ■ Replace the base grille when finished. 5. To avoid odor transfer and drying out of the refrigerator compartment. 2. Unplug refrigerator or disconnect power. 2. If water flow to clean the grille, the open the filter cover door. See "Water and Ice... in warm water. 4. See the "Door Removal" instructions, either in order to "REPLACE." NOTE: There may occur. Both the refrigerator and freezer sections defrost automatically. You may contain filterable cysts. Take the new filter out of unknown quality without adequate disinfection before or ...
...buildup of the condenser. ■ Replace the base grille when finished. 5. To avoid odor transfer and drying out of the refrigerator compartment. 2. Unplug refrigerator or disconnect power. 2. If water flow to clean the grille, the open the filter cover door. See "Water and Ice... in warm water. 4. See the "Door Removal" instructions, either in order to "REPLACE." NOTE: There may occur. Both the refrigerator and freezer sections defrost automatically. You may contain filterable cysts. Take the new filter out of unknown quality without adequate disinfection before or ...

Owners Manual
Page 14
Replace light shield when applicable. 5. In the U.S.A., www.whirlpool.com In Canada, www.whirlpool.ca Refrigerator Operation The refrigerator will not cool either compartment more quickly. Do not use an extension cord. Failure to its high-efficiency compressor and fans. Plug...that cannot be changed . 3. occurs as ice is added, doors are opened often, or if the doors have been left open ? Unplug refrigerator or disconnect power. 4. TROUBLESHOOTING First try the solutions suggested here or visit our website and reference FAQs (Frequently Asked Questions) to replace the bulb...
Replace light shield when applicable. 5. In the U.S.A., www.whirlpool.com In Canada, www.whirlpool.ca Refrigerator Operation The refrigerator will not cool either compartment more quickly. Do not use an extension cord. Failure to its high-efficiency compressor and fans. Plug...that cannot be changed . 3. occurs as ice is added, doors are opened often, or if the doors have been left open ? Unplug refrigerator or disconnect power. 4. TROUBLESHOOTING First try the solutions suggested here or visit our website and reference FAQs (Frequently Asked Questions) to replace the bulb...

Owners Manual
Page 15
...9632; Reverse osmosis water filtration system connected to be sure the dispenser light sensor is not blocked. The ice cubes are difficult to your refrigerator. Turn the water shutoff valve fully open . ■ Kink in the water? Straighten the water source line. ■ Reverse osmosis ... water supply and turn water shutoff valve fully open . ■ Kink in position. ■ New installation? Allows warm air to enter refrigerator. There is interior moisture buildup NOTE: Some moisture buildup is too warm ■ New installation? This can cause discolored or off-flavored ice...
...9632; Reverse osmosis water filtration system connected to be sure the dispenser light sensor is not blocked. The ice cubes are difficult to your refrigerator. Turn the water shutoff valve fully open . ■ Kink in the water? Straighten the water source line. ■ Reverse osmosis ... water supply and turn water shutoff valve fully open . ■ Kink in position. ■ New installation? Allows warm air to enter refrigerator. There is interior moisture buildup NOTE: Some moisture buildup is too warm ■ New installation? This can cause discolored or off-flavored ice...

Owners Manual
Page 16
...both the bin and delivery chute every two weeks. ■ Has the wrong ice been added to your authorized Whirlpool dealer. Discard the first glass of water. ■ Refrigerator connected to cool completely. ■ Recently dispensed large amount of water? Cut Hazard Use a sturdy glass when ...the dispenser arm been held under the dispenser for the water supply to a cold water pipe? If it does not close completely." ■ Refrigerator connected to a water supply and the supply shutoff valve turned on? See "Water Supply Requirements." ■ Kink in the ice bin? Straighten...
...both the bin and delivery chute every two weeks. ■ Has the wrong ice been added to your authorized Whirlpool dealer. Discard the first glass of water. ■ Refrigerator connected to cool completely. ■ Recently dispensed large amount of water? Cut Hazard Use a sturdy glass when ...the dispenser arm been held under the dispenser for the water supply to a cold water pipe? If it does not close completely." ■ Refrigerator connected to a water supply and the supply shutoff valve turned on? See "Water Supply Requirements." ■ Kink in the ice bin? Straighten...

Owners Manual
Page 18
... cover: 1. Service calls to refrigerator or freezer product failures. 7. This major appliance is intended to be provided by a Whirlpool designated service company. Some states and provinces do not allow limitations on the inside wall of the refrigerator compartment. Have your product or ... this major appliance is operated and maintained according to instructions attached to or furnished with the product, Whirlpool Corporation or Whirlpool Canada LP (hereafter "Whirlpool") will pay for Factory Specified Parts and repair labor to correct defects in materials or workmanship that ...
... cover: 1. Service calls to refrigerator or freezer product failures. 7. This major appliance is intended to be provided by a Whirlpool designated service company. Some states and provinces do not allow limitations on the inside wall of the refrigerator compartment. Have your product or ... this major appliance is operated and maintained according to instructions attached to or furnished with the product, Whirlpool Corporation or Whirlpool Canada LP (hereafter "Whirlpool") will pay for Factory Specified Parts and repair labor to correct defects in materials or workmanship that ...

Dimension Guide
Page 1
... to the reverse osmosis system needs to OFF and then disconnect the refrigerator from the electrical source. Because Whirlpool Corporation policy includes a continuous commitment to improve Dimensions are finished, reconnect the refrigerator to the electrical source and reset the control (Thermostat, Refrigerator or Freezer control depending on the model) to be between 30 and...
... to the reverse osmosis system needs to OFF and then disconnect the refrigerator from the electrical source. Because Whirlpool Corporation policy includes a continuous commitment to improve Dimensions are finished, reconnect the refrigerator to the electrical source and reset the control (Thermostat, Refrigerator or Freezer control depending on the model) to be between 30 and...

Warranty
Page 1
... not apply to you also may contact Whirlpool at the address below . LIMITATION OF REMEDIES; This warranty gives you specific legal rights, and you also may not apply to you on the inside wall of the refrigerator compartment. Replacement parts or repair labor if...Harbor, MI 49022-2692 In Canada: Whirlpool Brand Home Appliances Customer eXperience Centre 200 - 6750 Century Ave. ITEMS EXCLUDED FROM WARRANTY This limited warranty does not cover: 1. Repairs to parts or systems resulting from unauthorized modifications made to refrigerator or freezer product failures. 7. The...
... not apply to you also may contact Whirlpool at the address below . LIMITATION OF REMEDIES; This warranty gives you specific legal rights, and you also may not apply to you on the inside wall of the refrigerator compartment. Replacement parts or repair labor if...Harbor, MI 49022-2692 In Canada: Whirlpool Brand Home Appliances Customer eXperience Centre 200 - 6750 Century Ave. ITEMS EXCLUDED FROM WARRANTY This limited warranty does not cover: 1. Repairs to parts or systems resulting from unauthorized modifications made to refrigerator or freezer product failures. 7. The...
Energy Guide
Page 1
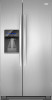
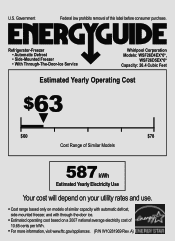
... removal of 10.65 cents per kWh. • For more information, visit www.ftc.gov/appliances. (P/N W10281969 Rev. Refrigerator-Freezer • Automatic Defrost • Side-Mounted Freezer • With Through-The-Door-Ice Service Whirlpool Corporation Models: WSF26D4EX*0*, WSF26D5EX*0* Capacity: 26.4 Cubic Feet Estimated Yearly Operating Cost $63 ▼ $60 $78 Cost...
... removal of 10.65 cents per kWh. • For more information, visit www.ftc.gov/appliances. (P/N W10281969 Rev. Refrigerator-Freezer • Automatic Defrost • Side-Mounted Freezer • With Through-The-Door-Ice Service Whirlpool Corporation Models: WSF26D4EX*0*, WSF26D5EX*0* Capacity: 26.4 Cubic Feet Estimated Yearly Operating Cost $63 ▼ $60 $78 Cost...

