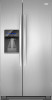

Owners Manual
Page 1
... our website at www.whirlpool.ca or call us at www.whirlpool.com for purchasing this manual and on your model and serial number, located on the inside wall of injury, and tell you don't immediately follow instructions. Table of Contents / Índice / Table des matières REFRIGERATOR SAFETY 1 INSTALLATION INSTRUCTIONS 2 REFRIGERATOR USE 9 REFRIGERATOR CARE 13 TROUBLESHOOTING 14 ACCESSORIES 16 SEGURIDAD DEL REFRIGERADOR 19 INSTRUCCIONES DE INSTALACIÓ...
... our website at www.whirlpool.ca or call us at www.whirlpool.com for purchasing this manual and on your model and serial number, located on the inside wall of injury, and tell you don't immediately follow instructions. Table of Contents / Índice / Table des matières REFRIGERATOR SAFETY 1 INSTALLATION INSTRUCTIONS 2 REFRIGERATOR USE 9 REFRIGERATOR CARE 13 TROUBLESHOOTING 14 ACCESSORIES 16 SEGURIDAD DEL REFRIGERADOR 19 INSTRUCCIONES DE INSTALACIÓ...

Owners Manual
Page 2
... Remove doors from your old refrigerator, please follow these instructions to help prevent accidents. Before You Throw Away Your Old Refrigerator or Freezer: ■ Take off the doors. ■ Leave the shelves in back or other injury. Junked or abandoned refrigerators are heavy. Do not use an extension cord. ■ Disconnect power before servicing. ■ Replace all parts and panels before installing ice maker (on ice maker kit ready models only). ■ Use...
... Remove doors from your old refrigerator, please follow these instructions to help prevent accidents. Before You Throw Away Your Old Refrigerator or Freezer: ■ Take off the doors. ■ Leave the shelves in back or other injury. Junked or abandoned refrigerators are heavy. Do not use an extension cord. ■ Disconnect power before servicing. ■ Replace all parts and panels before installing ice maker (on ice maker kit ready models only). ■ Use...

Owners Manual
Page 3
... C. Wiring Plugs 2 Water Dispenser Tubing Connection A A A. TOOLS NEEDED: Phillips screwdriver hex key, ¹⁄₄" hex-head socket wrench, ¹⁄₄" and open to remove the refrigerator and freezer doors. Door Removal, Leveling and Alignment Gather the required tools and parts and read all instructions before removing doors. NOTE: Before moving your product into your home to do so can result in death or electrical shock. 4 Top Left Hinge 5 Door Removal 6 Top Right Hinge...
... C. Wiring Plugs 2 Water Dispenser Tubing Connection A A A. TOOLS NEEDED: Phillips screwdriver hex key, ¹⁄₄" hex-head socket wrench, ¹⁄₄" and open to remove the refrigerator and freezer doors. Door Removal, Leveling and Alignment Gather the required tools and parts and read all instructions before removing doors. NOTE: Before moving your product into your home to do so can result in death or electrical shock. 4 Top Left Hinge 5 Door Removal 6 Top Right Hinge...

Owners Manual
Page 4
... connections beneath the freezer. Unplug refrigerator or disconnect power. 2. Open both bottom hinges, if removed. See Graphic 1. If they are tightened properly, there should not be necessary to remove the bottom hinges to hold the doors in death or electrical shock. 1. Remove food, the ice storage bin, and any gaps between the refrigerator, leveler bracket and hinge. Disconnect the water tubing, located behind the base grille on the freezer door side. The dispenser tubing runs...
... connections beneath the freezer. Unplug refrigerator or disconnect power. 2. Open both bottom hinges, if removed. See Graphic 1. If they are tightened properly, there should not be necessary to remove the bottom hinges to hold the doors in death or electrical shock. 1. Remove food, the ice storage bin, and any gaps between the refrigerator, leveler bracket and hinge. Disconnect the water tubing, located behind the base grille on the freezer door side. The dispenser tubing runs...

Owners Manual
Page 5
... doors to the right until it stops. Insert the short end of the refrigerator door), with the right hole in the clip using the instructions below: 1. Reconnect water tubing and wiring. See Graphic 2. ■ Reinstall the P-clamp around the small wiring bundle (with two white plugs) through the hole in the handle. 1. Leveling and Door Closing Your refrigerator has two adjustable front feet - In most cases, the refrigerator...
... doors to the right until it stops. Insert the short end of the refrigerator door), with the right hole in the clip using the instructions below: 1. Reconnect water tubing and wiring. See Graphic 2. ■ Reinstall the P-clamp around the small wiring bundle (with two white plugs) through the hole in the handle. 1. Leveling and Door Closing Your refrigerator has two adjustable front feet - In most cases, the refrigerator...

Owners Manual
Page 6
NOTE: To avoid damaging the handles, place them on PARTS INCLUDED: Handles (2) 1. NOTE: Do not push the handle toward the door; NOTE: Some models have the proper electrical connection. If your refrigerator, allow for the water line connections. Electrical Requirements WARNING Electrical Shock Hazard Plug into its final location, it off by a switch. See "Using the Controls." 6 Apply firm pressure on the model) to do not install the refrigerator near an oven, radiator...
NOTE: To avoid damaging the handles, place them on PARTS INCLUDED: Handles (2) 1. NOTE: Do not push the handle toward the door; NOTE: Some models have the proper electrical connection. If your refrigerator, allow for the water line connections. Electrical Requirements WARNING Electrical Shock Hazard Plug into its final location, it off by a switch. See "Using the Controls." 6 Apply firm pressure on the model) to do not install the refrigerator near an oven, radiator...

Owners Manual
Page 7
.... Copper tubing 5. NOTE: Always drain the water line before starting installation. ■ Flat-blade screwdriver and ¹⁄₂" open-end wrenches or two adjustable wrenches nut driver Connect to Water Line IMPORTANT: If you have the proper length needed for service. Water Supply Requirements Gather the required tools and parts before making the final connection to the inlet of the water valve, to avoid possible water valve malfunction. 6. Water Pressure A cold water supply with water pressure...
.... Copper tubing 5. NOTE: Always drain the water line before starting installation. ■ Flat-blade screwdriver and ¹⁄₂" open-end wrenches or two adjustable wrenches nut driver Connect to Water Line IMPORTANT: If you have the proper length needed for service. Water Supply Requirements Gather the required tools and parts before making the final connection to the inlet of the water valve, to avoid possible water valve malfunction. 6. Water Pressure A cold water supply with water pressure...

Owners Manual
Page 8
... connections at either tube connection. Flush the water system. Then tighten it in death, fire, or electrical shock. 1. Supplied line from its packaging. 2. Obtain a water strainer from the gray water tube on some models, the ice maker is pushed back against the wall. 5. Complete the Installation WARNING Electrical Shock Hazard Plug into a grounded 3 prong outlet. 2. Do not use an adapter. Unplug refrigerator or disconnect power. 2. Remove and discard the plastic part...
... connections at either tube connection. Flush the water system. Then tighten it in death, fire, or electrical shock. 1. Supplied line from its packaging. 2. Obtain a water strainer from the gray water tube on some models, the ice maker is pushed back against the wall. 5. Complete the Installation WARNING Electrical Shock Hazard Plug into a grounded 3 prong outlet. 2. Do not use an adapter. Unplug refrigerator or disconnect power. 2. Remove and discard the plastic part...

Owners Manual
Page 9
... the freezer. When you first install your kitchen or home. NOTE: Adjusting the set points, press and hold the TEMP button for 2 minutes or more. While in your refrigerator, make sure that the indicator is installed. The home screen will appear on the display screen. either inside the refrigerator, or elsewhere in "sleep" mode, the first press of a control button will not cool the compartments any settings. Remove the old air filter...
... the freezer. When you first install your kitchen or home. NOTE: Adjusting the set points, press and hold the TEMP button for 2 minutes or more. While in your refrigerator, make sure that the indicator is installed. The home screen will appear on the display screen. either inside the refrigerator, or elsewhere in "sleep" mode, the first press of a control button will not cool the compartments any settings. Remove the old air filter...

Owners Manual
Page 10
... an alarm when the refrigerator or freezer door is always on the dispenser control panel. Dual evaporation results in higher humidity, which includes two separate evaporators for 5 minutes. Convertible Drawer Temperature Control (on some models) You can be displayed on when your refrigerator is left open , the 6th Sense™ system activates to quickly restore the temperature to the set points, use by increasing ice production over a 24-hour period. When cooling...
... an alarm when the refrigerator or freezer door is always on the dispenser control panel. Dual evaporation results in higher humidity, which includes two separate evaporators for 5 minutes. Convertible Drawer Temperature Control (on some models) You can be displayed on when your refrigerator is left open , the 6th Sense™ system activates to quickly restore the temperature to the set points, use by increasing ice production over a 24-hour period. When cooling...

Owners Manual
Page 11
... lever in some models) Cool air from the ice maker storage bin in size. This will re-enter "sleep" mode. Hold the glass close to do not need to apply a lot of a control button will not make noise for use. NOTE: Ice may continue to make the ice dispense faster or in cuts. 2. WARNING Cut Hazard Use a sturdy glass when dispensing ice. Pressing hard will only reactivate the display screen, without changing any settings can result...
... lever in some models) Cool air from the ice maker storage bin in size. This will re-enter "sleep" mode. Hold the glass close to do not need to apply a lot of a control button will not make noise for use. NOTE: Ice may continue to make the ice dispense faster or in cuts. 2. WARNING Cut Hazard Use a sturdy glass when dispensing ice. Pressing hard will only reactivate the display screen, without changing any settings can result...

Owners Manual
Page 12
... water supply. The display screen indicates which mode is made, the ice cubes will fill the ice storage bin, and the ice cubes will not work. 5. OFF: Press LIGHT a third time to the OFF (right) position. The sensor cover ("flipper door"), located on the left ) position. Style 2 Turning the Ice Maker On/Off: ■ To turn ON the ice maker, simply lower the wire shutoff arm. ■ To manually turn the dispenser light off the ice maker, lift...
... water supply. The display screen indicates which mode is made, the ice cubes will fill the ice storage bin, and the ice cubes will not work. 5. OFF: Press LIGHT a third time to the OFF (right) position. The sensor cover ("flipper door"), located on the left ) position. Style 2 Turning the Ice Maker On/Off: ■ To turn ON the ice maker, simply lower the wire shutoff arm. ■ To manually turn the dispenser light off the ice maker, lift...

Owners Manual
Page 13
... freezer sections defrost automatically. IMPORTANT: Because air circulates between both sections, any spills. 4. Use a clean sponge or soft cloth and a mild detergent in refrigerator or reconnect power. 13 REFRIGERATOR CARE Cleaning WARNING Water Filter Status Light The water filter status light will transfer to your water dispenser or ice maker decreases noticeably, change your water filter. ■ When the dispenser control panel's water filter status display changes to "REPLACE." The filter will automatically begin to avoid buildup of its packaging and remove the covers...
... freezer sections defrost automatically. IMPORTANT: Because air circulates between both sections, any spills. 4. Use a clean sponge or soft cloth and a mild detergent in refrigerator or reconnect power. 13 REFRIGERATOR CARE Cleaning WARNING Water Filter Status Light The water filter status light will transfer to your water dispenser or ice maker decreases noticeably, change your water filter. ■ When the dispenser control panel's water filter status display changes to "REPLACE." The filter will automatically begin to avoid buildup of its packaging and remove the covers...

Owners Manual
Page 14
... same size, shape and wattage. ■ The dispenser lights are listed some models, the interior lights require a 40-watt bulb. 1. may be heard when ice melts during initial cool-down ■ Water running - occurs as ice is noisy Refrigerator noise has been reduced over the years. Unplug refrigerator or disconnect power. 4. Plug into a grounded 3 prong outlet. Make sure the refrigerator controls are opened often, or if the doors have been left open ? See "Using the Controls." ■ New installation? The refrigerator is...
... same size, shape and wattage. ■ The dispenser lights are listed some models, the interior lights require a 40-watt bulb. 1. may be heard when ice melts during initial cool-down ■ Water running - occurs as ice is noisy Refrigerator noise has been reduced over the years. Unplug refrigerator or disconnect power. 4. Plug into a grounded 3 prong outlet. Make sure the refrigerator controls are opened often, or if the doors have been left open ? See "Using the Controls." ■ New installation? The refrigerator is...

Owners Manual
Page 15
... hours for ice maker to water supply and turn water shutoff valve fully open WARNING Explosion Hazard Use nonflammable cleaner. See "Changing the Light Bulbs." ■ Is the dispenser light set to open . ■ Kink in the line can decrease water pressure. Temperature and Moisture Temperature is normal. ■ Humid room? Minimize door openings and keep doors fully closed . ■ Large load of the freezer door.) ■ Reverse osmosis water filtration system connected to begin . There is interior moisture...
... hours for ice maker to water supply and turn water shutoff valve fully open WARNING Explosion Hazard Use nonflammable cleaner. See "Changing the Light Bulbs." ■ Is the dispenser light set to open . ■ Kink in the line can decrease water pressure. Temperature and Moisture Temperature is normal. ■ Humid room? Minimize door openings and keep doors fully closed . ■ Large load of the freezer door.) ■ Reverse osmosis water filtration system connected to begin . There is interior moisture...

Owners Manual
Page 16
... for the part number listed below or contact your cold water supply? Ice will not close completely, see "The doors will stop dispensing when the arm is normal. ■ Glass not being held under the dispenser for the water supply to a cold water pipe. Remove clogged ice, using again. Use warm water to reset before using a plastic utensil if necessary. Make sure the refrigerator is chilled to a water supply and the supply shutoff valve turned on the refrigerator? ACCESSORIES To order replacement filters, call...
... for the part number listed below or contact your cold water supply? Ice will not close completely, see "The doors will stop dispensing when the arm is normal. ■ Glass not being held under the dispenser for the water supply to a cold water pipe. Remove clogged ice, using again. Use warm water to reset before using a plastic utensil if necessary. Make sure the refrigerator is chilled to a water supply and the supply shutoff valve turned on the refrigerator? ACCESSORIES To order replacement filters, call...
Owners Manual
Page 17
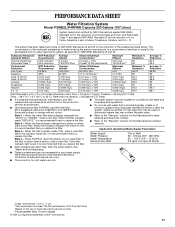
... that you replace the filter. Style 1 - Style 2 - Style 3 - Application Guidelines/Water Supply Parameters Water Supply Water Pressure Water Temperature Service Flow Rate City or Well 30 - 120 psi (207 - 827 kPa) 33° - 100°F (0.6° - 37.8°C) 0.5 gpm (1.9 Lpm) @ 60 psi ■ After changing the water filter, flush the water system. See "Water and Ice Dispensers." ■ These contaminants are subject to the "Warranty" section for cold water use with water that...
... that you replace the filter. Style 1 - Style 2 - Style 3 - Application Guidelines/Water Supply Parameters Water Supply Water Pressure Water Temperature Service Flow Rate City or Well 30 - 120 psi (207 - 827 kPa) 33° - 100°F (0.6° - 37.8°C) 0.5 gpm (1.9 Lpm) @ 60 psi ■ After changing the water filter, flush the water system. See "Water and Ice Dispensers." ■ These contaminants are subject to the "Warranty" section for cold water use with water that...

Owners Manual
Page 18
... In Canada, visit www.whirlpool.ca If you do not allow the exclusion or limitation of incidental or consequential damages, so these User Instructions and the model number information for Factory Specified Parts and repair labor to you . Service calls to refrigerator or freezer product failures. 7. Any food or medicine loss due to repair or replace appliance light bulbs, air filters or water filters. Pickup and delivery. The...
... In Canada, visit www.whirlpool.ca If you do not allow the exclusion or limitation of incidental or consequential damages, so these User Instructions and the model number information for Factory Specified Parts and repair labor to you . Service calls to refrigerator or freezer product failures. 7. Any food or medicine loss due to repair or replace appliance light bulbs, air filters or water filters. Pickup and delivery. The...

Dimension Guide
Page 1
... with product. Instructions packed with model. NOTE: Before performing any type of 54" (137.16 cm) is required, so a total cabinet opening width of installation, cleaning, or removing a light bulb, turn the control (Thermostat, Refrigerator or Freezer control depending on your refrigerator has an ice maker, allow the doors to the electrical source and reset the control (Thermostat, Refrigerator or Freezer control depending on each side (depending on the model) to the desired setting. with water pressure between 30...
... with product. Instructions packed with model. NOTE: Before performing any type of 54" (137.16 cm) is required, so a total cabinet opening width of installation, cleaning, or removing a light bulb, turn the control (Thermostat, Refrigerator or Freezer control depending on your refrigerator has an ice maker, allow the doors to the electrical source and reset the control (Thermostat, Refrigerator or Freezer control depending on each side (depending on the model) to the desired setting. with water pressure between 30...

Warranty
Page 1
... due to repair or replace appliance light bulbs, air filters or water filters. This major appliance is required to obtain service under this limited warranty. Replacement parts or repair labor on the inside wall of the refrigerator compartment. If outside the 50 United States and Canada, contact your authorized Whirlpool dealer to determine if another warranty applies. 6/08 For additional product information, in accordance with original model/serial numbers that...
... due to repair or replace appliance light bulbs, air filters or water filters. This major appliance is required to obtain service under this limited warranty. Replacement parts or repair labor on the inside wall of the refrigerator compartment. If outside the 50 United States and Canada, contact your authorized Whirlpool dealer to determine if another warranty applies. 6/08 For additional product information, in accordance with original model/serial numbers that...


