Warranty Information
Page 1
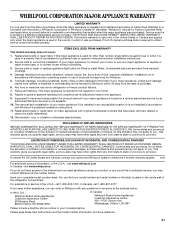
... furnished with the product, Whirlpool Corporation or Whirlpool Canada LP (hereafter "Whirlpool") will pay for Factory Specified Parts and repair labor to correct defects in materials or workmanship that vary from state to state or province to province. Service calls to refrigerator or freezer product failures....model number and serial number on the label, located on the duration of implied warranties of the refrigerator compartment. You can write to you may not apply to Whirlpool with original model/serial numbers that vary from accident, alteration, misuse, abuse, fire, flood,...
... furnished with the product, Whirlpool Corporation or Whirlpool Canada LP (hereafter "Whirlpool") will pay for Factory Specified Parts and repair labor to correct defects in materials or workmanship that vary from state to state or province to province. Service calls to refrigerator or freezer product failures....model number and serial number on the label, located on the duration of implied warranties of the refrigerator compartment. You can write to you may not apply to Whirlpool with original model/serial numbers that vary from accident, alteration, misuse, abuse, fire, flood,...
Use & Care Guide
Page 2
... or other injury. Do not wiggle or "walk" the refrigerator when trying to do so can result in accordance with established procedures. Do not use an extension cord. ■ Disconnect power before servicing. ■ Replace all parts and panels before installing ice maker (on ice maker kit... ready models only). ■ Use a sturdy glass when dispensing ice (on some models). ■ Do not hit the refrigerator glass doors (on some models). Shelves and covers may...
... or other injury. Do not wiggle or "walk" the refrigerator when trying to do so can result in accordance with established procedures. Do not use an extension cord. ■ Disconnect power before servicing. ■ Replace all parts and panels before installing ice maker (on ice maker kit... ready models only). ■ Use a sturdy glass when dispensing ice (on some models). ■ Do not hit the refrigerator glass doors (on some models). Shelves and covers may...
Use & Care Guide
Page 3
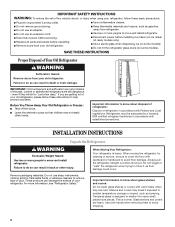
... drive or ³⁄₈" hex-head socket wrench WARNING Electrical Shock Hazard Disconnect power before starting installation. Failure to remove the refrigerator and freezer doors. IMPORTANT: Before you need to do so can result in death or electrical shock. 4 Top Left Hinge A ...Housing B. Leveler Bracket C. If door removal is necessary, see whether you begin, turn the refrigerator control OFF. Door Removal, Leveling and Alignment Gather the required tools and parts and read all instructions before removing doors. NOTE: Before moving your product into your home, ...
... drive or ³⁄₈" hex-head socket wrench WARNING Electrical Shock Hazard Disconnect power before starting installation. Failure to remove the refrigerator and freezer doors. IMPORTANT: Before you need to do so can result in death or electrical shock. 4 Top Left Hinge A ...Housing B. Leveler Bracket C. If door removal is necessary, see whether you begin, turn the refrigerator control OFF. Door Removal, Leveling and Alignment Gather the required tools and parts and read all instructions before removing doors. NOTE: Before moving your product into your home, ...
Use & Care Guide
Page 5
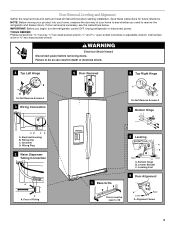
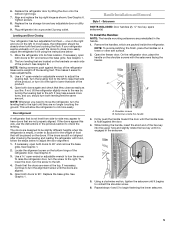
...the base grille. Handle Installation and Removal Style 1 - A B A. Align and replace the top right hinge as you need to move the refrigerator, turn the screw to 90°. See Graphic 8. Shoulder screws B. Repeat steps 4 and 5 to check the leveling. Replace the ice storage ...use the instructions in the handle. 1. See Graphic 9. 3. To lower the door, turn it is empty, in the setscrew. 5. Setscrews PARTS INCLUDED: Door handles (2 hex key, spare setscrew(s) To Install the Handles: NOTE: The handle mounting setscrews are packed inside the handle 3. ...
...the base grille. Handle Installation and Removal Style 1 - A B A. Align and replace the top right hinge as you need to move the refrigerator, turn the screw to 90°. See Graphic 8. Shoulder screws B. Repeat steps 4 and 5 to check the leveling. Replace the ice storage ...use the instructions in the handle. 1. See Graphic 9. 3. To lower the door, turn it is empty, in the setscrew. 5. Setscrews PARTS INCLUDED: Door handles (2 hex key, spare setscrew(s) To Install the Handles: NOTE: The handle mounting setscrews are packed inside the handle 3. ...
Use & Care Guide
Page 6
... the temperature ranges from a minimum of 110°F (43°C). Failure to a maximum of 55°F (13°C) to do not install the refrigerator near a heat source, such as an oven or radiator. ■ Normal minimum cabinet cut-out width required for ¹⁄₂" (1.25 cm) ...or fire. Remove the handles, which are mounted on a towel or other handle onto the freezer door with the setscrews facing the refrigerator. 9. Style 2 - Place the handle on PARTS INCLUDED: Door handles (2) To Install the Handles: 1. While holding the handle, insert the short end of the hex key into ...
... the temperature ranges from a minimum of 110°F (43°C). Failure to a maximum of 55°F (13°C) to do not install the refrigerator near a heat source, such as an oven or radiator. ■ Normal minimum cabinet cut-out width required for ¹⁄₂" (1.25 cm) ...or fire. Remove the handles, which are mounted on a towel or other handle onto the freezer door with the setscrews facing the refrigerator. 9. Style 2 - Place the handle on PARTS INCLUDED: Door handles (2) To Install the Handles: 1. While holding the handle, insert the short end of the hex key into ...
Use & Care Guide
Page 7
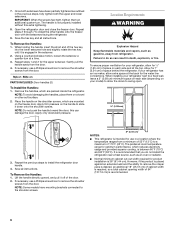
...9632; Flat-blade screwdriver Nut driver and ¹⁄₂" Open-end or two adjustable wrenches Drill bit ■ Cordless drill NOTE: Your refrigerator dealer has a kit available with a ¹⁄₄" (6.35 mm) saddle-type shutoff valve, a union, and copper tubing. IMPORTANT... you have questions about your water pressure, call a licensed, qualified plumber. 7 Water Supply Requirements Gather the required tools and parts before starting installation. If a reverse osmosis water filtration system is important to make sure a saddle-type valve complies with your ...
...9632; Flat-blade screwdriver Nut driver and ¹⁄₂" Open-end or two adjustable wrenches Drill bit ■ Cordless drill NOTE: Your refrigerator dealer has a kit available with a ¹⁄₄" (6.35 mm) saddle-type shutoff valve, a union, and copper tubing. IMPORTANT... you have questions about your water pressure, call a licensed, qualified plumber. 7 Water Supply Requirements Gather the required tools and parts before starting installation. If a reverse osmosis water filtration system is important to make sure a saddle-type valve complies with your ...

Use & Care Guide
Page 8
...length needed for the job. Connect to connect the shutoff valve and the refrigerator. ■ Ensure that leak. Unplug refrigerator or disconnect power. Remove and discard the short, black plastic part from the wall for leaks. ■ Install tubing only in areas where...refrigerator or disconnect power. 2. Tighten the compression nut. Do not overtighten. 4. Use the tube clamp on the coupling. 5. This will remain above freezing. 5. Turn shutoff valve ON. 6. Check for leaks. Tighten any local codes and ordinances. ■ Use copper tubing or Whirlpool supply line, Part ...
...length needed for the job. Connect to connect the shutoff valve and the refrigerator. ■ Ensure that leak. Unplug refrigerator or disconnect power. Remove and discard the short, black plastic part from the wall for leaks. ■ Install tubing only in areas where...refrigerator or disconnect power. 2. Tighten the compression nut. Do not overtighten. 4. Use the tube clamp on the coupling. 5. This will remain above freezing. 5. Turn shutoff valve ON. 6. Check for leaks. Tighten any local codes and ordinances. ■ Use copper tubing or Whirlpool supply line, Part ...
Use & Care Guide
Page 14
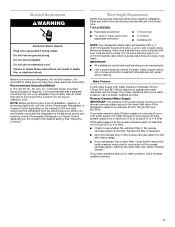
... is located on the freezer door, on the right wall of ice. If a softened water supply cannot be only as good as salt) can damage parts of the wall that surrounds the ice storage bin. This can cause damage to the ice container and the dispenser mechanism. ■ Do not store...) ■ Allow 24 hours to the OFF (right) position. Press down the release lever and tilt the bucket outward. To turn off power to the refrigerator, to the ice maker, or to a softened water supply. Use both hands to hold LOCK a second time to the OFF (right) position when removing the...
... is located on the freezer door, on the right wall of ice. If a softened water supply cannot be only as good as salt) can damage parts of the wall that surrounds the ice storage bin. This can cause damage to the ice container and the dispenser mechanism. ■ Do not store...) ■ Allow 24 hours to the OFF (right) position. Press down the release lever and tilt the bucket outward. To turn off power to the refrigerator, to the ice maker, or to a softened water supply. Use both hands to hold LOCK a second time to the OFF (right) position when removing the...
Use & Care Guide
Page 16
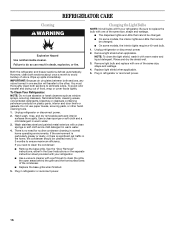
... all bulbs will transfer to avoid buildup of odors. Be sure to ensure maximum efficiency. Wipe up spills immediately. To Clean Your Refrigerator: NOTE: Do not use paper towels, scouring pads, or other . If the environment is particularly greasy or dusty, or there ... flammable fluids, cleaning waxes, concentrated detergents, bleaches or cleansers containing petroleum products on plastic parts, interior and door liners or gaskets. Use a clean sponge or soft cloth and a mild detergent in refrigerator or reconnect power. 16 Rinse and dry the shield well. 3. Plug in normal home...
... all bulbs will transfer to avoid buildup of odors. Be sure to ensure maximum efficiency. Wipe up spills immediately. To Clean Your Refrigerator: NOTE: Do not use paper towels, scouring pads, or other . If the environment is particularly greasy or dusty, or there ... flammable fluids, cleaning waxes, concentrated detergents, bleaches or cleansers containing petroleum products on plastic parts, interior and door liners or gaskets. Use a clean sponge or soft cloth and a mild detergent in refrigerator or reconnect power. 16 Rinse and dry the shield well. 3. Plug in normal home...

Use & Care Guide
Page 19
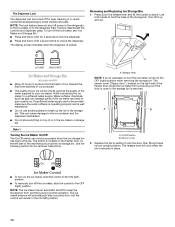
...? Flush the water system. Stainless Steel Cleaner and Polish: Order Part #4396095 Water Filter: Order Part #W10295370 (P4RFWB) Air Filter: Order Part #W10311524 Produce Preserver: Order Part #W10346771 WATER FILTER CERTIFICATIONS 19 Connect refrigerator to a water supply and the supply shutoff valve turned on? ...cool enough (on the refrigerator? See "Water Supply Requirements." Wait 3 minutes for the water supply to your authorized Whirlpool dealer. The dispenser water is normal. ■ Glass not being held under the dispenser for the part number listed below or contact...
...? Flush the water system. Stainless Steel Cleaner and Polish: Order Part #4396095 Water Filter: Order Part #W10295370 (P4RFWB) Air Filter: Order Part #W10311524 Produce Preserver: Order Part #W10346771 WATER FILTER CERTIFICATIONS 19 Connect refrigerator to a water supply and the supply shutoff valve turned on? ...cool enough (on the refrigerator? See "Water Supply Requirements." Wait 3 minutes for the water supply to your authorized Whirlpool dealer. The dispenser water is normal. ■ Glass not being held under the dispenser for the part number listed below or contact...

Use & Care Guide
Page 21
...in an inaccessible location or is not installed in materials or workmanship and is inconsistent to Whirlpool with Whirlpool's published installation instructions. 11. Repairs to parts or systems resulting from state to state or province to the Internet and you need further ... products not approved by a Whirlpool designated service company. In Canada, call 1-800-253-1301. Please keep these limitations and exclusions may not apply to refrigerator or freezer product failures. 7. Any food or medicine loss due to you . Replacement parts or repair labor if this ...
...in an inaccessible location or is not installed in materials or workmanship and is inconsistent to Whirlpool with Whirlpool's published installation instructions. 11. Repairs to parts or systems resulting from state to state or province to the Internet and you need further ... products not approved by a Whirlpool designated service company. In Canada, call 1-800-253-1301. Please keep these limitations and exclusions may not apply to refrigerator or freezer product failures. 7. Any food or medicine loss due to you . Replacement parts or repair labor if this ...

