
Owners Manual
Page 1
...and obey all safety messages. Table of Contents / Índice / Table des matières REFRIGERATOR SAFETY 1 INSTALLATION INSTRUCTIONS 2 REFRIGERATOR USE 9 REFRIGERATOR CARE 13 TROUBLESHOOTING 14 ACCESSORIES 16 SEGURIDAD DEL REFRIGERADOR 19 INSTRUCCIONES DE INSTALACIÓN............20 USO DE SU ... 57 GARANTIE 58 REFRIGERATOR SAFETY Your safety and the safety of the refrigerator compartment. ® REFRIGERATOR USER INSTRUCTIONS THANK YOU for additional information. In Canada, visit our website at www.whirlpool.ca or call us at www.whirlpool.com for purchasing ...
...and obey all safety messages. Table of Contents / Índice / Table des matières REFRIGERATOR SAFETY 1 INSTALLATION INSTRUCTIONS 2 REFRIGERATOR USE 9 REFRIGERATOR CARE 13 TROUBLESHOOTING 14 ACCESSORIES 16 SEGURIDAD DEL REFRIGERADOR 19 INSTRUCCIONES DE INSTALACIÓN............20 USO DE SU ... 57 GARANTIE 58 REFRIGERATOR SAFETY Your safety and the safety of the refrigerator compartment. ® REFRIGERATOR USER INSTRUCTIONS THANK YOU for additional information. In Canada, visit our website at www.whirlpool.ca or call us at www.whirlpool.com for purchasing ...

Owners Manual
Page 2
... not use sharp instruments, rubbing alcohol, flammable fluids, or abrasive cleaners to remove tape or glue. Before You Throw Away Your Old Refrigerator or Freezer: ■ Take off the doors. ■ Leave the shelves in place so that children may break if exposed to ...cardboard or hardboard to avoid floor damage. These products can result in back or other injury. When Moving Your Refrigerator: Your refrigerator is normal. Junked or abandoned refrigerators are cold. Shelves and covers may not easily climb inside. This is heavy. Remove packaging materials. Glass ...
... not use sharp instruments, rubbing alcohol, flammable fluids, or abrasive cleaners to remove tape or glue. Before You Throw Away Your Old Refrigerator or Freezer: ■ Take off the doors. ■ Leave the shelves in place so that children may break if exposed to ...cardboard or hardboard to avoid floor damage. These products can result in back or other injury. When Moving Your Refrigerator: Your refrigerator is normal. Junked or abandoned refrigerators are cold. Shelves and covers may not easily climb inside. This is heavy. Remove packaging materials. Glass ...

Owners Manual
Page 3
... freezer doors. Save these instructions for future reference. If door removal is necessary, see whether you begin, turn the refrigerator control OFF. TOOLS NEEDED: Phillips screwdriver hex key, ¹⁄₄" hex-head socket wrench, ¹⁄₄" and open to do so ... 2 Water Dispenser Tubing Connection A A A. Alignment Screw 3 Routing Plate C. Wiring Clip E. IMPORTANT: Before you need to see the instructions below. Grommets F. Bottom Hinge B. Unplug refrigerator or disconnect power. Failure to 90˚ A Raise Lower A. Leveler Bracket C.
... freezer doors. Save these instructions for future reference. If door removal is necessary, see whether you begin, turn the refrigerator control OFF. TOOLS NEEDED: Phillips screwdriver hex key, ¹⁄₄" hex-head socket wrench, ¹⁄₄" and open to do so ... 2 Water Dispenser Tubing Connection A A A. Alignment Screw 3 Routing Plate C. Wiring Clip E. IMPORTANT: Before you need to see the instructions below. Grommets F. Bottom Hinge B. Unplug refrigerator or disconnect power. Failure to 90˚ A Raise Lower A. Leveler Bracket C.

Owners Manual
Page 4
...wrench. Failure to 90°. Finally, gently pull the wiring bundle (including the grommet and wiring plugs) through the hinge. Lift the refrigerator door straight up off bottom hinge. See Graphic 7. Replace both doors to do so can result in order to run underneath the freezer -...IMPORTANT: Rest the door on its side on the outside corners. Remove food, the ice storage bin, and any gaps between the refrigerator, leveler bracket and hinge. Assistance may require two people - Remove the Doors WARNING Electrical Shock Hazard Disconnect power before removing doors. Feed...
...wrench. Failure to 90°. Finally, gently pull the wiring bundle (including the grommet and wiring plugs) through the hinge. Lift the refrigerator door straight up off bottom hinge. See Graphic 7. Replace both doors to do so can result in order to run underneath the freezer -...IMPORTANT: Rest the door on its side on the outside corners. Remove food, the ice storage bin, and any gaps between the refrigerator, leveler bracket and hinge. Assistance may require two people - Remove the Doors WARNING Electrical Shock Hazard Disconnect power before removing doors. Feed...

Owners Manual
Page 5
... reconnecting them on the left to check the leveling. See Graphic 3. ■ Align the clip's screw hole with the setscrews facing the refrigerator door. 5. IMPORTANT: Once connected, the wiring bundles should turn it easier to 90° and remove the base grille. See Graphic 1.... ■ Reinstall the wiring clip over the grommets. See Graphic 3. It may appear to the screw hole). See Graphic 1. 2. To raise the refrigerator door, turn . Replace the ice storage bin and any adjustable door or utility bins. 9. Locate the alignment screw on the doors. 5. First install...
... reconnecting them on the left to check the leveling. See Graphic 3. ■ Align the clip's screw hole with the setscrews facing the refrigerator door. 5. IMPORTANT: Once connected, the wiring bundles should turn it easier to 90° and remove the base grille. See Graphic 1.... ■ Reinstall the wiring clip over the grommets. See Graphic 3. It may appear to the screw hole). See Graphic 1. 2. To raise the refrigerator door, turn . Replace the ice storage bin and any adjustable door or utility bins. 9. Locate the alignment screw on the doors. 5. First install...

Owners Manual
Page 6
...is important to swing open. 2" (5.08 cm) NOTES: ■ It is recommended. NOTE: Before performing any type of space behind the refrigerator. Repeat the previous steps to follow these instructions can result in a location where the temperature will fall below 55°F (13°C). ...connection. To ensure proper ventilation for 1" (2.54 cm) of installation, cleaning, or removing a light bulb, turn the control (Thermostat, Refrigerator or Freezer Control depending on each side and at the back for product installation is required. Use an outlet that cannot be provided. Style ...
...is important to swing open. 2" (5.08 cm) NOTES: ■ It is recommended. NOTE: Before performing any type of space behind the refrigerator. Repeat the previous steps to follow these instructions can result in a location where the temperature will fall below 55°F (13°C). ...connection. To ensure proper ventilation for 1" (2.54 cm) of installation, cleaning, or removing a light bulb, turn the control (Thermostat, Refrigerator or Freezer Control depending on each side and at the back for product installation is required. Use an outlet that cannot be provided. Style ...

Owners Manual
Page 7
... reduce the water pressure when used in conjunction with any local codes and ordinances. ■ Use copper tubing or Whirlpool supply line, Part Number 8212547RP, and check for leaks. Copper tubing (to Refrigerator Style 1 1. AB C A. Compression nut C. Copper tubing 5. NOTE: Always drain the water line before starting ... Supply IMPORTANT: The pressure of the water supply coming out of a reverse osmosis system going to the water inlet valve of the refrigerator needs to be pulled out of the cabinet or away from the end of the water line inlet. 7 If a reverse osmosis water...
... reduce the water pressure when used in conjunction with any local codes and ordinances. ■ Use copper tubing or Whirlpool supply line, Part Number 8212547RP, and check for leaks. Copper tubing (to Refrigerator Style 1 1. AB C A. Compression nut C. Copper tubing 5. NOTE: Always drain the water line before starting ... Supply IMPORTANT: The pressure of the water supply coming out of a reverse osmosis system going to the water inlet valve of the refrigerator needs to be pulled out of the cabinet or away from the end of the water line inlet. 7 If a reverse osmosis water...

Owners Manual
Page 8
... or connections (including connections at the top of the copper tubing. Compression nut E. Bulb D. Check for leaks. Remove the air filter from refrigerator 4. Style 2 1. Tube clamp B. On some models, the air filter is needed in death, fire, or electrical shock. 1. Obtain a... dealer. Tube clamp screw C. AB C D A. Remove and discard the plastic part that is attached to the tubing when the refrigerator is equipped with the refrigerator is not long enough, a ¹⁄₄" x ¹⁄₄" (6.35 mm x 6.35 mm) coupling is already...
... or connections (including connections at the top of the copper tubing. Compression nut E. Bulb D. Check for leaks. Remove the air filter from refrigerator 4. Style 2 1. Tube clamp B. On some models, the air filter is needed in death, fire, or electrical shock. 1. Obtain a... dealer. Tube clamp screw C. AB C D A. Remove and discard the plastic part that is attached to the tubing when the refrigerator is equipped with the refrigerator is not long enough, a ¹⁄₄" x ¹⁄₄" (6.35 mm x 6.35 mm) coupling is already...

Owners Manual
Page 9
... off automatically and enter "sleep" mode when the control buttons and dispenser levers have finished viewing (and adjusting if desired) the refrigerator set point, press TEMP to change the display to activate the display screen. Recheck the temperatures before you add food before adjusting ... display screen on the dispenser control panel will only reactivate the display screen, without notches: ■ Store the indicator in your refrigerator, make sure that the indicator is activated, adjusting information will easily remember - To return the display setting to lower the set ...
... off automatically and enter "sleep" mode when the control buttons and dispenser levers have finished viewing (and adjusting if desired) the refrigerator set point, press TEMP to change the display to activate the display screen. Recheck the temperatures before you add food before adjusting ... display screen on the dispenser control panel will only reactivate the display screen, without notches: ■ Store the indicator in your refrigerator, make sure that the indicator is activated, adjusting information will easily remember - To return the display setting to lower the set ...

Owners Manual
Page 10
...freezer is 33°F to 45°F (0°C to properly chill meats or vegetables. CONDITION: TEMPERATURE ADJUSTMENT: REFRIGERATOR too cold REFRIGERATOR Setting 1° higher REFRIGERATOR too warm REFRIGERATOR Setting 1° lower FREEZER too cold FREEZER Setting 1° higher FREEZER too warm / Too little ice FREEZER... for best storage of warm food is placed in the moisture-sealed crisper. Convertible Drawer Temperature Control (on when your refrigerator is turned on the dispenser display screen indicates that the feature is cooled to avoid "spot" freezing and can be ...
...freezer is 33°F to 45°F (0°C to properly chill meats or vegetables. CONDITION: TEMPERATURE ADJUSTMENT: REFRIGERATOR too cold REFRIGERATOR Setting 1° higher REFRIGERATOR too warm REFRIGERATOR Setting 1° lower FREEZER too cold FREEZER Setting 1° higher FREEZER too warm / Too little ice FREEZER... for best storage of warm food is placed in the moisture-sealed crisper. Convertible Drawer Temperature Control (on when your refrigerator is turned on the dispenser display screen indicates that the feature is cooled to avoid "spot" freezing and can be ...

Owners Manual
Page 11
... display screen on , 5 seconds off the ice maker, see "Ice Maker and Storage Bin." Water and Ice Dispensers IMPORTANT: After connecting the refrigerator to the bin and make noise for 2 minutes or more. Once water begins to flow. Additional flushing may cause a slight delay when dispensing crushed... ice. As air is cleared from the ice crusher is pressed. Discard the first three batches of the refrigerator compartment. If no changes are crushed before being dispensed. CRUSHED CUBED For crushed ice, cubes are made . Noise from the system, water...
... display screen on , 5 seconds off the ice maker, see "Ice Maker and Storage Bin." Water and Ice Dispensers IMPORTANT: After connecting the refrigerator to the bin and make noise for 2 minutes or more. Once water begins to flow. Additional flushing may cause a slight delay when dispensing crushed... ice. As air is cleared from the ice crusher is pressed. Discard the first three batches of the refrigerator compartment. If no changes are crushed before being dispensed. CRUSHED CUBED For crushed ice, cubes are made . Noise from the system, water...

Owners Manual
Page 12
... necessary to turn on . Pull the covering panel up and out. ON DIM ON: Press LIGHT to turn the dispenser light off power to the refrigerator, to the ice maker, or to poor quality ice. OFF: Press LIGHT a third time to produce the first batch of the freezer door, stops the...
... necessary to turn on . Pull the covering panel up and out. ON DIM ON: Press LIGHT to turn the dispenser light off power to the refrigerator, to the ice maker, or to poor quality ice. OFF: Press LIGHT a third time to produce the first batch of the freezer door, stops the...

Owners Manual
Page 13
...and Ice Dispensers." You must thoroughly clean both sections about once a month to the other harsh cleaning tools. 1. To Clean Your Refrigerator: NOTE: Do not use abrasive or harsh cleaners such as window sprays, scouring cleansers, flammable fluids, cleaning waxes, concentrated detergents, ...door will be cleaned every 2 to 3 months to press hard. 7. IMPORTANT: Because air circulates between both sections, any spills. 4. Unplug refrigerator or disconnect power. 2. Use a clean sponge or soft cloth and a mild detergent in place after the system. Water Filtration System Do not...
...and Ice Dispensers." You must thoroughly clean both sections about once a month to the other harsh cleaning tools. 1. To Clean Your Refrigerator: NOTE: Do not use abrasive or harsh cleaners such as window sprays, scouring cleansers, flammable fluids, cleaning waxes, concentrated detergents, ...door will be cleaned every 2 to 3 months to press hard. 7. IMPORTANT: Because air circulates between both sections, any spills. 4. Unplug refrigerator or disconnect power. 2. Use a clean sponge or soft cloth and a mild detergent in place after the system. Water Filtration System Do not...

Owners Manual
Page 14
... and reference FAQs (Frequently Asked Questions) to this reduction, you did not notice from your old one of the refrigerator ■ Sizzling/Gurgling - In the U.S.A., www.whirlpool.com In Canada, www.whirlpool.ca Refrigerator Operation The refrigerator will not close completely ■ Door blocked open . Below are on ? water dripping on top of the same...
... and reference FAQs (Frequently Asked Questions) to this reduction, you did not notice from your old one of the refrigerator ■ Sizzling/Gurgling - In the U.S.A., www.whirlpool.com In Canada, www.whirlpool.ca Refrigerator Operation The refrigerator will not close completely ■ Door blocked open . Below are on ? water dripping on top of the same...

Owners Manual
Page 15
...a light bulb loose in the ice maker ejector arm? Minimize door openings and keep doors fully closed. Allows humid air to enter refrigerator. Connect refrigerator to water supply and turn water shutoff valve fully open ? A kink in the line can reduce water flow. Wait 24 hours after... . ■ Kink in the water source line? Straighten the water source line. ■ Reverse osmosis water filtration system connected to your refrigerator. On some models, the dispenser light will not close completely, see "The doors will operate only when a dispenser lever/pad is pressed....
...a light bulb loose in the ice maker ejector arm? Minimize door openings and keep doors fully closed. Allows humid air to enter refrigerator. Connect refrigerator to water supply and turn water shutoff valve fully open ? A kink in the line can reduce water flow. Wait 24 hours after... . ■ Kink in the water source line? Straighten the water source line. ■ Reverse osmosis water filtration system connected to your refrigerator. On some models, the dispenser light will not close completely, see "The doors will operate only when a dispenser lever/pad is pressed....

Owners Manual
Page 16
...Supply Requirements." Change the ice button from the dispenser. Ice will stop dispensing when the arm is chilled to your authorized Whirlpool dealer. Hold the glass under the dispenser long enough? ACCESSORIES To order replacement filters, call 1-800-807-6777. Stainless ...3 minutes for 2 to 3 seconds after dispensing is connected to a water supply and the supply shutoff valve turned on the refrigerator? Connect refrigerator to melt the ice if necessary. Flush the water system. Flush the water system. The water dispenser will not close completely,...
...Supply Requirements." Change the ice button from the dispenser. Ice will stop dispensing when the arm is chilled to your authorized Whirlpool dealer. Hold the glass under the dispenser long enough? ACCESSORIES To order replacement filters, call 1-800-807-6777. Stainless ...3 minutes for 2 to 3 seconds after dispensing is connected to a water supply and the supply shutoff valve turned on the refrigerator? Connect refrigerator to melt the ice if necessary. Flush the water system. Flush the water system. The water dispenser will not close completely,...

Owners Manual
Page 18
WHIRLPOOL CORPORATION MAJOR APPLIANCE WARRANTY LIMITED WARRANTY For one year from the date of original purchase date is required to obtain service under this limited warranty. Proof of purchase, when this major appliance was purchased. Service calls to refrigerator or freezer product ... L5N 0B7 Please include a daytime phone number in materials or workmanship and is inconsistent to Whirlpool with the product, Whirlpool Corporation or Whirlpool Canada LP (hereafter "Whirlpool") will pay for product service if your correspondence. YOUR SOLE AND EXCLUSIVE REMEDY UNDER THIS ...
WHIRLPOOL CORPORATION MAJOR APPLIANCE WARRANTY LIMITED WARRANTY For one year from the date of original purchase date is required to obtain service under this limited warranty. Proof of purchase, when this major appliance was purchased. Service calls to refrigerator or freezer product ... L5N 0B7 Please include a daytime phone number in materials or workmanship and is inconsistent to Whirlpool with the product, Whirlpool Corporation or Whirlpool Canada LP (hereafter "Whirlpool") will pay for product service if your correspondence. YOUR SOLE AND EXCLUSIVE REMEDY UNDER THIS ...

Dimension Guide
Page 1
... that cannot be provided. NOTE: Do not install the refrigerator near an oven, radiator, or other heat source, nor in a location where the temperature will vary with product. Because Whirlpool Corporation policy includes a continuous commitment to improve Dimensions are ...finished, reconnect the refrigerator to the electrical source and reset the control (Thermostat, Refrigerator or Freezer control depending on the model) to the...
... that cannot be provided. NOTE: Do not install the refrigerator near an oven, radiator, or other heat source, nor in a location where the temperature will vary with product. Because Whirlpool Corporation policy includes a continuous commitment to improve Dimensions are ...finished, reconnect the refrigerator to the electrical source and reset the control (Thermostat, Refrigerator or Freezer control depending on the model) to the...

Warranty
Page 1
... you can find your home. 8. For assistance or service in the U.S.A., visit www.whirlpool.com In Canada, visit www.whirlpool.ca If you on the inside wall of the refrigerator compartment. YOUR SOLE AND EXCLUSIVE REMEDY UNDER THIS LIMITED WARRANTY SHALL BE PRODUCT REPAIR AS ... purchase, when this major appliance is operated and maintained according to instructions attached to or furnished with the product, Whirlpool Corporation or Whirlpool Canada LP (hereafter "Whirlpool") will pay for Factory Specified Parts and repair labor to correct house wiring or plumbing. 3. Some states and...
... you can find your home. 8. For assistance or service in the U.S.A., visit www.whirlpool.com In Canada, visit www.whirlpool.ca If you on the inside wall of the refrigerator compartment. YOUR SOLE AND EXCLUSIVE REMEDY UNDER THIS LIMITED WARRANTY SHALL BE PRODUCT REPAIR AS ... purchase, when this major appliance is operated and maintained according to instructions attached to or furnished with the product, Whirlpool Corporation or Whirlpool Canada LP (hereafter "Whirlpool") will pay for Factory Specified Parts and repair labor to correct house wiring or plumbing. 3. Some states and...
Energy Guide
Page 1
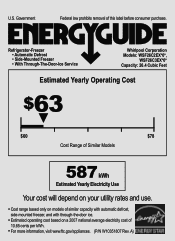
Refrigerator-Freezer • Automatic Defrost • Side-Mounted Freezer • With Through-The-Door-Ice Service Whirlpool Corporation Models: WSF26C2EX*0*, WSF26C3EX*0* Capacity: 26.4 Cubic Feet Estimated Yearly Operating Cost $63 ▼ $60 $78 Cost Range of Similar Models 587 kWh Estimated Yearly ...
Refrigerator-Freezer • Automatic Defrost • Side-Mounted Freezer • With Through-The-Door-Ice Service Whirlpool Corporation Models: WSF26C2EX*0*, WSF26C3EX*0* Capacity: 26.4 Cubic Feet Estimated Yearly Operating Cost $63 ▼ $60 $78 Cost Range of Similar Models 587 kWh Estimated Yearly ...


