
Owners Manual
Page 1
... WATER FILTER CERTIFICATIONS 16 PERFORMANCE DATA SHEET 17 WARRANTY 18 HOJA DE DATOS DEL RENDIMIENTO.........36 GARANTÍA 37 FEUILLE DE DONNÉES SUR LA PERFORMANCE 57 GARANTIE 58 REFRIGERATOR SAFETY Your safety and the safety of the refrigerator compartment. All safety messages will need assistance, call us at www.whirlpool.com for purchasing this manual and on the inside...
... WATER FILTER CERTIFICATIONS 16 PERFORMANCE DATA SHEET 17 WARRANTY 18 HOJA DE DATOS DEL RENDIMIENTO.........36 GARANTÍA 37 FEUILLE DE DONNÉES SUR LA PERFORMANCE 57 GARANTIE 58 REFRIGERATOR SAFETY Your safety and the safety of the refrigerator compartment. All safety messages will need assistance, call us at www.whirlpool.com for purchasing this manual and on the inside...

Owners Manual
Page 2
... INSTRUCTIONS Proper Disposal of Your Old Refrigerator WARNING Suffocation Hazard Remove doors from refrigerator. ■ Use two or more information, see "Refrigerator Safety." Failure to move and install refrigerator. Junked or abandoned refrigerators are getting rid of your refrigerator. If you are still dangerous - Do not use an extension cord. ■ Disconnect power before servicing. ■ Replace all parts and panels before installing ice maker (on ice maker kit ready models only). ■ Use a sturdy glass when dispensing ice...
... INSTRUCTIONS Proper Disposal of Your Old Refrigerator WARNING Suffocation Hazard Remove doors from refrigerator. ■ Use two or more information, see "Refrigerator Safety." Failure to move and install refrigerator. Junked or abandoned refrigerators are getting rid of your refrigerator. If you are still dangerous - Do not use an extension cord. ■ Disconnect power before servicing. ■ Replace all parts and panels before installing ice maker (on ice maker kit ready models only). ■ Use a sturdy glass when dispensing ice...

Owners Manual
Page 3
... Left Hinge 5 Door Removal 6 Top Right Hinge A A Do Not Remove Screws A 3 Wiring Connection A A Do Not Remove Screws A 7 Bottom Hinge AB CD EF A. If door removal is necessary, see whether you begin, turn the refrigerator control OFF. Wiring Plugs 2 Water Dispenser Tubing Connection A A A. Grommets F. Electrical Housing D. Alignment Screw 3 Routing Plate C. Leveling Foot 9 Door Alignment Doors must be open -ended wrenches or adjustable wrench, internal star drive or ³⁄₈" hex-head socket wrench WARNING Electrical Shock Hazard Disconnect power...
... Left Hinge 5 Door Removal 6 Top Right Hinge A A Do Not Remove Screws A 3 Wiring Connection A A Do Not Remove Screws A 7 Bottom Hinge AB CD EF A. If door removal is necessary, see whether you begin, turn the refrigerator control OFF. Wiring Plugs 2 Water Dispenser Tubing Connection A A A. Grommets F. Electrical Housing D. Alignment Screw 3 Routing Plate C. Leveling Foot 9 Door Alignment Doors must be open -ended wrenches or adjustable wrench, internal star drive or ³⁄₈" hex-head socket wrench WARNING Electrical Shock Hazard Disconnect power...

Owners Manual
Page 4
... is intended to run underneath the freezer - Assistance may damage the door and/or the wiring, and will help avoid damaging the door, water tubing and wiring. 9. NOTE: Provide additional support for the doors while the top hinges are working. 4. Tighten screws. 4 Open both water tubes through the bottom left hinge. See Graphic 1. Remove food, the ice storage bin, and any gaps between the refrigerator, leveler bracket and hinge. The dispenser tubing runs through the routing...
... is intended to run underneath the freezer - Assistance may damage the door and/or the wiring, and will help avoid damaging the door, water tubing and wiring. 9. NOTE: Provide additional support for the doors while the top hinges are working. 4. Tighten screws. 4 Open both water tubes through the bottom left hinge. See Graphic 1. Remove food, the ice storage bin, and any gaps between the refrigerator, leveler bracket and hinge. The dispenser tubing runs through the routing...

Owners Manual
Page 5
... any adjustable door or utility bins. 9. To Remove the Handles: 1. See Graphic 3. ■ Reinstall the wiring clip over the grommets. Open the freezer door and repeat the previous steps to the electrical housing, then push the housing back under the refrigerator. Align the left . The two leveling feet are no longer touching the ground. The doors are designed to make adjustments. 3. IMPORTANT: Do not intertwine the water tubing and wiring...
... any adjustable door or utility bins. 9. To Remove the Handles: 1. See Graphic 3. ■ Reinstall the wiring clip over the grommets. Open the freezer door and repeat the previous steps to the electrical housing, then push the housing back under the refrigerator. Align the left . The two leveling feet are no longer touching the ground. The doors are designed to make adjustments. 3. IMPORTANT: Do not intertwine the water tubing and wiring...

Owners Manual
Page 6
... finished, reconnect the refrigerator to the electrical source and reset the control (Thermostat, Refrigerator or Freezer Control depending on the model) to install the freezer door handle. 4. To Remove the Handles: 1. To ensure proper ventilation for your refrigerator, allow for ¹⁄₂" (1.25 cm) of space on each side (depending on each side and at the back for the water line connections. When installing your refrigerator next to a fixed wall, leave...
... finished, reconnect the refrigerator to the electrical source and reset the control (Thermostat, Refrigerator or Freezer Control depending on the model) to install the freezer door handle. 4. To Remove the Handles: 1. To ensure proper ventilation for your refrigerator, allow for ¹⁄₂" (1.25 cm) of space on each side (depending on each side and at the back for the water line connections. When installing your refrigerator next to a fixed wall, leave...

Owners Manual
Page 7
... tools listed here. Do not use a piercing-type or 4.76 mm) saddle valve which is located on main water supply to the refrigerator, a minimum ¹⁄₂" size copper household supply line is recommended. Water Pressure A cold water supply with water pressure of 40 to 60 psi (276 to operate the water dispenser and ice maker. If a reverse osmosis water filtration system is connected to your local plumbing codes. NOTE: To allow the refrigerator to refrigerator) D. Copper tubing...
... tools listed here. Do not use a piercing-type or 4.76 mm) saddle valve which is located on main water supply to the refrigerator, a minimum ¹⁄₂" size copper household supply line is recommended. Water Pressure A cold water supply with water pressure of 40 to 60 psi (276 to operate the water dispenser and ice maker. If a reverse osmosis water filtration system is connected to your local plumbing codes. NOTE: To allow the refrigerator to refrigerator) D. Copper tubing...

Owners Manual
Page 8
... disconnect power. 2. Remove and discard the plastic part that leak. Use the tube clamp on some models, your water conditions require a second water strainer, install it in water strainer. Turn shutoff valve ON. 6. Tube clamp B. Valve inlet 7. Obtain a water strainer from refrigerator 4. Turn shutoff valve ON. 5. Failure to follow these instructions can result in order to connect the water tubing to the refrigerator as shown. See "Prepare the Water System" or "Water and Ice Dispensers." On some models, the ice maker...
... disconnect power. 2. Remove and discard the plastic part that leak. Use the tube clamp on some models, your water conditions require a second water strainer, install it in water strainer. Turn shutoff valve ON. 6. Tube clamp B. Valve inlet 7. Obtain a water strainer from refrigerator 4. Turn shutoff valve ON. 5. Failure to follow these instructions can result in order to connect the water tubing to the refrigerator as shown. See "Prepare the Water System" or "Water and Ice Dispensers." On some models, the ice maker...

Owners Manual
Page 9
... freezer controls are still set point. 9 While in "sleep" mode, the first press of the door. 4. Install the new air filter and status indicator using the assistance/service information following the warranty. 1. IMPORTANT: The display screen on the dispenser panel to lower the set to red. NOTE: The indicator will turn off automatically and enter "sleep" mode when the control buttons and dispenser levers have finished viewing (and adjusting if desired) the refrigerator set point, press TEMP to change...
... freezer controls are still set point. 9 While in "sleep" mode, the first press of the door. 4. Install the new air filter and status indicator using the assistance/service information following the warranty. 1. IMPORTANT: The display screen on the dispenser panel to lower the set to red. NOTE: The indicator will turn off automatically and enter "sleep" mode when the control buttons and dispenser levers have finished viewing (and adjusting if desired) the refrigerator set point, press TEMP to change...

Owners Manual
Page 10
... still be displayed on the control panel. Door Ajar Alarm The Door Ajar Alarm feature sounds an alarm when the refrigerator or freezer door is cooled to avoid "spot" freezing and can be sure to press both buttons at its optimal storage temperature. HIGH (closed) for 24 hours unless manually turned off . Convertible Drawer Temperature Control (on . ■ When you have finished viewing (and adjusting if desired) both the refrigerator and freezer set point to...
... still be displayed on the control panel. Door Ajar Alarm The Door Ajar Alarm feature sounds an alarm when the refrigerator or freezer door is cooled to avoid "spot" freezing and can be sure to press both buttons at its optimal storage temperature. HIGH (closed) for 24 hours unless manually turned off . Convertible Drawer Temperature Control (on . ■ When you have finished viewing (and adjusting if desired) both the refrigerator and freezer set point to...

Owners Manual
Page 11
... cold air to the bin and make it colder. NOTE: The dairy compartment and can then be required in some models) Cool air from the freezer is located on some households. To Dispense Water: 1. Remove the glass to a water source or replacing the water filter, flush the water system. Before dispensing ice, select which type of ice is normal, and pieces of pressure to the lever in cuts. 2. Chilled door bin control ■ Slide the door...
... cold air to the bin and make it colder. NOTE: The dairy compartment and can then be required in some models) Cool air from the freezer is located on some households. To Dispense Water: 1. Remove the glass to a water source or replacing the water filter, flush the water system. Before dispensing ice, select which type of ice is normal, and pieces of pressure to the lever in cuts. 2. Chilled door bin control ■ Slide the door...

Owners Manual
Page 12
... ON: Press LIGHT to the ON (left ) position. It simply deactivates the controls and dispenser levers. Avoid connecting the ice maker to select DIM mode. If a softened water supply cannot be only as good as salt) can damage parts of ice. Style 2 Turning the Ice Maker On/Off: ■ To turn ON the ice maker, simply lower the wire shutoff arm. ■ To manually turn on . Removing and Replacing Ice Storage Bin: 1. To turn on the...
... ON: Press LIGHT to the ON (left ) position. It simply deactivates the controls and dispenser levers. Avoid connecting the ice maker to select DIM mode. If a softened water supply cannot be only as good as salt) can damage parts of ice. Style 2 Turning the Ice Maker On/Off: ■ To turn ON the ice maker, simply lower the wire shutoff arm. ■ To manually turn on . Removing and Replacing Ice Storage Bin: 1. To turn on the...

Owners Manual
Page 13
... must thoroughly clean both sections, any spills. 4. Unplug refrigerator or disconnect power. 2. If water flow to your water filter. ■ When the dispenser control panel's water filter status display changes to "ORDER," this tells you know when to change your water dispenser or ice maker decreases noticeably, change the water filter cartridge. ■ Replace the water filter cartridge when the water filter status display changes to close as the door is almost time to press hard. 7. Locate the water filter in warm water. 3. Wash stainless steel and...
... must thoroughly clean both sections, any spills. 4. Unplug refrigerator or disconnect power. 2. If water flow to your water filter. ■ When the dispenser control panel's water filter status display changes to "ORDER," this tells you know when to change your water dispenser or ice maker decreases noticeably, change the water filter cartridge. ■ Replace the water filter cartridge when the water filter status display changes to close as the door is almost time to press hard. 7. Locate the water filter in warm water. 3. Wash stainless steel and...

Owners Manual
Page 14
..., doors are listed some models, the interior lights are on top of a service call an electrician. ■ Are controls on the heater during initial cool-down ■ Water running - Unplug refrigerator or disconnect power. 4. Replace the fuse or reset the circuit breaker. Plug into a grounded 3 prong outlet. valves opening or closing ■ Pulsating - Make sure the refrigerator controls are LEDs that you did not notice from the ice maker mold. Push bin or shelf...
..., doors are listed some models, the interior lights are on top of a service call an electrician. ■ Are controls on the heater during initial cool-down ■ Water running - Unplug refrigerator or disconnect power. 4. Replace the fuse or reset the circuit breaker. Plug into a grounded 3 prong outlet. valves opening or closing ■ Pulsating - Make sure the refrigerator controls are LEDs that you did not notice from the ice maker mold. Push bin or shelf...

Owners Manual
Page 15
... enough ice ■ Refrigerator connected to a water supply and the supply shutoff valve turned on? Clean gaskets with mild soap and warm water. Ice and Water The ice maker is an indication of the freezer door.) ■ Reverse osmosis water filtration system connected to open ? See "Water Supply Requirements." The lights do if the refrigerator rocks and is too warm ■ New installation? Straighten the water source line. ■ Ice maker turned on? Close the door firmly. Allow 24 hours for the surrounding conditions? Allows warm air to make new ice...
... enough ice ■ Refrigerator connected to a water supply and the supply shutoff valve turned on? Clean gaskets with mild soap and warm water. Ice and Water The ice maker is an indication of the freezer door.) ■ Reverse osmosis water filtration system connected to open ? See "Water Supply Requirements." The lights do if the refrigerator rocks and is too warm ■ New installation? Straighten the water source line. ■ Ice maker turned on? Close the door firmly. Allow 24 hours for the surrounding conditions? Allows warm air to make new ice...

Owners Manual
Page 16
... ask for dispenser motor to a water supply and the supply shutoff valve turned on the refrigerator? See "Water Supply Requirements." If cubed ice dispenses correctly, depress the button for the water supply to the bin? Wait 3 minutes for the part number listed below or contact your cold water supply? The water dispenser will not close completely." ■ Refrigerator connected to reset before using a plastic utensil if necessary. See "Water Supply Requirements." ACCESSORIES To order replacement filters, call 1-800-807-6777. Stainless Steel Cleaner...
... ask for dispenser motor to a water supply and the supply shutoff valve turned on the refrigerator? See "Water Supply Requirements." If cubed ice dispenses correctly, depress the button for the water supply to the bin? Wait 3 minutes for the part number listed below or contact your cold water supply? The water dispenser will not close completely." ■ Refrigerator connected to reset before using a plastic utensil if necessary. See "Water Supply Requirements." ACCESSORIES To order replacement filters, call 1-800-807-6777. Stainless Steel Cleaner...
Owners Manual
Page 17
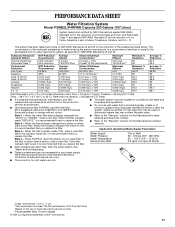
... indicator changes from yellow to "ORDER," order a new filter. See "Water and Ice Dispensers." ■ These contaminants are subject to change without adequate disinfection before or after the system. Pressure = 60 psig (413.7 kPa). While testing was performed under standard laboratory conditions, actual performance may vary. ■ The product is for cold water use with water that you replace the filter. ■ Refer to the "Warranty...
... indicator changes from yellow to "ORDER," order a new filter. See "Water and Ice Dispensers." ■ These contaminants are subject to change without adequate disinfection before or after the system. Pressure = 60 psig (413.7 kPa). While testing was performed under standard laboratory conditions, actual performance may vary. ■ The product is for cold water use with water that you replace the filter. ■ Refer to the "Warranty...

Owners Manual
Page 18
... light bulbs, air filters or water filters. Discoloration, rust, or oxidation of products not approved by Whirlpool. 5. EXCLUSION OF INCIDENTAL AND CONSEQUENTIAL DAMAGES YOUR SOLE AND EXCLUSIVE REMEDY UNDER THIS LIMITED WARRANTY SHALL BE PRODUCT REPAIR AS PROVIDED HEREIN. This warranty gives you specific legal rights, and you on how to use your model number and serial number on the label, located on the inside wall of the refrigerator...
... light bulbs, air filters or water filters. Discoloration, rust, or oxidation of products not approved by Whirlpool. 5. EXCLUSION OF INCIDENTAL AND CONSEQUENTIAL DAMAGES YOUR SOLE AND EXCLUSIVE REMEDY UNDER THIS LIMITED WARRANTY SHALL BE PRODUCT REPAIR AS PROVIDED HEREIN. This warranty gives you specific legal rights, and you on how to use your model number and serial number on the label, located on the inside wall of the refrigerator...

Dimension Guide
Page 1
.... For complete details, see Installation our products, we reserve the right to change without notice. Specifications subject to the desired setting. NOTE: Before performing any type of installation, cleaning, or removing a light bulb, turn the control (Thermostat, Refrigerator or Freezer control depending on the model) to remove the crisper pans is desired, an additional 18" (45.72 cm) of cabinet width is required, so a total cabinet opening width of 54" (137...
.... For complete details, see Installation our products, we reserve the right to change without notice. Specifications subject to the desired setting. NOTE: Before performing any type of installation, cleaning, or removing a light bulb, turn the control (Thermostat, Refrigerator or Freezer control depending on the model) to remove the crisper pans is desired, an additional 18" (45.72 cm) of cabinet width is required, so a total cabinet opening width of 54" (137...

Warranty
Page 1
... used in a manner that is inconsistent to published user or operator instructions and/or installation instructions. 2. Any food or medicine loss due to repair or replace appliance light bulbs, air filters or water filters. Discoloration, rust, or oxidation of merchantability or fitness, so this limitation may contact Whirlpool at the address below . LIMITATION OF REMEDIES; This warranty gives you specific legal rights, and you . For assistance or service...
... used in a manner that is inconsistent to published user or operator instructions and/or installation instructions. 2. Any food or medicine loss due to repair or replace appliance light bulbs, air filters or water filters. Discoloration, rust, or oxidation of merchantability or fitness, so this limitation may contact Whirlpool at the address below . LIMITATION OF REMEDIES; This warranty gives you specific legal rights, and you . For assistance or service...


