

Use & Care Guide
Page 1
... 65 ACCESSOIRES 67 FEUILLE DE DONNÉES SUR LA PERFORMANCE 68 GARANTIE 69 REFRIGERATOR SAFETY Your safety and the safety of the refrigerator compartment. Always read and obey all safety messages. In Canada, visit our website at www.whirlpool.ca or call us at 1-800-253-1301. If you should experience a problem...
... 65 ACCESSOIRES 67 FEUILLE DE DONNÉES SUR LA PERFORMANCE 68 GARANTIE 69 REFRIGERATOR SAFETY Your safety and the safety of the refrigerator compartment. Always read and obey all safety messages. In Canada, visit our website at www.whirlpool.ca or call us at 1-800-253-1301. If you should experience a problem...

Use & Care Guide
Page 2
...liquid dish soap over the adhesive with your fingers. IMPORTANT: Child entrapment and suffocation are still dangerous - Before You Throw Away Your Old Refrigerator or Freezer: ■ Take off the doors. ■ Leave the shelves in back or other injury. Failure to do so can result...instruments, rubbing alcohol, flammable fluids, or abrasive cleaners to remove tape or glue. Rub a small amount of your old refrigerator. Do not wiggle or "walk" the refrigerator when trying to move it . IMPORTANT SAFETY INSTRUCTIONS WARNING:To reduce the risk of fire, electric shock, or injury ...
...liquid dish soap over the adhesive with your fingers. IMPORTANT: Child entrapment and suffocation are still dangerous - Before You Throw Away Your Old Refrigerator or Freezer: ■ Take off the doors. ■ Leave the shelves in back or other injury. Failure to do so can result...instruments, rubbing alcohol, flammable fluids, or abrasive cleaners to remove tape or glue. Rub a small amount of your old refrigerator. Do not wiggle or "walk" the refrigerator when trying to move it . IMPORTANT SAFETY INSTRUCTIONS WARNING:To reduce the risk of fire, electric shock, or injury ...

Use & Care Guide
Page 3
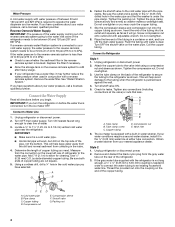
...information to know about glass shelves and covers: Do not clean glass shelves or covers with your local plumbing codes. If your refrigerator into many small, pebble-size pieces. The preferred room temperature range for optimum performance, which reduces water flow and clogs more )... Using After you do so can result in death, fire, or electrical shock. Glass shelves and covers are finished, reconnect the refrigerator to make sure a saddle-type valve complies with warm water when they are cold. Location Requirements WARNING Explosion Hazard Keep flammable materials...
...information to know about glass shelves and covers: Do not clean glass shelves or covers with your local plumbing codes. If your refrigerator into many small, pebble-size pieces. The preferred room temperature range for optimum performance, which reduces water flow and clogs more )... Using After you do so can result in death, fire, or electrical shock. Glass shelves and covers are finished, reconnect the refrigerator to make sure a saddle-type valve complies with warm water when they are cold. Location Requirements WARNING Explosion Hazard Keep flammable materials...
Use & Care Guide
Page 4
...against the wall. 4. Do not overtighten or you begin. Flush the tubing until water is blocked. Coil the copper tubing. Unplug refrigerator or disconnect power. 2. Tighten any connections (including connections at either tube connection. Tube clamp B. Obtain a water strainer from the.... Do not overtighten. 3. If you need. A B C D E A. Connect to 3.18 cm) vertical cold water pipe near the refrigerator. Tighten the compression nut. The ice maker is needed in the reverse osmosis system is clear. Pipe clamp C. Tighten the packing nut. Connect...
...against the wall. 4. Do not overtighten or you begin. Flush the tubing until water is blocked. Coil the copper tubing. Unplug refrigerator or disconnect power. 2. Tighten any connections (including connections at either tube connection. Tube clamp B. Obtain a water strainer from the.... Do not overtighten. 3. If you need. A B C D E A. Connect to 3.18 cm) vertical cold water pipe near the refrigerator. Tighten the compression nut. The ice maker is needed in the reverse osmosis system is clear. Pipe clamp C. Tighten the packing nut. Connect...

Use & Care Guide
Page 5
... onto the water valve as shown. Turn shutoff valve ON. 5. Do not use an adapter. Plug into a grounded 3 prong outlet. Open the refrigerator door and remove the base grille from doors. ■ Depending on the rear of ice. NOTE: Tighten the nut by hand. Style 1 - ...wrench two more turns. Do not overtighten. A B A. Check for leaks. Tighten any adjustable door or utility bins from the bottom front of the refrigerator. Electrical Shock Hazard Plug into a grounded 3 prong outlet. 2. Do not remove ground prong. See "Water Dispenser." NOTE: Allow 24 hours to...
... onto the water valve as shown. Turn shutoff valve ON. 5. Do not use an adapter. Plug into a grounded 3 prong outlet. Open the refrigerator door and remove the base grille from doors. ■ Depending on the rear of ice. NOTE: Tighten the nut by hand. Style 1 - ...wrench two more turns. Do not overtighten. A B A. Check for leaks. Tighten any adjustable door or utility bins from the bottom front of the refrigerator. Electrical Shock Hazard Plug into a grounded 3 prong outlet. 2. Do not remove ground prong. See "Water Dispenser." NOTE: Allow 24 hours to...

Use & Care Guide
Page 6
... as shown. IMPORTANT: Do not intertwine the water tubing and wiring bundles when reconnecting them free from the bottom front of the refrigerator door. 3. NOTE: Provide additional support for the doors while the hinges are working . 4. Disconnect the water dispenser tubing located behind.... 3. Replace the Doors and Hinges NOTE: Provide additional support for the doors while the hinges are in Top Hinge graphic. Lift the refrigerator door free from the cabinet. 5. Tighten screws. See Base Grille graphic. 6 NOTE: On some models, remove both the bottom hinge...
... as shown. IMPORTANT: Do not intertwine the water tubing and wiring bundles when reconnecting them free from the bottom front of the refrigerator door. 3. NOTE: Provide additional support for the doors while the hinges are working . 4. Disconnect the water dispenser tubing located behind.... 3. Replace the Doors and Hinges NOTE: Provide additional support for the doors while the hinges are in Top Hinge graphic. Lift the refrigerator door free from the cabinet. 5. Tighten screws. See Base Grille graphic. 6 NOTE: On some models, remove both the bottom hinge...

Use & Care Guide
Page 9
...installed. Additional leveling leg 4. Place the indicator face-down on either the rear or left interior wall near the top of the refrigerator compartment. 1. It may take several turns of the leveling screws to the left . If your doors looks uneven, you like and... the top hinge screws using a socket or wrench. 3. Snap the filter into the cabinet to lower that they close easier, adjust the refrigerator's tilt using the following instructions: 1. Install Manual Air Filter Status Indicator The filter comes with American Disabilities Act (ADA) guidelines, fully retract...
...installed. Additional leveling leg 4. Place the indicator face-down on either the rear or left interior wall near the top of the refrigerator compartment. 1. It may take several turns of the leveling screws to the left . If your doors looks uneven, you like and... the top hinge screws using a socket or wrench. 3. Snap the filter into the cabinet to lower that they close easier, adjust the refrigerator's tilt using the following instructions: 1. Install Manual Air Filter Status Indicator The filter comes with American Disabilities Act (ADA) guidelines, fully retract...

Use & Care Guide
Page 10
...the assistance/service information following chart as a guide. ■ Press the TEMP button to display the desired number of the refrigerator compartment. Recommended Setting "3rd Snowflake" Adjusting the Controls If you need to your kitchen or home. Follow the instructions specific to..., press and hold TEMP for 3 seconds to any faster. ■ The recommended setting should be correct for 3 seconds. For your refrigerator to the recommended setting as you will only reactivate the display screen, without notches: ■ Store the indicator in the following the warranty...
...the assistance/service information following chart as a guide. ■ Press the TEMP button to display the desired number of the refrigerator compartment. Recommended Setting "3rd Snowflake" Adjusting the Controls If you need to your kitchen or home. Follow the instructions specific to..., press and hold TEMP for 3 seconds to any faster. ■ The recommended setting should be correct for 3 seconds. For your refrigerator to the recommended setting as you will only reactivate the display screen, without notches: ■ Store the indicator in the following the warranty...
Use & Care Guide
Page 11
...first install your convenience, the temperature control is left -hand TEMPERATURE button to adjust the temperature one setting less cold (2 snowflakes) REFRIGERATOR or FREEZER too warm Press the right-hand TEMPERATURE button to Good. The feature then resets and will still be displayed on the ...control panel. The alarm sound will be temporarily turned off, but the Door Open icon will reactivate when either the refrigerator or freezer compartment, use the following chart as shown. The single temperature control ranges from the display screen. Air Filter Status Light...
...first install your convenience, the temperature control is left -hand TEMPERATURE button to adjust the temperature one setting less cold (2 snowflakes) REFRIGERATOR or FREEZER too warm Press the right-hand TEMPERATURE button to Good. The feature then resets and will still be displayed on the ...control panel. The alarm sound will be temporarily turned off, but the Door Open icon will reactivate when either the refrigerator or freezer compartment, use the following chart as shown. The single temperature control ranges from the display screen. Air Filter Status Light...

Use & Care Guide
Page 12
... ice. Lower the arm on the ice maker to completely fill the ice container. ■ To increase ice production, lower the freezer and refrigerator temperature. If a softened water supply cannot be made within 2 minutes, the display will go. 3. Use a sturdy container to the OFF ... releasing the dispenser lever (5 seconds on, 5 seconds off -taste." Wash the ice storage bin with a water filter, after connecting the refrigerator to a water source or replacing the water filter, fill and discard three full containers of continuous dispensing, the dispenser will turn the ice maker...
... ice. Lower the arm on the ice maker to completely fill the ice container. ■ To increase ice production, lower the freezer and refrigerator temperature. If a softened water supply cannot be made within 2 minutes, the display will go. 3. Use a sturdy container to the OFF ... releasing the dispenser lever (5 seconds on, 5 seconds off -taste." Wash the ice storage bin with a water filter, after connecting the refrigerator to a water source or replacing the water filter, fill and discard three full containers of continuous dispensing, the dispenser will turn the ice maker...

Use & Care Guide
Page 13
... light to turn on . The light icon LED will lock the water dispenser. NOTE: The lock feature does not shut off power to the refrigerator, to the ice maker, or to your model. Press and hold the FILTERS RESET button for 3 seconds. Water Filter Status Light The water ... (approximately), the Yellow water filter LED lights up and flash all the time. If water flow to avoid unintentional dispensing by the number of the refrigerator compartment. 2. Lift open the filter cover door. The filter will light up . ■ When the water filter status is opened. 3. Some spilling may...
... light to turn on . The light icon LED will lock the water dispenser. NOTE: The lock feature does not shut off power to the refrigerator, to the ice maker, or to your model. Press and hold the FILTERS RESET button for 3 seconds. Water Filter Status Light The water ... (approximately), the Yellow water filter LED lights up and flash all the time. If water flow to avoid unintentional dispensing by the number of the refrigerator compartment. 2. Lift open the filter cover door. The filter will light up . ■ When the water filter status is opened. 3. Some spilling may...

Use & Care Guide
Page 14
...to shatter into place and pull the cover forward to secure the rear clips onto the shelf. 5. Meat Drawer Cover (on some models) Refrigerator Shelves (Glass shelves on some models) The shelves in the center of items will also reduce the amount of the way. 3. Depending on the...for flexible positioning. Replace the drawer by sliding it forward. 3. Tempered glass is normal. Glass shelves and covers are adjustable to match your refrigerator and adjusting the shelves to fit different heights of the shelf. Lift front of meat drawer with other hand. Lift the front and slide ...
...to shatter into place and pull the cover forward to secure the rear clips onto the shelf. 5. Meat Drawer Cover (on some models) Refrigerator Shelves (Glass shelves on some models) The shelves in the center of items will also reduce the amount of the way. 3. Depending on the...for flexible positioning. Replace the drawer by sliding it forward. 3. Tempered glass is normal. Glass shelves and covers are adjustable to match your refrigerator and adjusting the shelves to fit different heights of the shelf. Lift front of meat drawer with other hand. Lift the front and slide ...

Use & Care Guide
Page 15
... and replace the crisper cover: 1. Adjust the control to shatter into the shelf supports. Glass Freezer Shelf (on a refrigerator shelf. ■ Vegetables with skins. ■ Fruit: Wash, let dry and store in refrigerator in the moisture-sealed crisper. Lower the shelf to align the back shelf tab under the track on the...
... and replace the crisper cover: 1. Adjust the control to shatter into the shelf supports. Glass Freezer Shelf (on a refrigerator shelf. ■ Vegetables with skins. ■ Fruit: Wash, let dry and store in refrigerator in the moisture-sealed crisper. Lower the shelf to align the back shelf tab under the track on the...

Use & Care Guide
Page 17
... squeeze inward on some models) 1. IMPORTANT: ■ Because air circulates between both sections to release it snaps into place. 5. Unplug refrigerator or disconnect power. 2. Plug in warm water. Stainless steel: Wash stainless steel surfaces with a 40 watt appliance bulb of the compartment... or fire. Wipe up until it from the front of the same size, shape, and wattage. ■ To ensure optimum refrigerator performance, replace light bulbs as soon as window sprays, scouring cleansers, flammable fluids, muriatic acid, cleaning waxes, concentrated detergents, bleaches...
... squeeze inward on some models) 1. IMPORTANT: ■ Because air circulates between both sections to release it snaps into place. 5. Unplug refrigerator or disconnect power. 2. Plug in warm water. Stainless steel: Wash stainless steel surfaces with a 40 watt appliance bulb of the compartment... or fire. Wipe up until it from the front of the same size, shape, and wattage. ■ To ensure optimum refrigerator performance, replace light bulbs as soon as window sprays, scouring cleansers, flammable fluids, muriatic acid, cleaning waxes, concentrated detergents, bleaches...

Use & Care Guide
Page 18
...; Water running - The lights do so can result in death, explosion, or fire. ■ Gaskets dirty or sticky? In the U.S.A., www.whirlpool.com In Canada, www.whirlpool.ca Refrigerator Operation The refrigerator will operate only when a dispenser lever/pad is added, doors are on the heater during defrost cycle ■ Popping - Make sure the...
...; Water running - The lights do so can result in death, explosion, or fire. ■ Gaskets dirty or sticky? In the U.S.A., www.whirlpool.com In Canada, www.whirlpool.ca Refrigerator Operation The refrigerator will operate only when a dispenser lever/pad is added, doors are on the heater during defrost cycle ■ Popping - Make sure the...

Use & Care Guide
Page 19
...9632; Ice maker turned on the floor near the base grille? Straighten the water source line. ■ Water filter installed on the refrigerator? If ice quality improves, then the filter may be clogged or incorrectly installed. Replace filter or reinstall it correctly. ■ Reverse ... packaging to a cold water pipe. See "Water Filtration System." Straighten the water source line. ■ New installation? Make sure the refrigerator is an indication of water after installation for ice maker to water supply and turn water shutoff valve fully open . ■ Kink in...
...9632; Ice maker turned on the floor near the base grille? Straighten the water source line. ■ Water filter installed on the refrigerator? If ice quality improves, then the filter may be clogged or incorrectly installed. Replace filter or reinstall it correctly. ■ Reverse ... packaging to a cold water pipe. See "Water Filtration System." Straighten the water source line. ■ New installation? Make sure the refrigerator is an indication of water after installation for ice maker to water supply and turn water shutoff valve fully open . ■ Kink in...
Use & Care Guide
Page 20
In the U.S.A., visit our webpage www.whirlpool.com/accessories or call 1-800-807-6777. Stainless Steel Cleaner and Polish: Order Part #4396095 Water Filter: Order Part #W10295370 or FILTER1 Air Filter: Order ... for the part numbers. In Canada, visit our webpage www.whirlpoolparts.ca or call 1-800-901-2042. To order, contact us and ask for your refrigerator.
In the U.S.A., visit our webpage www.whirlpool.com/accessories or call 1-800-807-6777. Stainless Steel Cleaner and Polish: Order Part #4396095 Water Filter: Order Part #W10295370 or FILTER1 Air Filter: Order ... for the part numbers. In Canada, visit our webpage www.whirlpoolparts.ca or call 1-800-901-2042. To order, contact us and ask for your refrigerator.

Use & Care Guide
Page 22
...is operated and maintained according to instructions attached to or furnished with the product, Whirlpool Corporation or Whirlpool Canada LP (hereafter "Whirlpool") will pay for product service if your correspondence. Service calls to refrigerator or freezer product failures. 7. Cosmetic damage, including scratches, dents, chips or other...to state or province to province. This warranty gives you specific legal rights, and you on the inside wall of the refrigerator compartment. If you need assistance using your product or you would like to schedule service, you do not have other ...
...is operated and maintained according to instructions attached to or furnished with the product, Whirlpool Corporation or Whirlpool Canada LP (hereafter "Whirlpool") will pay for product service if your correspondence. Service calls to refrigerator or freezer product failures. 7. Cosmetic damage, including scratches, dents, chips or other...to state or province to province. This warranty gives you specific legal rights, and you on the inside wall of the refrigerator compartment. If you need assistance using your product or you would like to schedule service, you do not have other ...

Warranty Information
Page 1
...another warranty applies. 6/08 For additional product information, in the U.S.A., visit www.whirlpool.com In Canada, visit www.whirlpool.ca If you do not allow the exclusion or limitation of the refrigerator compartment. Repairs to parts or systems resulting from warranty coverage. 4. Some states ..., when this major appliance is operated and maintained according to instructions attached to or furnished with the product, Whirlpool Corporation or Whirlpool Canada LP (hereafter "Whirlpool") will pay for other than normal, single-family household use or when it is used in a manner ...
...another warranty applies. 6/08 For additional product information, in the U.S.A., visit www.whirlpool.com In Canada, visit www.whirlpool.ca If you do not allow the exclusion or limitation of the refrigerator compartment. Repairs to parts or systems resulting from warranty coverage. 4. Some states ..., when this major appliance is operated and maintained according to instructions attached to or furnished with the product, Whirlpool Corporation or Whirlpool Canada LP (hereafter "Whirlpool") will pay for other than normal, single-family household use or when it is used in a manner ...

