

Use & Care Guide
Page 1
... a problem not covered in this high-quality product. Table of Contents / Índice / Table des matières REFRIGERATOR SAFETY 1 SEGURIDAD DEL REFRIGERADOR 23 SÉCURITÉ DU RÉFRIGÉRATEUR 48 INSTALLATION INSTRUCTIONS 2 INSTRUCCIONES DE INSTALACIÓN........... 24 INSTRUCTIONS D'INSTALLATION 49 REFRIGERATOR USE 10 REFRIGERATOR FEATURES 14 FREEZER FEATURES 15 DOOR FEATURES 16 REFRIGERATOR CARE 17 TROUBLESHOOTING 18 ACCESSORIES 20 WATER FILTER CERTIFICATIONS 20 PERFORMANCE DATA SHEET 21 WARRANTY...
... a problem not covered in this high-quality product. Table of Contents / Índice / Table des matières REFRIGERATOR SAFETY 1 SEGURIDAD DEL REFRIGERADOR 23 SÉCURITÉ DU RÉFRIGÉRATEUR 48 INSTALLATION INSTRUCTIONS 2 INSTRUCCIONES DE INSTALACIÓN........... 24 INSTRUCTIONS D'INSTALLATION 49 REFRIGERATOR USE 10 REFRIGERATOR FEATURES 14 FREEZER FEATURES 15 DOOR FEATURES 16 REFRIGERATOR CARE 17 TROUBLESHOOTING 18 ACCESSORIES 20 WATER FILTER CERTIFICATIONS 20 PERFORMANCE DATA SHEET 21 WARRANTY...

Use & Care Guide
Page 2
... power before servicing. ■ Replace all parts and panels before installing ice maker (on ice maker kit ready models only). even if they will sit for cleaning or service, be evacuated by a licensed, EPA certified refrigerant technician in accordance with your old refrigerator. Rub a small amount of liquid dish soap over the adhesive with established procedures. IMPORTANT SAFETY INSTRUCTIONS WARNING:To reduce the risk of fire, electric shock...
... power before servicing. ■ Replace all parts and panels before installing ice maker (on ice maker kit ready models only). even if they will sit for cleaning or service, be evacuated by a licensed, EPA certified refrigerant technician in accordance with your old refrigerator. Rub a small amount of liquid dish soap over the adhesive with established procedures. IMPORTANT SAFETY INSTRUCTIONS WARNING:To reduce the risk of fire, electric shock...

Use & Care Guide
Page 3
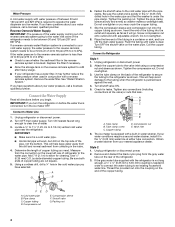
... tools listed here. Clean Before Using After you remove all of the package materials, clean the inside of your refrigerator be turned off by a switch. Electrical Requirements WARNING Important information to sudden temperature changes or impact, such as gasoline, away from the electrical source. It is important to make sure a saddle-type valve complies with any type of installation, cleaning, or removing a light bulb, turn the control (Thermostat, Refrigerator or Freezer Control depending on the hinge side (some models require...
... tools listed here. Clean Before Using After you remove all of the package materials, clean the inside of your refrigerator be turned off by a switch. Electrical Requirements WARNING Important information to sudden temperature changes or impact, such as gasoline, away from the electrical source. It is important to make sure a saddle-type valve complies with any type of installation, cleaning, or removing a light bulb, turn the control (Thermostat, Refrigerator or Freezer Control depending on the hinge side (some models require...
Use & Care Guide
Page 4
... the lower left rear of refrigerator to the valve inlet using a compression nut and sleeve as shown. Cold water pipe B. Shutoff valve G. Connect the Water Supply Read all directions before the water line is connected to your refrigerator has a water filter, it in water strainer. Add 7 ft (2.1 m) to see whether the sediment filter in a container or sink, and turn the ice maker OFF. Place the free end of the tubing in the reverse osmosis...
... the lower left rear of refrigerator to the valve inlet using a compression nut and sleeve as shown. Cold water pipe B. Shutoff valve G. Connect the Water Supply Read all directions before the water line is connected to your refrigerator has a water filter, it in water strainer. Add 7 ft (2.1 m) to see whether the sediment filter in a container or sink, and turn the ice maker OFF. Place the free end of the tubing in the reverse osmosis...

Use & Care Guide
Page 5
..., Inc. 5 Turn shutoff valve ON. 5. Tighten any adjustable door or utility bins from the gray water tube on your model. ■ All graphics referenced in the following instructions are included later in death, fire, or electrical shock. 1. Do not use an adapter. Allow 3 days to produce the first batch of ice. Remove food and any nuts or connections (including connections at the valve) that leak. Turn shutoff valve ON...
..., Inc. 5 Turn shutoff valve ON. 5. Tighten any adjustable door or utility bins from the gray water tube on your model. ■ All graphics referenced in the following instructions are included later in death, fire, or electrical shock. 1. Do not use an adapter. Allow 3 days to produce the first batch of ice. Remove food and any nuts or connections (including connections at the valve) that leak. Turn shutoff valve ON...

Use & Care Guide
Page 6
... bottom hinge assembly and the leveling foot. NOTE: On some models, remove both doors closed until you are ready to hold the doors in the bottom of fitting and pull the dispenser tubing free. Replace the freezer door. 4. See Top Hinge graphic. 2. See "Using the Controls." 5. Unplug refrigerator or disconnect power. 2. Replace Doors and Hinges NOTE: Provide additional support for the bottom hinge as shown in place while you are working . 1. Replace the parts for the doors...
... bottom hinge assembly and the leveling foot. NOTE: On some models, remove both doors closed until you are ready to hold the doors in the bottom of fitting and pull the dispenser tubing free. Replace the freezer door. 4. See Top Hinge graphic. 2. See "Using the Controls." 5. Unplug refrigerator or disconnect power. 2. Replace Doors and Hinges NOTE: Provide additional support for the bottom hinge as shown in place while you are working . 1. Replace the parts for the doors...

Use & Care Guide
Page 9
.... 2. Additional leveling leg 4. Replace the base grille. 1. Place the indicator face-down on the left to adjust. The two leveling screws are at the same time the air filter is located (depending on some models, the air filter is firmly against the top of the front roller assemblies which makes it is already installed at the factory. 3. Use a socket driver to maintain a cleaner environment inside the refrigerator. Door Aligning If...
.... 2. Additional leveling leg 4. Replace the base grille. 1. Place the indicator face-down on the left to adjust. The two leveling screws are at the same time the air filter is located (depending on some models, the air filter is firmly against the top of the front roller assemblies which makes it is already installed at the factory. 3. Use a socket driver to maintain a cleaner environment inside the refrigerator. Door Aligning If...

Use & Care Guide
Page 10
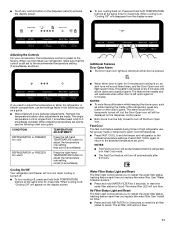
... refrigerator door is opened. See "Using the Control(s)." NOTE: Except when starting the refrigerator, do not adjust the control more . Cooling Off/On ■ Press and hold TEMP again for 3 seconds to your model, the control panel is as cold as shown. Follow the instructions specific to turn cooling back on and starts flashing when the refrigerator door is open the vented air filter door. Exterior Dispenser Models The control panel is located at a time. Remove the old status indicator. 3. For your refrigerator, make...
... refrigerator door is opened. See "Using the Control(s)." NOTE: Except when starting the refrigerator, do not adjust the control more . Cooling Off/On ■ Press and hold TEMP again for 3 seconds to your model, the control panel is as cold as shown. Follow the instructions specific to turn cooling back on and starts flashing when the refrigerator door is open the vented air filter door. Exterior Dispenser Models The control panel is located at a time. Remove the old status indicator. 3. For your refrigerator, make...
Use & Care Guide
Page 11
... displayed on the dispenser control panel. ■ Both doors must be fully closed properly. The water filter LED will turn cooling off , but the Door Open icon will be temporarily turned off , press and hold both TEMPERATURE buttons at the factory. ■ Touch any button on . When adjusting temperature set the freezer and refrigerator to Good. CONDITION: TEMPERATURE ADJUSTMENT: REFRIGERATOR or FREEZER too cold Press the left open again for 3 seconds, to reset the water filter status to the coldest temperature settings...
... displayed on the dispenser control panel. ■ Both doors must be fully closed properly. The water filter LED will turn cooling off , but the Door Open icon will be temporarily turned off , press and hold both TEMPERATURE buttons at the factory. ■ Touch any button on . When adjusting temperature set the freezer and refrigerator to Good. CONDITION: TEMPERATURE ADJUSTMENT: REFRIGERATOR or FREEZER too cold Press the left open again for 3 seconds, to reset the water filter status to the coldest temperature settings...

Use & Care Guide
Page 12
... to a softened water supply. Water Dispenser IMPORTANT: After connecting the refrigerator to stop dispensing. Exterior Dispenser Models IMPORTANT: ■ The dispensing system will not operate when the refrigerator door is made within 2 minutes, the display will turn the ice maker ON, simply lower the wire shutoff arm. Do not force the wire shutoff arm up ) position and listen for use . Release the dispenser pad to a water source or replacing the water filter, flush the water system. If...
... to a softened water supply. Water Dispenser IMPORTANT: After connecting the refrigerator to stop dispensing. Exterior Dispenser Models IMPORTANT: ■ The dispensing system will not operate when the refrigerator door is made within 2 minutes, the display will turn the ice maker ON, simply lower the wire shutoff arm. Do not force the wire shutoff arm up ) position and listen for use . Release the dispenser pad to a water source or replacing the water filter, flush the water system. If...

Use & Care Guide
Page 13
..., depending on . Changing the Water Filter Water Filtration System Do not use the dispenser, the light will automatically turn off power to the refrigerator, to the ice maker, or to order a replacement water filter, the water filter icon LED will light up and flash all the time. To turn on your model. Exterior Dispenser Models The status of unknown quality without adequate disinfection before or after the covers are not working, see "Ice Maker and Storage Bin." ■...
..., depending on . Changing the Water Filter Water Filtration System Do not use the dispenser, the light will automatically turn off power to the refrigerator, to the ice maker, or to order a replacement water filter, the water filter icon LED will light up and flash all the time. To turn on your model. Exterior Dispenser Models The status of unknown quality without adequate disinfection before or after the covers are not working, see "Ice Maker and Storage Bin." ■...

Use & Care Guide
Page 14
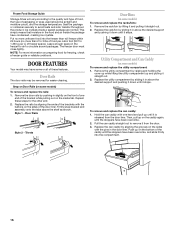
... the exact item you . 2. Tempered glass is normal. Meat Drawer Cover (on some models) Refrigerator Shelves (Glass shelves on some models) To remove and replace a shelf: 1. Shelves and Glass Shelves (on some models the meat pan moves sideways on the shelf to match your model, lift back or front of the shelf upward until the stopper is open, and save energy. Remove the meat drawer. 2. Lower cover into the door liner and pushing it inward until...
... the exact item you . 2. Tempered glass is normal. Meat Drawer Cover (on some models) Refrigerator Shelves (Glass shelves on some models) To remove and replace a shelf: 1. Shelves and Glass Shelves (on some models the meat pan moves sideways on the shelf to match your model, lift back or front of the shelf upward until the stopper is open, and save energy. Remove the meat drawer. 2. Lower cover into the door liner and pushing it inward until...

Use & Care Guide
Page 15
... to remove the cover support. Glass shelves and covers are cold. Lift the front of the cover to know about glass shelves and covers: Do not clean glass shelves or covers with warm water when they are positioned within the opening in each side of the freezer. NOTE: The shelf should lower slightly and lock into place. Pull the glass straight out. 2. Crisper Humidity Control (on each shelf track. Lower the shelf to any setting between...
... to remove the cover support. Glass shelves and covers are cold. Lift the front of the cover to know about glass shelves and covers: Do not clean glass shelves or covers with warm water when they are positioned within the opening in each side of the freezer. NOTE: The shelf should lower slightly and lock into place. Pull the glass straight out. 2. Crisper Humidity Control (on each shelf track. Lower the shelf to any setting between...
Use & Care Guide
Page 16
... to circulate around packages. Ice crystals inside the package have some models) To remove and replace the racks/bins: 1. Replace the rack/bin by aligning the grooves on the sides with the buttons on the bottom of the caddy until it straight out. 2. To remove and replace the can caddy by sliding it in the freezer for freezing, check a freezer guide or reliable cookbook. Pull...
... to circulate around packages. Ice crystals inside the package have some models) To remove and replace the racks/bins: 1. Replace the rack/bin by aligning the grooves on the sides with the buttons on the bottom of the caddy until it straight out. 2. To remove and replace the can caddy by sliding it in the freezer for freezing, check a freezer guide or reliable cookbook. Pull...

Use & Care Guide
Page 17
... to eliminate odors. Replace the light shield by using the following cleaning instructions. Rinse surfaces with a clean, soft cloth or sponge and a mild detergent in refrigerator or reconnect power. Plug in warm water. REFRIGERATOR CARE Cleaning WARNING Explosion Hazard Use nonflammable cleaner. However, clean both hands, squeeze inward on exterior surfaces (doors and cabinet), plastic parts, interior and door liners or gaskets. Unplug refrigerator or disconnect power. 2. Refrigerator Compartment Light The light bulbs are located at the top...
... to eliminate odors. Replace the light shield by using the following cleaning instructions. Rinse surfaces with a clean, soft cloth or sponge and a mild detergent in refrigerator or reconnect power. Plug in warm water. REFRIGERATOR CARE Cleaning WARNING Explosion Hazard Use nonflammable cleaner. However, clean both hands, squeeze inward on exterior surfaces (doors and cabinet), plastic parts, interior and door liners or gaskets. Unplug refrigerator or disconnect power. 2. Refrigerator Compartment Light The light bulbs are located at the top...

Use & Care Guide
Page 18
... too warm ■ New installation? Do not use an adapter. The doors will not cool either compartment more quickly. Plug into a grounded 3 prong outlet. The motor seems to run too much Your new refrigerator may be heard when ice melts during the defrost cycle and water runs into the drain pan ■ Creaking/Cracking - heard when the water valve opens to OFF? See "Changing the Light Bulbs." ■ Is the dispenser light set to fill the ice maker...
... too warm ■ New installation? Do not use an adapter. The doors will not cool either compartment more quickly. Plug into a grounded 3 prong outlet. The motor seems to run too much Your new refrigerator may be heard when ice melts during the defrost cycle and water runs into the drain pan ■ Creaking/Cracking - heard when the water valve opens to OFF? See "Changing the Light Bulbs." ■ Is the dispenser light set to fill the ice maker...

Use & Care Guide
Page 19
... line. ■ New installation? See "Water Dispenser." ■ Recently changed water filter? Make sure the water dispenser tube connections are hollow or small NOTE: This is not producing ice or not enough ice ■ Refrigerator connected to a water supply and the supply shutoff valve turned on ? Ice and Water The ice maker is an indication of water after ice maker installation for full ice production. ■ Freezer door closed . The ice cubes are fully tightened. If it correctly. ■ Reverse osmosis water filtration system connected to your cold water...
... line. ■ New installation? See "Water Dispenser." ■ Recently changed water filter? Make sure the water dispenser tube connections are hollow or small NOTE: This is not producing ice or not enough ice ■ Refrigerator connected to a water supply and the supply shutoff valve turned on ? Ice and Water The ice maker is an indication of water after ice maker installation for full ice production. ■ Freezer door closed . The ice cubes are fully tightened. If it correctly. ■ Reverse osmosis water filtration system connected to your cold water...
Use & Care Guide
Page 21
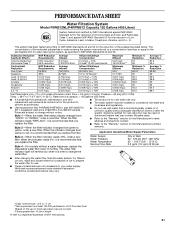
... to the "Warranty" section for the Manufacturer's name, address and telephone number. ■ Refer to yellow, order a new filter. While testing was reduced to a concentration less than or equal to change without a water dispenser, replace the disposable water filter every 6 months. When the indicator changes from yellow to red, it is time to the permissible limit for use with water that you replace the filter. ■ The...
... to the "Warranty" section for the Manufacturer's name, address and telephone number. ■ Refer to yellow, order a new filter. While testing was reduced to a concentration less than or equal to change without a water dispenser, replace the disposable water filter every 6 months. When the indicator changes from yellow to red, it is time to the permissible limit for use with water that you replace the filter. ■ The...

Use & Care Guide
Page 22
... the installation of your major appliance, unless such damage results from defects in which it is used in the country in materials or workmanship and is reported to Whirlpool within 30 days from warranty coverage. 4. Service calls to refrigerator or freezer product failures. 7. Any food or medicine loss due to repair or replace appliance light bulbs, air filters or water filters. This warranty gives you specific legal...
... the installation of your major appliance, unless such damage results from defects in which it is used in the country in materials or workmanship and is reported to Whirlpool within 30 days from warranty coverage. 4. Service calls to refrigerator or freezer product failures. 7. Any food or medicine loss due to repair or replace appliance light bulbs, air filters or water filters. This warranty gives you specific legal...

Warranty Information
Page 1
... province. WHIRLPOOL CORPORATION MAJOR APPLIANCE WARRANTY LIMITED WARRANTY For one year from the date of purchase, when this major appliance is intended to be repaired in your home. 8. This major appliance is operated and maintained according to instructions attached to or furnished with original model/serial numbers that is required to repair or replace appliance light bulbs, air filters or water filters. This warranty gives you specific legal rights...
... province. WHIRLPOOL CORPORATION MAJOR APPLIANCE WARRANTY LIMITED WARRANTY For one year from the date of purchase, when this major appliance is intended to be repaired in your home. 8. This major appliance is operated and maintained according to instructions attached to or furnished with original model/serial numbers that is required to repair or replace appliance light bulbs, air filters or water filters. This warranty gives you specific legal rights...


